


前言:
由于某种原因,突然想自己搭一个属于自己的项目框架出来,框架选择时大致了解了市场上流行的SSM(Spring+SpringMVC+MyBatis)和SSH(Struts2+Spring+Hibernate)框架。只是做了简单了解,深层次的了解以我现在的水平暂时还达不到。
最后决定使用Spring4+SpringMVC4+Hibernate5来完成我的项目框架。至于为什么选择SpringMVC和Hibernate请自行深究。
整体思路:
1.首先搭建SpringMVC框架
2.搭建Hibernate框架
3.使用Spring整合SpringMVC,Hibernate
引入jar文件:
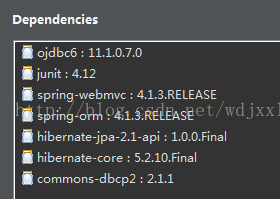
1.先配置好了Maven,连接的阿里云仓库,当添加某个jar包时,会将与这个jar包相关的jar包同时down下来。项目中配置的依赖如下图:
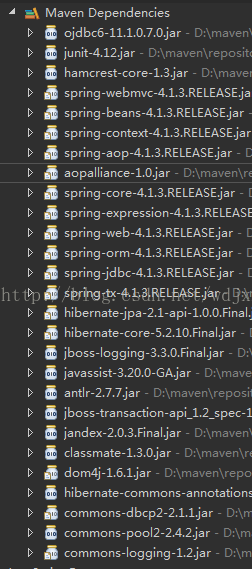
2.实际根据maven依赖下载的jar包目录如下图:
搭建SpringMVC框架:
1.导入jar文件
如上图所示,如果没有配置maven,则可以从官网下载的spring framework解压缩后,libs中所包含的所有jar包,我们只需要将spring-*-4.2.5.RELEASE.jar复制,然后粘贴至工程项目中的lib目录下。就是将所有以RELEASE.jar结尾的,而不用将以javadoc.jar和sources.jar结尾的jar包放至lib目录下。
2.配置web.xml
  <servlet>
	<servlet-name>mvc</servlet-name>
	<servlet-class>org.springframework.web.servlet.DispatcherServlet</servlet-class>
	<init-param>
		<param-name>contextConfigLocation</param-name>
		<param-value>classpath:conf/spring-*.xml</param-value>
	</init-param>
	<load-on-startup>1</load-on-startup>
  </servlet>
  <servlet-mapping>
	<servlet-name>mvc</servlet-name>
	<url-pattern>/</url-pattern>
  </servlet-mapping>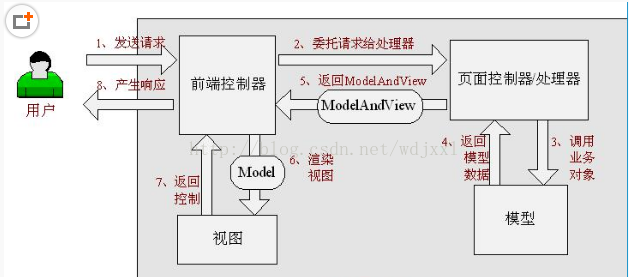
2、 页面控制器接收到请求后,进行功能处理,首先需要收集和绑定请求参数到一个对象,这个对象在Spring Web MVC中叫命令对象,并进行验证,然后将命令对象委托给业务对象进行处理;处理完毕后返回一个ModelAndView(模型数据和逻辑视图名);图2-1中的3、4、5步骤;
3、 前端控制器收回控制权,然后根据返回的逻辑视图名,选择相应的视图进行渲染,并把模型数据传入以便视图渲染;图2-1中的步骤6、7;
4、 前端控制器再次收回控制权,将响应返回给用户,图2-1中的步骤8;至此整个结束。
springmvc核心框架图:
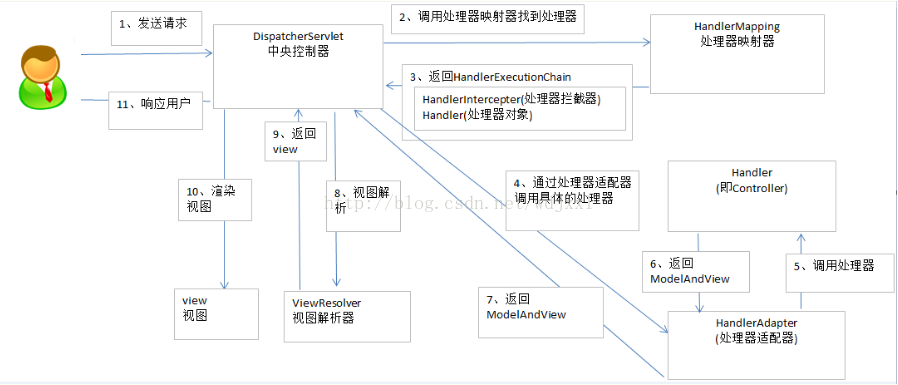
核心架构的具体流程步骤如下:
1、 首先用户发送请求——>DispatcherServlet,前端控制器收到请求后自己不进行处理,而是委托给其他的解析器进行处理,作为统一访问点,进行全局的流程控制;
2、 DispatcherServlet——>HandlerMapping, HandlerMapping将会把请求映射为HandlerExecutionChain对象(包含一个Handler处理器(页面控制器)对象、多个HandlerInterceptor拦截器)对象,通过这种策略模式,很容易添加新的映射策略;
3、 DispatcherServlet——>HandlerAdapter,HandlerAdapter将会把处理器包装为适配器,从而支持多种类型的处理器,即适配器设计模式的应用,从而很容易支持很多类型的处理器;
4、 HandlerAdapter——>处理器功能处理方法的调用,HandlerAdapter将会根据适配的结果调用真正的处理器的功能处理方法,完成功能处理;并返回一个ModelAndView对象(包含模型数据、逻辑视图名);
5、 ModelAndView的逻辑视图名——> ViewResolver, ViewResolver将把逻辑视图名解析为具体的View,通过这种策略模式,很容易更换其他视图技术;
6、 View——>渲染,View会根据传进来的Model模型数据进行渲染,此处的Model实际是一个Map数据结构,因此很容易支持其他视图技术;
7、返回控制权给DispatcherServlet,由DispatcherServlet返回响应给用户,到此一个流程结束。
现在对SpringMVC应该已经有了一个大致的了解。
配置好了web.xml(整个web应用的配置文件)之后,接下来我们需要配置spring-mvc.xml。
下面是spring-mvc的具体配置:
<?xml version="1.0" encoding="UTF-8"?>
<beans xmlns="http://www.springframework.org/schema/beans"
	xmlns:xsi="http://www.w3.org/2001/XMLSchema-instance"
	xmlns:context="http://www.springframework.org/schema/context"
	xmlns:jdbc="http://www.springframework.org/schema/jdbc"
	xmlns:jee="http://www.springframework.org/schema/jee"
	xmlns:tx="http://www.springframework.org/schema/tx"
	xmlns:aop="http://www.springframework.org/schema/aop"
	xmlns:mvc="http://www.springframework.org/schema/mvc"
	xmlns:util="http://www.springframework.org/schema/util"
	xmlns:jpa="http://www.springframework.org/schema/data/jpa"
	xsi:schemaLocation="
		http://www.springframework.org/schema/beans http://www.springframework.org/schema/beans/spring-beans-4.3.xsd
		http://www.springframework.org/schema/context http://www.springframework.org/schema/context/spring-context-4.3.xsd
		http://www.springframework.org/schema/jdbc http://www.springframework.org/schema/jdbc/spring-jdbc-4.3.xsd
		http://www.springframework.org/schema/jee http://www.springframework.org/schema/jee/spring-jee-4.3.xsd
		http://www.springframework.org/schema/tx http://www.springframework.org/schema/tx/spring-tx-4.3.xsd
		http://www.springframework.org/schema/data/jpa http://www.springframework.org/schema/data/jpa/spring-jpa-4.3.xsd
		http://www.springframework.org/schema/aop http://www.springframework.org/schema/aop/spring-aop-4.3.xsd
		http://www.springframework.org/schema/mvc http://www.springframework.org/schema/mvc/spring-mvc-4.3.xsd
		http://www.springframework.org/schema/util http://www.springframework.org/schema/util/spring-util-4.3.xsd">

	<!-- 配置注解扫描包,这里为 com.myframework.controller,
		  将扫描这个包下面所有带有@Controller的类,这些类被视为Controller-->
	<context:component-scan base-package="com.myframework"/>

	<!-- 开启注解扫描驱动 -->
	<mvc:annotation-driven/>

	<!-- 配置视图渲染关系,这里所有请求处理后将渲染为/WEB-INF/views下的jsp文件,
		   到底是哪个jsp文件呢这就看请求处理动作到时候具体返回的是哪个文件了 -->
    <bean class="org.springframework.web.servlet.view.InternalResourceViewResolver">
        <property name="prefix">
            <value>/WEB-INF/views/</value>
        </property>
        <property name="suffix">
            <value>.jsp</value>
        </property>
    </bean>
</beans>
好了,现在对web应用的配置,springmvc的配置已经完成了,万事俱备,只欠东风,我们具体的执行动作呢?
package com.myframework.controller;

import org.springframework.stereotype.Controller;
import org.springframework.web.bind.annotation.RequestMapping;
import org.springframework.web.servlet.ModelAndView;

@Controller
public class TestController {
	@RequestMapping("/test.do")
	public ModelAndView testMVC() {
		System.out.println("这里测试springMVC配置。");
		ModelAndView modelAndView = new ModelAndView("/test");
		modelAndView.addObject("info", "Hello,myFramework!");
		return modelAndView;
	}
}
@RequestMapping 表示匹配请求动作,这里将匹配 test 这个请求动作(使用value配置)
ModelAndView modelAndView = new ModelAndView("/test"); 表示返回test.jsp,并且是/WEB-INF/views下的jsp文件(前面讲过的)
我们来看看超级简单的test.jsp
<%@ page language="java" contentType="text/html; charset=UTF-8"
pageEncoding="UTF-8"%>
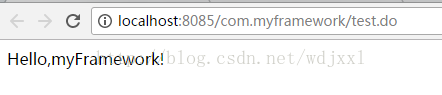
${info} !!!现在我们来做一个测试:
访问地址:http://localhost:8085/com.myframework/test.do,在浏览器中得到如下显示:
至此,我们的SpringMVC框架已经搭建完成,向前走了一小步。下面我们更进一步,来看看Hibernate框架的搭建.
搭建Hibernate框架:
第一步,导入jar包(前面都说明了,这里就不多说了)
第二 步,建立POJO对象
package com.myframework.entity;

import java.io.Serializable;

import javax.persistence.Column;
import javax.persistence.Entity;
import javax.persistence.GeneratedValue;
import javax.persistence.GenerationType;
import javax.persistence.Id;
import javax.persistence.Table;

@Entity
@Table(name = "USER_ZY")
public class User implements Serializable{

	private static final long serialVersionUID = 1L;

	@Id
	@GeneratedValue(strategy = GenerationType.IDENTITY)
	private String id;
	@Column
	private String userName;
	@Column
	private String password;
	@Column
	private int valid;

	public User() {

	}

	public User(String id, String userName, String password, int valid) {
		super();
		this.id = id;
		this.userName = userName;
		this.password = password;
		this.valid = valid;
	}

	public String getId() {
		return id;
	}
	public void setId(String id) {
		this.id = id;
	}
	public String getUserName() {
		return userName;
	}
	public void setUserName(String userName) {
		this.userName = userName;
	}
	public String getPassword() {
		return password;
	}
	public void setPassword(String password) {
		this.password = password;
	}
	public int getValid() {
		return valid;
	}
	public void setValid(int valid) {
		this.valid = valid;
	}

	@Override
	public String toString() {
		return "User [id=" + id + ", userName=" + userName + ", password=" + password + ", valid=" + valid + "]";
	}

}第三步,建立对象映射文件(User.hbm.xml)
<?xml version="1.0" encoding="UTF-8"?>
<hibernate-mapping>
    <!-- 实体类,对应的数据表 -->
    <class name="com.myframework.entity.User" table="user_zy">
        <!-- 自增长 -->
        <id column="id" name="id"></id>
        <property column="userName" name="userName"></property>
        <property column="password" name="password"></property>
        <property column="valid" name="valid"></property>
    </class>
</hibernate-mapping>
第四步,建立Hibernate配置文件hibernate.cfg.xml(包含数据库连接信息等)
<?xml version="1.0" encoding="UTF-8"?>
<hibernate-configuration>
    <session-factory>
        <!-- 分别为:数据库驱动类型,数据库链接URL,数据库账号,数据库密码 -->
        <property name="hibernate.connection.driver_class">oracle.jdbc.driver.OracleDriver</property>
        <property name="hibernate.connection.url">jdbc:oracle:thin:@localhost:1521:orcl</property>
        <property name="hibernate.connection.username">userName</property>
        <property name="hibernate.connection.password">password</property>

        <!-- 分别为:是否显示SQL,是否格式输出SQL,自动创建|更新|验证数据库表结构 ,数据库方言-->
        <property name="hibernate.show_sql">true</property>
        <property name="hibernate.format_sql">true</property>
        <!-- <property name="hibernate.hbm2ddl.auto">update</property>   -->
        <property name="hibernate.dialect">org.hibernate.dialect.Oracle10gDialect</property>

        <!-- 匹配的POJO映射文件 -->
        <mapping resource="com/myframework/entity/User.hbm.xml"></mapping>

    </session-factory>
</hibernate-configuration>
第五步,新增数据,测试
package com.myframework.textclass;

import java.util.UUID;

import org.junit.Before;
import org.junit.Test;
import org.springframework.context.ApplicationContext;
import org.springframework.context.support.ClassPathXmlApplicationContext;

import com.myframework.entity.User;
import java.util.List;

import org.hibernate.Session;
import org.hibernate.SessionFactory;
import org.hibernate.Transaction;
import org.hibernate.cfg.Configuration;
import org.hibernate.query.Query;

public class TestAddUser {

	Transaction tx = null;
	Session session = null;

	@Before
	public void before() {
	//读取hibernate.cfg.xml配置,并初始化配置
        Configuration cfg = new Configuration();
        cfg.configure();

        //根据配置获取sessionFactory,然后开启事务
        SessionFactory sessionFactory = cfg.buildSessionFactory();
        session = sessionFactory.openSession();
        tx = session.beginTransaction();
	}

	@Test
	public void testAddUser() {
	//初始化一个POJO对象
        User user = new User();
        user.setUserName("马汉");
        user.setPassword("12345678910987654321");
        user.setId(UUID.randomUUID().toString());
        user.setValid(1);

        //使用HQL语句查询
        Query query = session.createQuery("from User");
        List<User> userList = query.getResultList();
        System.out.println(userList.size());

        //存入user对象至user表中
        session.save(user);

        //提交事务,关闭会话
        tx.commit();
        session.close();
	}
}
现在我们来查看一下后台数据库:

至此,我们的hibernate框架也搭建完毕,下面我们来用Spring整合SpringMVC,Hibernate。这个过程可能较以上两个过程而言要麻烦一些,但是不必担心,慢慢来。
Spring 整合SpringMVC和Hibernate:
在开始这个步骤之前,我们需要了解一些东西:
1.SpringMVC是Spring框架的一部分,所以它能很好的和Spring配合使用。
2.下面我们将使用全注解方式来完成整合,所以你必须对Spring的注解有一个详细的了解。
3.对IOC(控制反转),DI(依赖注入)要有一定了解。
4.熟悉MVC分层架构(对于Controller,Service,DAO有一定了解)。
5.Spring管理hibernate,其实管理的就是Hibernate的sessionFactory。
下面我们来一一剖析
第一步,配置web.xml文件
增加一个spring-hibernate.xml配置文件。
<param-value>classpath:conf/spring-*.xml</param-value>
前面我们的这种写法会自动读取到以spring-开头的并且以.xml结尾的所有配置文件。
在上面的配置中我们看到,指定了一个spring全局配置文件spring-hibernate.xml(这个名字你任意取,这是在指定情况下)。默认情况applicationContext.xml。
第二步,配置spring-hibernate.xml
<?xml version="1.0" encoding="UTF-8"?>
<beans xmlns="http://www.springframework.org/schema/beans"
	xmlns:xsi="http://www.w3.org/2001/XMLSchema-instance"
	xmlns:context="http://www.springframework.org/schema/context"
	xmlns:jdbc="http://www.springframework.org/schema/jdbc"
	xmlns:jee="http://www.springframework.org/schema/jee"
	xmlns:tx="http://www.springframework.org/schema/tx"
	xmlns:aop="http://www.springframework.org/schema/aop"
	xmlns:mvc="http://www.springframework.org/schema/mvc"
	xmlns:util="http://www.springframework.org/schema/util"
	xmlns:jpa="http://www.springframework.org/schema/data/jpa"
	xsi:schemaLocation="
		http://www.springframework.org/schema/beans http://www.springframework.org/schema/beans/spring-beans-4.3.xsd
		http://www.springframework.org/schema/context http://www.springframework.org/schema/context/spring-context-4.3.xsd
		http://www.springframework.org/schema/jdbc http://www.springframework.org/schema/jdbc/spring-jdbc-4.3.xsd
		http://www.springframework.org/schema/jee http://www.springframework.org/schema/jee/spring-jee-4.3.xsd
		http://www.springframework.org/schema/tx http://www.springframework.org/schema/tx/spring-tx-4.3.xsd
		http://www.springframework.org/schema/data/jpa http://www.springframework.org/schema/data/jpa/spring-jpa-4.3.xsd
		http://www.springframework.org/schema/aop http://www.springframework.org/schema/aop/spring-aop-4.3.xsd
		http://www.springframework.org/schema/mvc http://www.springframework.org/schema/mvc/spring-mvc-4.3.xsd
		http://www.springframework.org/schema/util http://www.springframework.org/schema/util/spring-util-4.3.xsd">

	<!-- dbcp连接池配置,引入jar包:commons-dbcp2.jar -->
	<bean id = "dataSource" class = "org.apache.commons.dbcp2.BasicDataSource">
		<property name = "driverClassName" value = "oracle.jdbc.driver.OracleDriver"/>
		<property name = "url" value = "jdbc:oracle:thin:@localhost:1521:orcl"/>
		<property name = "username" value = "username"/>
		<property name = "password" value = "password"/>
		<!-- <property name = "maxActive" value = "150"/> -->
	</bean>

	<!-- 使用spring来配置sessionFactory。
	还可以使用spring加载hibernate.cfg.xml配置文件的方式来配置sessionFactory -->
	<bean id = "sessionFactory" class="org.springframework.orm.hibernate4.LocalSessionFactoryBean">
		<property name = "dataSource" ref = "dataSource"></property>
		<!-- mappingResources属性用来列出全部映射文件 -->
		<property name="mappingResources">
			<list>
				<!-- 以下用来列出所有的PO映射文件 -->
				<value>com/myframework/entity/User.hbm.xml</value>
			</list>
		</property>

		<property name = "hibernateProperties">
			<props>
				<!-- 数据库方言 -->
				<prop key="hibernate.dialect">org.hibernate.dialect.Oracle10gDialect</prop>
				<prop key="hibernate.show_sql">true</prop>
				<prop key="hibernate.format_sql">true</prop>
			</props>
		</property>
	</bean>
</beans>
这个文件的配置很重要,对于各个配置点的具体信息,详细情况,请查阅更多资料。
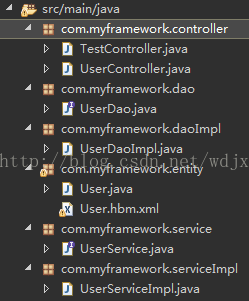
第三步,建立MVC结构
总结:
至此Spring4+SpringMVC4+Hibernate5框架就搭建完毕了,细心的朋友到这里应该并没有松一口气,因为MVC结构虽然建立好了,但并没有提供详细代码,在其中会使用到Spring种种注解以及DI(依赖注入)。
虽然这些也是至关重要的,但要初步了解并进行使用也是非常简单的,所以就留给大家一些自己发挥的空间。
在搭建的过程中,遇到的问题大大小小数十个,请静下心来一个一个的解决它们,否则它就像一堵墙一样将会永远阻碍着你前行。


 954
954

 被折叠的 条评论
为什么被折叠?
被折叠的 条评论
为什么被折叠?
 到【灌水乐园】发言


