


引言
MySQL是一个关系型数据库管理系统,由瑞典MySQL AB 公司开发,目前属于 Oracle 旗下产品。MySQL分为社区版和商业版,具有体积小、速度快、成本低、开源的优点。MySQL备受互联网公司青睐,如腾讯、阿里选择MySQL作为其数据库管理软件。之前学习使用SQL Server作为DBMS,由于体量过大现在将注意力转移到体积较小的MySQL上来。
下载与安装
MySQL官网:https://www.mysql.com/
MySQL官网提供Installer(安装)版和Archive(文档)版,两种类型的安装包。Installer安装包支持分别安装X86和X64两种系统位数的安装,而Archive版X86和X64需要分别下载安装。鉴于开发的应用会安装在X86和X64系统上,因此推荐使用Installer版MySQL。当然实际使用时安装Installer和Archive二者之一即可。
MySQL软件下载
MySQL Installer 下载
mysql-installer-community-5.7.19.0.msi:https://dev.mysql.com/downloads/file/?id=471661
MySQL Archive 下载
mysql-5.7.19-win32.zip:https://dev.mysql.com/downloads/file/?id=471341
mysql-5.7.19-winx64.zip:https://dev.mysql.com/downloads/file/?id=471342
MySQL 安装
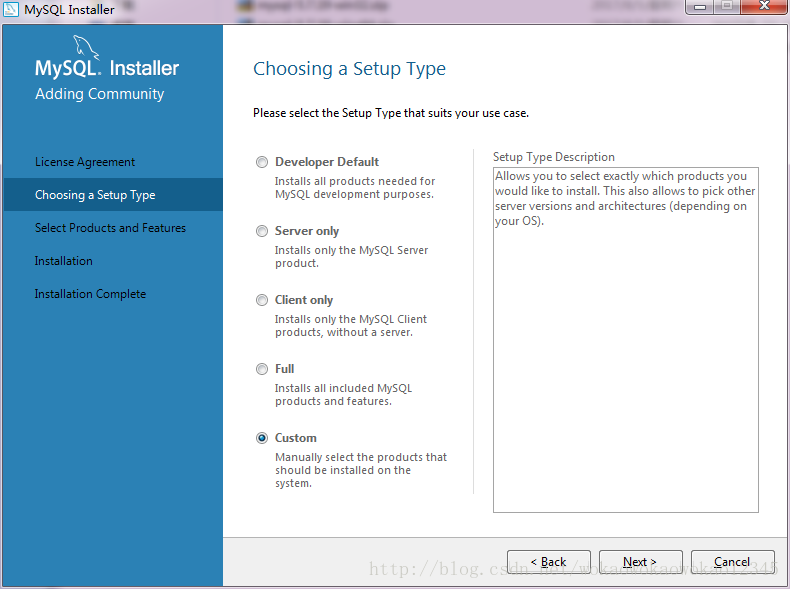
Installer版安装过程
- 双击打开mysql-installer-community-5.7.19.0.msi
- 根据自己需要选择安装模式,这里选择只安装服务器,并设置路径,没有特别需要默认路径即可
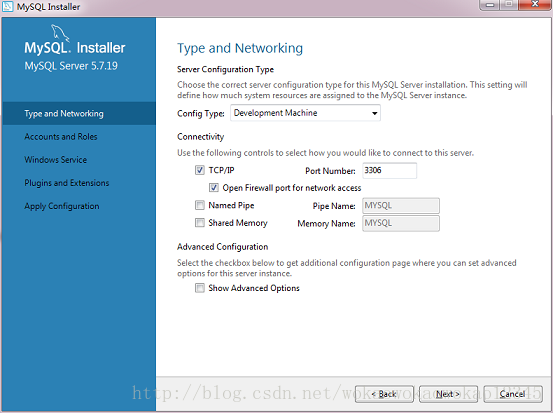
- 设置类型和网络,默认设置
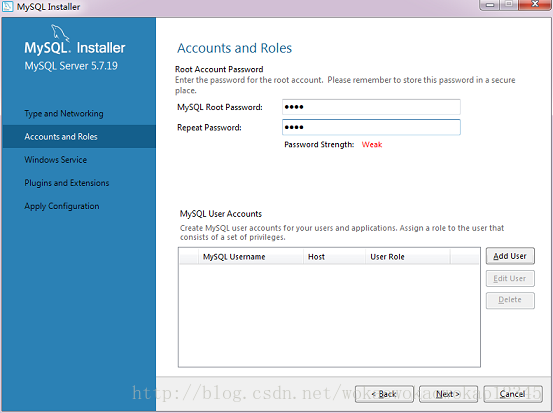
- 设置账户和密码,需要牢记
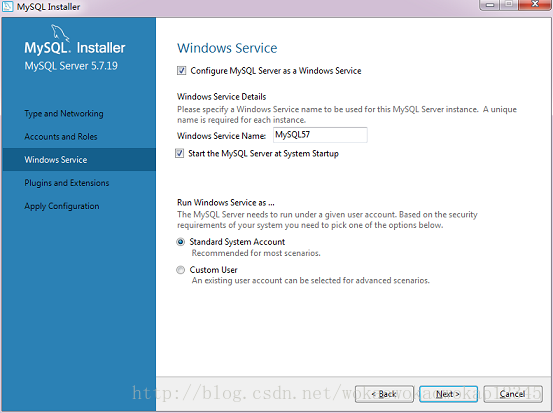
- 设置Windows服务,默认设置
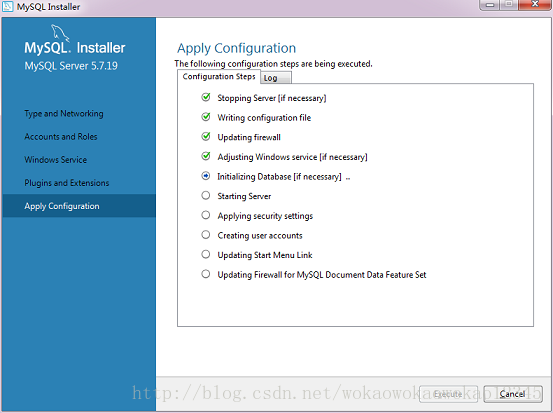
- 应用调试,执行
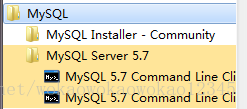
- 安装成功,进行验证,开始菜单中打开MySQL命令行工具
打开命令行工具
输入设置的Root密码,输入show datases查看当前存在的数据库


Archive版安装过程
- 解压mysql-5.7.19-winx64.zip,并复制粘贴到想要安装的位置,比如放在C:\Program Files下面
MySQL Server 5.7是前面安装的Installer版,mysql-5.7.19-winx64是经过解压后的文件 - 将ysql-5.7.19-winx64文件名,修改为MySQL Server 5.7 X64,不改也可以
- 添加环境变量,C:\Program Files\MySQL\MySQL Server 5.7 X64\bin
- 在MySQL目录中新建文件夹datax64,修改MySQL默认的配置文件,最新版的MySQL中并没有配置文件,我们自己在路径C:\Program Files\MySQL\MySQL Server 5.7 X64下新建my.ini文件,并修改内容如下后保存。


# Other default tuning values
# MySQL Server Instance Configuration File
# ----------------------------------------------------------------------
# Generated by the MySQL Server Instance Configuration Wizard
#
#
# Installation Instructions
# ----------------------------------------------------------------------
#
# On Linux you can copy this file to /etc/my.cnf to set global options,
# mysql-data-dir/my.cnf to set server-specific options
# (@localstatedir@ for this installation) or to
# ~/.my.cnf to set user-specific options.
#
# On Windows you should keep this file in the installation directory
# of your server (e.g. C:\Program Files\MySQL\MySQL Server X.Y). To
# make sure the server reads the config file use the startup option
# "--defaults-file".
#
# To run run the server from the command line, execute this in a
# command line shell, e.g.
# mysqld --defaults-file="C:\Program Files\MySQL\MySQL Server X.Y\my.ini"
#
# To install the server as a Windows service manually, execute this in a
# command line shell, e.g.
# mysqld --install MySQLXY --defaults-file="C:\Program Files\MySQL\MySQL Server X.Y\my.ini"
#
# And then execute this in a command line shell to start the server, e.g.
# net start MySQLXY
#
#
# Guildlines for editing this file
# ----------------------------------------------------------------------
#
# In this file, you can use all long options that the program supports.
# If you want to know the options a program supports, start the program
# with the "--help" option.
#
# More detailed information about the individual options can also be
# found in the manual.
#
# For advice on how to change settings please see
# http://dev.mysql.com/doc/refman/5.7/en/server-configuration-defaults.html
#
#
# CLIENT SECTION
# ----------------------------------------------------------------------
#
# The following options will be read by MySQL client applications.
# Note that only client applications shipped by MySQL are guaranteed
# to read this section. If you want your own MySQL client program to
# honor these values, you need to specify it as an option during the
# MySQL client library initialization.
#
[client]

# pipe
# socket=0.0
port=3306

[mysql]
no-beep

default-character-set=utf8


# SERVER SECTION
# ----------------------------------------------------------------------
#
# The following options will be read by the MySQL Server. Make sure that
# you have installed the server correctly (see above) so it reads this
# file.
#
# server_type=3
[mysqld]

# The next three options are mutually exclusive to SERVER_PORT below.
# skip-networking

# enable-named-pipe

# shared-memory

# shared-memory-base-name=MYSQL

# The Pipe the MySQL Server will use
# socket=MYSQL

# The TCP/IP Port the MySQL Server will listen on
port=3306

# Path to installation directory. All paths are usually resolved relative to this.
# basedir="C:/Program Files/MySQL/MySQL Server 5.7/"

# Path to the database root
datadir=C:/ProgramData/MySQL/MySQL Server 5.7/Data

# The default character set that will be used when a new schema or table is
# created and no character set is defined
character-set-server=utf8

# The default storage engine that will be used when create new tables when
default-storage-engine=INNODB

# Set the SQL mode to strict
sql-mode="STRICT_TRANS_TABLES,NO_AUTO_CREATE_USER,NO_ENGINE_SUBSTITUTION"

# Enable Windows Authentication
# plugin-load=authentication_windows.dll

# General and Slow logging.
log-output=FILE
general-log=0
general_log_file="LILY-PC.log"
slow-query-log=1
slow_query_log_file="LILY-PC-slow.log"
long_query_time=10

# Binary Logging.
# log-bin

# Error Logging.
log-error="LILY-PC.err"

# Server Id.
server-id=1

# Secure File Priv.
secure-file-priv="C:/ProgramData/MySQL/MySQL Server 5.7/Uploads"

# The maximum amount of concurrent sessions the MySQL server will
# allow. One of these connections will be reserved for a user with
# SUPER privileges to allow the administrator to login even if the
# connection limit has been reached.
max_connections=151

# Query cache is used to cache SELECT results and later return them
# without actual executing the same query once again. Having the query
# cache enabled may result in significant speed improvements, if your
# have a lot of identical queries and rarely changing tables. See the
# "Qcache_lowmem_prunes" status variable to check if the current value
# is high enough for your load.
# Note: In case your tables change very often or if your queries are
# textually different every time, the query cache may result in a
# slowdown instead of a performance improvement.
query_cache_size=0

# The number of open tables for all threads. Increasing this value
# increases the number of file descriptors that mysqld requires.
# Therefore you have to make sure to set the amount of open files
# allowed to at least 4096 in the variable "open-files-limit" in
# section [mysqld_safe]
table_open_cache=2000

# Maximum size for internal (in-memory) temporary tables. If a table
# grows larger than this value, it is automatically converted to disk
# based table This limitation is for a single table. There can be many
# of them.
tmp_table_size=11M

# How many threads we should keep in a cache for reuse. When a client
# disconnects, the client's threads are put in the cache if there aren't
# more than thread_cache_size threads from before.  This greatly reduces
# the amount of thread creations needed if you have a lot of new
# connections. (Normally this doesn't give a notable performance
# improvement if you have a good thread implementation.)
thread_cache_size=10

#*** MyISAM Specific options
# The maximum size of the temporary file MySQL is allowed to use while
# recreating the index (during REPAIR, ALTER TABLE or LOAD DATA INFILE.
# If the file-size would be bigger than this, the index will be created
# through the key cache (which is slower).
myisam_max_sort_file_size=100G

# If the temporary file used for fast index creation would be bigger
# than using the key cache by the amount specified here, then prefer the
# key cache method.  This is mainly used to force long character keys in
# large tables to use the slower key cache method to create the index.
myisam_sort_buffer_size=13M

# Size of the Key Buffer, used to cache index blocks for MyISAM tables.
# Do not set it larger than 30% of your available memory, as some memory
# is also required by the OS to cache rows. Even if you're not using
# MyISAM tables, you should still set it to 8-64M as it will also be
# used for internal temporary disk tables.
key_buffer_size=8M

# Size of the buffer used for doing full table scans of MyISAM tables.
# Allocated per thread, if a full scan is needed.
read_buffer_size=25K
read_rnd_buffer_size=256K

#*** INNODB Specific options ***
# innodb_data_home_dir=0.0

# Use this option if you have a MySQL server with InnoDB support enabled
# but you do not plan to use it. This will save memory and disk space
# and speed up some things.
# skip-innodb

# If set to 1, InnoDB will flush (fsync) the transaction logs to the
# disk at each commit, which offers full ACID behavior. If you are
# willing to compromise this safety, and you are running small
# transactions, you may set this to 0 or 2 to reduce disk I/O to the
# logs. Value 0 means that the log is only written to the log file and
# the log file flushed to disk approximately once per second. Value 2
# means the log is written to the log file at each commit, but the log
# file is only flushed to disk approximately once per second.
innodb_flush_log_at_trx_commit=1

# The size of the buffer InnoDB uses for buffering log data. As soon as
# it is full, InnoDB will have to flush it to disk. As it is flushed
# once per second anyway, it does not make sense to have it very large
# (even with long transactions).
innodb_log_buffer_size=1M

# InnoDB, unlike MyISAM, uses a buffer pool to cache both indexes and
# row data. The bigger you set this the less disk I/O is needed to
# access data in tables. On a dedicated database server you may set this
# parameter up to 80% of the machine physical memory size. Do not set it
# too large, though, because competition of the physical memory may
# cause paging in the operating system.  Note that on 32bit systems you
# might be limited to 2-3.5G of user level memory per process, so do not
# set it too high.
innodb_buffer_pool_size=8M

# Size of each log file in a log group. You should set the combined size
# of log files to about 25%-100% of your buffer pool size to avoid
# unneeded buffer pool flush activity on log file overwrite. However,
# note that a larger logfile size will increase the time needed for the
# recovery process.
innodb_log_file_size=48M

# Number of threads allowed inside the InnoDB kernel. The optimal value
# depends highly on the application, hardware as well as the OS
# scheduler properties. A too high value may lead to thread thrashing.
innodb_thread_concurrency=9

# The increment size (in MB) for extending the size of an auto-extend InnoDB system tablespace file when it becomes full.
innodb_autoextend_increment=64

# The number of regions that the InnoDB buffer pool is divided into.
# For systems with buffer pools in the multi-gigabyte range, dividing the buffer pool into separate instances can improve concurrency,
# by reducing contention as different threads read and write to cached pages.
innodb_buffer_pool_instances=8

# Determines the number of threads that can enter InnoDB concurrently.
innodb_concurrency_tickets=5000

# Specifies how long in milliseconds (ms) a block inserted into the old sublist must stay there after its first access before
# it can be moved to the new sublist.
innodb_old_blocks_time=1000

# It specifies the maximum number of .ibd files that MySQL can keep open at one time. The minimum value is 10.
innodb_open_files=300

# When this variable is enabled, InnoDB updates statistics during metadata statements.
innodb_stats_on_metadata=0

# When innodb_file_per_table is enabled (the default in 5.6.6 and higher), InnoDB stores the data and indexes for each newly created table
# in a separate .ibd file, rather than in the system tablespace.
innodb_file_per_table=1

# Use the following list of values: 0 for crc32, 1 for strict_crc32, 2 for innodb, 3 for strict_innodb, 4 for none, 5 for strict_none.
innodb_checksum_algorithm=0

# The number of outstanding connection requests MySQL can have.
# This option is useful when the main MySQL thread gets many connection requests in a very short time.
# It then takes some time (although very little) for the main thread to check the connection and start a new thread.
# The back_log value indicates how many requests can be stacked during this short time before MySQL momentarily
# stops answering new requests.
# You need to increase this only if you expect a large number of connections in a short period of time.
back_log=80

# If this is set to a nonzero value, all tables are closed every flush_time seconds to free up resources and
# synchronize unflushed data to disk.
# This option is best used only on systems with minimal resources.
flush_time=0

# The minimum size of the buffer that is used for plain index scans, range index scans, and joins that do not use
# indexes and thus perform full table scans.
join_buffer_size=256K

# The maximum size of one packet or any generated or intermediate string, or any parameter sent by the
# mysql_stmt_send_long_data() C API function.
max_allowed_packet=4M

# If more than this many successive connection requests from a host are interrupted without a successful connection,
# the server blocks that host from performing further connections.
max_connect_errors=100

# Changes the number of file descriptors available to mysqld.
# You should try increasing the value of this option if mysqld gives you the error "Too many open files".
open_files_limit=4161

# Set the query cache type. 0 for OFF, 1 for ON and 2 for DEMAND.
query_cache_type=0

# If you see many sort_merge_passes per second in SHOW GLOBAL STATUS output, you can consider increasing the
# sort_buffer_size value to speed up ORDER BY or GROUP BY operations that cannot be improved with query optimization
# or improved indexing.
sort_buffer_size=256K

# The number of table definitions (from .frm files) that can be stored in the definition cache.
# If you use a large number of tables, you can create a large table definition cache to speed up opening of tables.
# The table definition cache takes less space and does not use file descriptors, unlike the normal table cache.
# The minimum and default values are both 400.
table_definition_cache=1400

# Specify the maximum size of a row-based binary log event, in bytes.
# Rows are grouped into events smaller than this size if possible. The value should be a multiple of 256.
binlog_row_event_max_size=8K

# If the value of this variable is greater than 0, a replication slave synchronizes its master.info file to disk.
# (using fdatasync()) after every sync_master_info events.
sync_master_info=10000

# If the value of this variable is greater than 0, the MySQL server synchronizes its relay log to disk.
# (using fdatasync()) after every sync_relay_log writes to the relay log.
sync_relay_log=10000

# If the value of this variable is greater than 0, a replication slave synchronizes its relay-log.info file to disk.
# (using fdatasync()) after every sync_relay_log_info transactions.
sync_relay_log_info=10000

# Indicates how is the InnoDB Cluster configured as (Classic, Sandbox, Master or Slave).
# innodbclustertypeselection=ClassicMySQLReplication

# Indicates how is the InnoDB Cluster is/will be named.
# innodbclustername="sandboxCluster"

# Indicates how many instances will the InnoDB cluster sandbox will have.
# innodbclusterinstances=0

# Holds the InnoDB Cluster Username.
# innodbclusterusername

# Indicates the InnoDB Cluster URI.
# innodbclusteruri

# Indicates the InnoDB Cluster Port.
# innodbclusterport=3306

# Load mysql plugins at start."plugin_x ; plugin_y".
# plugin_load

# MySQL server's plugin configuration.
# loose_mysqlx_port=33060
- 以管理员身份运行cmd,输入命令 cd C:\Program Files\mysql-5.7.16-winx64\bin 回车
- 输入mysqld –initialize-insecure –user=mysql 回车
- 输入 mysqld install 回车
- 输入net start mysql 回车启动mysql服务
- 从上图看到mysql服务已经启动了,我们输入mysql -u root -p 回车登录mysql数据库
- 要求输入密码,刚刚安装完是没有密码的,直接回车
- 到这里就成功了


给MySQL安装图形化操作工具
对于初次接触MySQL的用户,尤其是从SQL Server过来的用户,看到使用cmd窗口操作MySQL是不是有些无从下手。这一小节就讲述一下如何给MySQL安装GUI工具。下面是几个图形化的管理工具:
1、phpMyAdmin
2、MySQLDumper
3、Navicat
4、MySQL GUI Tools
5、MySQL ODBC Connector
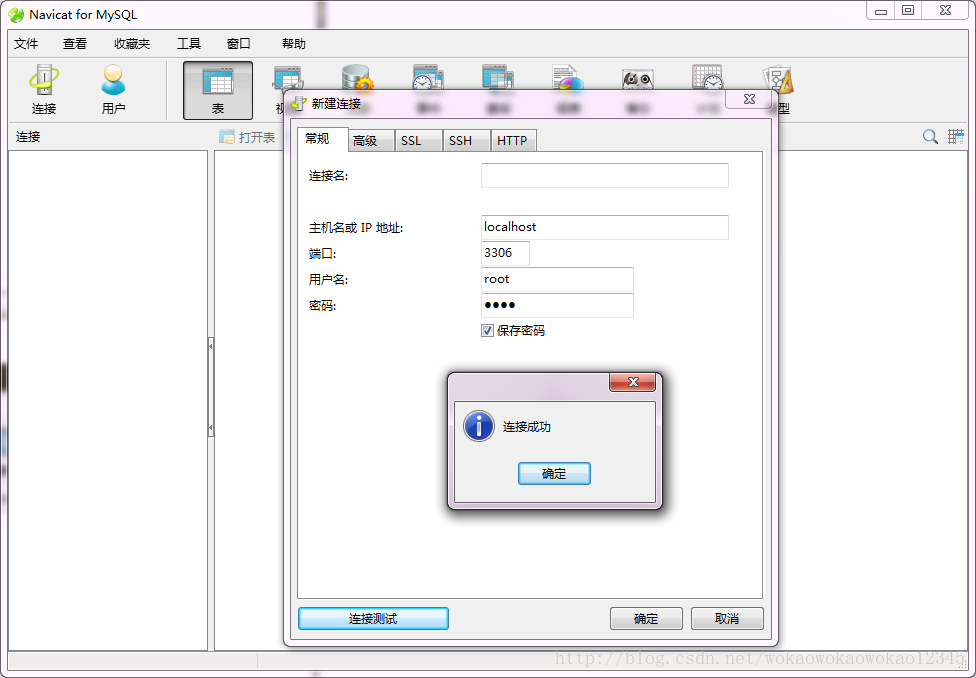
在MySQL GUI Tools和Navicat之间,我选择Navicat,理由如下:Navicat for MySQL可以与任何3.21或以上版本的MySQL一起工作,支持大部分的MySQL最新功能,包括触发器、存储过程、函数、事件、视图、管理用户,等等。它不仅对专业开发人员来说是非常尖端的技术,而且对于新手来说也易学易用。它可以使用户连接到本地/远程服务器,提供了几种实用工具,例如数据结构同步、导入/导出、备份和报告,使维护数据的过程很容易。
- 下载安装链接Navicat
完整卸载MySQL
- 停止mysql服务,cmd模式下输入net stop mysql;
- 进入控制面板卸载mysql;
- 删除mysql文件夹下的my.ini文件及所有文件;
- 运行“regedit”文件,打开注册表
删除HKEY_LOCAL_MACHINE\SYSTEM\ControlSet001\Services\Eventlog\Application\MySQL文件夹
删除HKEY_LOCAL_MACHINE\SYSTEM\ControlSet002\Services\Eventlog\Application\MySQL文件夹。
删除HKEY_LOCAL_MACHINE\SYSTEM\CurrentControlSet\Services\Eventlog\Application\MySQL的文件夹。 - 删除C盘下的“C:\ProgramData\MySQL ”所有文件,该programData文件是隐藏的默认,设置显示后即可见。
- 以管理员权限的方式打开cmd命令窗口,然后将在dos命令中输入命令:
sc delete mysql //这里的mysql是你要删除的服务名。
总结
这篇博文里关于MySQL的安装和测试,分别是用了Installer和Archive两种安装方式安装MySQL,实际使用时候选择其中一种方式即可。我个人推荐Installer,毕竟简单直观。下篇文章里将讲述如何搭建Qt+MySQL的开发环境,毕竟开发服务用户才最终目的。
参考
http://www.jb51.net/article/83646.htm
http://blog.csdn.net/ludwig_/article/details/52634587


 229
229


 被折叠的 条评论
为什么被折叠?
被折叠的 条评论
为什么被折叠?
 到【灌水乐园】发言


