


现在UI系统已经有了最为基本的打开和关闭的功能了,接下来需要对UI系统进行一个小小的扩展。
继续以确认框作为例子:确认框这种形式在不同的地方都会使用到。比如上一篇文章中提到的科技树功能,每点一个科技,都会有一个对应的确认框。
我们不可能也没有必要针对每一个科技都制作一个新的确认框,所以除了开启一个新的UI之外,我们还需要一些扩展性的功能。而确认框,将是一个非常典型的例子。
确认框的功能,其实包含两层含义:
1.上一个UI会传递一些信息给下一个UI,然后在下一个UI中,这些信息会显示出来。(比如科技树确认框中“你确定要提升XXX科技吗?”,或者关闭游戏时“你确定要退出游戏吗?”这一类的话)
2.上一个UI会将自身的某些方法传递给下一个UI,这样下一个UI就会执行这些方法。(比如提升科技的确认框,点了确认会提升对应的科技,退出游戏的确认框,点了确定会退出游戏)
所以,说白了就是要传递一些信息给下一个UI,所以我们需要定义一个新的类,用来保存这些信息:
- public class UIEvent
- {
- public UIType Type { get; private set; }
- public Action Action { get; private set; }
- public Hashtable Msg { get; private set; }
- public UIEvent(UIType type)
- {
- Type = type;
- Action = null;
- Msg = null;
- }
- public UIEvent(UIType type, Hashtable msg)
- {
- Type = type;
- Action = null;
- Msg = msg;
- }
- public UIEvent(UIType type, Action act)
- {
- Type = type;
- Action = act;
- Msg = null;
- }
- public UIEvent(UIType type, Action act, Hashtable msg)
- {
- Type = type;
- Action = act;
- Msg = msg;
- }
- }
复制代码
内容很简单,UIType就不多说了,Action是一个委托,用于将上一个UI的函数传递过来,Msg是一个Hashtable,用于保存一些信息。
接下来去修改UIRoot类和BaseUI类:
- public class BaseUI : MonoBehaviour
- {
- ……
- public void OpenUI(UIEvent uiEvent)//给OpenUI加入参数
- {
- gameObject.SetActive(true);
- }
- }
- public class UIRoot : MonoBehaviour {
- ……
- public void OpenNormalUI(UIEvent uiEvent)
- {
- UIType uiType = uiEvent.Type;
- ……
- CurrentUI.OpenUI(uiEvent);
- }
- public void OpenKeepAboveUI(UIEvent uiEvent)
- {
- UIType uiType = uiEvent.Type;
- ……
- theUI.OpenUI(uiEvent);
- }
- }
复制代码
之后更新所有用过这几个函数的地方:
首先是打开StartUI的地方
- public class UIRoot : MonoBehaviour {
- ……
- private void Start()
- {
- OpenNormalUI(new UIEvent(UIType.StartUI));
- }
- ……
- }
- 然后是StartUI
- public class StartUI : BaseUI {
- ……
- private void StartGame()
- {
- UIRoot.Instance.OpenNormalUI(new UIEvent(UIType.GameSettingUI));
- }
- }
复制代码
而后是GameSettingUI
- public class GameSettingUI : BaseUI {
- ……
- public void StartGame()
- {
- UIRoot.Instance.OpenNormalUI(new UIEvent(UIType.StartUI));
- }
- public void OpenTestUI()
- {
- UIRoot.Instance.OpenKeepAboveUI(new UIEvent(UIType.TestAboveUI));
- }
- }
复制代码
接下来是做一个确认框,确认框的UI主要包含3个部分:信息描述,确认按钮,取消按钮
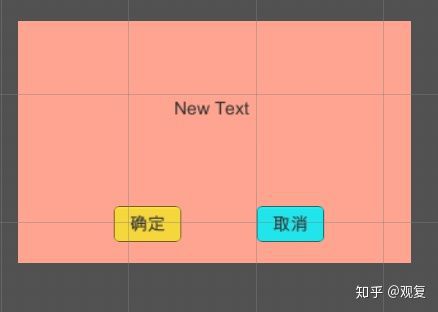
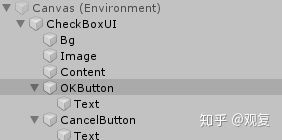
如图,和以前流程一样,做好了CheckBoxUI组建并放到了相应的位置。
信息描述的组建是Content,确认按钮是OKButton,取消是CancleButton。给CheckBoxUI挂上如下脚本用以初始化。
- public class CheckBoxUI : BaseUI
- {
- private Text Text;
- private Button OKButton;
- private Button CancelButton;
- private void Awake()
- {
- Text = UITool.FindChildByName(gameObject, "Content").GetComponent<Text>();
- OKButton = UITool.FindChildByName(gameObject, "OKButton").GetComponent<Button>();
- OKButton.onClick.AddListener(OnClickOk);
- CancelButton = UITool.FindChildByName(gameObject, "CancelButton").GetComponent<Button>();
- CancelButton.onClick.AddListener(OnClickCancel);
- }
- private void OnClickOk()
- {
- }
- private void OnClickCancel()
- {
- }
- }
复制代码
在UIConfig中添加对应的配置:
- public class UIConfig
- {
- public static Dictionary<UIType, string> UIPath = new Dictionary<UIType, string>
- {
- ……
- { UIType.CheckBoxUI,"UIPrefabs/CheckBoxUI" },
- };
- }
- public enum UIType
- {
- ……
- CheckBoxUI,
- }
复制代码
然后再在TestAboveUI中加入对应的开启入口:
- public class TestAboveUI : BaseUI
- {
- ……
- private Button NewUIButton;
- private void Awake()
- {
- ……
- NewUIButton = UITool.FindChildByName(gameObject, "NewUIButton").GetComponent<Button>();
- NewUIButton.onClick.AddListener(OpenNewUI);
- }
- ……
- public void OpenNewUI()
- {
- }
- }
复制代码
其中OpenNewUI就是用来打开新的UI的:
如果在该函数内加一句
UIRoot.Instance.OpenKeepAboveUI(new UIEvent(UIType.CheckBoxUI));
就可以打开确认框了,但是要做的并不仅仅是打开确认框,而是要让确认框显示对应的文字,并且点了确认后,要实现改窗口中包含的某个代码。
所以UIEvent内需要加更多的东西,作为测试,希望确认框执行的效果是在控制台打印“1111111111”,并且在确认框中显示“是否需要打印”。
- public void OpenNewUI()
- {
- UIEvent uiEvent = new UIEvent(
- UIType.CheckBoxUI,
- () => {
- Debug.Log(111111111111);
- },
- new Hashtable
- {
- { "content","是否需要打印"},
- }
- );
- UIRoot.Instance.OpenKeepAboveUI(uiEvent);
- }
复制代码
这里面的()=>{Debug.Log(111111111111);}是一个lamda表达式,等同于
- public void OpenNewUI()
- {
- UIEvent uiEvent = new UIEvent(
- UIType.CheckBoxUI,
- showLog,
- new Hashtable
- {
- { "content","是否需要打印"},
- }
- );
- UIRoot.Instance.OpenKeepAboveUI(uiEvent);
- }
- void showLog()
- {
- Debug.Log(111111111111);
- }
复制代码
而后是在CheckBoxUI里面实现,首先,买手游账号平台我们需要用到多态的特性,所以要修改一下BaseUI的代码:
- public class BaseUI : MonoBehaviour
- {
- ……
- public virtual void OpenUI(UIEvent uiEvent)
- {
- gameObject.SetActive(true);
- }
- ……
- }
复制代码
将OpenUI函数变为虚函数。然后将CheckBoxUI修改一下:
- public class CheckBoxUI : BaseUI
- {
- ……
- private Action Action;
- ……
- public override void OpenUI(UIEvent uiEvent)
- {
- Text.text = uiEvent.Msg["content"].ToString();
- if (uiEvent.Action != null)
- {
- Action = uiEvent.Action;
- }
- base.OpenUI(uiEvent);
- }
- private void OnClickOk()
- {
- Action();
- Action = null;
- UIRoot.Instance.CloseKeepAboveUI();
- }
- private void OnClickCancel()
- {
- Action = null;
- UIRoot.Instance.CloseKeepAboveUI();
- }
- }
复制代码
运行一下:

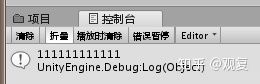
能够成功的打印,并且显示正确的信息了。
自此,一个最为简单的UI系统已经实现,接下来将实现的是游戏基本的逻辑框架。


 1877
1877


 被折叠的 条评论
为什么被折叠?
被折叠的 条评论
为什么被折叠?
 到【灌水乐园】发言


