


centos7 xtrabackup mysql 基本测试(4)—虚拟机环境 mysql 修改datadir
参考
centos更改mysql数据库目录
https://blog.csdn.net/sinat_33151213/article/details/125079593
https://blog.csdn.net/jx_ZhangZhaoxuan/article/details/129139499
https://dev.mysql.com/doc/refman/8.4/en/selinux-file-context.html
https://developer.aliyun.com/article/1238771
https://cloud.tencent.com/developer/article/1409771
创建目录
sudo mkdir -p /opt/datadir/
首先,关闭MySQL服务:
sudo systemctl stop mysqld
sudo systemctl status  mysqld
然后,复制原始datadir目录,作为新的目录:
sudo cp -rp /var/lib/mysql /opt/datadir/
sudo ls /opt/datadir/mysql/
接下来,修改 MySQL配置文件my.cnf:
sudo cp /etc/my.cnf /etc/org_my.cnf
sudo vi /etc/my.cnf
# For advice on how to change settings please see
# http://dev.mysql.com/doc/refman/5.7/en/server-configuration-defaults.html

[mysqld]
#
# Remove leading # and set to the amount of RAM for the most important data
# cache in MySQL. Start at 70% of total RAM for dedicated server, else 10%.
# innodb_buffer_pool_size = 128M
#
# Remove leading # to turn on a very important data integrity option: logging
# changes to the binary log between backups.
# log_bin
#
# Remove leading # to set options mainly useful for reporting servers.
# The server defaults are faster for transactions and fast SELECTs.
# Adjust sizes as needed, experiment to find the optimal values.
# join_buffer_size = 128M
# sort_buffer_size = 2M
# read_rnd_buffer_size = 2M
datadir=/opt/datadir/mysql/
socket=/opt/datadir/mysql/mysql.sock

# Disabling symbolic-links is recommended to prevent assorted security risks
symbolic-links=0

log-error=/var/log/mysqld.log
pid-file=/var/run/mysqld/mysqld.pid
[client]
socket=/opt/datadir/mysql/mysql.sock
保存并关闭文件。此时,需要递归更改新目录的权限,以确保MySQL能够访问其中的数据:
sudo chown -R mysql:mysql /opt/datadir/mysql
sudo chmod -R 755 /opt/datadir/
sudo chmod -R 755 /opt/datadir/
这句话是需要的,
[client]这个也是需要的
不然
只能下面
mysql -h 127.0.0.1 -u root -p
这种方式登录
不能
mysql -u root -p
这种方式登录
sudo cp /etc/my.cnf /etc/opt_my.cnf
selinux 与 mysql
getenforce
查看 selinux 状态
Enforcing
先查看当前配置信息.
getenforce
Enforcing
就表明SELinux已经启用.只需要关闭即可。
关闭方法: (不用关闭)
#setenforce 0 (0|1 开|关)
或者
setsebool ftpd_disable_trans 1
semanage
ping www.baidu.com
检查并修改/etc/resolv.conf文件,确保DNS服务器地址正确。
nameserver 8.8.8.8
nameserver 8.8.4.4
CentOS7安装时使用"基础服务器"选项安装, 后发现没有semanage命令.
使用yum查询选项搜索
sudo yum provides semanage
多试几次
Loaded plugins: fastestmirror
Loading mirror speeds from cached hostfile
 * base: mirrors.bupt.edu.cn
 * extras: mirrors.bupt.edu.cn
 * updates: mirrors.bupt.edu.cn
base
extras
mysql-connectors-community
mysql-tools-community
mysql57-community
updates
updates/7/x86_64/primary_db
updates/7/x86_64/filelists_db
policycoreutils-python-2.5-34.el7.x86_64 : SELinux policy core python utilities
Repo        : base
Matched from:
Filename    : /usr/sbin/semanage
sudo yum install -y policycoreutils-python-2.5-34.el7.x86_64
sudo semanage fcontext -l|grep mysqld_db_t
/var/lib/mysql(-files|-keyring)?(/.*)? all files system_u:object_r:mysqld_db_t:s0
11
sudo semanage fcontext -a -t mysqld_db_t "/opt/datadir/mysql(/.*)?"
sudo restorecon -Rv /opt/datadir/mysql
sudo semanage fcontext -l|grep mysqld_db_t
22
/var/lib/mysql(-files|-keyring)?(/.*)?             all files          system_u:object_r:mysqld_db_t:s0
/opt/datadir/mysql(/.*)?                           all files          system_u:object_r:mysqld_db_t:s0
33
sudo systemctl start mysqld
sudo systemctl status mysqld
44
测试
mysql -u etc -p
'1234aA~1'
进入之后
show variables like '%dir';
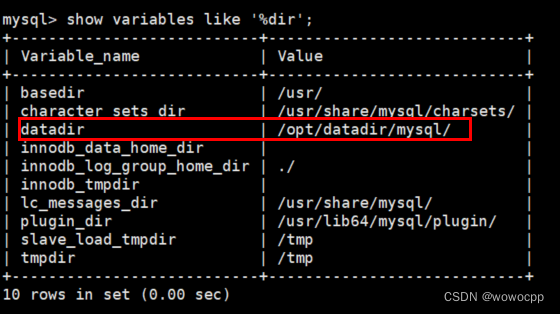
日期: 2024年6月24日
下一步是 开始 xtrabackup 了吧


 332
332


 被折叠的 条评论
为什么被折叠?
被折叠的 条评论
为什么被折叠?
 到【灌水乐园】发言


