


Masonry是一个轻量级的界面布局框架,拥有自己的描述语法,采用更优雅的链式语法封装自动布局,简洁明了并具有高可读性,而且同时支持 iOS 和 Max OS X。Masonry是一个用代码写iOS或OS界面的库,用官方的说明就是Masonry完成可以代替Auto layout。Masonry的github地址:https://github.com/SnapKit/Masonry
Masonry使用起来很方便和流畅,本人最近开始在新项目中使用框架进行界面布局。亲身的实践感觉Masonry确实比APPLE的官方的API(NSLayoutConstraint)好用很多。先来看一下Masonry官方的提供的sample
code:
|
1
2
3
4
|
[objc] view plaincopy
[view1 mas_makeConstraints:^(MASConstraintMaker *make) {
make.edges.equalTo(superview).
with
.insets(padding);
}];
|
这也是最常用的用法,为view设置约束。 看到上面的代码风格,典型的链式语法,流畅易懂。
我们先来看一下Masonry支持的约束属性:
|
1
2
3
4
5
6
7
8
9
10
11
12
13
14
15
16
17
18
19
20
21
22
23
|
[objc] view plaincopy
// 左侧
@property (nonatomic, strong, readonly) MASConstraint *left;
// 顶部
@property (nonatomic, strong, readonly) MASConstraint *top;
// 右侧
@property (nonatomic, strong, readonly) MASConstraint *right;
// 底部
@property (nonatomic, strong, readonly) MASConstraint *bottom;
// 首部
@property (nonatomic, strong, readonly) MASConstraint *leading;
// 尾部
@property (nonatomic, strong, readonly) MASConstraint *trailing;
// 宽
@property (nonatomic, strong, readonly) MASConstraint *width;
// 高
@property (nonatomic, strong, readonly) MASConstraint *height;
// 中心点x
@property (nonatomic, strong, readonly) MASConstraint *centerX;
// 中心点y
@property (nonatomic, strong, readonly) MASConstraint *centerY;
// 文本基线
@property (nonatomic, strong, readonly) MASConstraint *baseline;
|
这里需要注意的是:NSLayoutAttributeLeft/NSLayoutAttributeRight 和 NSLayoutAttributeLeading/NSLayoutAttributeTrailing的区别是left/right永远是指左右,而leading/trailing在某些从右至左习惯的地区会变成,leading是右边,trailing是左边。所以如果涉及到国际化方面,建议还是使用 NSLayoutAttributeLeading/NSLayoutAttributeTrailing。
在Masonry中能够添加、修改 Auto layout 约束有三个函数:
[objc] view plaincopy
|
1
2
3
|
(NSArray *)mas_makeConstraints:(void(^)(MASConstraintMaker *make))block;
(NSArray *)mas_updateConstraints:(void(^)(MASConstraintMaker *make))block;
(NSArray *)mas_remakeConstraints:(void(^)(MASConstraintMaker *make))block;
|
其中:
mas_makeConstraints 只负责新增约束,Autolayout不能同时存在两条针对于同一对象的约束,否则会报错。(这个方法最常用)
mas_updateConstraints 针对上面的情况会更新在block中出现的约束,不会导致出现两个相同约束的情况。
mas_remakeConstraints 则会清除之前的所有约束 仅保留最新的约束。
如果我们灵活的运用这三个方法,基本就可以应付各种各样的约束布局情况了。
一、添加约束(mas_makeConstraints)
先来看一下Masonry如何实现一个view的简单布局。
场景一:
还是和上面的例子一样:一个子view在父view中,其中子view的上下左右边缘都离父view的边缘40个像素。
|
1
2
3
4
5
6
7
8
9
10
11
12
13
14
|
[objc] view plaincopy
[self.view setBackgroundColor:[UIColor redColor]];
//创建子view
UIView *subView = [[UIView alloc] init];
[subView setBackgroundColor:[UIColor blackColor]];
[self.view addSubview:subView];
//layout 子view
__weak __typeof(self)weakSelf = self;
[subView mas_makeConstraints:^(MASConstraintMaker *make) {
make.top.equalTo(weakSelf.view).
with
.offset(40);
//子view的上边缘离父view的上边缘40个像素
make.left.equalTo(weakSelf.view).
with
.offset(40);
//子view的左边缘离父view的左边缘40个像素
make.bottom.equalTo(weakSelf.view).
with
.offset(-40);
//子view的下边缘离父view的下边缘40个像素
make.right.equalTo(weakSelf.view).
with
.offset(-40);
//子view的右边缘离父view的右边缘40个像素
}];
|
针对上面的布局约束写法,还有更为简洁的写法:
|
1
2
3
4
5
|
[objc] view plaincopy
//layout 子view
[subView mas_makeConstraints:^(MASConstraintMaker *make) {
make.edges.equalTo(weakSelf.view).insets(UIEdgeInsetsMake(40, 40, 40, 40));
}];
|
效果如下:
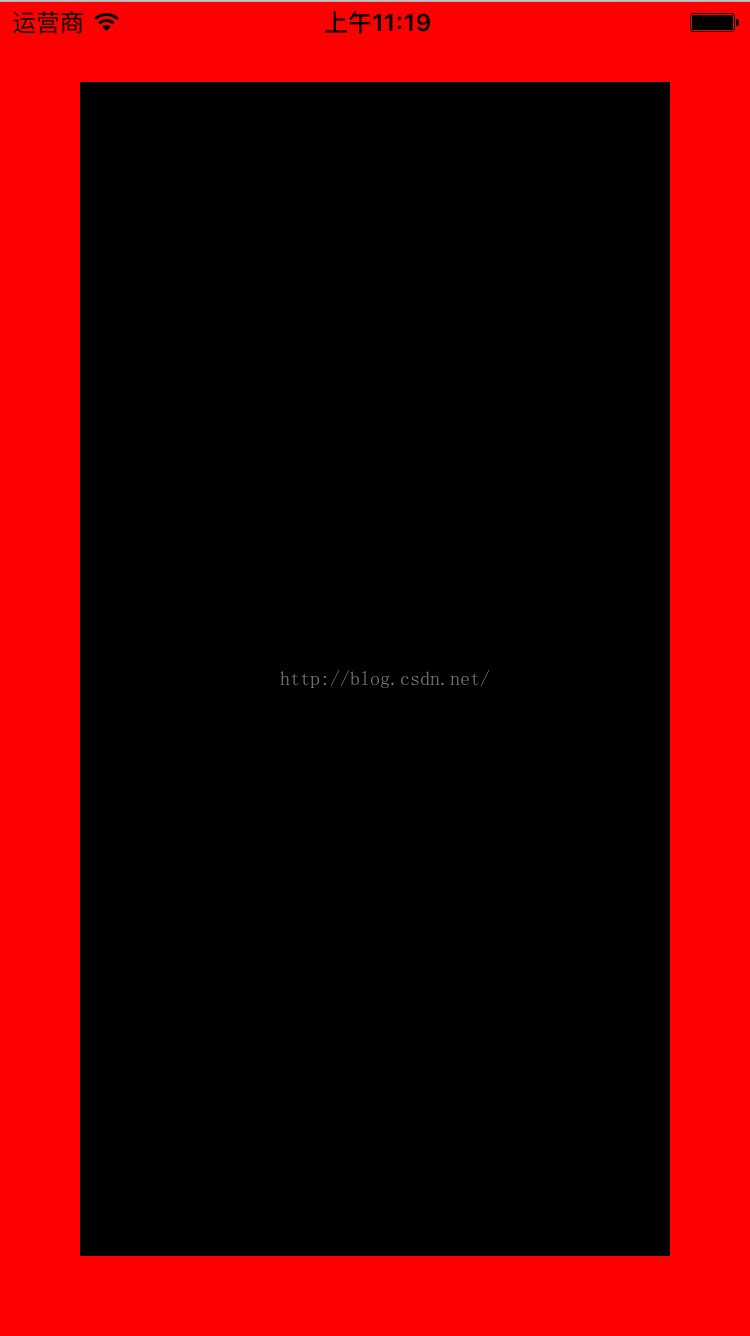
可以很明显的看出,使用Masonry布局无论是代码量还是语法描述都很简洁易懂。比起前面使用 NSLayoutConstraint 不是好一点半点。
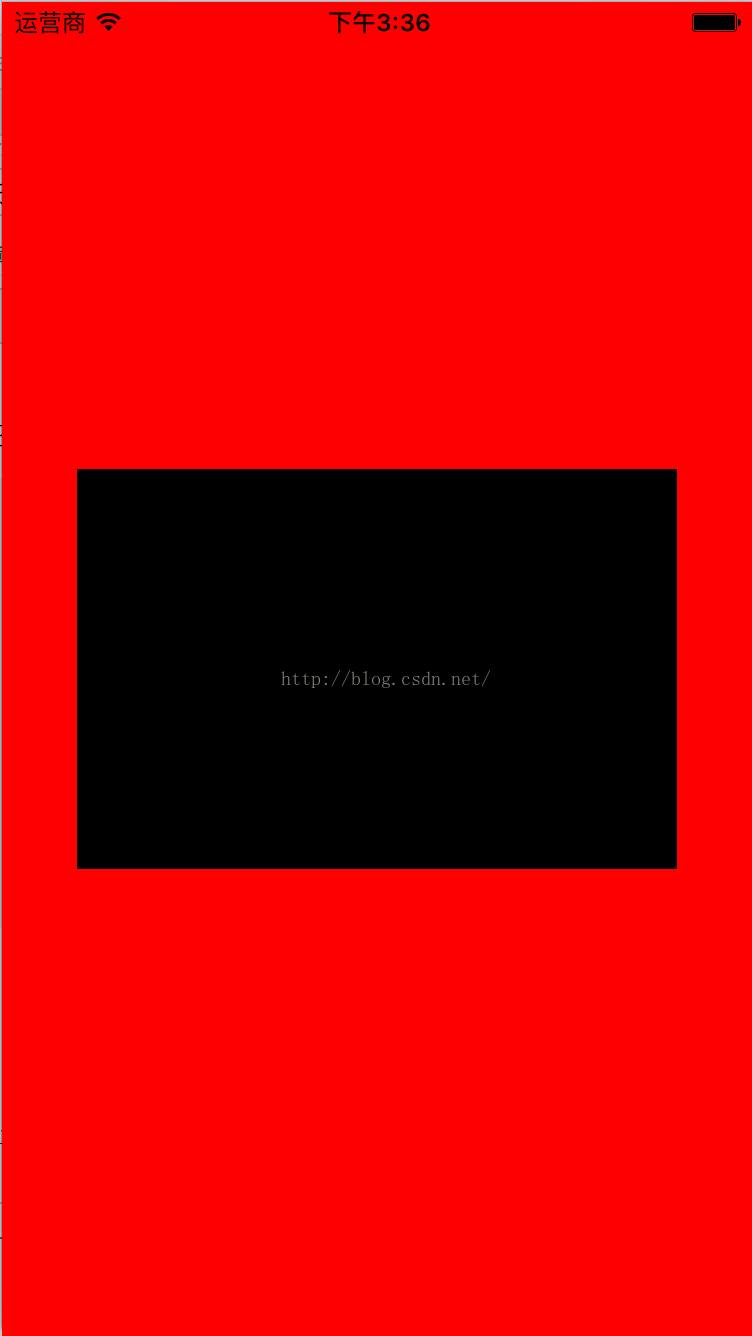
场景二:
子view在父view的中间,且子view长300,高200。
|
1
2
3
4
5
6
7
8
9
10
11
12
|
[objc] view plaincopy
[self.view setBackgroundColor:[UIColor redColor]];
//创建子view
UIView *subView = [[UIView alloc] init];
[subView setBackgroundColor:[UIColor blackColor]];
[self.view addSubview:subView];
//layout 子view
__weak __typeof(self)weakSelf = self;
[subView mas_makeConstraints:^(MASConstraintMaker *make) {
make.center.equalTo(weakSelf.view);
//子view在父view中间
make.size.mas_equalTo(CGSizeMake(300, 200));
//子view长300,高200
}];
|
效果如下:
二、更新、修改约束(mas_updateConstraints)
使用Masonry更新约束非常方便简单。
比如需要将上面例子的view的宽度和高修都改为100:
|
1
2
3
4
5
6
|
[objc] view plaincopy
//将view的宽度、高度设为100
[subView mas_updateConstraints:^(MASConstraintMaker *make) {
make.width.equalTo(@100);
make.height.equalTo(@100);
}];
|
三、在使用Masonry中,我们需要注意几个问题
1、在使用 mas_makeConstraint 方法给view添加约束的时候,必须要确定该view已经添加到父view上了,即[self.view addSubview:view];否则将会约束报错。这个和使用NSLayoutConstraint一样。
2、Autolayout不能同时存在两条针对于同一对象的约束,否则会报错。只能进行更新修改。
3、其次对于 equalTo 和 mas_equalTo的区别:mas_equalTo只是对其参数进行了一个BOX操作(装箱) ,所支持的类型除了NSNumber支持的那些数值类型之外就只支持CGPoint、CGSize、UIEdgeInsets,例如:make.size.mas_equalTo(CGSizeMake(300,400));
对于对象或是多个属性的处理,就使用equalTo,例如:make.size.equalTo(weakSelf.view); make.width.equalTo(weakSelf.view); make.height.equalTo(@30);
4、方法with和and,这连个方法其实没有做任何操作,方法只是返回对象本身,这这个方法的左右完全是为了方法写的时候的可读性 。
5、因为iOS中原点在左上角所以使用offset时注意right和bottom用负数。
6、Masonry约束是无法更新 NSLayoutConstraint 约束。因为Masonry在更新约束的时候会去遍历查找view上面的约束集,先判断view上的约束的类是否为 MASLayoutConstraint的类,如果是才会进行更新。所以,如果你是用XIB、StoryBoard拉线添加的约束或者是通过代码方式使用NSLayoutConstraint类添加的约束都无法在代码里用Masonry的 mas_updateConstraints 方法进行约束更新。Masonry更新约束的部分源码:
|
1
2
3
4
5
6
7
8
9
10
11
12
13
14
15
16
17
18
|
[objc] view plaincopy
- (MASLayoutConstraint *)layoutConstraintSimilarTo:(MASLayoutConstraint *)layoutConstraint {
// check if any constraints are the same apart from the only mutable property constant
// go through constraints in reverse as we do not want to match auto-resizing or interface builder constraints
// and they are likely to be added first.
for
(NSLayoutConstraint *existingConstraint
in
self.installedView.constraints.reverseObjectEnumerator) {
if
(![existingConstraint isKindOfClass:MASLayoutConstraint.class])
continue
;
if
(existingConstraint.firstItem != layoutConstraint.firstItem)
continue
;
if
(existingConstraint.secondItem != layoutConstraint.secondItem)
continue
;
if
(existingConstraint.firstAttribute != layoutConstraint.firstAttribute)
continue
;
if
(existingConstraint.secondAttribute != layoutConstraint.secondAttribute)
continue
;
if
(existingConstraint.relation != layoutConstraint.relation)
continue
;
if
(existingConstraint.multiplier != layoutConstraint.multiplier)
continue
;
if
(existingConstraint.priority != layoutConstraint.priority)
continue
;
return
(id)existingConstraint;
}
return
nil;
}
|
四、Masonry实现动画
Masonry的动画实现和NSLayoutConstraint类的动画实现基本一致,都是基于 layoutIfNeeded 方法。传统的 animation方法通过Masonry实现如下:
|
1
2
3
4
5
6
7
8
9
10
11
12
13
14
15
16
17
18
19
20
21
22
23
24
25
26
27
28
29
|
[objc] view plaincopy
[self.view setBackgroundColor:[UIColor redColor]];
//创建子view
UIView *subView = [[UIView alloc] init];
[subView setBackgroundColor:[UIColor blackColor]];
[self.view addSubview:subView];
//layout 子view
__weak __typeof(self)weakSelf = self;
[subView mas_makeConstraints:^(MASConstraintMaker *make) {
//子view的上边缘离父view的上边缘100个像素
make.top.equalTo(weakSelf.view).
with
.offset(100);
//子view的左边缘离父view的左边缘50个像素
make.left.equalTo(weakSelf.view).
with
.offset(50);
//子view的右边缘离父view的右边缘50个像素
make.right.equalTo(weakSelf.view).
with
.offset(-50);
//子view的高度为1
make.height.equalTo(@1);
}];
//先根据初始化添加的约束生成最初的frame并显示view
[self.view layoutIfNeeded];
//开始动画
[UIView animateWithDuration:3.0 animations:^{
[subView mas_updateConstraints:^(MASConstraintMaker *make) {
make.height.equalTo(@300);
}];
//更新约束 在某个时刻约束会被还原成frame使视图显示
[self.view layoutIfNeeded];
} completion:^(BOOL finished) {
}];
|


 8010
8010

 被折叠的 条评论
为什么被折叠?
被折叠的 条评论
为什么被折叠?
 到【灌水乐园】发言


