


项目基于 Qt + OpenCV 部署yolov5 添加了检测线程(主线程负责主窗口UI显示)避免拖动窗口时卡顿
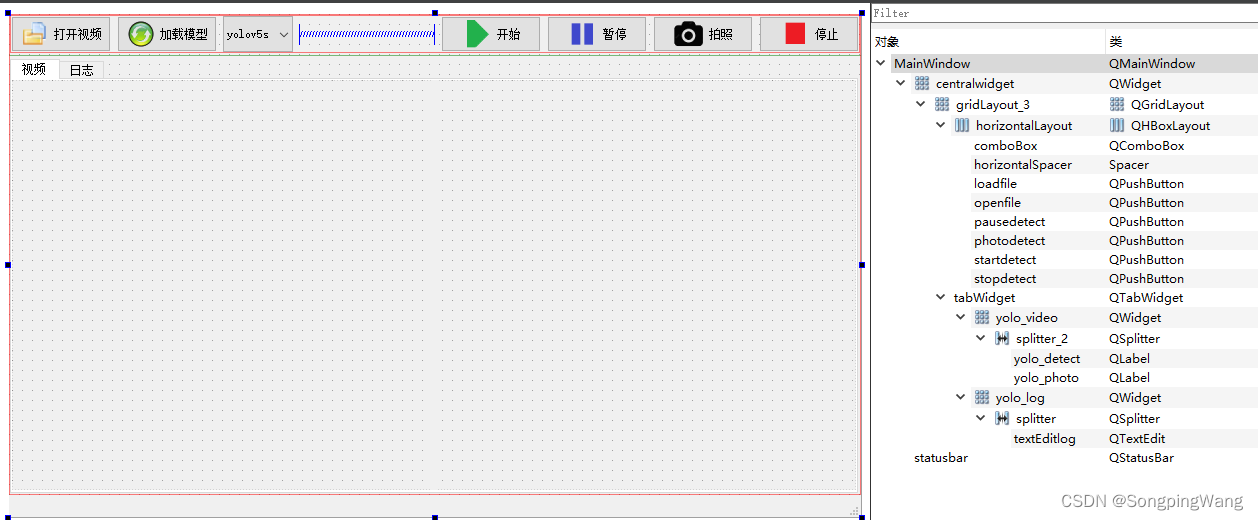
一、新建项目 UI设计
二、代码部分
mainwindow 类
mainwindow.hpp
#ifndef MAINWINDOW_H
#define MAINWINDOW_H
#include <QFileDialog>
#include <QFile>
#include <QMainWindow>
#include <QTimer>
#include <QImage>
#include <QPixmap>
#include <QDateTime>
#include <QMutex>
#include <QMutexLocker>
#include <QMimeDatabase>
#include <QProgressBar>
#include <iostream>
#include <chrono>
#include "detector.h"

QT_BEGIN_NAMESPACE
namespace Ui {
    class MainWindow; }
QT_END_NAMESPACE

class MainWindow : public QMainWindow
{

    Q_OBJECT

public:
    MainWindow(QWidget *parent = nullptr);
    ~MainWindow();

private slots:
    void recv_frame_all(long frame_all);
    void recv_frame_num(long frame_num);
    void on_openfile_clicked();

    void on_loadfile_clicked();

    void on_startdetect_clicked();

    void on_stopdetect_clicked();

    void on_comboBox_activated(const QString &arg1);

    void on_pausedetect_clicked();

    void on_photodetect_clicked();

signals:
    void send_imagefile_info(QString filename);
    void send_videofile_info(QString filename);
    void send_onnxfile_info(QString filename);
    void send_comboBox_info(QString arg);


private:
    Ui::MainWindow *ui;
    detector* detector_;
    QProgressBar * pProgressBar;
    QLabel *  pLabel;

    QString filename;
    bool IsDetect_ok = false;
    long m_frame_all = 0;
    long m_frame_num = 0;
};
#endif // MAINWINDOW_H
mainwindow.cpp
#include "mainwindow.h"
#include "ui_mainwindow.h"
#include <QTextEdit>


MainWindow::MainWindow(QWidget *parent)
    : QMainWindow(parent)
    , ui(new Ui::MainWindow)
{

    ui->setupUi(this);
    setWindowTitle(QStringLiteral("YoloV5目标检测软件"));

    ui->startdetect->setEnabled(false);
    ui->stopdetect->setEnabled(false);
    ui->pausedetect->setEnabled(false);
    ui->photodetect->setEnabled(false);
    ui->textEditlog->document()->setMaximumBlockCount(60);
    detector_ = new detector();

    pProgressBar = new QProgressBar();
    pLabel= new QLabel();
    ui->statusbar->addPermanentWidget(pLabel);
    ui->statusbar->addPermanentWidget(pProgressBar);

    connect(this, &MainWindow::send_imagefile_info, detector_, &detector::recv_imagefile);
    connect(this, &MainWindow::send_videofile_info, detector_, &detector::recv_videofile);
    connect(this, &MainWindow::send_onnxfile_info, detector_, &detector::recv_onnxfile);

    connect(detector_, &detector::send_init_info, this, [=](QString init_info){

        ui->textEditlog->append(init_info);
        });

    connect(detector_, &detector::send_loadModel_info, this, [=](QString model_info){

        ui->textEditlog->append(model_info);
        });

    connect(detector_, &detector::send_detect_info, this, [=](QString detect_info){

        ui->textEditlog->append(detect_info);
        });

    connect(detector_, &detector::send_video_info, this, [=](QString video_info)
最低0.47元/天 解锁文章


 2179
2179


 被折叠的 条评论
为什么被折叠?
被折叠的 条评论
为什么被折叠?
 到【灌水乐园】发言


