


Canvas基础篇:阴影属性详解
前言
在之前文章中,我们讲述了如何为Canvas图形设置线性渐变和径向渐变,本文将讲述如何为图形设置阴影效果。
阴影效果
Canvas通过shadowOffsetX、shadowOffsetY、shadowBlur和shadowColor这四个关键属性,为图形设置阴影效果。
shadowOffsetX
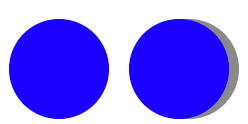
shadowOffsetX决定了阴影在水平方向(X 轴)上的偏移距离。当它的值为正数时,阴影会向右 “滑动”;值为负数时,阴影则向左 “滑动” 。我们来看一个简单的效果示例:
代码示例
<!DOCTYPE html>
<html>
  <head>
    <meta charset="utf-8">
    <meta name="viewport" content="width=device-width, initial-scale=1.0">
    <title>shadowOffsetX示例</title>
  </head>
  <body>
    <canvas id="canvas" width="400" height="400"></canvas>
    <script>
      const canvas = document.getElementById('canvas');
      const ctx = canvas.getContext('2d');
      // 无阴影的圆形
      ctx.beginPath();
      ctx.arc(100, 100, 50, 0, Math.PI * 2);
      ctx.fillStyle = 'blue';
      ctx.fill();
      ctx.closePath();

      // 设置shadowOffsetX为10
      ctx.shadowOffsetX = 10;
      // 设置阴影颜色
      ctx.shadowColor = 'rgba(0, 0, 0, 0.5)';

      // 有阴影的圆形
      ctx.beginPath();
      ctx.arc(220, 100, 50, 0, Math.PI * 2);
      ctx.fillStyle = 'blue';
      ctx.fill();
      ctx.closePath();
    </script>
  </body>
</html>
效果预览
上述代码绘制了两个圆形,一个是不带阴影的圆,一个是带有shadowOffsetX阴影的圆:
shadowOffsetY
shadowOffsetY决定了阴影在垂直方向(Y轴)上的偏移距离。当它的值为正数时,阴影会向下 “滑动”;值为负数时,阴影则向上 “滑动” 。我们来看一个简单的效果示例:
代码示例
<!DOCTYPE html>
<html>
  <head>
    <meta charset="utf-8">
    <meta name="viewport" content="width=device-width, initial-scale=1.0">
    <title>shadowOffsetY示例</title>
  </head>
  <body>
    <canvas id="canvas" width="400" height="400"></canvas>
    <script>
      const canvas = document.getElementById('canvas');
      const ctx = canvas.getContext('2d');
      // 无阴影的圆形
      ctx.beginPath();
      ctx.arc(100, 100, 50, 0, Math.PI * 2);
      ctx.fillStyle = 'blue';
      ctx.fill();
      ctx.closePath();

      // 设置shadowOffsetY为10
      ctx.shadowOffsetY = -10;
      // 设置阴影颜色
      ctx.shadowColor = 'rgba(0, 0, 0, 0.5)';

      // 有阴影的圆形
      ctx.beginPath();
      ctx.arc(220, 100, 50, 0, Math.PI * 2);
      ctx.fillStyle = 'blue';
      ctx.fill();
      ctx.closePath();
    </script>
  </body>
</html>
效果预览
上述代码绘制了两个圆形,一个是不带阴影的圆,一个是带有shadowOffsetY阴影的圆:

shadowBlur
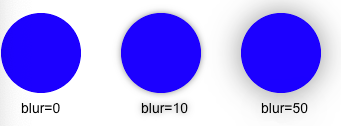
shadowBlur属性定义了阴影的模糊程度,数值越大,阴影边缘就越模糊,默认值为 0,此时阴影边缘清晰锐利;当设置为 10 时,阴影就会变得柔和朦胧:
代码示例
<!DOCTYPE html>
<html>
  <head>
    <meta charset="utf-8">
    <meta name="viewport" content="width=device-width, initial-scale=1.0">
    <title>shadowBlur示例</title>
  </head>
  <body>
    <canvas id="canvas" width="400" height="400"></canvas>
    <script>
      const canvas = document.getElementById('canvas');
      const ctx = canvas.getContext('2d');

      // 不同blur值的对比
      const blurValues = [0, 10, 50];
      blurValues.forEach((blur, index) => {
        ctx.shadowBlur = blur;
        ctx.shadowColor = 'rgba(0, 0, 0, 0.5)';

        ctx.beginPath();
        ctx.arc(100 + index * 120, 100, 40, 0, Math.PI * 2);
        ctx.fillStyle = 'blue';
        ctx.fill();
        ctx.closePath();

        // 显示当前blur值
        ctx.fillStyle = 'black';
        ctx.font = '14px Arial';
        ctx.fillText(`blur=${blur}`, 80 + index * 120, 160);
      });
    </script>
  </body>
</html>
效果预览
上述代码绘制了三个圆形,每个圆的shadowBlur各有不同:
shadowColor
shadowColor用于指定阴影的颜色,其属性值和fillStyle、strokeStyle取值一致,上述三个例子中我们都有用到shadowColor属性。如果不设置该属性,阴影将“不生效”,因为其默认值为一个完全透明的黑色。
综合示例
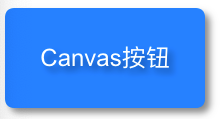
上面讲述了阴影相关的4个属性,现在我们实现一个综合示例:绘制一个带阴影效果的立体按钮:
效果预览
代码实现
<!DOCTYPE html>
<html>

  <head>
    <meta charset="UTF-8">
    <meta name="viewport" content="width=device-width, initial-scale=1.0">
    <title>立体按钮</title>
  </head>

  <body>
    <canvas id="canvas" width="400" height="400"></canvas>
    <script>
      const canvas = document.getElementById('canvas');
      const ctx = canvas.getContext('2d');

      // 设置阴影属性
      ctx.shadowOffsetX = 5;
      ctx.shadowOffsetY = 5;
      ctx.shadowBlur = 10;
      ctx.shadowColor = 'rgba(0, 0, 0, 0.5)';

      // 绘制按钮主体
      ctx.fillStyle = '#007BFF';
      ctx.roundRect = function(x, y, width, height, radius) {
        ctx.beginPath();
        ctx.moveTo(x + radius, y);
        ctx.lineTo(x + width - radius, y);
        ctx.quadraticCurveTo(x + width, y, x + width, y + radius);
        ctx.lineTo(x + width, y + height - radius);
        ctx.quadraticCurveTo(x + width, y + height, x + width - radius, y + height);
        ctx.lineTo(x + radius, y + height);
        ctx.quadraticCurveTo(x, y + height, x, y + height - radius);
        ctx.lineTo(x, y + radius);
        ctx.quadraticCurveTo(x, y, x + radius, y);
        ctx.closePath();
        return ctx;
      };
      ctx.roundRect(50, 50, 200, 100, 10).fill();

      // 绘制按钮文字
      ctx.fillStyle = 'white';
      ctx.font = '24px Arial';
      ctx.textAlign = 'center';
      ctx.textBaseline = 'middle';
      ctx.fillText('Canvas按钮', 150, 100);
    </script>
  </body>

</html>
结语
本文主要介绍了如何在图形中设置阴影,对于文章中错误的地方或者有任何问题,欢迎在评论区留言分享!


 被折叠的 条评论
为什么被折叠?
被折叠的 条评论
为什么被折叠?
 到【灌水乐园】发言


