


This guide walks you through the process of creating a Spring application connected to a MySQL Database (as opposed to an in-memory, embedded database, which most of the other guides and many sample applications use). It uses Spring Data JPA to access the database, but this is only one of many possible choices (for example, you could use plain Spring JDBC).
本指南将引导您完成创建连接到MySQL数据库的Spring应用程序的过程(与其它大多数指南和许多示例应用程序使用的内存中嵌入式数据库相反)。它使用Spring Data JPA访问数据库,但这只是许多可能的选择之一(例如,您可以使用纯Spring JDBC)
What You Will Build
你将建立什么
You will create a MySQL database, build a Spring application, and connect it to the newly created database.
您将创建一个MySQL数据库,构建一个Spring应用程序,并将其连接到新创建的数据库
| MySQL is licensed with the GPL, so any program binary that you distribute with it must use the GPL, too. See the GNU General Public Licence. | |
|---|---|
| MySQL已获得GPL的许可,因此随它分发的任何二进制程序文件也必须使用GPL。参见GNU通用公共许可证 |
What You Need
你需要什么
-
MySQL version 5.6 or better. If you have Docker installed, it might be useful to run the database as a container.
MySQL 5.6或更高版本。如果安装了Docker,将数据库作为容器运行可能会很有用
-
About 15 minutes
-
A favorite text editor or IDE
-
JDK 1.8 or later
-
You can also import the code straight into your IDE:
How to complete this guide
如何完成本指南
Like most Spring Getting Started guides, you can start from scratch and complete each step or you can bypass basic setup steps that are already familiar to you. Either way, you end up with working code.
像大多数Spring入门指南一样,您可以从头开始并完成每个步骤,也可以绕过您已经熟悉的基本设置步骤。无论哪种方式,您最终都可以使用工作代码
To start from scratch, move on to Starting with Spring Initializr.
要从头开始,请继续至从Spring Initializr开始
To skip the basics, do the following:
- Download and unzip the source repository for this guide, or clone it using Git:
git clone https://github.com/spring-guides/gs-accessing-data-mysql.git - cd into
gs-accessing-data-mysql/initial - Jump ahead to Create the Database.
When you finish, you can check your results against the code in gs-accessing-data-mysql/complete.
Starting with Spring Initializr
For all Spring applications, you should start with the Spring Initializr. The Initializr offers a fast way to pull in all the dependencies you need for an application and does a lot of the set up for you. This example needs the Spring Web Starter, Spring Data JPA, and MySQL Driver dependencies. The following image shows the Initializr set up for this sample project:
对于所有Spring应用程序,您应该从Spring Initializr开始。Initializr提供了一种快速的方法来提取应用程序所需的所有依赖关系,并为您完成了许多设置。此示例需要Spring Web Starter,Spring Data JPA和MySQL Driver依赖项。下图显示了此示例项目的Initializr设置:
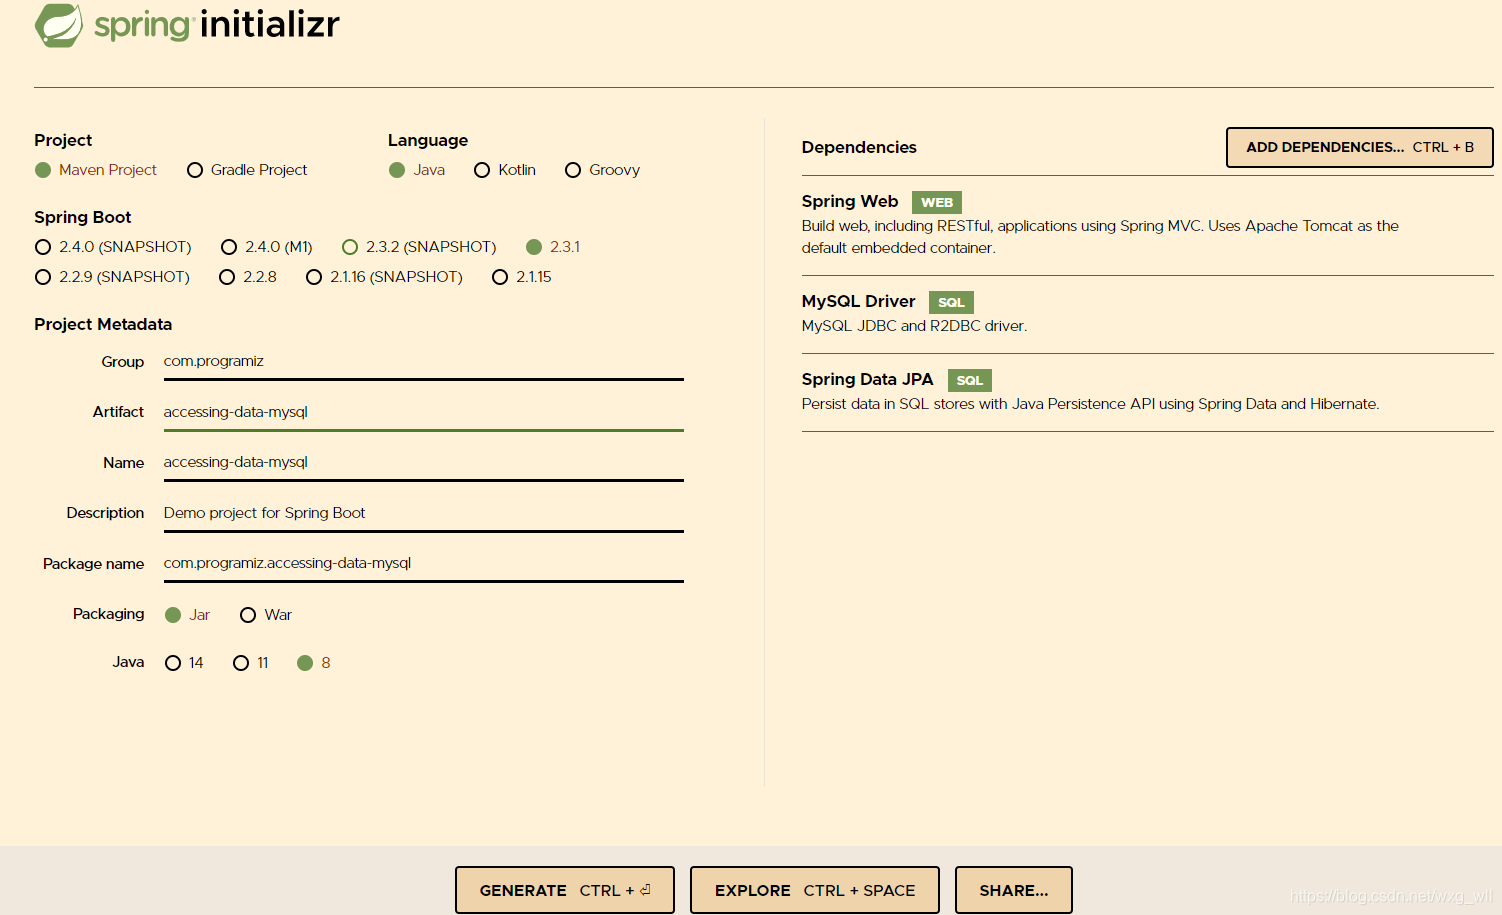
The preceding image shows the Initializr with Maven chosen as the build tool. You can also use Gradle. It also shows values of com.example and accessing-data-mysql as the Group and Artifact, respectively. You will use those values throughout the rest of this sample. | |
|---|---|
| 上图显示了选择Maven作为构建工具的Initializr。您也可以使用Gradle。它还将com.example和accessing-data-mysql的值分别显示为Group和Artifact。在本示例的其余部分中,将使用这些值。 |
The following listing shows the pom.xml file created when you choose Maven:
以下清单显示了选择Maven时创建的pom.xml文件:
<?xml version="1.0" encoding="UTF-8"?>
<project xmlns="http://maven.apache.org/POM/4.0.0" xmlns:xsi="http://www.w3.org/2001/XMLSchema-instance"
	xsi:schemaLocation="http://maven.apache.org/POM/4.0.0 https://maven.apache.org/xsd/maven-4.0.0.xsd">
	<modelVersion>4.0.0</modelVersion>
	<parent>
		<groupId>org.springframework.boot</groupId>
		<artifactId>spring-boot-starter-parent</artifactId>
		<version>2.3.1.RELEASE</version>
		<relativePath/> <!-- lookup parent from repository -->
	</parent>
	<groupId>com.programiz</groupId>
	<artifactId>accessing-data-mysql</artifactId>
	<version>0.0.1-SNAPSHOT</version>
	<name>accessing-data-mysql</name>
	<description>Demo project for Spring Boot</description>

	<properties>
		<java.version>1.8</java.version>
	</properties>

	<dependencies>
		<dependency>
			<groupId>org.springframework.boot</groupId>
			<artifactId>spring-boot-starter-data-jpa</artifactId>
		</dependency>
		<dependency>
			<groupId>org.springframework.boot</groupId>
			<artifactId>spring-boot-starter-web</artifactId>
		</dependency>

		<dependency>
			<groupId>mysql</groupId>
			<artifactId>mysql-connector-java</artifactId>
			<scope>runtime</scope>
		</dependency>
		<dependency>
			<groupId>org.springframework.boot</groupId>
			<artifactId>spring-boot-starter-test</artifactId>
			<scope>test</scope>
			<exclusions>
				<exclusion>
					<groupId>org.junit.vintage</groupId>
					<artifactId>junit-vintage-engine</artifactId>
				</exclusion>
			</exclusions>
		</dependency>
	</dependencies>

	<build>
		<plugins>
			<plugin>
				<groupId>org.springframework.boot</groupId>
				<artifactId>spring-boot-maven-plugin</artifactId>
			</plugin>
		</plugins>
	</build>

</project>
The following listing shows the build.gradle file created when you choose Gradle:
以下清单显示了选择Gradle时创建的build.gradle文件:
plugins {
	id 'org.springframework.boot' version '2.3.1.RELEASE'
	id 'io.spring.dependency-management' version '1.0.9.RELEASE'
	id 'java'
}

group = 'com.programiz'
version = '0.0.1-SNAPSHOT'
sourceCompatibility = '1.8'

repositories {
	mavenCentral()
}

dependencies {
	implementation 'org.springframework.boot:spring-boot-starter-data-jpa'
	implementation 'org.springframework.boot:spring-boot-starter-web'
	runtimeOnly 'mysql:mysql-connector-java'
	testImplementation('org.springframework.boot:spring-boot-starter-test') {
		exclude group: 'org.junit.vintage', module: 'junit-vintage-engine'
	}
}

test {
	useJUnitPlatform()
}
Create the Database
Open a terminal (command prompt in Microsoft Windows) and open a MySQL client as a user who can create new users.
For example, on a Linux system, use the following command;
$ sudo mysql --password
This connects to MySQL as root and allows access to the user from all hosts. This is not the recommended way for a production server.
它以root身份连接到MySQL,并允许所有主机访问用户。这不是生产服务器的推荐方法
To create a new database, run the following commands at the mysql prompt:
要创建新数据库,请在mysql提示符下运行以下命令:
mysql> create database db_example; -- Creates the new database
mysql> create user 'springuser'@'%' identified by 'ThePassword4!'; -- Creates the user
mysql> grant all on db_example.* to 'springuser'@'%'; -- Gives all privileges to the new user on the newly created database 为新创建的数据库上的新用户授予所有特权
Create the application.properties File
Spring Boot gives you defaults on all things. For example, the default database is H2. Consequently, when you want to use any other database, you must define the connection attributes in the application.properties file.
Spring Boot为您提供所有默认设置。例如,默认数据库为H2。因此,当您要使用任何其他数据库时,必须在application.properties文件中定义连接属性
Create a resource file called src/main/resources/application.properties, as the following listing shows:
创建一个名为src/main/resources/application.properties的资源文件,如下清单所示:
spring.jpa.hibernate.ddl-auto=update
spring.datasource.url=jdbc:mysql://${MYSQL_HOST:localhost}:3306/db_example?useSSL=false&serverTimezone=UTC&useLegacyDatetimeCode=false
spring.datasource.username=springuser
spring.datasource.password=ThePassword4!
Here, spring.jpa.hibernate.ddl-auto can be none, update, create, or create-drop. See the Hibernate documentation for details.
在这里,spring.jpa.hibernate.ddl-auto可以为none,update,create或create-drop。有关详细信息,请参见Hibernate文档
-
none: The default forMySQL. No change is made to the database structure.MySQL的默认设置。数据库结构未做任何更改
-
update: Hibernate changes the database according to the given entity structures.Hibernate根据给定的实体结构更改数据库
-
create: Creates the database every time but does not drop it on close.每次创建数据库,但不关闭数据库
-
create-drop: Creates the database and drops it whenSessionFactorycloses.创建数据库并在SessionFactory关闭时将其删除
You must begin with either create or update, because you do not yet have the database structure. After the first run, you can switch it to update or none, according to program requirements. Use update when you want to make some change to the database structure.
您必须从创建或更新开始,因为您还没有数据库结构。第一次运行后,您可以根据程序要求将其切换为更新或不更新。如果要对数据库结构进行一些更改,请使用update
The default for H2 and other embedded databases is create-drop. For other databases, such as MySQL, the default is none.
H2和其他嵌入式数据库的默认值为create-drop。对于其他数据库,例如MySQL,默认值为none
It is a good security practice to, after your database is in a production state, set this to none, revoke all privileges from the MySQL user connected to the Spring application, and give the MySQL user only SELECT, UPDATE, INSERT, and DELETE. You can read more about this at the end of this guide. | |
|---|---|
| 在数据库处于生产状态后,将其设置为none,撤销连接到Spring应用程序的MySQL用户的所有特权,并仅给MySQL用户SELECT,UPDATE,INSERT和DELETE,这是一种良好的安全实践。 |
Create the @Entity Model
You need to create the entity model, as the following listing (in src/main/java/com/programiz/accessingdatamysql/User.java) shows:
您需要创建实体模型,如以下清单(在src/main/java/com/programiz/accessingdatamysql/User.java中)所示:
package com.programiz.accessingdatamysql;

import javax.persistence.Entity;
import javax.persistence.GeneratedValue;
import javax.persistence.GenerationType;
import javax.persistence.Id;

// This tells Hibernate to make a table out of this class
// 这告诉Hibernate用该类制作一张表
@Entity
public class User {
    @Id
    @GeneratedValue(strategy= GenerationType.AUTO)
    private Integer id;

    private String name;

    private String email;

    public Integer getId() {
        return id;
    }

    public void setId(Integer id) {
        this.id = id;
    }

    public String getName() {
        return name;
    }

    public void setName(String name) {
        this.name = name;
    }

    public String getEmail() {
        return email;
    }

    public void setEmail(String email) {
        this.email = email;
    }
}
Hibernate automatically translates the entity into a table.
Hibernate自动将实体转换为表
Create the Repository
创建存储库
You need to create the repository that holds user records, as the following listing (in src/main/java/com/programiz/accessingdatamysql/UserRepository.java) shows:
您需要创建存储用户记录的存储库,如以下清单(在src/main/java/com/programiz/accessingdatamysql/UserRepository.java中)所示:
package com.programiz.accessingdatamysql;

import org.springframework.data.repository.CrudRepository;

public interface UserRepository extends CrudRepository<User, Integer> {

}
Spring automatically implements this repository interface in a bean that has the same name (with a change in the case — it is called userRepository).
Spring在具有相同名称的Bean中自动实现此存储库接口(大小写有所变化,称为userRepository)
Create a Controller
You need to create a controller to handle HTTP requests to your application, as the following listing (in src/main/java/com/programiz/accessingdatamysql/MainController.java) shows:
您需要创建一个控制器来处理应用程序的HTTP请求,如以下清单(在src/main/java/com/programiz/accessingdatamysql/MainController.java中)所示:
package com.programiz.accessingdatamysql;

import org.springframework.beans.factory.annotation.Autowired;
import org.springframework.stereotype.Controller;
import org.springframework.web.bind.annotation.*;

// This means that this class is a Controller
// 这意味着该类是一个控制器
// This mean URL's start with /demo (after application path)
// 这意味着URL以/demo开头
@Controller
@RequestMapping(path="/demo")
public class MainController {
    // This means to get the bean called userRepository
    // 这意味着获得名为userRepository的bean
    // Which is auto-generated by spring, we will use it to handle the data
    // 这是由Spring自动生成的,我们将使用它来处理数据
    @Autowired
    private UserRepository userRepository;

    // Map ONLY POST Requests
    // 仅限Map发布请求
    @PostMapping(path="/add")
    public @ResponseBody
    String addNewUser (@RequestParam String name, @RequestParam String email) {
        // @ResponseBody means the returned String is the response, not a view name
        // @ResponseBody表示返回的字符串是响应,而不是视图名称
        // @RequestParam means it is a parameter from the GET or POST request
        // @RequestParam表示它是GET或POST请求中的参数
        User n = new User();
        n.setName(name);
        n.setEmail(email);
        userRepository.save(n);

        return "Saved";
    }

    @GetMapping(path="/all")
    public @ResponseBody Iterable<User> getAllUsers() {
        // This returns a JSON or XML with the users
        return userRepository.findAll();
    }
}
The preceding example explicitly specifies POST and GET for the two endpoints. By default, @RequestMapping maps all HTTP operations.
前面的示例为两个端点显式指定了POST和GET。默认情况下,@RequestMapping映射所有HTTP操作
Create an Application Class
创建一个应用程序类
Spring Initializr creates a simple class for the application. The following listing shows the class that Initializr created for this example (in src/main/java/com/example/accessingdatamysql/AccessingDataMysqlApplication.java):
创建一个应用程序类Spring Initializr为应用程序创建一个简单的类。以下清单显示了Initializr为此示例创建的类(在src/main/java/com/example/ accessingdatamysql/AccessingDataMysqlApplication.java中)
package com.programiz.accessingdatamysql;

import org.springframework.boot.SpringApplication;
import org.springframework.boot.autoconfigure.SpringBootApplication;

@SpringBootApplication
public class AccessingDataMysqlApplication {

    public static void main(String[] args) {

        SpringApplication.run(AccessingDataMysqlApplication.class, args);
    }
}
For this example, you need not modify the AccessingDataMysqlApplication class.:
@SpringBootApplication is a convenience annotation that adds all of the following:
对于此示例,您无需修改AccessingDataMysqlApplication类。@SpringBootApplication是一个方便注释,它添加了以下所有内容:
-
@Configuration: Tags the class as a source of bean definitions for the application context.将类标记为应用程序上下文的Bean定义的源
-
@EnableAutoConfiguration: Tells Spring Boot to start adding beans based on classpath settings, other beans, and various property settings. For example, ifspring-webmvcis on the classpath, this annotation flags the application as a web application and activates key behaviors, such as setting up aDispatcherServlet.告诉Spring Boot根据类路径设置,其它bean和各种属性设置开始添加bean。例如,如果spring-webmvc在类路径上,则此注解将应用程序标记为Web应用程序并激活诸如设置DispatcherServlet之类的关键行为
-
@ComponentScan: Tells Spring to look for other components, configurations, and services in thecom/examplepackage, letting it find the controllers.告诉Spring在com/programiz包中寻找其它组件,配置和服务,让它找到控制器
The main() method uses Spring Boot’s SpringApplication.run() method to launch an application. Did you notice that there was not a single line of XML? There is no web.xml file, either. This web application is 100% pure Java and you did not have to deal with configuring any plumbing or infrastructure.
main()方法使用Spring Boot的SpringApplication.run()方法启动应用程序。您是否注意到没有一行XML?也没有web.xml文件。该Web应用程序是100%纯Java,您无需处理任何管道或基础架构
Build an executable JAR
You can run the application from the command line with Gradle or Maven. You can also build a single executable JAR file that contains all the necessary dependencies, classes, and resources and run that. Building an executable jar makes it easy to ship, version, and deploy the service as an application throughout the development lifecycle, across different environments, and so forth.
您可以使用Gradle或Maven从命令行运行该应用程序。您还可以构建一个包含所有必需的依赖项,类和资源的可执行JAR文件,然后运行该文件。生成可执行jar使得在整个开发生命周期中,跨不同环境等等的情况下,可以轻松地将服务作为应用程序进行发行,版本化和部署
If you use Gradle, you can run the application by using ./gradlew bootRun. Alternatively, you can build the JAR file by using ./gradlew build and then run the JAR file, as follows:
如果使用Gradle,则可以使用./gradlew bootRun运行该应用程序。或者,可以使用./gradlew build来构建JAR文件,然后运行JAR文件,如下所示
java -jar build/libs/gs-accessing-data-mysql-0.1.0.jar
If you use Maven, you can run the application by using ./mvnw spring-boot:run. Alternatively, you can build the JAR file with ./mvnw clean package and then run the JAR file, as follows:
如果使用Maven,则可以使用./mvnw spring-boot:run运行该应用程序。或者,您可以使用./mvnw clean程序包构建JAR文件,然后运行JAR文件,如下所示
java -jar target/gs-accessing-data-mysql-0.1.0.jar
| The steps described here create a runnable JAR. You can also build a classic WAR file. | |
|---|---|
| 此处描述的步骤将创建可运行的JAR。您也可以构建经典的WAR文件 |
When you run the application, logging output is displayed. The service should be up and running within a few seconds.
运行应用程序时,将显示日志记录输出。该服务应在几秒钟内启动并运行
Test the Application
Now that the application is running, you can test it by using curl or some similar tool. You have two HTTP endpoints that you can test:
现在该应用程序正在运行,您可以使用curl或其它类似工具对其进行测试。您有两个可以测试的HTTP端点
GET localhost:8080/demo/all: Gets all data. POST localhost:8080/demo/add: Adds one user to the data.
The following curl command adds a user:
$ curl localhost:8080/demo/add -d name=First -d email=someemail@someemailprovider.comCOPY
The reply should be as follows:
Saved
The following command shows all the users:
$ curl localhost:8080/demo/all
The reply should be as follows:
[{"id":1,"name":"First","email":"someemail@someemailprovider.com"}]
Make Some Security Changes
进行一些安全更改
When you are on a production environment, you may be exposed to SQL injection attacks. A hacker may inject DROP TABLE or any other destructive SQL commands. So, as a security practice, you should make some changes to your database before you expose the application to your users.
在生产环境中,您可能会遭受SQL注入攻击。黑客可能会注入DROP TABLE或任何其它破坏性的SQL命令。因此,作为安全实践,您应该在对用户公开应用程序之前对数据库进行一些更改
The following command revokes all the privileges from the user associated with the Spring application:
以下命令撤销与Spring应用程序关联的用户的所有特权:
mysql> revoke all on db_example.* from 'springuser'@'%';
Now the Spring application cannot do anything in the database.
现在,Spring应用程序无法在数据库中执行任何操作
The application must have some privileges, so use the following command to grant the minimum privileges the application needs:
应用程序必须具有某些特权,因此请使用以下命令来授予应用程序所需的最低特权:
mysql> grant select, insert, delete, update on db_example.* to 'springuser'@'%';
Removing all privileges and granting some privileges gives your Spring application the privileges necessary to make changes to only the data of the database and not the structure (schema).
删除所有特权并授予一些特权将使您的Spring应用程序具有仅更改数据库数据而不更改结构(架构)所需的特权
When you want to make changes to the database:
当您要更改数据库时:
-
Regrant permissions.
授予权限
-
Change the
spring.jpa.hibernate.ddl-autotoupdate. -
Re-run your applications.
Then repeat the two commands shown here to make your application safe for production use again. Better still, use a dedicated migration tool, such as Flyway or Liquibase.
然后重复此处显示的两个命令,以确保您的应用程序可以安全地再次用于生产。更好的是,使用专用的迁移工具,例如Flyway或Liquibase


 1293
1293


 被折叠的 条评论
为什么被折叠?
被折叠的 条评论
为什么被折叠?
 到【灌水乐园】发言


