


前言
本系列文章是本人HarmonyOS期末项目,主要设计项目为购物应用App,第一章为登录界面的开发。
一、运用的装饰器与组件
在本次开发中运用了@Extend装饰器,用于添加公共样式函数,主要运用了Text()、TextInput()、Button()等组件,此外还运用@ohos.router进行页面路由,实现了由登录界面进入主页的操作。
二、具体运用
1.使用@Extend装饰器
代码如下:
//添加公共的样式函数
//@Extend装饰器:扩展组件样式
//@Extend装饰器(组件描述名称)function 样式名称(){}
@Extend(TextInput) function inputStyle() {
  .placeholderColor(0x999999)
  .maxLength(6)   //最大长度
  .padding(12)
  .margin(10)
}

@Extend(Button) function btnWidthStyle() {
  .width(80)
  .height(80)
}
TextInput({placeholder:'请输入用户名'})
          .inputStyle()
          .onChange(data => {
            //输入值发生变化时,触发回调,data代表输入的内容
            this.user = data;
            console.info('user: '+ data)
          })

TextInput({placeholder:'请输入密码'})
          .type(InputType.Password)   //输入框的类型
          .inputStyle()  //公共样式函数
          .onChange(data => {
            //输入值发生变化时,触发回调,data代表输入的内容
            this.password = data;
            console.info('user: '+ data)
          })
Row(){
          ForEach(this.otherData, (item: string) => {
            Button(item,{type: ButtonType.Circle, stateEffect: true})
              .btnWidthStyle()  //公共样式函数
          }, (item: string) => JSON.stringify(item))
        }
        .width('100%')
        .justifyContent(FlexAlign.SpaceAround)
        .margin({top: 20})
2.实现登录界面的页面路由
代码如下:
//导入页面路由模块
import router from '@ohos.router';
//登录按钮
        Button('登录',{type: ButtonType.Capsule, stateEffect: true})
          .width('90%')
          .margin(20)
          .onClick(() => {
            //判断
            if(this.user=='' || this.password==''){
              //不能跳转,同时给出弹窗提示
              promptAction.showToast({
                message: '用户名或密码不能为空',
                duration: 3000,  //持续的时间
                bottom: 60
              })
            }else {
              //路由跳转
              router.pushUrl({
                url: 'pages/MainPage'
              }).catch((error: Error) => {
                //错误提示
              })
            }
          })
该处使用的url地址源为main.pages.json。
3.错误登录提示
在登录页添加了未输入账号、密码不能正常登录的提示,运用了@ohos.promptAction弹窗组件,使用 if 语句进行判断。
代码如下:
//ohos OpenHarmonyOS
//弹窗
import promptAction from '@ohos.promptAction';
//判断
            if(this.user=='' || this.password==''){
              //不能跳转,同时给出弹窗提示
              promptAction.showToast({
                message: '用户名或密码不能为空',
                duration: 3000,  //持续的时间
                bottom: 60
              })
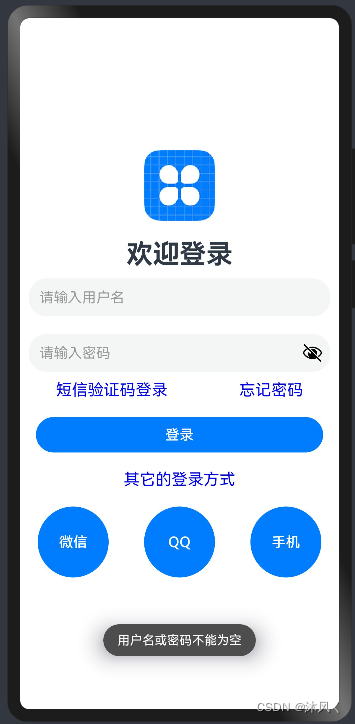
效果展示:
登录页代码:
//导入页面路由模块
import router from '@ohos.router';
//ohos OpenHarmonyOS
//弹窗
import promptAction from '@ohos.promptAction';
@Entry
@Component
struct Login {
  @State message: string = '欢迎登录';
  @State user: string = '';   //用户名
  @State password: string = '';   //密码
  private otherData: Array<string> =[
    "微信", "QQ", "手机"
  ]

  build() {
    Row() {
      Column() {
        //LOGO
        Image($r('app.media.icon'))
          .width(80)
          .height(80)
          .margin({bottom: 20})
        //欢迎登录
        Text(this.message)
          .fontSize('30fp')
          .fontWeight(FontWeight.Bold)
        //用户名和密码
        TextInput({placeholder:'请输入用户名'})
          .inputStyle()
          .onChange(data => {
            //输入值发生变化时,触发回调,data代表输入的内容
            this.user = data;
            console.info('user: '+ data)
          })

        TextInput({placeholder:'请输入密码'})
          .type(InputType.Password)   //输入框的类型
          .inputStyle()  //公共样式函数
          .onChange(data => {
            //输入值发生变化时,触发回调,data代表输入的内容
            this.password = data;
            console.info('user: '+ data)
          })
        //文字提示
        Row(){
          Text('短信验证码登录')
            .fontSize('18fp')
            .fontColor(Color.Blue)
          Text('忘记密码')
            .fontSize('18fp')
            .fontColor(Color.Blue)
        }
        .width('100%')
        .justifyContent(FlexAlign.SpaceAround)

        //登录按钮
        Button('登录',{type: ButtonType.Capsule, stateEffect: true})
          .width('90%')
          .margin(20)
          .onClick(() => {
            //判断
            if(this.user=='' || this.password==''){
              //不能跳转,同时给出弹窗提示
              promptAction.showToast({
                message: '用户名或密码不能为空',
                duration: 3000,  //持续的时间
                bottom: 60
              })
            }else {
              //路由跳转
              router.pushUrl({
                url: 'pages/MainPage'
              }).catch((error: Error) => {
                //错误提示
              })
            }
          })

        //其它
        Row(){
          Text('其它的登录方式')
            .fontSize('18fp')
            .fontColor(Color.Blue)
        }
        .width('100%')
        .justifyContent(FlexAlign.Center)

        Row(){
          ForEach(this.otherData, (item: string) => {
            Button(item,{type: ButtonType.Circle, stateEffect: true})
              .btnWidthStyle()  //公共样式函数
          }, (item: string) => JSON.stringify(item))
        }
        .width('100%')
        .justifyContent(FlexAlign.SpaceAround)
        .margin({top: 20})

      }
      .width('100%')
    }
    .height('100%')
  }
}

//添加公共的样式函数
//@Extend装饰器:扩展组件样式
//@Extend装饰器(组件描述名称)function 样式名称(){}
@Extend(TextInput) function inputStyle() {
  .placeholderColor(0x999999)
  .maxLength(6)   //最大长度
  .padding(12)
  .margin(10)
}

@Extend(Button) function btnWidthStyle() {
  .width(80)
  .height(80)
}
总结
以上就是今天要讲的内容,本文简单介绍了登录页的开发,下一章继续介绍App主页的整体架构设计。


 12万+
12万+

 被折叠的 条评论
为什么被折叠?
被折叠的 条评论
为什么被折叠?
 到【灌水乐园】发言


