简介
看段Android官方的简介
Class Overview
Displays text to the user and optionally allows them to edit it. A TextView is a complete text editor, however the basic class is configured to not allow editing; see EditText for a subclass that configures the text view for editing.
To allow users to copy some or all of the TextView’s value and paste it somewhere else, set the XML attribute android:textIsSelectable to “true” or call setTextIsSelectable(true). The textIsSelectable flag allows users to make selection gestures in the TextView, which in turn triggers the system’s built-in copy/paste controls.
TextView主要用于给用户展示文字,并且让用户随意的可以对文字进行编辑。但是普通的TextView是不允许用来编辑的,只有EditText才可以。
如果在XML中设置了android:textIsSelectable 或者在Java代码中调用了setTextIsSelectable(true)方法,就可以允许对TextView的部分或者全部文字进行复制,然后粘贴到其他地方。textIsSelectable 标签是允许用户在TextView上使用选择手势。
顺便提下,大家如果想看API文档的话,可以在
file:///E:/AndroidEnvironment/SDK/docs/reference/android/widget/TextView.html
你安装SDK的目录下/docs/reference/android/widget/TextView.html找到你想要查看控件的API
分析思路
一般自定义view都需要满足2个条件,展示我们期望的UI,正确传递或者接收处理点击或者触摸事件。
所以对于TextView的分析也从这三个地方展开
绘制过程
onMeasure()
onLayout()
onDraw()事件接收处理
由于TextView继承于View,所以主要分析onTouchEvent()方法就好了
一些和TextView有关的类如何实现,比如Spans,Layout,接收输入的InputConnection
本文基于Android SDK API-19的基础上分析
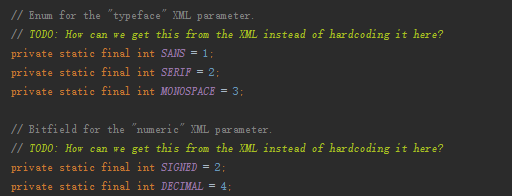
在分析之前,我们先来看个小彩蛋
不知道这个//TODO是某个哥们自问自答呢,还是别人在对他的代码review的时候给注上的
再分析之前,顺便抛出一个问题供大家思考下,maxEms这个属性到底是用来做什么的?
网上的答案五花八门,在下面的源码中我们可以一窥究竟。
绘制过程
首先来看onMeasure()部分代码
@Override
    protected void onMeasure(int widthMeasureSpec, int heightMeasureSpec) {
    //首先接收到父容器传递过来的MeasureSpec
    //关于MeasureSpec是如果计算的,可以查看之前的博文
    //[LinearLayout源码解析](http://blog.csdn.net/wz249863091/article/details/51702980)
        int widthMode = MeasureSpec.getMode(widthMeasureSpec);
        int heightMode = MeasureSpec.getMode(heightMeasureSpec);
        int widthSize = MeasureSpec.getSize(widthMeasureSpec);
        int heightSize = MeasureSpec.getSize(heightMeasureSpec);

        int width;
        int height;

        //这里解释下什么叫作boring
        //A BoringLayout is a very simple Layout implementation for text that
        //fits on a single line and is all left-to-right characters.
        //boring就是指布局所用的文本里面不包含任何Span,所有的文本方向都是从左到右的布局,
        //并且仅需一行就能显示完全的布局
        //这里将TextView和Hint的boring初始化
        BoringLayout.Metrics boring = UNKNOWN_BORING;
        BoringLayout.Metrics hintBoring = UNKNOWN_BORING;

        //获得文字的排序方式。一共有6种
        //FIRSTSTRONG_RTL,FIRSTSTRONG_LTR Unicode双向算法
        //ANYRTL_LTR
        //LTR,RTL 左到右或者右到左排序
        //LOCALE
        //first strong算法 有兴趣的同学可以自行研究下,一般情况下都是左到右排序
        if (mTextDir == null) {
            mTextDir = getTextDirectionHeuristic();
        }

        int des = -1;
        boolean fromexisting = false;

        //如果宽度是精确模式了,那就那父容器给的宽度当作当前TextView的宽度
        if (widthMode == MeasureSpec.EXACTLY) {
            // Parent has told us how big to be. So be it.
            width = widthSize;
        } else {
            if (mLayout != null && mEllipsize == null) {
            //首先计算下期望值,如果行数大于1就返回-1,否则返回单行宽度
            //具体代码贴在下面
                des = desired(mLayout);
            }

            //如果小于0,即行数大于1行,就去判断是否是boring
            //isBoring()这个方法也在下面有详细分析,大家可以阅读后
            //再回过头来看看
            if (des < 0) {
                boring = BoringLayout.isBoring(mTransformed, mTextPaint, mTextDir, mBoring);
                //阅读过下面的方法,就知道boring是一个Metrics矩阵,
                //包含了文本样式 width, ascent, and descen等
                if (boring != null) {
                    mBoring = boring;
                }
            } else {
                fromexisting = true;
            }

            //再次判断boring是否为null
            //这里有2种情况会为null
            //1.des>0,即Textview只显示一行文字,就不会去计算boring的值了
            //2.Textview包含的内容不是boring的,多行,有缩进或者包含spann
            if (boring == null || boring == UNKNOWN_BORING) {
                //如果是多行文字的
                if (des < 0) {
                    des = (int) FloatMath.ceil(Layout.getDesiredWidth(mTransformed, mTextPaint));
                }
                width = des;
            } else {
            //如果是boring模式的就很简单了,把boring刚测量得到的width赋给TextView
            //即文字的宽度
                width = boring.width;
            }

            //这里就是加上Drawable的宽度
            final Drawables dr = mDrawables;
            if (dr != null) {
                width = Math.max(width, dr.mDrawableWidthTop);
                width = Math.max(width, dr.mDrawableWidthBottom);
            }

            //这里会再计算一次hint的宽度,流程和上面的一模一样,就不再重复了
            if (mHint != null) {
                int hintDes = -1;
                int hintWidth;

                if (mHintLayout != null && mEllipsize == null) {
                    hintDes = desired(mHintLayout);
                }

                if (hintDes < 0) {
                    hintBoring = BoringLayout.isBoring(mHint, mTextPaint, mTextDir, mHintBoring);
                    if (hintBoring != null) {
                        mHintBoring = hintBoring;
                    }
                }

                if (hintBoring == null || hintBoring == UNKNOWN_BORING) {
                    if (hintDes < 0) {
                        hintDes = (int) FloatMath.ceil(Layout.getDesiredWidth(mHint, mTextPaint));
                    }
                    hintWidth = hintDes;
                } else {
                    hintWidth = hintBoring.width;
                }

                if (hintWidth > width) {
                    width = hintWidth;
                }
            }

            //这里再加上padding的值
            //顺便说一句,padding的值是在子view里自己算的
            //margin的值是在父容器里算的
            //在自定义view和viewgroup的时候,千万注意
            //width += getCompoundPaddingLeft() + getCompoundPaddingRight();

            //在这,就能解答之前的疑问,EMS这个属性到底是干嘛的
            //如果我们设置了maxEms这个属性
            //public void setMaxEms(int maxems) {

           // mMaxWidth = maxems;
            //mMaxWidthMode = EMS;

            //requestLayout();
            //invalidate();
                //}
            //mMaxWidth的值就是EMS的值
            //如果设置了maxLength,那么mMaxWidth的值就是maxWidth的值
            //然后再来看如果是EMS模式
            //Math.min(width, mMa


 最低0.47元/天 解锁文章


 372
372

 被折叠的 条评论
为什么被折叠?


