


Elasticsearch(一)
初始elasticsearch
什么是elasticsearch
elasticsearch是一款非常强大的开源搜索引擎,可以帮助我们从海量数据中快速查找到需要的内容
elasticsearch结合kibana、Logstash、Beats,也就是elastic stack(ELK)。被广泛应用在日志数据分析、实时监控等领域。
elasticsearch是elastic stack的核心,负责存储、搜索、分析数据
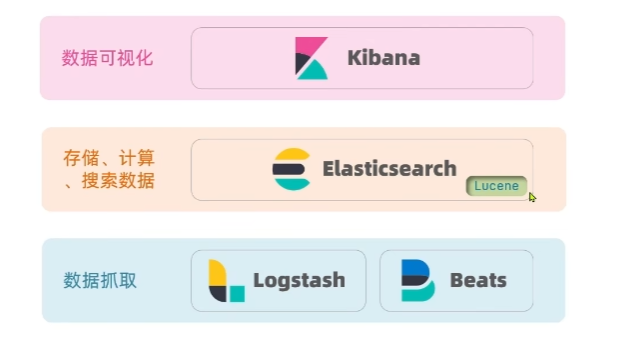
Lucene是一个Java语言的搜索引擎类库:https://lucene.apache.org/
优势:
- 易扩展
- 高性能(基于倒排索引)
缺点:
- 只限于Java语言开发
- 学习路线陡峭
- 不支持水平扩展
Elasticsearch:https://www.elastic.co/cn/
相比与lucene,elasticsearch具备下列优势:
- 支持分布式,可水平扩展
- 提供Restful接口,可被任何语言调用
搜索引擎技术排名:
- Elasticsearch:开源分布式搜索引擎
- Splunk:商业项目
- Solr:Apache的开源搜索引擎
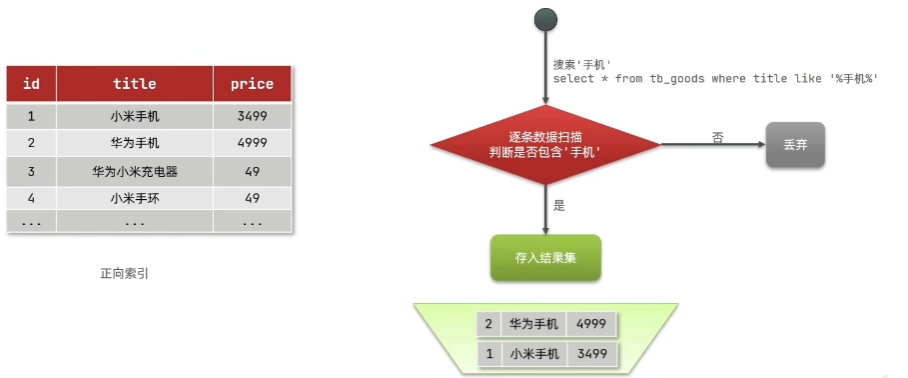
正向索引和倒排索引
传统数据库采用正向索引,例如给下表中创建id索引:
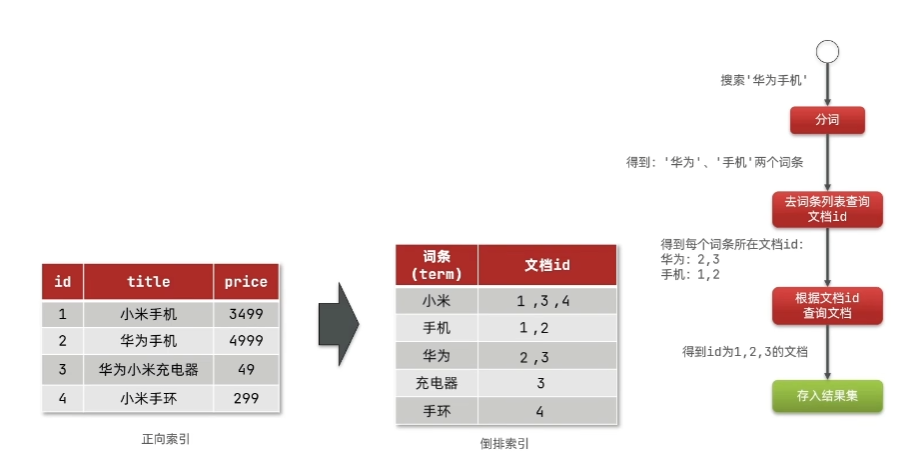
elasticsearch采用倒排索引:
- 文档:每条数据就是一个文档
- 词条:文档按照语义分成词语
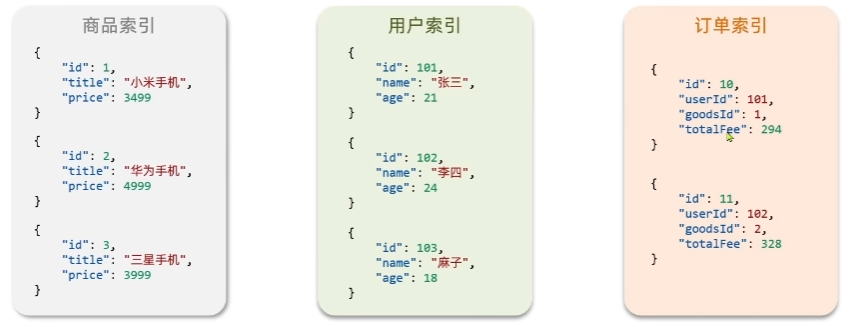
文档
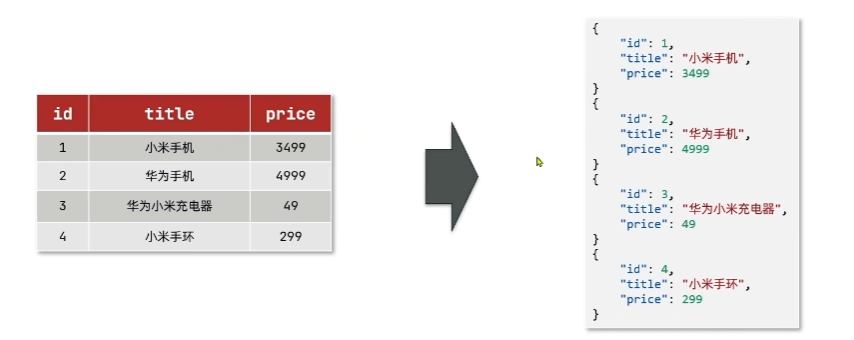
elasticsearch是面向文档存储的,可以是数据库中的一条商品数据,一个订单信息
文档数据会被序列化为json格式后存储在elasticsearch中
索引
索引:相同类型的文档的集合
映射:索引中文案的字段约束信息,类似于表的结构约束
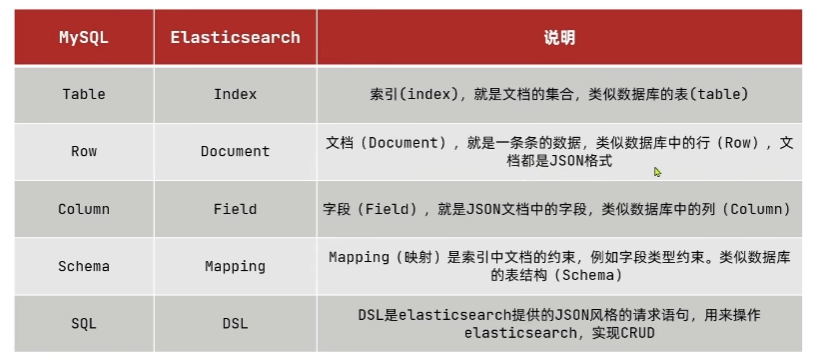
概念对比
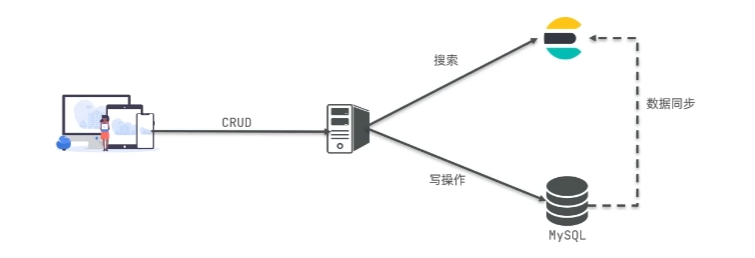
架构
Mysql:擅长事务类型操作,可以确保数据的安全和一致性
Elasticsearch:擅长海量数据的搜索、分析、计算
安装elasticsearch、kibana
1.部署单点es
1.1.创建网络
因为我们还需要部署kibana容器,因此需要让es和kibana容器互联。这里先创建一个网络:
docker network create es-net
1.2.加载镜像
这里我们采用elasticsearch的7.12.1版本的镜像,这个镜像体积非常大,接近1G。不建议大家自己pull。
课前资料提供了镜像的tar包:
大家将其上传到虚拟机中,然后运行命令加载即可:
# 导入数据
docker load -i es.tar
同理还有kibana的tar包也需要这样做。
1.3.运行
运行docker命令,部署单点es:
docker run -d \
    --name es \
    -e "ES_JAVA_OPTS=-Xms512m -Xmx512m" \
    -e "discovery.type=single-node" \
    -v es-data:/usr/share/elasticsearch/data \
    -v es-plugins:/usr/share/elasticsearch/plugins \
    --privileged \
    --network es-net \
    -p 9200:9200 \
    -p 9300:9300 \
elasticsearch:7.12.1
命令解释:
- -e “cluster.name=es-docker-cluster”:设置集群名称
- -e “http.host=0.0.0.0”:监听的地址,可以外网访问
- -e “ES_JAVA_OPTS=-Xms512m -Xmx512m”:内存大小
- -e “discovery.type=single-node”:非集群模式
- -v es-data:/usr/share/elasticsearch/data:挂载逻辑卷,绑定es的数据目录
- -v es-logs:/usr/share/elasticsearch/logs:挂载逻辑卷,绑定es的日志目录
- -v es-plugins:/usr/share/elasticsearch/plugins:挂载逻辑卷,绑定es的插件目录
- –privileged:授予逻辑卷访问权
- –network es-net :加入一个名为es-net的网络中
- -p 9200:9200:端口映射配置
在浏览器中输入:http://192.168.72.133:9200 即可看到elasticsearch的响应结果:
2.部署kibana
kibana可以给我们提供一个elasticsearch的可视化界面,便于我们学习。
2.1.部署
运行docker命令,部署kibana
docker run -d \
--name kibana \
-e ELASTICSEARCH_HOSTS=http://es:9200 \
--network=es-net \
-p 5601:5601  \
kibana:7.12.1
- –network es-net :加入一个名为es-net的网络中,与elasticsearch在同一个网络中
- -e ELASTICSEARCH_HOSTS=http://es:9200":设置elasticsearch的地址,因为kibana已经与elasticsearch在一个网络,因此可以用容器名直接访问elasticsearch
- -p 5601:5601:端口映射配置
kibana启动一般比较慢,需要多等待一会,可以通过命令:
docker logs -f kibana
查看运行日志,当查看到下面的日志,说明成功:
此时,在浏览器输入地址访问:http://192.168.72.133:5601,即可看到结果
2.2.DevTools
kibana中提供了一个DevTools界面:
这个界面中可以编写DSL来操作elasticsearch。并且对DSL语句有自动补全功能。
3.安装IK分词器
官网:https://github.com/medcl/elasticsearch-analysis-ik
3.1.在线安装ik插件(较慢)
# 进入容器内部
docker exec -it elasticsearch /bin/bash

# 在线下载并安装
./bin/elasticsearch-plugin  install https://github.com/medcl/elasticsearch-analysis-ik/releases/download/v7.12.1/elasticsearch-analysis-ik-7.12.1.zip

#退出
exit
#重启容器
docker restart elasticsearch
3.2.离线安装ik插件(推荐)
1)查看数据卷目录
安装插件需要知道elasticsearch的plugins目录位置,而我们用了数据卷挂载,因此需要查看elasticsearch的数据卷目录,通过下面命令查看:
docker volume inspect es-plugins
显示结果:
[
    {
        "CreatedAt": "2022-05-06T10:06:34+08:00",
        "Driver": "local",
        "Labels": null,
        "Mountpoint": "/var/lib/docker/volumes/es-plugins/_data",
        "Name": "es-plugins",
        "Options": null,
        "Scope": "local"
    }
]
说明plugins目录被挂载到了:/var/lib/docker/volumes/es-plugins/_data这个目录中。
2)解压缩分词器安装包
下面我们需要把课前资料中的ik分词器解压缩,重命名为ik
3)上传到es容器的插件数据卷中
也就是/var/lib/docker/volumes/es-plugins/_data:
4)重启容器
# 4、重启容器
docker restart es
# 查看es日志
docker logs -f es
5)测试:
IK分词器包含两种模式:
- ik_smart:最少切分
- ik_max_word:最细切分
POST /_analyze
{
  "analyzer": "ik_max_word",
  "text": "希诚是无敌的,xc is best"
}
结果:
{
  "tokens" : [
    {
      "token" : "希",
      "start_offset" : 0,
      "end_offset" : 1,
      "type" : "CN_CHAR",
      "position" : 0
    },
    {
      "token" : "诚",
      "start_offset" : 1,
      "end_offset" : 2,
      "type" : "CN_CHAR",
      "position" : 1
    },
    {
      "token" : "是",
      "start_offset" : 2,
      "end_offset" : 3,
      "type" : "CN_CHAR",
      "position" : 2
    },
    {
      "token" : "无敌",
      "start_offset" : 3,
      "end_offset" : 5,
      "type" : "CN_WORD",
      "position" : 3
    },
    {
      "token" : "的",
      "start_offset" : 5,
      "end_offset" : 6,
      "type" : "CN_CHAR",
      "position" : 4
    },
    {
      "token" : "xc",
      "start_offset" : 7,
      "end_offset" : 9,
      "type" : "ENGLISH",
      "position" : 5
    },
    {
      "token" : "best",
      "start_offset" : 13,
      "end_offset" : 17,
      "type" : "ENGLISH",
      "position" : 6
    }
  ]
}
3.3 扩展词词典
随着互联网的发展,“造词运动”也越发的频繁。出现了很多新的词语,在原有的词汇列表中并不存在。比如:“奥力给”,“泰库辣” 等。
所以我们的词汇也需要不断的更新,IK分词器提供了扩展词汇的功能。
1)打开IK分词器config目录:
2)在IKAnalyzer.cfg.xml配置文件内容添加:
<?xml version="1.0" encoding="UTF-8"?>
<!DOCTYPE properties SYSTEM "http://java.sun.com/dtd/properties.dtd">
<properties>
        <comment>IK Analyzer 扩展配置</comment>
        <!--用户可以在这里配置自己的扩展字典 *** 添加扩展词典-->
        <entry key="ext_dict">ext.dic</entry>
</properties>
3)新建一个 ext.dic,可以参考config目录下复制一个配置文件进行修改
泰库辣
奥力给
4)重启elasticsearch
docker restart es

# 查看 日志
docker logs -f elasticsearch
日志中已经成功加载ext.dic配置文件
5)测试效果:
GET /_analyze
{
  "analyzer": "ik_max_word",
  "text": "如果你也跟我一样的话,那么我觉得,泰库辣"
}
注意当前文件的编码必须是 UTF-8 格式,严禁使用Windows记事本编辑
3.4 停用词词典
在互联网项目中,在网络间传输的速度很快,所以很多语言是不允许在网络上传递的,如:关于宗教、政治等敏感词语,那么我们在搜索时也应该忽略当前词汇。
IK分词器也提供了强大的停用词功能,让我们在索引时就直接忽略当前的停用词汇表中的内容。
1)IKAnalyzer.cfg.xml配置文件内容添加:
<?xml version="1.0" encoding="UTF-8"?>
<!DOCTYPE properties SYSTEM "http://java.sun.com/dtd/properties.dtd">
<properties>
        <comment>IK Analyzer 扩展配置</comment>
        <!--用户可以在这里配置自己的扩展字典-->
        <entry key="ext_dict">ext.dic</entry>
         <!--用户可以在这里配置自己的扩展停止词字典  *** 添加停用词词典-->
        <entry key="ext_stopwords">stopword.dic</entry>
</properties>
3)在 stopword.dic 添加停用词
xxx
4)重启elasticsearch
# 重启服务
docker restart elasticsearch
docker restart kibana

# 查看 日志
docker logs -f elasticsearch
日志中已经成功加载stopword.dic配置文件
5)测试效果:
GET /_analyze
{
  "analyzer": "ik_max_word",
  "text": "如果你也跟我一样的话,那么我觉得,泰库辣,xxx!"
}
注意当前文件的编码必须是 UTF-8 格式,严禁使用Windows记事本编辑
索引库操作
mapping属性
mapping是对索引库中文档的约束,常见的mapping属性包括:https://www.elastic.co/guide/en/elasticsearch/reference/current/mapping.html
-
type:字段数据类型,常见的简单类型有:
-
- 字符串:text(可分词的文本)、keyword(精确值,例如:品牌、国家、ip地址)
- 数值:long、integer、short、byte、double、float
- 布尔:boolean
- 日期:date
- 对象:object
-
index:是否创建索引,默认为true
-
analyzer:使用哪种分词器
-
properties:该字段的子字段
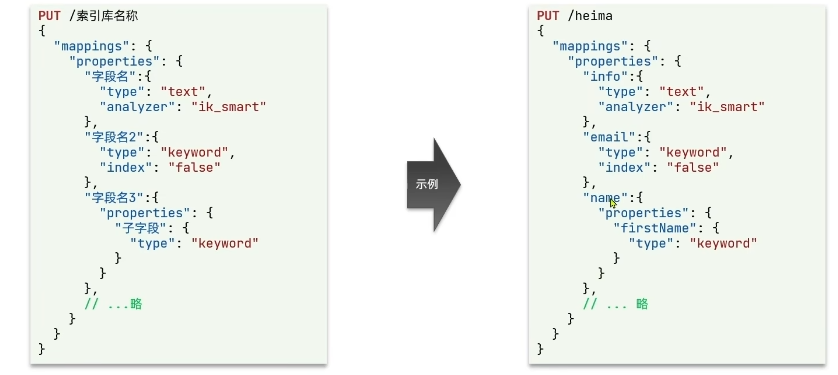
创建索引库
ES通过Restful请求操作索引库、文档。请求内容用DSL语句来表示。创建索引库和mapping的DSL语法如下:
# 创建索引库
PUT /xc
{
  "mappings": {
    "properties": {
      "info":{
        "type": "text",
        "analyzer": "ik_smart"
      },
      "email":{
        "type": "keyword",
        "index": false
      },
      "name":{
        "type": "object",
        "properties": {
          "firstName":{
            "type": "keyword"
          },
          "lastName":{
            "type": "keyword"
          }
        }
      }
    }
  }
}
查看、删除索引库
查看索引库语法:
GET /索引库名称
删除索引库的语法
DELETE /索引库名称
修改索引库
索引库和mapping一旦创建无法修改,但是可以添加新的字段,语法:
PUT /索引库名/_mapping
{
    "properties": {
      "新字段名":{
        "type": "text"
      }
  }
}
文档操作
添加文档
新增文档的DSL语法:
POST /索引库名/_doc/文档id
{
	"字段1": "值1",
	"字段2": "值2",
	"字段3": {
    	"子属性1": "值3",
    	"子属性2": "值4"
	}
}
查询、删除文档
查询
GET /索引库名/_doc/文档id
删除
DELETE /索引库名/_doc/文档id
修改文档
方式一:全量修改,会删除旧文档,添加新文档
PUT /索引库名/_doc/文档id
{
	"字段1": "值1",
	"字段2": "值2",
	"字段3": {
    	"子属性1": "值3",
    	"子属性2": "值4"
	}
}
方式二:增量修改,修改指定字段值
POST /索引库名/_update/文档id
{
	"doc":{
      	"字段值":"新的值"
	}
}
RestAPI
ES官网提供了各种不同语言的客户端,用来操作ES。这些客户端的本质就是组装DSL语句,通过http请求发送给ES。官网:https://www.elastic.co/guide/en/elasticsearch/client/index.html
案例:利用JavaRestClient实现创建、删除索引库,判断索引库是否存在
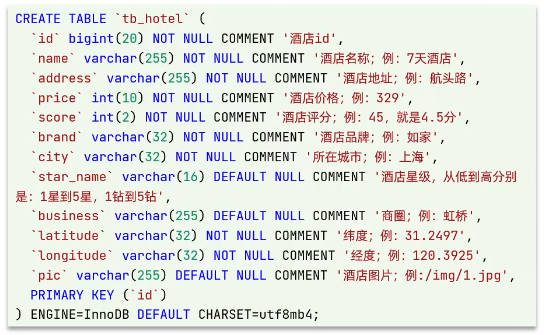
1. 分析数据结构,定义mapping属性
小提示:
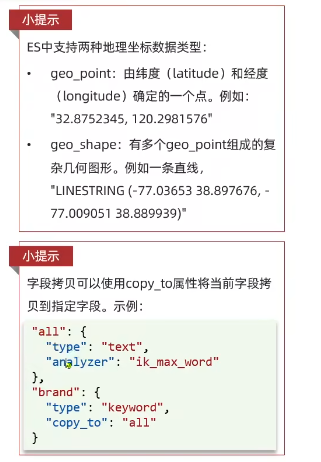
定义mapping属性
PUT /hotel
{
  "mappings": {
    "properties": {
      "id":{
        "type": "keyword"
      },
      "name":{
        "type": "text",
        "analyzer": "ik_max_word",
        "copy_to": "all"
      },
      "address":{
        "type": "keyword",
        "index": false
      },
      "price":{
        "type": "integer"
      },
      "score":{
        "type":"integer"
      },
      "brand":{
        "type": "keyword",
        "copy_to": "all"
      },
      "city":{
        "type": "keyword"
      },
      "starName":{
        "type": "keyword"
      },
      "business":{
        "type": "keyword",
        "copy_to": "all"
      },
      "location":{
        "type": "geo_point"
      },
      "pic":{
        "type": "keyword",
        "index": false
      },
      "all":{
        "type": "text",
        "analyzer": "ik_max_word"
      }
    }
  }
}
2. 初始化JavaRestClient
导入依赖
        <dependency>
            <groupId>org.elasticsearch.client</groupId>
            <artifactId>elasticsearch-rest-high-level-client</artifactId>
            <version>7.12.1</version>
        </dependency>
将springboot管理的es依赖7.6.x的替换成直接管理的
    <properties>
        <elasticsearch.version>7.12.1</elasticsearch.version>
    </properties>
初始化RestHignLevelClient
package cn.itcast.hotel;

import org.apache.http.HttpHost;
import org.elasticsearch.client.RestClient;
import org.elasticsearch.client.RestHighLevelClient;
import org.junit.jupiter.api.AfterEach;
import org.junit.jupiter.api.BeforeEach;
import org.junit.jupiter.api.Test;
import org.springframework.boot.test.context.SpringBootTest;

import java.io.IOException;

/**
 * @author xc
 * @date 2023/5/10 18:38
 */
@SpringBootTest
public class HotelIndexTest {

    private RestHighLevelClient client;


    @Test
    void testInit(){
        System.out.println(client);
    }

    // 在调用方法后执行的操作
    @BeforeEach
    void setUp() {
        this.client = new RestHighLevelClient(RestClient.builder(
                HttpHost.create("http://192.168.72.133:9200")
        ));
    }
    // 在调用方法前执行的操作
    @AfterEach
    void tearDown() throws IOException {
        this.client.close();
    }
}
3. 创建索引库
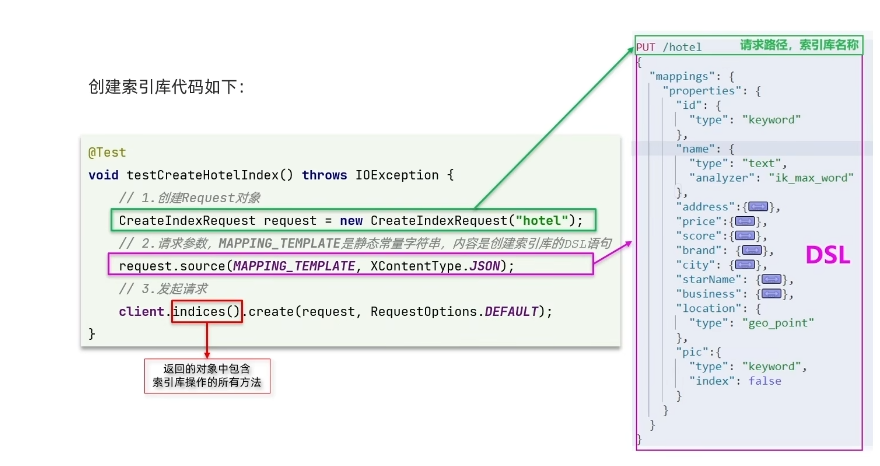
创建索引库
    @Test
    void testInit() throws IOException {
        // 1.创建Request对象
        CreateIndexRequest request = new CreateIndexRequest("hotel");
        // 2.准备请求参数:DSL语句
        request.source(MAPPING_TEMPLATE, XContentType.JSON);
        // 3.发送请求
        client.indices().create(request, RequestOptions.DEFAULT);
    }
4. 删除索引库、判断索引库是否存在
- 删除索引库代码
    @Test
    void testDeleteHotelIndex() throws IOException {
        // 1.创建Request对象
        DeleteIndexRequest request = new DeleteIndexRequest("hotel");
        // 2.发送请求
        client.indices().delete(request,RequestOptions.DEFAULT);
    }
- 判断索引库是否存在
    @Test
    void testExistsHotelIndex() throws IOException {
        // 1.创建Request对象
        GetIndexRequest request = new GetIndexRequest("hotel");
        // 2.发送请求
        boolean exists = client.indices().exists(request, RequestOptions.DEFAULT);
        System.out.println(exists);
    }
案例:利用JavaRestClient实现文档的CRUD
1.利用JavaRestClient新增酒店数据
    @Test
    void testAddDocument() throws IOException {
        List<Hotel> hotel = hotelService.list();
        hotel.forEach(h -> {
            HotelDoc hotelDoc = new HotelDoc(h);
            IndexRequest request = new IndexRequest("hotel").id(h.getId().toString());
            request.source(JSON.toJSONString(hotelDoc),XContentType.JSON);
            try {
                client.index(request,RequestOptions.DEFAULT);
            } catch (IOException e) {
                throw new RuntimeException(e);
            }
        });
    }
2.利用JavaRestClient根据id查询酒店数据
    @Test
    void testGETDocument() throws IOException {
        GetRequest request = new GetRequest("hotel","61083");
        GetResponse documentFields = client.get(request, RequestOptions.DEFAULT);
        String json = documentFields.getSourceAsString();
        System.out.println(json);
    }
3.利用JavaRestClient删除酒店数据
    @Test
    void testDELETEDocument() throws IOException {
        DeleteRequest request = new DeleteRequest("hotel","61083");
        client.delete(request, RequestOptions.DEFAULT);
    }
4.利用JavaRestClient修改酒店数据
    @Test
    void testUpdateDocument() throws IOException {
        UpdateRequest request = new UpdateRequest("hotel", "61083");
        request.doc(
                "city","武汉"
        );
        client.update(request, RequestOptions.DEFAULT);
    }
案例:批量导入数据
    @Test
    void testBulkRequest() throws IOException {
        BulkRequest request = new BulkRequest();
        List<Hotel> hotel = hotelService.list();
        hotel.forEach(h -> {
            HotelDoc hotelDoc = new HotelDoc(h);
            request.add(new IndexRequest("hotel").id(hotelDoc.getId().toString()).source(JSON.toJSONString(hotelDoc),XContentType.JSON));
        });
        client.bulk(request,RequestOptions.DEFAULT);
    }
EFAULT);
    }
4.利用JavaRestClient修改酒店数据
    @Test
    void testUpdateDocument() throws IOException {
        UpdateRequest request = new UpdateRequest("hotel", "61083");
        request.doc(
                "city","武汉"
        );
        client.update(request, RequestOptions.DEFAULT);
    }
案例:批量导入数据
    @Test
    void testBulkRequest() throws IOException {
        BulkRequest request = new BulkRequest();
        List<Hotel> hotel = hotelService.list();
        hotel.forEach(h -> {
            HotelDoc hotelDoc = new HotelDoc(h);
            request.add(new IndexRequest("hotel").id(hotelDoc.getId().toString()).source(JSON.toJSONString(hotelDoc),XContentType.JSON));
        });
        client.bulk(request,RequestOptions.DEFAULT);
    }


 3654
3654


 被折叠的 条评论
为什么被折叠?
被折叠的 条评论
为什么被折叠?
 到【灌水乐园】发言


