


Feathers’s Volley and Demo:https://github.com/xf616510229/VolleyDemo.git
Volley简介
2013年Google I/O大会上推出了一个新的网络通信框架——Volley,它简单易用,适合通信频繁的操作,不适合大数据量的操作
volley本来的意思就是集中射击、集鸣:

下载Volley
Git:git clone https://android.googlesource.com/platform/frameworks/volley,然后让项目依赖此文件
Gradle:compile 'com.android.volley:volley:1.0.0'
或是在dependencies中搜索并依赖,一般第一个就是
注意:Module app 中使用的是:compile ‘eu.the4thfloor.volley:com.android.volley:2015.05.28’
该compile多了一些功能,比如ImageRequest.Transformation
官方文档:https://developer.android.com/training/volley/index.html
doc:http://afzaln.com/volley/
Volley的使用
StringRequest
 RequestQueue queue = Volley.newRequestQueue(this);
        StringRequest stringRequest = new StringRequest("http://www.baidu.com",
                new Response.Listener<String>() {
                    @Override
                    public void onResponse(String response) {
                        // TODO 请求成功回调
                        Log.d("TAG", response);
                    }
                }, new Response.ErrorListener() {
            @Override
            public void onErrorResponse(VolleyError error) {
                // TODO 请求失败回调
                Log.e("TAG", error.getMessage(), error);
            }
        });
        // 将请求添加到请求队列,会自动开始请求
        queue.add(stringRequest);
设置请求方法
StringRequest stringRequest = new StringRequest(Method.POST, url, listener, errorListener);
子类JsonRequest/JsonArrayRequest
JsonObjectRequest jsonObjectRequest = new JsonObjectRequest("http://m.weather.com.cn/data/101010100.html", null,
        new Response.Listener<JSONObject>() {
            @Override
            public void onResponse(JSONObject response) {
                Log.d("TAG", response.toString());
            }
        }, new Response.ErrorListener() {
            @Override
            public void onErrorResponse(VolleyError error) {
                Log.e("TAG", error.getMessage(), error);
            }
        });
 mQueue.add(jsonObjectRequest);
ImageRequest
ImageRequest imageRequest = new ImageRequest(
        "http://developer.android.com/images/home/aw_dac.png",
        new Response.Listener<Bitmap>() {
            @Override
            public void onResponse(Bitmap response) {
                // 请求成功设置图片
                imageView.setImageBitmap(response);
            }
        }, 0, 0, Config.RGB_565, new Response.ErrorListener() {
            @Override
            public void onErrorResponse(VolleyError error) {
                   // 请求失败设置默认图片
                imageView.setImageResource(R.drawable.default_image);
            }
ImageLoader
ImageLoader imageLoader = new ImageLoader(mQueue, new ImageCache() {
    @Override
    public void putBitmap(String url, Bitmap bitmap) {
        // 缓存图片到本地
    }

    @Override
    public Bitmap getBitmap(String url) {
        // 读取缓存的图片
        return null;
    }
});
ImageListener listener = ImageLoader.getImageListener(imageView,
        R.drawable.default_image, R.drawable.failed_image);
imageLoader.get("https://img-my.csdn.net/uploads/201404/13/1397393290_5765.jpeg", listener);
/*
imageLoader.get("https://img-my.csdn.net/uploads/201404/13/1397393290_5765.jpeg",
                listener, 200, 200);
*/
NetworkImageView
<com.android.volley.toolbox.NetworkImageView
        android:id="@+id/niv"
        android:layout_width="100dp"
        android:layout_height="100dp"
        android:layout_above="@id/iv"
        android:layout_centerHorizontal="true"/>
niv = (NetworkImageView) findViewById(R.id.niv);
niv.setDefaultImageResId(R.drawable.no_image);
niv.setErrorImageResId(R.drawable.image_failed);
niv.setImageUrl("http://avatar.csdn.net/1/7/7/1_xf616510229.jpg",
new ImageLoader(mQueue, new BitmapCache()));自定义GsonRequest
请看类GsonRequest
自定义XMLRequest
请看类XMLRequest
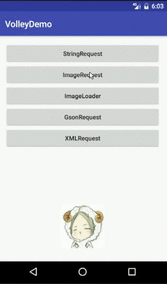
Demo效果:
Volley源码解析
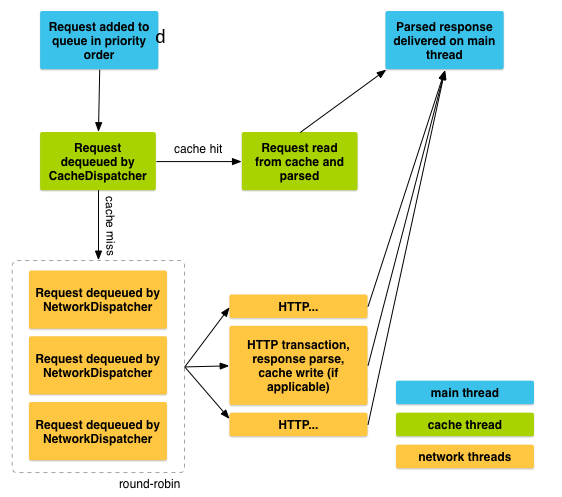
- Request added to queue in priority order
- Request dequeued by CacheDispatcher
- cache hit: request read from cache and parsed
- cache miss:cache dequeued by NetworkDispatcher(round-robin)
- HTTP、HTTP transaction,response parse,cache write(if applicable)、HTTP
- Parsed response delivered on main thread.
源码解析
解析源码,首先要从他的方法上着手
- 创建一个RequestQueue
/* [Volley.java] */

    public static RequestQueue newRequestQueue(Context context, int maxDiskCacheBytes) {
        return newRequestQueue(context, null, maxDiskCacheBytes);
    }

    public static RequestQueue newRequestQueue(Context context, HttpStack stack) {
        return newRequestQueue(context, stack, -1);
    }

    public static RequestQueue newRequestQueue(Context context, HttpStack stack, int maxDiskCacheBytes) {

            // 1. 生成缓存文件File对象
            File cacheDir = new File(context.getCacheDir(), DEFAULT_CACHE_DIR);

            // 2. 根据packageName与版本号生成一个userAgent
            String userAgent = "volley/0";
            try {
                String packageName = context.getPackageName();
                PackageInfo info = context.getPackageManager().getPackageInfo(packageName, 0);
                userAgent = packageName + "/" + info.versionCode;
            } catch (NameNotFoundException e) {

            }

            // 3. 创建httpStack
            if (stack == null) {
                if (Build.VERSION.SDK_INT >= 9) {
                    stack = new HurlStack(); // 创建HurlStack,内部为HttpUrlConnection
                } else { // 创建HttpClientStack,内部是由HttpClient实现
                    stack = new HttpClientStack(AndroidHttpClient.newInstance(userAgent));
                }
            }

            // 4. 创建一个Network,将httpStack传入
            Network network = new BasicNetwork(stack);

            // 5. 创建requestQueue
            RequestQueue queue;
            if (maxDiskCacheBytes <= -1) {
                // No maximum size specified
                queue = new RequestQueue(new DiskBasedCache(cacheDir), network);
            } else {
                // Disk cache size specified
                queue = new RequestQueue(new DiskBasedCache(cacheDir, maxDiskCacheBytes), network);
            }

            // 6.
            queue.start();

            // 7. 返回queue
            return queue;
        }
我们从源码上可以看到,newRequestQueue最终都是调用三个参数的构造方法完成的,七种的三个参数分别为:
- context
- HttpStack
- maxDiskCacheBytes 磁盘缓存最大值,默认是-1,如果小于0,代表没有缓存最大限制
相信你们看完之后最疑惑的地方就是在于HttpStack了,让我们看一下HttpStack:
HttpStack
/*[HttpStack.java]*/
public interface HttpStack {
    /**
     * <p>A GET request is sent if request.getPostBody() == null. A POST request is sent otherwise,
     * and the Content-Type header is set to request.getPostBodyContentType().</p>
     *
     * @param request the request to perform
     * @param additionalHeaders additional headers to be sent together with
     *         {@link Request#getHeaders()}
     * @return the HTTP response
     */
    public HttpResponse performRequest(Request<?> request, Map<String, String> additionalHeaders)
        throws IOException, AuthFailureError;
}
HttpStack是一个接口,只有一个抽象方法:performRequest,需要三个参数
- request
- additionalHeaders,附加的请求头,请求头信息大都是键值对,所以此处使用Map集合
根据方法的名字,以及返回值Response,可以初步判断,该类是用于执行请求的,为了证实猜想,我们看看他的两个子类:
HurlStack
HttpClientStack
/*[HutlStack]*/
@Override
    public HttpResponse performRequest(Request<?> request, Map<String, String> additionalHeaders)
            throws IOException, AuthFailureError {
        String url = request.getUrl();
        HashMap<String, String> map = new HashMap<String, String>();
        map.putAll(request.getHeaders());
        // 添加额外的头
        map.putAll(additionalHeaders);

        // 重写URL
        if (mUrlRewriter != null) {
            String rewritten = mUrlRewriter.rewriteUrl(url);
            if (rewritten == null) {
                throw new IOException("URL blocked by rewriter: " + url);
            }
            url = rewritten;
        }
        // 使用URLConnection进行网络请求
        URL parsedUrl = new URL(url);
        HttpURLConnection connection = openConnection(parsedUrl, request);
        // 将请求头添加到connection中
        for (String headerName : map.keySet()) {
            connection.addRequestProperty(headerName, map.get(headerName));
        }
        // 为请求设置必要的参数,比如给connection设置请求方式(GET POST),具体清查看源码
        setConnectionParametersForRequest(connection, request);

        // 初始化HttpResponse,注意,这里的HttpResponse是HttpClient中的,所以需要必要的转换
        // Initialize HttpResponse with data from the HttpURLConnection.
        ProtocolVersion protocolVersion = new ProtocolVersion("HTTP", 1, 1);
        int responseCode = connection.getResponseCode();
        if (responseCode == -1) {
            // -1 is returned by getResponseCode() if the response code could not be retrieved.
            // Signal to the caller that something was wrong with the connection.
            throw new IOException("Could not retrieve response code from HttpUrlConnection.");
        }
        StatusLine responseStatus = new BasicStatusLine(protocolVersion,
                connection.getResponseCode(), connection.getResponseMessage());
        BasicHttpResponse response = new BasicHttpResponse(responseStatus);
        response.setEntity(entityFromConnection(connection));
        for (Entry<String, List<String>> header : connection.getHeaderFields().entrySet()) {
            if (header.getKey() != null) {
                Header h = new BasicHeader(header.getKey(), header.getValue().get(0));
                response.addHeader(h);
            }
        }
        return response;
    }

    /**
     * 内部类 用于重写URL的接口
     * An interface for transforming URLs before use.
     */
    public interface UrlRewriter {
        /**
         * 返回重写后的url
         * Returns a URL to use instead of the provided one, or null to indicate
         * this URL should not be used at all.
         */
        public String rewriteUrl(String originalUrl);
    }
/*[HttpClientStack.java]*/
@Override
public HttpResponse performRequest(Request<?> request, Map<String, String> additionalHeaders)
throws IOException, AuthFailureError {
HttpUriRequest httpRequest = createHttpRequest(request, additionalHeaders);
addHeaders(httpRequest, additionalHeaders);
addHeaders(httpRequest, request.getHeaders());
onPrepareRequest(httpRequest);
HttpParams httpParams = httpRequest.getParams();
int timeoutMs = request.getTimeoutMs();
// TODO: Reevaluate this connection timeout based on more wide-scale
// data collection and possibly different for wifi vs. 3G.
HttpConnectionParams.setConnectionTimeout(httpParams, 5000);
HttpConnectionParams.setSoTimeout(httpParams, timeoutMs);
return mClient.execute(httpRequest);
}HttpClientStack就相对简单了,对请求作出了一些相应的处理,然后执行获取了response对象
HttpStack就是这样,它的功能主要还是让执行request,获取response
然后,第四步骤中,又使用这个stack对象生成了一个Network实例,让我们看一下Network
Network
/*[Network.java]*/
public interface Network {
    /**
     * Performs the specified request.
     * @param request Request to process
     * @return A {@link NetworkResponse} with data and caching metadata; will never be null
     * @throws VolleyError on errors
     */
    public NetworkResponse performRequest(Request<?> request) throws VolleyError;
}
又是一个接口,我们看到,Network中也只有一个方法,也叫performRequest,执行请求,
返回的同样也是response对象,但是是NetworkResponse对象,其中包含了相应码,响应头,响应体等信息
BasicNetwork:
 @Override
    public NetworkResponse performRequest(Request<?> request) throws VolleyError {
        long requestStart = SystemClock.elapsedRealtime();
        while (true) {
            HttpResponse httpResponse = null;
            byte[] responseContents = null;
            Map<String, String> responseHeaders = Collections.emptyMap();
            try {
                // Gather headers.
                Map<String, String> headers = new HashMap<String, String>();
                addCacheHeaders(headers, request.getCacheEntry());
                // 这里
                httpResponse = mHttpStack.performRequest(request, headers);
                ....
            } catch (SocketTimeoutException e) {
                attemptRetryOnException("socket", request, new TimeoutError());
            } catch (ConnectTimeoutException e) {
                ....
            }
            ...
        }
    }
Network的performRequest就是调用HttpStack的performRequest方法,根据不同的情况进行不同方式的网络请求,获取response
然后,对queue进行初始化,此时才真正初始化queue
/*[RequestQueue]*/
public RequestQueue(Cache cache, Network network, int threadPoolSize,
            ResponseDelivery delivery) {
        mCache = cache;
        mNetwork = network;
        mDispatchers = new NetworkDispatcher[threadPoolSize];
        mDelivery = delivery;
    }

    public RequestQueue(Cache cache, Network network, int threadPoolSize) {
        this(cache, network, threadPoolSize,
                new ExecutorDelivery(new Handler(Looper.getMainLooper())));
    }

    public RequestQueue(Cache cache, Network network) {
        this(cache, network, DEFAULT_NETWORK_THREAD_POOL_SIZE);
    }
可以看到,RequestQueue共有三个构造器,最终都指向四个参数的构造器
四个参数分别为
- Cache缓存类
- Network类
- threadPoolSize,线程池线程数量
- ResponseDelivery ?
先看Cache接口:
/*[Cache.java]*/
public interface Cache {
    public Entry get(String key);

    public void put(String key, Entry entry);

    public void initialize();

    public void invalidate(String key, boolean fullExpire);

    public void remove(String key);

    public void clear();

    public static class Entry {
        /** The data returned from cache. */
        public byte[] data;

        /** ETag for cache coherency. */
        public String etag;

        /** Date of this response as reported by the server. */
        public long serverDate;

        /** The last modified date for the requested object. */
        public long lastModified;

        /** TTL for this record. */
        public long ttl;

        /** Soft TTL for this record. */
        public long softTtl;

        /** Immutable response headers as received from server; must be non-null. */
        public Map<String, String> responseHeaders = Collections.emptyMap();

        /** True if the entry is expired. */
        public boolean isExpired() {
            return this.ttl < System.currentTimeMillis();
        }

        /** True if a refresh is needed from the original data source. */
        public boolean refreshNeeded() {
            return this.softTtl < System.currentTimeMillis();
        }
    }
}
Cache接口中提供了存取缓存的方法,和一个保存缓存信息的内部类Entry
Network提供了执行request的方法
默认的网络线程池的大小为4:
/** Number of network request dispatcher threads to start. */
    private static final int DEFAULT_NETWORK_THREAD_POOL_SIZE = 4;
构造器拿着这个大小,创建了一个NetworkDispatcher数组,这个类我们等用到时去看。
至此,requestQueue已经初始化完成,接着就调用了start()方法
    /**
     * Starts the dispatchers in this queue.
     */
    public void start() {
        stop();  // Make sure any currently running dispatchers are stopped.
        // Create the cache dispatcher and start it.
        mCacheDispatcher = new CacheDispatcher(mCacheQueue, mNetworkQueue, mCache, mDelivery);
        mCacheDispatcher.start();

        // Create network dispatchers (and corresponding threads) up to the pool size.
        for (int i = 0; i < mDispatchers.length; i++) {
            NetworkDispatcher networkDispatcher = new NetworkDispatcher(mNetworkQueue, mNetwork,
                    mCache, mDelivery);
            mDispatchers[i] = networkDispatcher;
            networkDispatcher.start();
        }
    }
我们看到注释是start the dispatchers in the queue,下文中又启动了CacheDispatchers与NetworkDispatcher
我们先看一看创建CacheDispatcher传入的参数的初始化:
    /** The cache triage queue. */
    private final PriorityBlockingQueue<Request<?>> mCacheQueue =
        new PriorityBlockingQueue<Request<?>>();

    /** The queue of requests that are actually going out to the network. */
    private final PriorityBlockingQueue<Request<?>> mNetworkQueue =
        new PriorityBlockingQueue<Request<?>>();
所谓的cacheQueue,就是一个泛型为Request的队列,networkQueue也是,自行配图观看~
注:PriorityBlockingQueue 是Java7推出的含有优先级的队列集合
CacheQueue继承Thread类,
让我们看看CacheDispatcher的构造器:
/*[CacheDispacher.java]*/
    /**
     * Creates a new cache triage dispatcher thread.  You must call {@link #start()}
     * in order to begin processing.
     *
     * @param cacheQueue Queue of incoming requests for triage
     * @param networkQueue Queue to post requests that require network to
     * @param cache Cache interface to use for resolution
     * @param delivery Delivery interface to use for posting responses
     */
    public CacheDispatcher(
            BlockingQueue<Request<?>> cacheQueue, BlockingQueue<Request<?>> networkQueue,
            Cache cache, ResponseDelivery delivery) {
        mCacheQueue = cacheQueue;
        mNetworkQueue = networkQueue;
        mCache = cache;
        mDelivery = delivery;
    }
我们从构造器的注释上看得很清楚,这个类会创建一个新的用于对request缓存队列进行缓存处理的线程,调用start()方法启动线程。
让我们看看run(),他究竟做了些什么:
@Override
    public void run() {
        if (DEBUG) VolleyLog.v("start new dispatcher");
        // 设置线程优先级为标准优先级,下文将会开启很多线程
        Process.setThreadPriority(Process.THREAD_PRIORITY_BACKGROUND);

        // 初始化缓存类,while 循环,代表该线程不断的从队列中取出请求进行缓存操作
        // Make a blocking call to initialize the cache.
        mCache.initialize();

        while (true) {
            try {
                // 取出一个request
                // Get a request from the cache triage queue, blocking until
                // at least one is available.
                final Request<?> request = mCacheQueue.take();
                request.addMarker("cache-queue-take");

                // If the request has been canceled, don't bother dispatching it.
                if (request.isCanceled()) {
                    request.finish("cache-discard-canceled");
                    continue;
                }

                // 如果这个request没有缓存,添加标记 cache-miss,并把它交给网络请求队列
                // Attempt to retrieve this item from cache.
                Cache.Entry entry = mCache.get(request.getCacheKey());
                if (entry == null) {
                    request.addMarker("cache-miss");
                    // Cache miss; send off to the network dispatcher.
                    mNetworkQueue.put(request);
                    continue;
                }

                // 如果缓存无效了,同样也交给networkQueue
                // If it is completely expired, just send it to the network.
                if (entry.isExpired()) {
                    request.addMarker("cache-hit-expired");
                    request.setCacheEntry(entry);
                    mNetworkQueue.put(request);
                    continue;
                }


                // 如果缓存存在,且有效,添加标记cache-hit-parsed,然后使用响应处理类ResponseDelivery进行处理
                // We have a cache hit; parse its data for delivery back to the request.
                request.addMarker("cache-hit");
                Response<?> response = request.parseNetworkResponse(
                        new NetworkResponse(entry.data, entry.responseHeaders));
                request.addMarker("cache-hit-parsed");

                if (!entry.refreshNeeded()) {
                    // Completely unexpired cache hit. Just deliver the response.
                    mDelivery.postResponse(request, response);
                } else {
                    // Soft-expired cache hit. We can deliver the cached response,
                    // but we need to also send the request to the network for
                    // refreshing.
                    request.addMarker("cache-hit-refresh-needed");
                    request.setCacheEntry(entry);

                    // Mark the response as intermediate.
                    response.intermediate = true;

                    // Post the intermediate response back to the user and have
                    // the delivery then forward the request along to the network.
                    mDelivery.postResponse(request, response, new Runnable() {
                        @Override
                        public void run() {
                            try {
                                mNetworkQueue.put(request);
                            } catch (InterruptedException e) {
                                // Not much we can do about this.
                            }
                        }
                    });
                }

            } catch (InterruptedException e) {
                // We may have been interrupted because it was time to quit.
                if (mQuit) {
                    return;
                }
                continue;
            }
        }
    }
我们紧接着看一看NetworkDispatcher:
/**
 * Provides a thread for performing network dispatch from a queue of requests.
 *
 * Requests added to the specified queue are processed from the network via a
 * specified {@link Network} interface. Responses are committed to cache, if
 * eligible, using a specified {@link Cache} interface. Valid responses and
 * errors are posted back to the caller via a {@link ResponseDelivery}.
 */
public class NetworkDispatcher extends Thread {
    /** The queue of requests to service. */
    private final BlockingQueue<Request<?>> mQueue;
    /** The network interface for processing requests. */
    private final Network mNetwork;
    /** The cache to write to. */
    private final Cache mCache;
    /** For posting responses and errors. */
    private final ResponseDelivery mDelivery;
    /** Used for telling us to die. */
    private volatile boolean mQuit = false;

    /**
     * Creates a new network dispatcher thread.  You must call {@link #start()}
     * in order to begin processing.
     *
     * @param queue Queue of incoming requests for triage
     * @param network Network interface to use for performing requests
     * @param cache Cache interface to use for writing responses to cache
     * @param delivery Delivery interface to use for posting responses
     */
    public NetworkDispatcher(BlockingQueue<Request<?>> queue,
            Network network, Cache cache,
            ResponseDelivery delivery) {
        mQueue = queue;
        mNetwork = network;
        mCache = cache;
        mDelivery = delivery;
    }

    /**
     * Forces this dispatcher to quit immediately.  If any requests are still in
     * the queue, they are not guaranteed to be processed.
     */
    public void quit() {
        mQuit = true;
        interrupt();
    }

    @TargetApi(Build.VERSION_CODES.ICE_CREAM_SANDWICH)
    private void addTrafficStatsTag(Request<?> request) {
        // Tag the request (if API >= 14)
        if (Build.VERSION.SDK_INT >= Build.VERSION_CODES.ICE_CREAM_SANDWICH) {
            TrafficStats.setThreadStatsTag(request.getTrafficStatsTag());
        }
    }

    @Override
    public void run() {
        Process.setThreadPriority(Process.THREAD_PRIORITY_BACKGROUND);
        while (true) {
            long startTimeMs = SystemClock.elapsedRealtime();
            Request<?> request;
            try {
                // Take a request from the queue.
                request = mQueue.take();
            } catch (InterruptedException e) {
                // We may have been interrupted because it was time to quit.
                if (mQuit) {
                    return;
                }
                continue;
            }

            try {
                request.addMarker("network-queue-take");

                // If the request was cancelled already, do not perform the
                // network request.
                if (request.isCanceled()) {
                    request.finish("network-discard-cancelled");
                    continue;
                }

                addTrafficStatsTag(request);

                // 这里
                // Perform the network request.
                NetworkResponse networkResponse = mNetwork.performRequest(request);
                request.addMarker("network-http-complete");

                // If the server returned 304 AND we delivered a response already,
                // we're done -- don't deliver a second identical response.
                if (networkResponse.notModified && request.hasHadResponseDelivered()) {
                    request.finish("not-modified");
                    continue;
                }

                // Parse the response here on the worker thread.
                Response<?> response = request.parseNetworkResponse(networkResponse);
                request.addMarker("network-parse-complete");

                // Write to cache if applicable.
                // TODO: Only update cache metadata instead of entire record for 304s.
                if (request.shouldCache() && response.cacheEntry != null) {
                    mCache.put(request.getCacheKey(), response.cacheEntry);
                    request.addMarker("network-cache-written");
                }

                // Post the response back.
                request.markDelivered();
                mDelivery.postResponse(request, response);
            } catch (VolleyError volleyError) {
                volleyError.setNetworkTimeMs(SystemClock.elapsedRealtime() - startTimeMs);
                parseAndDeliverNetworkError(request, volleyError);
            } catch (Exception e) {
                VolleyLog.e(e, "Unhandled exception %s", e.toString());
                VolleyError volleyError = new VolleyError(e);
                volleyError.setNetworkTimeMs(SystemClock.elapsedRealtime() - startTimeMs);
                mDelivery.postError(request, volleyError);
            }
        }
    }

    private void parseAndDeliverNetworkError(Request<?> request, VolleyError error) {
        error = request.parseNetworkError(error);
        mDelivery.postError(request, error);
    }
}
我们看到: NetworkResponse networkResponse = mNetwork.performRequest(request);
在执行run()时,调用了performRequest(request)获取了response,前面说过,这个方法就是进行网络请求的真正的方法
无论是CacheDispatcher 还是 NetworkDispatcher 最后都执行了mDelivery.postResponse()方法,这个方法用来解析来自缓存或者网络响应,而且是抛给主线程处理:
我们看看这个方法:
/*[ExecutorDelivery]*/
public ExecutorDelivery(Executor executor) {
        mResponsePoster = executor;
    }

    @Override
    public void postResponse(Request<?> request, Response<?> response) {
        postResponse(request, response, null);
    }

    @Override
    public void postResponse(Request<?> request, Response<?> response, Runnable runnable) {
        request.markDelivered();
        request.addMarker("post-response");
        mResponsePoster.execute(new ResponseDeliveryRunnable(request, response, runnable));
    }

    @Override
    public void postError(Request<?> request, VolleyError error) {
        request.addMarker("post-error");
        Response<?> response = Response.error(error);
        mResponsePoster.execute(new ResponseDeliveryRunnable(request, response, null));
    }
我们看到这个方法调用了mResponsePoster.execute(),mResponsePoster是一个Runnable
他是ExecutorDelivery的内部类,调用execute(),回去执行run()
如下:
  private class ResponseDeliveryRunnable implements Runnable {
        private final Request mRequest;
        private final Response mResponse;
        private final Runnable mRunnable;

        public ResponseDeliveryRunnable(Request request, Response response, Runnable runnable) {
            mRequest = request;
            mResponse = response;
            mRunnable = runnable;
        }

        @SuppressWarnings("unchecked")
        @Override
        public void run() {
            // 请求被取消,结束请求
            // If this request has canceled, finish it and don't deliver.
            if (mRequest.isCanceled()) {
                mRequest.finish("canceled-at-delivery");
                return;
            }

            // ·请求成功,交给request处理·
            // Deliver a normal response or error, depending.
            if (mResponse.isSuccess()) {
                mRequest.deliverResponse(mResponse.result);
            } else {
                mRequest.deliverError(mResponse.error);
            }

            // If this is an intermediate response, add a marker, otherwise we're done
            // and the request can be finished.
            if (mResponse.intermediate) {
                mRequest.addMarker("intermediate-response");
            } else {
                mRequest.finish("done");
            }

            // If we have been provided a post-delivery runnable, run it.
            if (mRunnable != null) {
                mRunnable.run();
            }
       }
    }
我们看到请求成功的时候,将response.result交给了Request:
Request有如下几个实现类:
StringRequest ClearCacheRequest ImageRequest
以StringRequest为例:
  @Override
    protected void deliverResponse(String response) {
        mListener.onResponse(response);
    }
deliverResponse将response交给listener处理,而这个listener就是我们进行回调处理response的Listener
至此整个流程也就结束。
总结
Volley的大体流程:
1. 将请求添加到缓存队列
2. 在缓存线程中处理缓存队列中的请求
3. 如果缓存存在,抛给主线程,进行对response处理
4. 如果缓存不存在,将request抛给网络请求队列,在网络线程中遍历处理request
5. 然后进行写缓存,仍在网络线程中。
6. 最好抛给主线程,对response处理


 280
280


 被折叠的 条评论
为什么被折叠?
被折叠的 条评论
为什么被折叠?
 到【灌水乐园】发言


