


Spring框架版本迭代
SPRING 1.X 时代
大量编写xml配置文件的节点,spring框架开发应用程序,每个xml中都会使用大量bean标签,来实现SPRING容器的IOC、DI功能。不存在这些注解:@Autowired @Component @Service @Controller @Repository。
SPRING 2.X 时代
java出现了jdk1.5新特性注解、反射、枚举等功能。SPRING随之推出了基于java5的注解功能的新特性,IOC容器的注解使得扫描注解能够构造bean对象,@Component @Service @Controller @Repository DI注入 @Qualifier @Autowired。让在1.x时代编写大量的xml配置文件的工作减少了很多很多。
什么情况下使用注解:业务层使用注解(Controller Service)。
什么情况下使用xml配置:引入的技术 redis、mysql等使用xml配置。
SPRING 3.X 时代
基于java5的注解功能上,spring扩展了大量的功能注解,比如@Configuration @Bean @Import @ComponentScan等等,他们可以让在2.x时代残留的那种xml配置彻底的消失了,从xml配置完全转化成为代码注解的编写;趋势:配置越来越简单。
SPRING 4.X / 5.X
都是在基于这个趋势实现更多注解的扩展,让代码的功能变得更强,开发的效率变得更高,出现了很多组合注解@RestController等。
4.X时代 spring提供了一个叫做条件注解@Conditional,springboot能够做到零xml配置文件是springboot功劳吗?本质不是,spring本身就支持不需要配置文件xml了。
案例学习3.X/4.X重要注解
@Configuration
这个注解在spring3.0出现,作用是一个配置类,一般用来声明一个或者多个bean对象,通过使用内部的方法注解@Bean交给容器管理。作为配置类和2.X版本相比,取代XML的作用,一个xml配置,相当于一个配置类。
加载spring应用的元数据xml配置文件,根据xml配置内容读取到后,完成spring容器的内存数据管理
//读取xml,加载spring上下文对象
@Test
public void loadXML(){
    //准备加载的文件路径
    String filePath="classpath:demo01.xml";
    //对应加载spring应用的上下文类型
    ClassPathXmlApplicationContext
            application=new ClassPathXmlApplicationContext(filePath);
}
创建一个交由xml创建的对象
public class Bean01 {
    public Bean01() {
        System.out.println("Bean01被容器加载了");
    }
}
在xml创建一个bean对象
<?xml version="1.0" encoding="UTF-8"?>
<beans xmlns="http://www.springframework.org/schema/beans"
       xmlns:xsi="http://www.w3.org/2001/XMLSchema-instance"
       xsi:schemaLocation="
       http://www.springframework.org/schema/beans http://www.springframework.org/schema/beans/spring-beans.xsd">
    <!-- 创建 Bean01 Bean对象 -->
    <bean id="bean01" class="com.test.beans.Bean01"/>
</beans>
@Bean
常见使用在方法上的注解,作用是配合一个配置类,或者是一个spring可以加载扫描的类例如@Component,使得方法的返回值作为bean对象被容器管理.。效果和一个xml中的bean标签一样
加载配置类:
@Test
public void loadConfig(){
    //对应加载spring应用的上下文类型
    AnnotationConfigApplicationContext
            application=new AnnotationConfigApplicationContext(MyConfiguration01.class);
}
配置类:
//spring应用的配置类定义,必须添加@Configuration注解
@Configuration
public class MyConfiguration01 {
    /**
     * @Bean注解创建bean01
     */
    @Bean(name="bean01")
    public Bean01 bean01(){
        //可以实现对Bean01对象的初始化
        Bean01 bean01=new Bean01();
        return bean01;
    }
}
@ComponentScan
配合一个配置类@Configuration实现类注解的扫描.扫描@Controller @Service @Componet @Autowired @Configuration等。
xml实现注解的扫描:
<?xml version="1.0" encoding="UTF-8"?>
<beans xmlns="http://www.springframework.org/schema/beans"
       xmlns:xsi="http://www.w3.org/2001/XMLSchema-instance"
       xmlns:context="http://www.springframework.org/schema/context"
       xsi:schemaLocation="
       http://www.springframework.org/schema/beans
       http://www.springframework.org/schema/beans/spring-beans.xsd
       http://www.springframework.org/schema/context
       http://www.springframework.org/schema/context/spring-context.xsd">
    <!--包扫描 扫描对象所在的包-->
    <context:component-scan base-package="com.test.beans"/>
</beans>
准备Bean02对象 (通过xml扫描配置输出成功,loadXML测试)
@Component
public class Bean02 {
    public Bean02() {
        System.out.println("Bean02被容器加载了");
    }
}配置类添加注解(loadConfig测试)
@Configuration
//什么属性都不加,会默认扫描当前配置类所在的包
@ComponentScan(basePackages ={"com.test.beans"} )
public class MyConfiguration01 {
//@Bean注解创建bean01
@Bean(name="bean01")
public Bean01 bean01(){
Bean01 bean01=new Bean01();
return bean01;
}
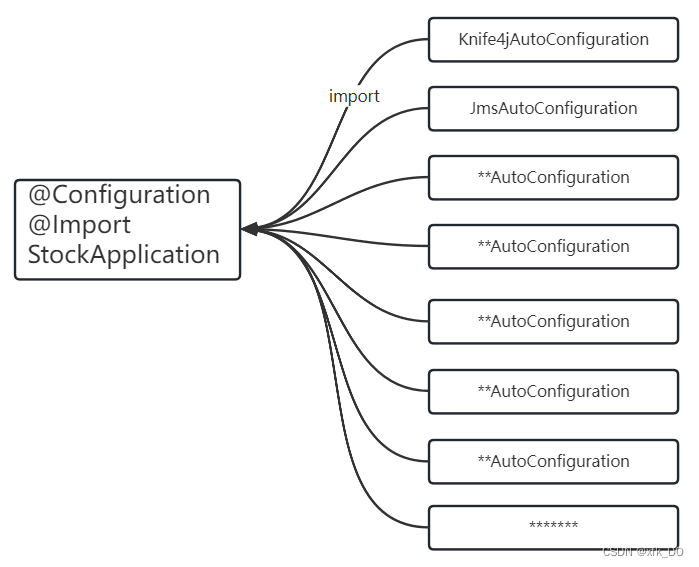
}@Import
在xml编写的时候,不会将所有的xml逻辑都集中在一个xml中。为了易读,将文件分开。导入的总是一个入口(demo01.xml)。在spring项目中,无论是自己编写还是已经提供的配置类,都会存在大量的配置类叫做**Configuration。被容器加载的入口配置类可以通过引入这个注解,导入其它想要生效的配置类,也要配合配置类注解使用Import。
创建对象
public class Bean03 {
    public Bean02() {
        System.out.println("Bean03被容器加载了");
    }
}
xml配置文件(demo02.xml)
<?xml version="1.0" encoding="UTF-8"?>
<beans xmlns="http://www.springframework.org/schema/beans"
       xmlns:xsi="http://www.w3.org/2001/XMLSchema-instance"
       xsi:schemaLocation="
       http://www.springframework.org/schema/beans http://www.springframework.org/schema/beans/spring-beans.xsd">
    <!-- 创建 Bean03 Bean对象 -->
    <bean id="bean03" class="com.test.beans.Bean03"/>
</beans>
为了实现Bean01、Bean02、Bean03都能创建出来,在demo01.xml中加载demo02.xml
<?xml version="1.0" encoding="UTF-8"?>
<beans xmlns="http://www.springframework.org/schema/beans"
       xmlns:xsi="http://www.w3.org/2001/XMLSchema-instance"
       xmlns:context="http://www.springframework.org/schema/context"
       xsi:schemaLocation="
       http://www.springframework.org/schema/beans
       http://www.springframework.org/schema/beans/spring-beans.xsd
       http://www.springframework.org/schema/context
       http://www.springframework.org/schema/context/spring-context.xsd">
    <bean id="bean01" class="com.beans.Bean01"/>
    <context:component-scan base-package="com.test.beans"/>
    <!--导入demo02-->
    <import resource="demo02.xml"/>
</beans>
配置类(MyConfiguration2 .java)
@Configuration
public class MyConfiguration02 {
    @Bean(name="bean03")
    public Bean03 bean03(){
        //可以实现对Bean03对象的初始化
        Bean03 bean03=new Bean03();
        return bean03;
    }
}
当前加载的MyConfiguration1,在MyConfiguration1中加载MyConfiguration2
@Configuration
@ComponentScan(basePackages ={"com.test.beans"} )
//可以导入两种值
//第一种直接导入配置类
//第二种导入选择器,导入的类非常非常多 100多个200多个...
//springboot中使用的第二种导入方式
@Import(value ={MyConfiguration02.class} )
public class MyConfiguration01 {
    @Bean(name="bean01")
    public Bean01 bean01(){
        Bean01 bean01=new Bean01();
        return bean01;
    }
}
@PropertySource
导入自定义的配置文件properties.
比如自定义 jdbc.properties
username=laowang
password=123456
此配置也会读入内存,可以使用@Value使用
@Configuration
@ComponentScan(basePackages ={"com.test.beans"} )
@Import(value ={MyConfiguration02.class} )
@PropertySource("classpath:jdbc.properties")
public class MyConfiguration01 {
    public Bean01 bean01(){
        Bean01 bean01=new Bean01();
        return bean01;
    }
}
@ImportResource
通过这个注解,允许启动spring应用中元数据(配置类和配置xml都看成是元数据)可以来自配置类的同时,也来自配置xml文件。这个注解可以作用在配置上,读取额外的配置xml文件。
- Bean04.java
public class Bean04 {
    public Bean04() {
        System.out.println("Bean04被容器加载了");
    }
}
- demo03.xml
<?xml version="1.0" encoding="UTF-8"?>
<beans xmlns="http://www.springframework.org/schema/beans"
       xmlns:xsi="http://www.w3.org/2001/XMLSchema-instance"
       xsi:schemaLocation="
       http://www.springframework.org/schema/beans
       http://www.springframework.org/schema/beans/spring-beans.xsd">
    <!--加载一个bean04-->
    <bean id="bean04" class="com.beans.Bean04"/>
</beans>
- 修改入口配置类
@Configuration
@ComponentScan(basePackages ={"com.tarena.csmall.starter.test.beans"} )
@Import(value ={MyConfiguration02.class} )
@PropertySource("classpath:jdbc.properties")
@ImportResource("classpath:demo03.xml")
public class MyConfiguration01 {
    @Bean(name="bean01")
    public Bean01 bean01(){
        Bean01 bean01=new Bean01();
        return bean01;
    }
}
SpringBoot自动配置原理
核心在于启动类的注解@SpringBootApplication
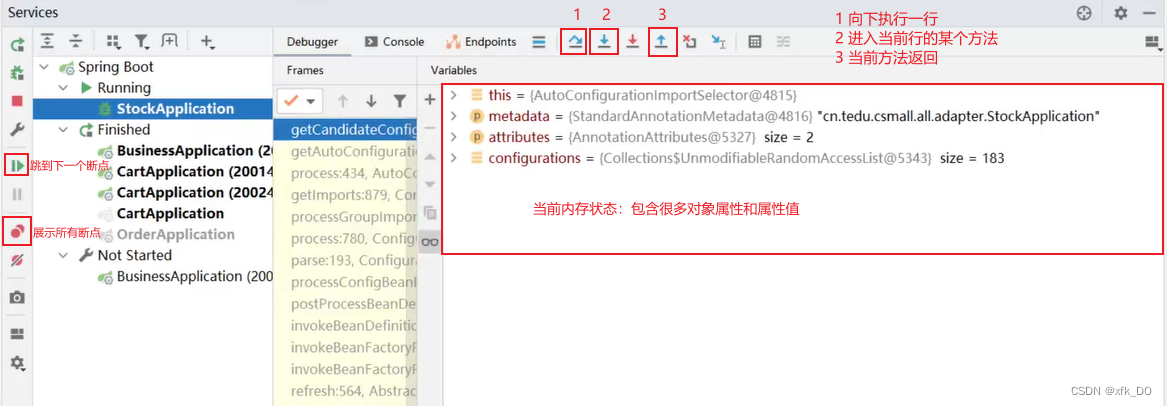
debug工具
springboot原理详解
核心注解
- springboot利用spring注解功能编写整理的一个组合注解
- SpringBootConfiguration:包装了一个@Configuration的注解,所以有这个注解的类本身就是一个配置类(启动类是个配置类)。
- ComponentScan:扫描自定义的各种注解所在的包,比如service controller 全局异常捕获(加载和扫描我们自己的业务逻辑)。默认扫描此类所在的包。
- EnableAutoConfiguration:开启自动配置加载。此注解底层使用@Import导入了配置类选择器,意味着很多配置类,体现了自动配置原理。
@EnableAutoConfiguration包装了@Import注解,导入一个选择器执行一个核心方法selectImports

方法返回结果是一个数组String[] ,元素是自动配置类全路径名称。
{"com.aa.a.**AutoConfiguration","com.aa.b.**AutoConfiguration"..}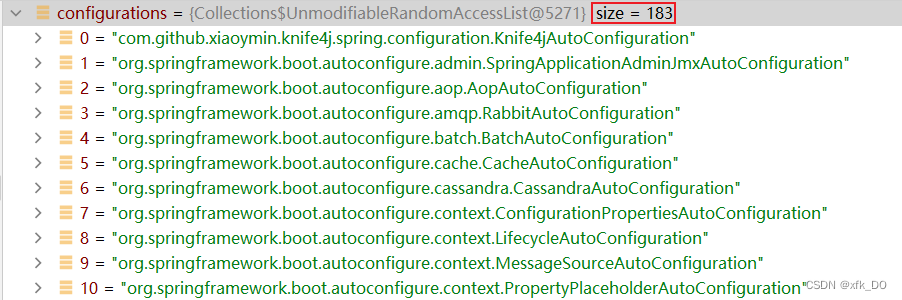
Import导入注解,获取这些字符串数组元素,就会执行导入功能。
对比import另一种导入方式,直接导入配置类的反射对象。这里只多了一步,解析全路径名称,获取反射对象。
问题:如此多的配置类,不可能在一个项目中全部使用。要进行过滤和筛选,哪些有效,哪些无效。
条件注解@Conditional
在众多的自动配置类中,就需要满足一定条件才能加载。这个功能是spring提供的条件注解,在springboot做了衍生。满足条件,配置类才加载;不满足条件,配置类不加载的。
一个springboot工程启动,如果观察哪些配置满足条件,可以使用debug模式,对应root范围。
logging:
  level:
    root:debug
会在日志中出现提示哪些条件没有满足:matched configuration、unmatched configuration
@ConditionalOnClass
类注解和方法注解,条件满足类加载,方法加载;条件不满足,则不加载。
指定class必须在依赖环境中存在.存在则满足,不存在则不满足
@ConditionalOnMissingClass
与上面的条件逻辑是相反的。存在则不满足,不存在则满足。
@ConditionalOnBean
类注解和方法注解,,某个限定条件的bean对象在容器中存在 则满足、,不存在则不满足。
@ConditionalOnMissingBean
与上面条件逻辑相反。一般是留给自定义扩展的。
@ConditionalOnProperty
根据条件对属性的描述,判断满足还是不满足,可以提供属性存在,属性值是否指定,属性值是否未命中等逻辑.。
条件配置类案例
测试@ConditionalOnMissingClass和@ConditionalOnProperty
属性有csmall.password=123456 的属性数据 条件则满足,没有,或者值不是123456都不满足。
还有一个匹配值条件:matchIfMissing=true/false;如果条件不存在值为true满足,值为false则不满足。
@Configuration
/**
 * 如果内存中有个csmall.password=123456
 * 则条件满足
 * jwt.rsa.pwd=678
 */
@ConditionalOnProperty
        (prefix = "csmall",value ="password",havingValue ="123456")
public class MyConditionalConfiguration01 {
    public MyConditionalConfiguration01() {
        System.out.println("条件配置类01,条件满足,加载");
    }
}
使用入口配置类扫描这个测试:
@Configuration
@ComponentScan(basePackages ={"com.test.condition"})
public class MyConfiguration01 {

}
@ConditionalOnClass/ConditionalOnMissingClass
@Configuration
//jedis是redis的一个java客户端. redisTemplate底层在使用的就有可能是jedis
@ConditionalOnMissingClass({"redis.clients.jedis.dfgdsf"})
public class MyConditionalConfiguration02 {
    public MyConditionalConfiguration02() {
        System.out.println("条件配置类02,条件满足,加载");
    }
}
导入的配置类在哪
通过selector导入String[]哪来的?springboot如果将其写死,没有扩展的空间了。springboot提供了自动配置的导入逻辑,需要准备一个META-INF/spring.factories的文件,这个文件的格式,可以参考spring-boot-autoconfigure中的内容。
源码路径找到配置类的所在之处:
@EnableAutoConfiguration ==> AutoConfigurationImportSelector.class ==> selectImports() ==> getAutoConfigurationEntry() ==> getCandidateConfigurations() ===> loadFactoryNames() ===> loadSpringFactories ===> "META-INF/spring.factories"
底层使用EnableAutoConfiguration.class反射对象解析成key值去META-INF/spring.factories找对应的value值,值是否加载屈居去条件注解配置。
List<String> configurations = SpringFactoriesLoader.loadFactoryNames(EnableAutoConfiguration.class, this.getClass.getClassLoader());

加载自动配置总结
-
启动类的核心注解(EnableAutoConfiguration)。
-
以Enable的注解都在进行配置类导入。
-
Import注解导入一个selector选择器(返回一堆配置类的全路径名称String[])。
-
这些String[] 来自于一个META-INF/spring.factories的文件,通过注解作为key值,读取数据。
-
并不是所有的自动配置类都加载,需要满足条件注解。
这些配置类如何导入的?
Spring提供了一个SpringFactories功能(SPI),读取固定文件META-INF/spring.factories,按照格式配置的内容会被加载,对应EnableAutConfiguration就是springboot要使用的自动配置类,交给一个导入的Selector,通过类的全路径名称,实现配置类的加载,通过条件的判断,筛选满足的配置类。
API:application programming interface SPI:service provider interface
共同点:接口 提供方定的。区别点:API 实现,是提供方定的, SPI实现,是调用方定的.(只要提到SPI ,一般都会看到一个固定的文件,配置自己的实现)。
自定义starter
需求描述:
使用stock 依赖自定义starter 定义一个配置,不需要stock扫描,也不需要手动导入,使用自动配置扩展逻辑配置在spring.factories文件中,使用属性 csmall.user.enable开启自动配置逻辑(条件)。
阅读当前AutoConfigure
***-srping-boot-starter,必定包含autoconfigure
mybatis-spring-boot-starter:mybatis-spring-boot-autoconfigure
dubbo-spring-boot-starter:dubbo-spring-boot-autoconfigure
knife4j-spring-boot-starter:knife4j-spring-boot-autoconfigure
准备一个自动配置类
只要加载配置类条件满足,容器user bean对象就会被创建;条件不满足,user对象则不被创建。
@Configuration
@Slf4j
public class UserAutoConfiguration {
    //创建一个user对象,但是是否创建取决于属性条件
    @Bean
    @ConditionalOnProperty
            (prefix = "csmall",value = "enable",havingValue = "true")
    public User initUser(){
        log.debug("条件满足,user创建容器bean对象");
        User user=new User();
        return user;
    }
}
准备spring.factories
在自定义的starter项目中,准备一个文件resources/META-INF/spring.factories

配置文件属性问题
@ConfigurationProperties
配合读取配置文件properties中,yaml中有层级关系的属性,赋值给bean对象。
@EnableConfigurationProperties
配合上述注解,引入读取的逻辑,让读取实现。
@Data
@Component
@ConfigurationProperties(prefix = "csmall")
@EnableConfigurationProperties
public class Bean05 {
    /**
     * 当前程序启动,Bean05一旦被扫描,
     * 由于属性读取注解生效,name属性,会自动读取 properties文件中
     * csmall.name
     * csmall.age
     */
    private String name;
    private Integer age;
}
这种读取属性注入到bean中的方式和@Value的区别在于,注入的底层原理不同
@Value反射赋值的,没有set方法也可以
@ConfigurationProperties是使用的setter方法
同时后一种方法,提供多级属性赋值
如果可以在bean对象使用这些注解实现属性的读取,初始化就方便极了.但是一般这种bean对象是自定义的,可以这样实现,要是第三方的代码.没法改源码实现第三方bean的初始化属性注入的.
使用方式是:
-
**Properties类 在类中添加@ConfigurationProperties
@Data
@ConfigurationProperties(prefix = "csmall")
public class UserProperties {
    private Boolean enable;
}-
EnableConfigurationProperties注解放到一个配置类中,在注解属性里导入这个**Properties,使这个类称为一个容器bean对象
@Slf4j
@Configuration
@EnableConfigurationProperties(UserProperties.class)
public class UserAutoConfiguration {
    //创建一个user对象,但是是否创建取决于属性条件
    @Bean
    @ConditionalOnProperty(prefix = "csmall",value = "enable",havingValue = "true")
    public User initUser(){
        log.debug("条件满足,user创建容器bean对象");
        User user = new User();
        return user;
    }
}- 如果在idea中要实现智能提示.需要在starter中添加一个springboot的依赖
    <!--属性配置的配置依赖  自动提示-->
    <dependency>
        <groupId>org.springframework.boot</groupId>
        <artifactId>spring-boot-configuration-processor</artifactId>
    </dependency>


 289
289


 被折叠的 条评论
为什么被折叠?
被折叠的 条评论
为什么被折叠?
 到【灌水乐园】发言


