


消息发送示例代码:
public static void main(String[] args) throws MQClientException, InterruptedException {
        DefaultMQProducer producer = new DefaultMQProducer("please_rename_unique_group_name");
        producer.setNamesrvAddr("127.0.0.1:9876"); //naseServer地址
        producer.start();
        for (int i = 0; i < 1000; i++) {
            try {
              //消息
                Message msg = new Message("TopicTest" ,
                    "TagA",
                    ("Hello RocketMQ " + i).getBytes(RemotingHelper.DEFAULT_CHARSET) /* Message body */
                );
              //消息发送
                SendResult sendResult = producer.send(msg,10000);
                System.out.printf("%s%n", sendResult);
            } catch (Exception e) {
                e.printStackTrace();
                Thread.sleep(1000);
            }
        }
        producer.shutdown();
    }
DefaultMQProducer是消息发送者的默认实现类,它的继承关系是:
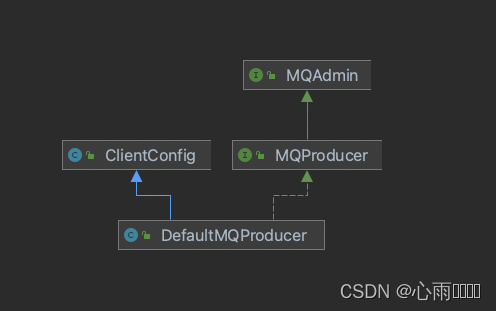
MQAdmin是MQ的基本管理接口,它的功能主要接口包括创建Topic,查找消费消息物理偏移量等等。
MQProducer是消息发送者接口,包括消息发送,开启、关闭等功能接口在这里面定义。
来看一下几个常用的消息发送API。
这两个接口都是都是同步发送消息,一个不指定超时时间,另一个可以指定超时时间。(不指定超时时间,那么默认为3s):
SendResult send(final Message msg);
SendResult send(final Message msg, final long timeout);
异步消息发送,SendCallback是消息发送之后的回调接口,区别依然是指定超时时间:
void send(final Message msg, final SendCallback sendCallback);
void send(final Message msg, final SendCallback sendCallback, final long timeout);
单向发送:
void sendOneway(final Message msg);
其他发送AIP:
//同步指定消息队列进行发送
SendResult send(final Message msg, final MessageQueue mq);
//异步指定消息队列进行消息发送
void send(final Message msg, final MessageQueue mq, final SendCallback sendCallback);
//单向指定消息队列进行消息发送
void sendOneway(final Message msg, final MessageQueue mq);
//消息发送时可以使用自定义的队列负载机制,同样的也还有异步、单向的API
SendResult send(final Message msg, final MessageQueueSelector selector, final Object arg);
//批量消息发送、批量发送只有同步发送模式
SendResult send(final Collection<Message> msgs)
-
同步sync
消息发送之后,同步等待服务器返回结果
-
异步async
消息发送之后,立即返回、消息发送者线程不阻塞,消息发送成功或者失败对在一个新的线程中回调定义的回调接口。
-
单向oneway
消息发送之后立即返回,不关心发送接口,也没有回调函数。
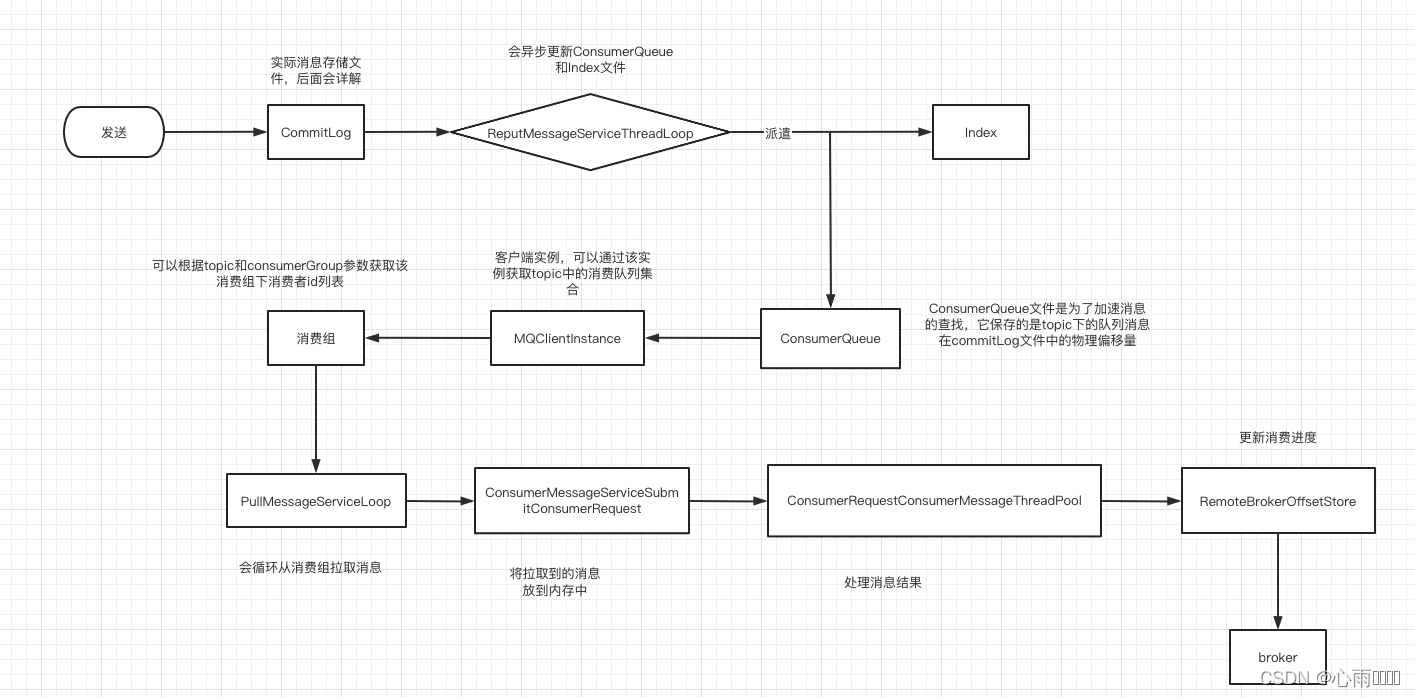
消息发送流程:
然后来看一下producer启动的代码:
当调用 producer.start() 后他经历了下面这些步骤
 this.serviceState = ServiceState.START_FAILED;
//检查生产者组是否符合要求,改变生产者的instanceName为进程id
this.checkConfig();
if (!this.defaultMQProducer.getProducerGroup().equals(MixAll.CLIENT_INNER_PRODUCER_GROUP)) {
  this.defaultMQProducer.changeInstanceNameToPID();
}
//创建mQClientInstance实例
this.mQClientFactory = MQClientManager.getInstance().getOrCreateMQClientInstance(this.defaultMQProducer, rpcHook);
//向MQClientInstance注册服务,将当前生产者加入MQClientInstance管理,方便后续调用网络请求,进行心跳检测等等
boolean registerOK = mQClientFactory.registerProducer(this.defaultMQProducer.getProducerGroup(), this);
if (!registerOK) {
  this.serviceState = ServiceState.CREATE_JUST;
  throw new MQClientException("The producer group[" + this.defaultMQProducer.getProducerGroup()
                              + "] has been created before, specify another name please." + FAQUrl.suggestTodo(FAQUrl.GROUP_NAME_DUPLICATE_URL),
                              null);
}
this.topicPublishInfoTable.put(this.defaultMQProducer.getCreateTopicKey(), new TopicPublishInfo());
//启动
if (startFactory) {
  mQClientFactory.start();
}
log.info("the producer [{}] start OK. sendMessageWithVIPChannel={}", this.defaultMQProducer.getProducerGroup(),
         this.defaultMQProducer.isSendMessageWithVIPChannel());
this.serviceState = ServiceState.RUNNING;
当启动了Producer之后,就会有一个MQClientInstance实例了,他就主要承担着与RocketMQ服务器进行交互了。
消息发送流程:

首先我们来看 producer.send(msg,10000)方法:
1.一直点进来之后就会来到 sendDefaultImpl 方法:
//校验message,校验topic是否合法,判断消息体是否是空的或者消息题内容是否超过4M。
Validators.checkMessage(msg, this.defaultMQProducer);
2.获取路由信息:
//获取路由信息
TopicPublishInfo topicPublishInfo = this.tryToFindTopicPublishInfo(msg.getTopic());
根据topic获取路由信息
private TopicPublishInfo tryToFindTopicPublishInfo(final String topic) {
  			//尝试从本地缓存获取
        TopicPublishInfo topicPublishInfo = this.topicPublishInfoTable.get(topic);
        if (null == topicPublishInfo || !topicPublishInfo.ok()) {
            this.topicPublishInfoTable.putIfAbsent(topic, new TopicPublishInfo());
          	//nameserver获取
            this.mQClientFactory.updateTopicRouteInfoFromNameServer(topic);//#@1
            topicPublishInfo = this.topicPublishInfoTable.get(topic);
        }

        if (topicPublishInfo.isHaveTopicRouterInfo() || topicPublishInfo.ok()) {
            return topicPublishInfo;
        } else {
          	//使用默认主题去查路由信息
            this.mQClientFactory.updateTopicRouteInfoFromNameServer(topic, true, this.defaultMQProducer);//#@2
            topicPublishInfo = this.topicPublishInfoTable.get(topic);
            return topicPublishInfo;
        }
    }
然后再说一下上面代码中的 #@1 和#@2两个地方的代码。
#@1是根据topic从NameServer获取路由信息,在前面一章文章讲NameServer的路由发现时,讲过NameServer提供了根据topic找路由信息的功能。那么这里这个地方代码较多我就不全部粘贴出来了。其实这两个地方吊的事一个方法,只不过一个使用默认主题去查而第一次没有用默认主题,来看一下这个方法。
第一部分:
是否使用默认主题获取路由信息,若使用默认主题查询信息,就将topic的队列替换为生产者默认的队列个数,不是默认主题就用该主题去过去路由信息。
 TopicRouteData topicRouteData;
if (isDefault && defaultMQProducer != null) {
  //1.用默认主题查询路由信息,如果查到了就将路由信息中读写队列个数替换为生产者默认的队列个数
  topicRouteData = this.mQClientAPIImpl.getDefaultTopicRouteInfoFromNameServer(defaultMQProducer.getCreateTopicKey(),1000 * 3);
  if (topicRouteData != null) {
    for (QueueData data : topicRouteData.getQueueDatas()) {
      int queueNums = Math.min(defaultMQProducer.getDefaultTopicQueueNums(), data.getReadQueueNums());
      data.setReadQueueNums(queueNums);
      data.setWriteQueueNums(queueNums);
    }
  }
} else {
  //不是默认主题,根据topic从nameserver获取路由信息
  topicRouteData = this.mQClientAPIImpl.getTopicRouteInfoFromNameServer(topic, 1000 * 3);
}
没找到路由信息就返回了。
第二部分找到路由信息:
就根据topic从本地获取原来的路由信息进行比较看是够发送了变化。若发生了变化就需要更新地址缓存表。
if (topicRouteData != null) { //找到路由信息
    //获取本地路由信息
    TopicRouteData old = this.topicRouteTable.get(topic);
    //判断是够发生改变
    boolean changed = topicRouteDataIsChange(old, topicRouteData);
    if (!changed) {
    	changed = this.isNeedUpdateTopicRouteInfo(topic);
    } else {
    	log.info("the topic[{}] route info changed, old[{}] ,new[{}]", topic, old, topicRouteData);
    }
    //发生改变,更新地址缓存表
    if (changed) {
      TopicRouteData cloneTopicRouteData = topicRouteData.cloneTopicRouteData();
      //更新brokerAddrTable
      for (BrokerData bd : topicRouteData.getBrokerDatas()) {
      	this.brokerAddrTable.put(bd.getBrokerName(), bd.getBrokerAddrs());
      }
      // Update Pub info
      {
      //路由信息转换为topic信息
      TopicPublishInfo publishInfo = topicRouteData2TopicPublishInfo(topic, topicRouteData);
      publishInfo.setHaveTopicRouterInfo(true);
      Iterator<Entry<String, MQProducerInner>> it = this.producerTable.entrySet().iterator();
      while (it.hasNext()) {
        Entry<String, MQProducerInner> entry = it.next();
        MQProducerInner impl = entry.getValue();
        if (impl != null) {
          impl.updateTopicPublishInfo(topic, publishInfo);
        }
      }
    }
    // Update sub info
    {
      Set<MessageQueue> subscribeInfo = topicRouteData2TopicSubscribeInfo(topic, topicRouteData);
      Iterator<Entry<String, MQConsumerInner>> it = this.consumerTable.entrySet().iterator();
      while (it.hasNext()) {
        Entry<String, MQConsumerInner> entry = it.next();
        MQConsumerInner impl = entry.getValue();
        if (impl != null) {
          impl.updateTopicSubscribeInfo(topic, subscribeInfo);
        }
      }
    }
    log.info("topicRouteTable.put. Topic = {}, TopicRouteData[{}]", topic, cloneTopicRouteData);
    this.topicRouteTable.put(topic, cloneTopicRouteData);
    return true;
}
3.选择一个消息队列
在这里面会获取一个自增值然后与消息队列个数取模然后返回这个队列
//选择一个消息队列,故障规避机制也在这里面,默认是不启用故障规避机制的
MessageQueue mqSelected = this.selectOneMessageQueue(topicPublishInfo, lastBrokerName);
4.消息发送
在这里面会根据broker地址,然后构建请求,选择消息发送模式(同步、异步、单向),然后将消息发送出去。
//消息发送
sendResult = this.sendKernelImpl(msg, mq, communicationMode, sendCallback, topicPublishInfo, timeout - costTime);
这一块里面代码也是蛮多的,我也不罗列出来了,感兴趣的可以自己去点开看一看。
本篇文章简单说了一下消息发送的集中API,以及消息发送的整个流程,但是后面对于代码逻辑这部分讲的也是比较粗糙的,因为这块的代码确实挺多的,我一一粘出来可能这篇笔记的长度是现在的3倍了,我罗列了几个关键点代码,并且简单的说明了一下。


 794
794

 被折叠的 条评论
为什么被折叠?
被折叠的 条评论
为什么被折叠?
 到【灌水乐园】发言


