


文章目录
JetPack

Lifecycle
使用Lifecycle解耦页面和组件
如果组件的操作与activity的生命周期强关联,可以用Lifecycle解耦
以计时器Demo为例(app打开时计时器启动,app退到后台时计时器停止,再回到app时计时器继续启动)
1、自定义组件 实现 LifecycleObserver
//自定义Chronometer计时器 (继承Chronometer),然后实现LifecycleObserver
public class MyChronometer extends Chronometer implements LifecycleObserver{

    private long elapsedTime;

    public MyChronometer(Context context, AttributeSet attrs) {
        super(context, attrs);
    }

    @OnLifecycleEvent(Lifecycle.Event.ON_RESUME)  //对应activity的 onResume
    private void startMeter(){
        setBase(SystemClock.elapsedRealtime() - elapsedTime);
        start();
    }

    @OnLifecycleEvent(Lifecycle.Event.ON_PAUSE)  //对应activity的  onPause
    private void stopMeter(){
        elapsedTime = SystemClock.elapsedRealtime() - getBase();
        stop();
    }
}
2、在布局文件中使用
<com.kaiya.mvp.jetpacktest.custom.MyChronometer
        app:layout_constraintLeft_toLeftOf="parent"
        app:layout_constraintRight_toRightOf="parent"
        app:layout_constraintTop_toTopOf="parent"
        app:layout_constraintBottom_toBottomOf="parent"
        android:text="hello world "
        android:textSize="30sp"
        android:id="@+id/chronometer"
        android:layout_width="wrap_content"
        android:layout_height="wrap_content" />
3、在onCreate方法中调用
myChronometer = findViewById(R.id.chronometer);
getLifecycle().addObserver(myChronometer);  //添加观察(监听)
4、总结:
涉及到界面生命周期的操作放在了控件内部,使得控件与界面(activity)解耦了。如果后续需要复用控件的话,直接将控件拿去使用就行,不用再关心是否涉及界面生命周期操作
使用Lifecycle解耦Service与组件
以app获取GPS定位为例(点击Start按钮开始获取定位,点击Stop停止获取)
1、添加依赖(LifecycleService)及权限
implementation 'androidx.lifecycle:lifecycle-extensions:2.2.0'
在AndroidManifest.xml清单文件中添加权限
<uses-permission android:name="android.permission.ACCESS_FINE_LOCATION" />
<uses-permission android:name="android.permission.ACCESS_COARSE_LOCATION" />
2、创建MyLocationService继承LifecycleService
public class MyLocationService extends LifecycleService{
    public MyLocationService() {
        Log.e("mylog","MyLocationService");
        //创建观察者
        MyLocationObserver myLocationObserver = new MyLocationObserver(this);
        //给lifecycle添加观察者
        getLifecycle().addObserver(myLocationObserver);
    }
}
3、创建MyLocationObserver 实现 LifecycleObserver
public class MyLocationObserver implements LifecycleObserver {

    private Context context;
    private LocationManager locationManager;
    private MyLocationListener myLocationObserver;

    public MyLocationObserver(Context context) {
        this.context = context;
    }

    @OnLifecycleEvent(Lifecycle.Event.ON_CREATE)  //对应Service 的 onCreate
    private void startGetLocation() {
        Log.e("mylog","startGetLocation");
        //获取location管理
        locationManager = (LocationManager) context.getSystemService(Context.LOCATION_SERVICE);
        myLocationObserver = new MyLocationListener();
        if (ActivityCompat.checkSelfPermission(context, Manifest.permission.ACCESS_FINE_LOCATION) != PackageManager.PERMISSION_GRANTED && ActivityCompat.checkSelfPermission(context, Manifest.permission.ACCESS_COARSE_LOCATION) != PackageManager.PERMISSION_GRANTED) {
            return;
        }
        locationManager.requestLocationUpdates(LocationManager.GPS_PROVIDER, 3000, 1, myLocationObserver);
    }

    @OnLifecycleEvent(Lifecycle.Event.ON_DESTROY) //对应Service 的 onDestory
    private void stopGetLocation(){
        Log.e("mylog","stopGetLocation");
        locationManager.removeUpdates(myLocationObserver);
    }

    //创建Location监听
    static class MyLocationListener implements LocationListener{

        @Override
        public void onLocationChanged(@NonNull Location location) {
            Log.e("mylog","location changed:"+location.toString());
        }

        @Override
        public void onLocationChanged(@NonNull List<Location> locations) {
            Log.e("mylog","1");
        }

        @Override
        public void onFlushComplete(int requestCode) {
            Log.e("mylog","2");
        }

        @Override
        public void onStatusChanged(String provider, int status, Bundle extras) {
            Log.e("mylog","3");
        }

        @Override
        public void onProviderEnabled(@NonNull String provider) {
            Log.e("mylog","4");
        }

        @Override
        public void onProviderDisabled(@NonNull String provider) {
            Log.e("mylog","5");
        }
    }
}
4、调用
public class LifeCycleServerActivity extends AppCompatActivity {

    @Override
    protected void onCreate(Bundle savedInstanceState) {
        super.onCreate(savedInstanceState);
        setContentView(R.layout.activity_life_cycle_server);
        checkPermission();
    }
    //动态注册权限
    public void checkPermission() {
        ActivityCompat.requestPermissions(this,
                new String[]{
                        Manifest.permission.ACCESS_FINE_LOCATION,
                        Manifest.permission.ACCESS_COARSE_LOCATION},
                111);
    }

    public void startGPS(View view) {
        startService(new Intent(this, MyLocationService.class));
    }

    public void stopGPS(View view) {
        stopService(new Intent(this, MyLocationService.class));
    }

    @Override
    public void onRequestPermissionsResult(int requestCode, @NonNull String[] permissions, @NonNull int[] grantResults) {
        super.onRequestPermissionsResult(requestCode, permissions, grantResults);
        if (requestCode == 111) {
            for (int i = 0; i < grantResults.length; i++) {
                if (grantResults[i] != PackageManager.PERMISSION_GRANTED) {
                    Toast.makeText(this, "缺少权限(" + permissions[i] + ")",Toast.LENGTH_SHORT);
                    return;
                }
            }
        }
    }
}
5、总结
可以看到,获取gps信息需要在生命周期(onCreate和onDestory)中注册和移除监听。而使用了lifecycle后,MyLocationService 仅在构造方法中进行观察者创建和添加。将service与LocationListener解耦。在MyLocationObserver 中实现了逻辑,且可单独出来使用。
使用ProcessLifecycleOwner监听应用程序生命周期
- 针对整个应用程序的监听,与Activity数量无关
- Lifecycle.Event.ON_CREATE 只会被调用一次,Lifecycle.Event.ON_DESTORY永远不会被调用
1、自定义Application
public class MyApplication extends Application {
    @Override
    public void onCreate() {
        super.onCreate();
        //使用ProcessLifecycleOwner 添加观察者
        ProcessLifecycleOwner.get().getLifecycle().addObserver(new ApplicationObserver());
    }
}
2、创建ApplicationObserver 实现 LifecycleObserver
public class ApplicationObserver implements LifecycleObserver {
    private String TAG = "mylog";

    @OnLifecycleEvent(Lifecycle.Event.ON_CREATE) //对应应用程序的oncreate
    public void onCreate(){
        Log.e(TAG,"lifecycle.Event.ON_CREATE");
    };
    @OnLifecycleEvent(Lifecycle.Event.ON_START)
    public void onStart(){
        Log.e(TAG,"lifecycle.Event.ON_START");
    }
    @OnLifecycleEvent(Lifecycle.Event.ON_RESUME)
    public void onResume(){
        Log.e(TAG,"lifecycle.Event.ON_RESUME");
    }
    @OnLifecycleEvent(Lifecycle.Event.ON_PAUSE)
    public void onPause(){
        Log.e(TAG,"lifecycle.Event.ON_PAUSE");
    }
    @OnLifecycleEvent(Lifecycle.Event.ON_STOP)
    public void onStop(){
        Log.e(TAG,"lifecycle.Event.ON_STOP");
    }
    @OnLifecycleEvent(Lifecycle.Event.ON_DESTROY)
    public void onDestory(){
        Log.e(TAG,"lifecycle.Event.ON_DESTORY");
    }
}
3、在AndroidManifest.xml 中添加自定义application
<application
        android:name=".ProcessLifecycleOwner.MyApplication" //添加自定义Application
        android:allowBackup="true"
        android:icon="@mipmap/ic_launcher"
        android:label="@string/app_name"
        android:roundIcon="@mipmap/ic_launcher_round"
        android:supportsRtl="true"
        android:theme="@style/Theme.JetPackTest">
        <activity android:name=".LifeCycleActivity" />
        <activity android:name=".LifeCycleServerActivity" />
        <activity android:name=".MainActivity">
            <intent-filter>
                <action android:name="android.intent.action.MAIN" />

                <category android:name="android.intent.category.LAUNCHER" />
            </intent-filter>
        </activity>

        <service android:name=".LifecycleService.MyLocationService" />
    </application>
4、总结
和之前俩个Lifecycle的使用一样,将application中关于生命周期的操作放到了LifecycleObserver中,使得其独立且能单独使用
刚打开应用时:

当应用返回到后台时:

当应用又后台返回前台时:

5、好处
- 帮助开发者建立可感知生命周期的组件
- 组件在其内部管理自己的生命周期,从而降低模块耦合度
- 降低内存泄露发生的可能性
- Activity、Fragment、Service、Application均有Lifecycle支持
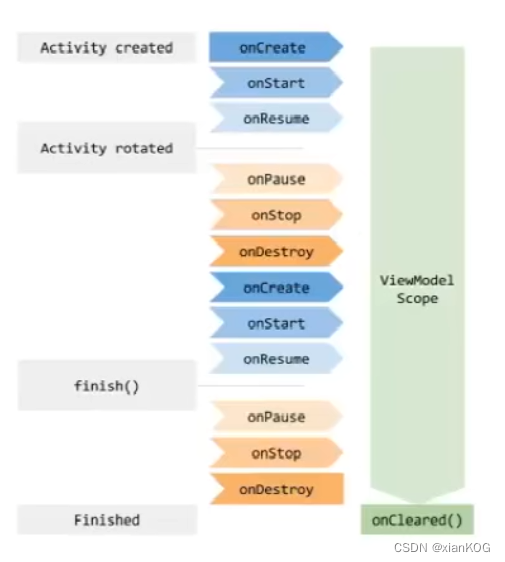
ViewModel 与 LiveData
ViewModel
由于
- 瞬态数据丢失(手机界面旋转导致数据丢失)
- 异步调用的内存泄露
- 类膨胀提高维护难度和测试难度
出现了ViewModel,作用
- 它介于View(视图)和Model(数据模型)之间的桥梁
- 使视图和数据能够分离,也能保持通信
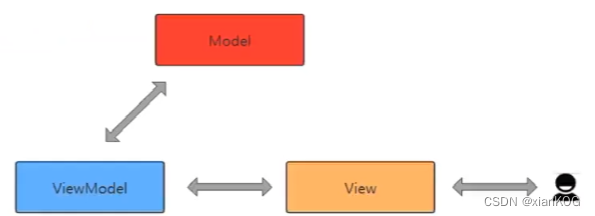
应用(屏幕旋转后用户操作数据仍然存在)
1、创建ViewModel
public class MyViewModel extends ViewModel {
    public int number;
}
2、使用
public class ViewModelActivity extends AppCompatActivity {
    private TextView textView;
    private MyViewModelActivity viewModel;

    @Override
    protected void onCreate(Bundle savedInstanceState) {
        super.onCreate(savedInstanceState);
        setContentView(R.layout.activity_view_model);
        textView = findViewById(R.id.content);
        //加载ViewModel
        viewModel = new ViewModelProvider(
                this,
                new ViewModelProvider.AndroidViewModelFactory(getApplication())
                ).get(MyViewModel.class);
        //使用
        textView.setText(String.valueOf(viewModel.number));
    }

    public void addNumber(View view) {
    	//操作ViewModel
        textView.setText(String.valueOf(++viewModel.number));
    }
}
3、效果


通过加号按钮可以进行数字的增加操作,当屏幕旋转后,数据不丢失
4、原理
- 不要向ViewModel中传入context,会导致内存泄露
- 如果要使用context,请使用AndroidViewModel中的Application
//继承 AndroidViewModel ,构造方法中就有aplication
public class MyViewModel extends AndroidViewModel{
	public int number;
	public MyViewModel(@NonNull Application application(){
		super(application);
	}
}
LiveData
与ViewModel关系
- 在ViewModel中的数据发生变化时通知页面
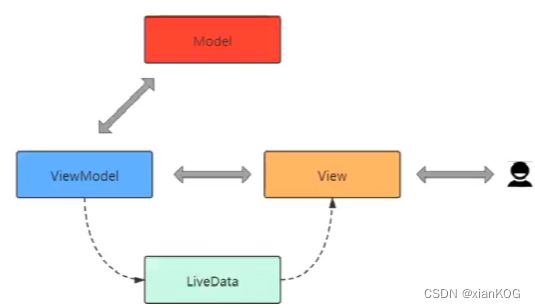
应用(当ViewModel改变时,LiveData更新View)
1、创建ViewModel+LiveData
public class MyViewModel extends ViewModel {
	//在ViewModel中声明一个LiveData
    private MutableLiveData<Integer> currentSecond;
	//单例模式返回LiveData对象
    public MutableLiveData<Integer> getCurrentSecond() {
        if(currentSecond == null) {
            currentSecond = new MutableLiveData<>();
            currentSecond.setValue(0);
        }
        return currentSecond;
    }
}
2、调用
protected void onCreate(Bundle savedInstanceState) {
        super.onCreate(savedInstanceState);
        setContentView(R.layout.activity_view_model_and_data);
        textView = findViewById(R.id.textView);
        //或者ViewModel对象
        myViewModel = new ViewModelProvider(this
                ,new ViewModelProvider.AndroidViewModelFactory(getApplication())
        ).get(MyViewModel.class);
        //给textView设置值(ViewModel中的LiveData)
        textView.setText(String.valueOf(myViewModel.getCurrentSecond()));
        //当ViewModel中的LiveData值改变时,给textView重新赋值
        myViewModel.getCurrentSecond().observe(this, new Observer<Integer>() {
            @Override
            public void onChanged(Integer integer) {
                textView.setText(String.valueOf(integer));
            }
        });
        startTimer();
    }

//定时器
private void startTimer() {
        new Timer().schedule(new TimerTask() {
            @Override
            public void run() {
                //非UI线程(异步),用postValue
                //UI线程,用setValue
                myViewModel.getCurrentSecond().postValue(
                        myViewModel.getCurrentSecond().getValue()+1
                );
            }
        },1000,1000);
    }
ViewModel + LiveData 实现Fragment间通信
1、创建ViewModel和LiveData
public class FViewModel extends ViewModel {
	//在ViewModel中声明LiveData
    private MutableLiveData<Integer> progress;
	//单例模式
    public MutableLiveData<Integer> getProgress() {
        if(progress == null){
            progress = new MutableLiveData<>();
            progress.setValue(0);
        }
        return progress;
    }
}
2、创建两个Fragment(FirstFragment和SecondFragment),并在布局文件中各放入一个可拖拽的进度条
<SeekBar
        android:id="@+id/seekBar"
        android:layout_width="match_parent"
        android:layout_height="wrap_content"
        android:max="100"
        android:min="0"
        app:layout_constraintBottom_toBottomOf="parent"
        app:layout_constraintLeft_toLeftOf="parent"
        app:layout_constraintRight_toRightOf="parent"
        app:layout_constraintTop_toTopOf="parent" />
3、在FristFragment中监听SeekBar的改变并修改ViewModel中LiveData值
@Override
    public View onCreateView(LayoutInflater inflater, ViewGroup container,
                             Bundle savedInstanceState) {
        View root = inflater.inflate(R.layout.fragment_1, container, false);
        seekBar = root.findViewById(R.id.seekBar);
        //获取ViewModel
        FViewModel fViewModel = new ViewModelProvider(
                getActivity(),
                new ViewModelProvider.AndroidViewModelFactory(getActivity().getApplication())
        ).get(FViewModel.class);
		//监听SeekBar(可拖拽进度条),并修改LiveData值
        seekBar.setOnSeekBarChangeListener(new SeekBar.OnSeekBarChangeListener() {
            @Override
            public void onProgressChanged(SeekBar seekBar, int i, boolean b) {
                fViewModel.getProgress().setValue(i);
            }

            @Override
            public void onStartTrackingTouch(SeekBar seekBar) {

            }

            @Override
            public void onStopTrackingTouch(SeekBar seekBar) {

            }
        });
        return root;
    }
4、在SecondFragment中监听LiveData值得改变,并对SecondFragment中的SeekBar赋值,使得SecondFragment与FirstFragment中的SeekBar同步拖动
@Override
    public View onCreateView(LayoutInflater inflater, ViewGroup container,
                             Bundle savedInstanceState) {
        View root = inflater.inflate(R.layout.fragment_2, container, false);
        seekBar = root.findViewById(R.id.seekBar);
        //获取ModelView对象
        FViewModel fViewModel = new ViewModelProvider(
                getActivity(),
                new ViewModelProvider.AndroidViewModelFactory(getActivity().getApplication())
        ).get(FViewModel.class);
        //监听ViewModel中LiveData的改变,并对Seekbar赋值
        fViewModel.getProgress().observe(getActivity(), new Observer<Integer>() {
            @Override
            public void onChanged(Integer integer) {
                seekBar.setProgress(integer);
            }
        });

        return root;
    }
5、效果图
liveData优势
- 确保界面符合数据状态
- 不会发生内存泄露
- 不会因Activity停止而导致奔溃
- 数据始终保持最新状态
- 适当的配置更改
- 共享资源
DataBinding 的意义与应用
意义
让布局文件承担了部分原来属于页面的工作,使页面与布局耦合度进一步降低
使用前的配置
1、在build.gradle(app)中
defaultConfig {
        ...
        ...
        //添加以下代码
        buildFeatures {
        	dataBinding true
    	}
    }
2、创建一个对象 Idol
public class Idol {
    public String name;
    public String start;

    public Idol(String name, String start) {
        this.name = name;
        this.start = start;
    }
}
3、在布局文件中
将鼠标指针放在文件左上方的 <?xml 前面,按 alt+回车 ,弹出如图选项
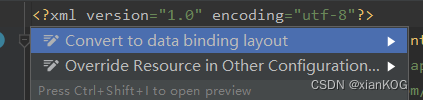
选择 “Convert to data binding layout ”后,会在布局的外层添加一层布局 <layout xmlns… 和 <data标签
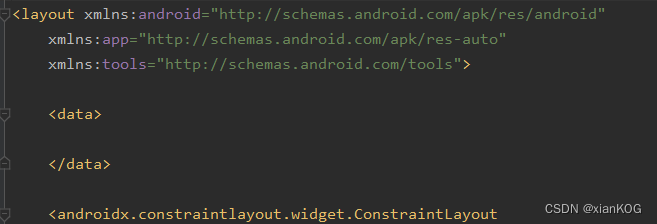
然后在 <data 标签中传入变量
<data>
	<variable
            name="idol"
            type="com.kaiya.mvp.jetpacktest.dataBinding.Idol" />
</data>
在onCreate中使用
//获取绑定对象
ActivityDataBindingBinding binding = DataBindingUtil.setContentView(this,R.layout.activity_data_binding);
Idol idol = new Idol("张三张三张三","五星五星五星");
//设置属性
binding.setIdol(idol);
//可以直接通过id设置控件的值,省略了 findViewById()
binding.image.setImageResource(R.drawable.ic_launcher_foreground);
在布局文件中引用属性
<TextView
            android:id="@+id/textView1"
            android:layout_width="wrap_content"
            android:layout_height="wrap_content"
            android:layout_marginTop="50dp"
            tools:text="姓名"
            android:text="@{idol.name}"  //引入属性
            android:textSize="30sp"
            app:layout_constraintHorizontal_bias="0.498"
            app:layout_constraintLeft_toLeftOf="parent"
            app:layout_constraintRight_toRig htOf="parent"
            app:layout_constraintTop_toBottomOf="@+id/image" />

        <TextView
            android:id="@+id/textView2"
            android:layout_width="wrap_content"
            android:layout_height="wrap_content"
            android:layout_marginTop="10dp"
            android:textSize="20sp"
            tools:text="星级"
            android:text="@{idol.start}" //引用属性
            app:layout_constraintLeft_toLeftOf="parent"
            app:layout_constraintRight_toRightOf="parent"
            app:layout_constraintTop_toBottomOf="@+id/textView1" />
效果:

总结:
布局文件绑定了类,让类的属性与控件值绑定,使得页面上减少了 findViewById 和 赋值代码。布局文件承担了部分原来属于页面的工作,使得页面和布局的耦合度进一步降低
import标签
在DataBinding使用中,如果 Idol 类包含int类型属性,在布局文件中如何赋值?
public class Idol {
    public String name;
    public int start;

    public Idol(String name, int start) {
        this.name = name;
        this.start = start;
    }
}
在布局文件中赋值时,如何将int转换成字符串?
Idol idol = new Idol("张三张三张三",4);
//设置属性
binding.setIdol(idol);

<TextView>
	...
	android:text="@{idol.start}" //如何将 4 转换成字符串?
	...
</TextView>
需要创建一个处理类
public class StartUtils {
    public static String getStart(int start){
        switch (start){
            case 1:
                return "一星";
            case 2:
                return "二星";
            case 3:
                return "三星";
            case 4:
                return "四星";
            case 5:
                return "五星";
        }
        return "";
    }
}
然后在布局文件中使用 <import 标签 引入处理类
<data>
        <variable
            name="idol"
            type="com.kaiya.mvp.jetpacktest.dataBindingF.Idol" />
        //引入处理类
        <import type="com.kaiya.mvp.jetpacktest.dataBindingF.StartUtils" />
    </data>
使用:
<TextView>
	...
	android:text="@{StartUtils.getStart(idol.start)}"
	...
</TextView>
事件绑定
1、定义一个事件类
public class EventHandleListener {
    private Context context;
    public EventHandleListener(Context context) {
        this.context = context;
    }
    //定义事件方法
    public void buttonOnClick(View view){
        Toast.makeText(context,"喜欢",Toast.LENGTH_SHORT).show();
        view.setBackgroundColor(context.getResources().getColor(R.color.teal_200));
    }
}
2、给 DataBinding 设置事件
@Override
    protected void onCreate(Bundle savedInstanceState) {
        super.onCreate(savedInstanceState);
        setContentView(R.layout.activity_data_binding);
        binding = DataBindingUtil.setContentView(this,R.layout.activity_data_binding);
        Idol idol = new Idol("张三张三张三","五星五星五星");
        binding.setIdol(idol);
        binding.image.setImageResource(R.drawable.ic_launcher_foreground);
        binding.setEventHandle(new EventHandleListener(this)); // 添加事件
    }
3、在布局文件中引入事件并调用
<data>
        <variable
            name="idol"
            type="com.kaiya.mvp.jetpacktest.dataBindingF.Idol" />
        <variable
            name="eventHandle"
            type="com.kaiya.mvp.jetpacktest.dataBindingF.EventHandleListener" /> //引入事件
        <import type="com.kaiya.mvp.jetpacktest.dataBindingF.StartUtils" />
    </data>
//调用
<Button
	android:onClick="@{eventHandle.buttonOnClick}" //调用点击事件
	android:layout_marginTop="20dp"
	app:layout_constraintTop_toBottomOf="@+id/textView2"
	app:layout_constraintLeft_toLeftOf="parent"
	app:layout_constraintRight_toRightOf="parent"
	android:text="喜欢"
	android:layout_width="wrap_content"
	android:layout_height="wrap_content" />
二级页面的绑定
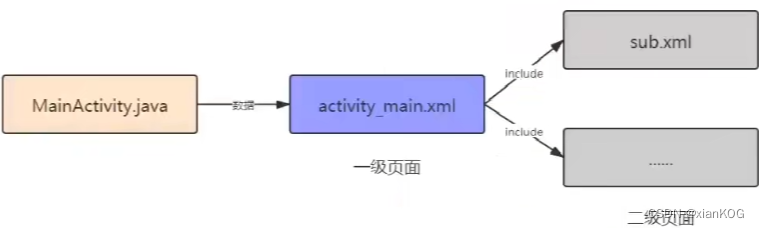
现在用 <include 实现一个嵌套布局
<layout xmlns:android="http://schemas.android.com/apk/res/android"
    xmlns:app="http://schemas.android.com/apk/res-auto"
    xmlns:tools="http://schemas.android.com/tools">

    <data>
        <variable
            name="idol"
            type="com.kaiya.mvp.jetpacktest.dataBindingF.Idol" />
    </data>

    <androidx.constraintlayout.widget.ConstraintLayout
        android:layout_width="match_parent"
        android:layout_height="match_parent"
        tools:context=".DataBindingTwoActivity">

        <ImageView
            android:id="@+id/image"
            android:layout_width="300dp"
            android:layout_height="300dp"
            android:layout_marginTop="20dp"
            android:src="@drawable/ic_launcher_background"
            app:layout_constraintLeft_toLeftOf="parent"
            app:layout_constraintRight_toRightOf="parent"
            app:layout_constraintTop_toTopOf="parent" />
		//嵌套布局
        <include
            android:layout_marginTop="50dp"
            layout="@layout/item_layout"
            android:layout_width="wrap_content"
            android:layout_height="wrap_content"
            app:layout_constraintEnd_toEndOf="parent"
            app:layout_constraintStart_toStartOf="parent"
            app:layout_constraintTop_toBottomOf="@+id/image" />

    </androidx.constraintlayout.widget.ConstraintLayout>
</layout>
如何将 idol 对象传给 二级布局 <include中呢?在 <include中引入对象
 <include
            app:idol="@{idol}"  //引入对象
            android:layout_marginTop="50dp"
            layout="@layout/item_layout"
            android:layout_width="wrap_content"
            android:layout_height="wrap_content"
            app:layout_constraintEnd_toEndOf="parent"
            app:layout_constraintStart_toStartOf="parent"
            app:layout_constraintTop_toBottomOf="@+id/image" />
然后在二级布局中绑定对象
<data>
        <variable
            name="idol"
            type="com.kaiya.mvp.jetpacktest.dataBindingF.Idol" />
    </data>
然后调用
<TextView
            android:id="@+id/textView1"
            android:layout_width="wrap_content"
            android:layout_height="wrap_content"
            android:text="@{idol.name}" //使用
            android:textSize="30sp"
            app:layout_constraintLeft_toLeftOf="parent"
            app:layout_constraintRight_toRightOf="parent"
            app:layout_constraintTop_toTopOf="parent"
            tools:text="姓名" />

        <TextView
            android:id="@+id/textView2"
            android:layout_width="wrap_content"
            android:layout_height="wrap_content"
            android:layout_marginTop="10dp"
            android:text="@{idol.start}" //使用
            android:textSize="20sp"
            app:layout_constraintLeft_toLeftOf="parent"
            app:layout_constraintRight_toRightOf="parent"
            app:layout_constraintTop_toBottomOf="@+id/textView1"
            tools:text="五星" />
DataBinding设置对象
@Override
protected void onCreate(Bundle savedInstanceState) {
super.onCreate(savedInstanceState);
setContentView(R.layout.activity_data_binding_two);
binding = DataBindingUtil.setContentView(this,R.layout.activity_data_binding_two);
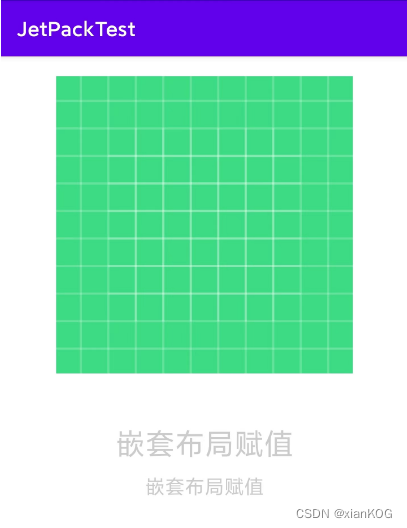
Idol idol = new Idol("嵌套布局赋值","嵌套布局赋值");
binding.setIdol(idol);
}
效果:
自定义BindingAdapter加载网络图片
例子:使用 @BindingAdapter 加载网络图片
1、创建MyBindingAdapter,添加 @BindingAdapter 注解
public class MyBindingAdapter {
	//@BindingAdapter 可以单独使用
	//其中 ("image")为自定义字符串, 在布局文件中通过 app:image 使用
    @BindingAdapter("image")
    public static void setImage(ImageView image, String url){
        if(!TextUtils.isEmpty(url))
            Picasso.get()
                .load(url)
                .placeholder(R.drawable.ic_launcher_background)
                .into(image);
        else
            image.setBackgroundColor(Color.GRAY);
    }
}
1、在布局文件中绑定图片
<data>
        <variable
            name="networkImage"  //定义名称
            type="String" />  //类型
    </data>

    <androidx.constraintlayout.widget.ConstraintLayout
        android:layout_width="match_parent"
        android:layout_height="match_parent"
        tools:context=".CustomBindAdapterActivity">

        <ImageView
        	//app:image对应 @BindingAdapter(“image”) 中的image
        	//然后使用<data>中定义的networkImage变量
            app:image="@{networkImage}"
            tools:srcCompat="@tools:sample/avatars"
            android:id="@+id/imageView"
            app:layout_constraintTop_toTopOf="parent"
            app:layout_constraintBottom_toBottomOf="parent"
            app:layout_constraintLeft_toLeftOf="parent"
            app:layout_constraintRight_toRightOf="parent"
            android:layout_width="300dip"
            android:layout_height="300dip" />

    </androidx.constraintlayout.widget.ConstraintLayout>
3、通过DataBinding设置网络图片路径
访问网络图片,需要先添加权限
<uses-permission android:name="android.permission.INTERNET" />
使用
//获取binding
ActivityCustomBindAdapterBinding binding = DataBindingUtil.setContentView(this,R.layout.activity_custom_bind_adapter);
//设置networkimage
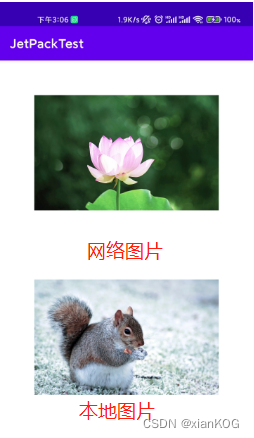
binding.setNetworkImage("https://gimg2.baidu.com/image_search/src=http%3A%2F%2Fpic1.win4000.com%2Fwallpaper%2F2018-06-27%2F5b3345789ca2c.jpg&refer=http%3A%2F%2Fpic1.win4000.com&app=2002&size=f9999,10000&q=a80&n=0&g=0n&fmt=auto?sec=1672813829&t=478fb36f728ae1f18cd508b261c4b556");
流程:
通过setNetworkImage() 将图片路径传到布局文件中的 networkImage 变量中,然后通过 app:image=“@{networkImage}” 又将图片路径传到类 MyBindingAdapter 的 setImage() 方法中,然后进行逻辑处理
例子:使用 @BindingAdapter 加载本地图片**
1、布局文件中增加变量,并使用变量
<data>
        <variable
            name="networkImage"
            type="String" />
        <variable
            name="localImage" //增加的变量
            type="int" />
    </data>
`
//使用
<ImageView
            app:image="@{localImage}" //使用
            tools:srcCompat="@tools:sample/avatars"
            android:id="@+id/imageView"
            app:layout_constraintTop_toTopOf="parent"
            app:layout_constraintBottom_toBottomOf="parent"
            app:layout_constraintLeft_toLeftOf="parent"
            app:layout_constraintRight_toRightOf="parent"
            android:layout_width="300dip"
            android:layout_height="300dip" />

``

2、重载setImage方法(相同的注解和关键字符串,不同的参数)

```java
	@BindingAdapter("image")
    public static void setImage(ImageView image, String url){
        if(!TextUtils.isEmpty(url))
            Picasso.get()
                .load(url)
                .placeholder(R.drawable.ic_launcher_background)
                .into(image);
        else
            image.setBackgroundColor(Color.GRAY);
    }

    @BindingAdapter("image")
    public static void setImage(ImageView image, int resId){ //重载
        image.setImageResource(resId);
    }
3、给 DataBinding 设置本地图片路径
binding.setLocalImage(R.drawable.ic_launcher_background);
效果
例子:使用 @BindingAdapter 加载多个来源
1、布局文件引用多个变量
<ImageView
        	//引用了两个变量,imageOne和imageTwo
            app:imageOne="@{networkImage}"
            app:imageTwo="@{localImage}"
            tools:srcCompat="@tools:sample/avatars"
            android:id="@+id/imageView"
            app:layout_constraintTop_toTopOf="parent"
            app:layout_constraintBottom_toBottomOf="parent"
            app:layout_constraintLeft_toLeftOf="parent"
            app:layout_constraintRight_toRightOf="parent"
            android:layout_width="300dip"
            android:layout_height="300dip" />
2、对应的注解和方法
//参数可选,网络图片为空时,加载本地图片
@BindingAdapter(value = {"imageOne","imageTwo"}, requireAll = false)
    public static void setImage(ImageView image, String url,int resId){
        if(!TextUtils.isEmpty(url))
            Picasso.get()
                .load(url)
                .placeholder(R.drawable.ic_launcher_background)
                .into(image);
        else
            image.setImageResource(resId);
    }
3、设置哪个值就显示哪个
//如果只设置网络图片路径,则控件只展示网络图片
binding.setNetworkImage("https://gimg2.baidu.com/image_search/src=http%3A%2F%2Fpic1.win4000.com%2Fwallpaper%2F2018-06-27%2F5b3345789ca2c.jpg&refer=http%3A%2F%2Fpic1.win4000.com&app=2002&size=f9999,10000&q=a80&n=0&g=0n&fmt=auto?sec=1672813829&t=478fb36f728ae1f18cd508b261c4b556");
//如果只设置本地图片路径,则控件只展示本地图片
binding.setLocalImage(R.drawable.songshu);
双向绑定BaseObservable与ObservableField
BaseObservable实现双向绑定
1、创建对象类
public class User {
    public String username;

    public User(String username) {
        this.username = username;
    }
}
2、创建继承与BaseObservable的类
public class userViewModel extends BaseObservable {
private User user;
//初始化该类时,自动创建User对象
public userViewModel() {
this.user = new User("张三");
}
@Bindable //使用@Bindable ,当User发生改变时,会调用该方法
public String getUserName(){
return user.username;
}
//当EditText中的内容发生改变,就会调用这个方法
public void setUserName(String username){
if(!TextUtils.isEmpty(username)) {
user.username = username;
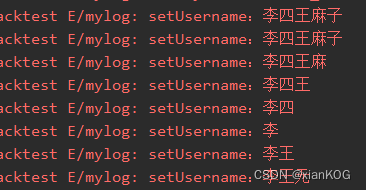
Log.e("mylog","setUsername"+username);
notifyPropertyChanged(BR.userName);
}
}
}
3、绑定类并引用
<data>
        <variable
            name="userViewModel"  //绑定类
            type="com.kaiya.mvp.jetpacktest.BaseObsAndObsField.userViewModel" />
    </data>

    <androidx.constraintlayout.widget.ConstraintLayout
        android:layout_width="match_parent"
        android:layout_height="match_parent"
        tools:context=".BaseObsFieldActivity">

        <EditText
            android:text="@={userViewModel.userName}" //引用类
            android:hint="请输入内容"
            android:layout_marginTop="30dp"
            android:id="@+id/edit"
            app:layout_constraintTop_toTopOf="parent"
            app:layout_constraintLeft_toLeftOf="parent"
            app:layout_constraintRight_toRightOf="parent"
            android:layout_width="300dp"
            android:layout_height="30dp" />

    </androidx.constraintlayout.widget.ConstraintLayout>
4、DataBinding 设置类
ActivityBaseObsFieldBinding binding = DataBindingUtil.setContentView(this,R.layout.activity_base_obs_field);
binding.setUserViewModel(new userViewModel());

//修改对象属性的方法
public void changeName(View view) {
        userViewModel.setUserName("李四王麻子");
}
5、效果
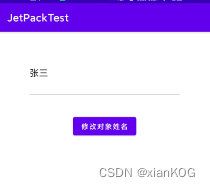
当点击按钮修改对象属性为“李四王麻子”后,editView内容也发生改变。
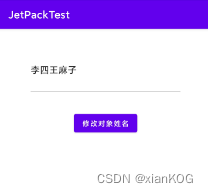
而当修改editView内容时,也同时会修改对象的属性。
ObservableField实现双向绑定
1、同样需要创建对象
public class User {
    public String username;

    public User(String username) {
        this.username = username;
    }
}
2、创建viewmodel 并 使用ObservableField
public class ObsFieldViewModel {
    private ObservableField<User> userObservableField; //声明

    public ObsFieldViewModel(){
        User user = new User("zhangsan");
        userObservableField = new ObservableField<>();
        userObservableField.set(user); //设置对象
    }
	//get方法
    public String getUserName(){
        return userObservableField.get().username;
    }
	//set方法
    public void setUserName(String userName){
        userObservableField.get().username = userName;
    }
}
3、绑定及引用
<variable
            name="ObsFieldViewModel"
            type="com.kaiya.mvp.jetpacktest.baseObsAndObsField.ObsFieldViewModel" />
//引用
<EditText
            app:layout_constraintTop_toBottomOf="@+id/textView2"
            android:text="@={ObsFieldViewModel.userName}" //引用
            android:hint="请输入内容"
            android:layout_marginTop="30dp"
            android:id="@+id/edit2"
            app:layout_constraintLeft_toLeftOf="parent"
            app:layout_constraintRight_toRightOf="parent"
            android:layout_width="300dp"
            android:layout_height="50dp" />
4、dataBinding设置类
binding.setObsFieldViewModel(obsFieldViewModel); //设置类
//点击按钮修改对象的属性
public void changeName1(View view) {
        obsFieldViewModel.setUserName("lisiwangmazi");
    }
5、效果同 BaseObservable,但更加简洁
RecycleView的绑定
1、recycleView布局
<layout xmlns:android="http://schemas.android.com/apk/res/android"
    xmlns:app="http://schemas.android.com/apk/res-auto"
    xmlns:tools="http://schemas.android.com/tools">

    <data>

    </data>

    <androidx.constraintlayout.widget.ConstraintLayout
        android:layout_width="match_parent"
        android:layout_height="match_parent"
        tools:context=".RecycleViewActivity">

        <androidx.recyclerview.widget.RecyclerView
            android:id="@+id/recycleview"
            android:layout_width="match_parent"
            android:layout_height="match_parent" />

    </androidx.constraintlayout.widget.ConstraintLayout>
</layout>
2、创建Idol类
public class Idol {
    public String chName;
    public String enName;
    public String image;

    public Idol(String chName, String enName, String image) {
        this.chName = chName;
        this.enName = enName;
        this.image = image;
    }
}
3、创建recycleViewAdapter
public class recycleViewAdapter extends RecyclerView.Adapter<recycleViewAdapter.MyViewHolder> {
    List<Idol> idols;

    public recycleViewAdapter(List<Idol> idols) {
        this.idols = idols;
    }

    @NonNull
    @Override
    public MyViewHolder onCreateViewHolder(@NonNull ViewGroup parent, int viewType) {
        ItemBinding itemBinding = DataBindingUtil.inflate(LayoutInflater.from(parent.getContext()),
                R.layout.item,
                parent,
                false);
        return new MyViewHolder(itemBinding);
    }

    @Override
    public void onBindViewHolder(@NonNull MyViewHolder holder, int position) {
        Idol idol = idols.get(position);
        holder.itemBinding.setIdol(idol);
    }

    @Override
    public int getItemCount() {
        return idols.size();
    }

    static class MyViewHolder extends RecyclerView.ViewHolder{

        private ItemBinding itemBinding;

        public MyViewHolder(@NonNull View itemView) {
            super(itemView);
        }

        public MyViewHolder(ItemBinding itemBinding) {
            super(itemBinding.getRoot());
            this.itemBinding = itemBinding;
        }
    }

}
4、adapter 的item布局
<layout xmlns:android="http://schemas.android.com/apk/res/android"
    xmlns:app="http://schemas.android.com/apk/res-auto"
    xmlns:tools="http://schemas.android.com/tools">

    <data>
        <variable
            name="idol"  //引用类
            type="com.kaiya.mvp.jetpacktest.recycleView.Idol" />
    </data>

    <androidx.constraintlayout.widget.ConstraintLayout
        android:layout_width="match_parent"
        android:layout_height="65dp">

        <ImageView
            app:itemImage="@{idol.image}"  //通过@bindingAdapter加载图片
            android:id="@+id/image"
            android:src="@drawable/ic_launcher_background"
            android:layout_margin="10dp"
            app:layout_constraintTop_toTopOf="parent"
            app:layout_constraintLeft_toLeftOf="parent"
            android:layout_width="50dp"
            android:layout_height="50dp" />

        <TextView
            android:id="@+id/nameC"
            android:text="@{idol.chName}" //赋值
            android:layout_marginTop="2dp"
            android:layout_marginStart="10dp"
            app:layout_constraintLeft_toRightOf="@+id/image"
            app:layout_constraintTop_toTopOf="@+id/image"
            android:layout_width="wrap_content"
            android:layout_height="wrap_content" />

        <TextView
            android:id="@+id/nameE"
            android:text="@{idol.enName}" //赋值
            android:layout_marginBottom="2dp"
            app:layout_constraintBottom_toBottomOf="@+id/image"
            app:layout_constraintLeft_toLeftOf="@+id/nameC"
            android:layout_width="wrap_content"
            android:layout_height="wrap_content" />

    </androidx.constraintlayout.widget.ConstraintLayout>
</layout>
5、因为要使用@BindingAdapter加载图片,需创建
public class ImageViewBindingAdapter {

    @BindingAdapter("itemImage")  //与布局文件中的标签一致
    public static void setImage(ImageView image, String url){
        if(!TextUtils.isEmpty(url))
            Picasso.get()
                .load(url)
                .placeholder(R.drawable.ic_launcher_background)
                .into(image);
        else
            image.setBackgroundColor(Color.GRAY);
    }
}
6、使用
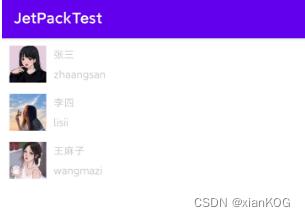
先创建数据源
public class IdolUtils {
    public static List<Idol> get(){
        List<Idol> list = new ArrayList<>();
        Idol i1 = new Idol("张三","zhaangsan","https://gimg2.baidu.com/image_search/src=http%3A%2F%2Fc-ssl.duitang.com%2Fuploads%2Fblog%2F202105%2F10%2F20210510174256_4b4d0.thumb.1000_0.jpeg&refer=http%3A%2F%2Fc-ssl.duitang.com&app=2002&size=f9999,10000&q=a80&n=0&g=0n&fmt=auto?sec=1673661917&t=6e3d1f6624a399479681ee213355f3b0");
        list.add(i1);
        Idol i2 = new Idol("李四","lisii","https://gimg2.baidu.com/image_search/src=http%3A%2F%2Fc-ssl.duitang.com%2Fuploads%2Fblog%2F202106%2F09%2F20210609081952_51ef5.thumb.1000_0.jpg&refer=http%3A%2F%2Fc-ssl.duitang.com&app=2002&size=f9999,10000&q=a80&n=0&g=0n&fmt=auto?sec=1673661992&t=b380fa35e774dc0ffe409012af243f47");
        list.add(i2);
        Idol i3 = new Idol("王麻子","wangmazi","https://gimg2.baidu.com/image_search/src=http%3A%2F%2Fc-ssl.duitang.com%2Fuploads%2Fblog%2F202111%2F10%2F20211110082815_526b2.thumb.1000_0.jpeg&refer=http%3A%2F%2Fc-ssl.duitang.com&app=2002&size=f9999,10000&q=a80&n=0&g=0n&fmt=auto?sec=1673662006&t=b1d90ec1b0011bf00f89544bf55f0b7d");
        list.add(i3);
        return list;
    }
}
然后在activity中使用
protected void onCreate(Bundle savedInstanceState) {
        super.onCreate(savedInstanceState);
        //获取DataBinding
        ActivityRecycleViewBinding binding = DataBindingUtil.setContentView(this,R.layout.activity_recycle_view);
        //给recycleView设置线性布局
        binding.recycleview.setLayoutManager(new LinearLayoutManager(this));
        //设置数据源
        recycleViewAdapter adapter = new recycleViewAdapter(IdolUtils.get());
        binding.recycleview.setAdapter(adapter);
    }
7、效果
DataBinding + ViewModle + LiveData
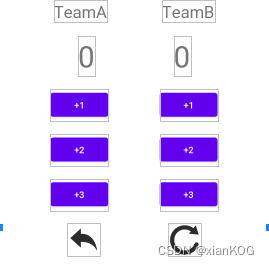
例子:计分板
1、布局文件
<?xml version="1.0" encoding="utf-8"?>
<layout xmlns:android="http://schemas.android.com/apk/res/android"
    xmlns:app="http://schemas.android.com/apk/res-auto"
    xmlns:tools="http://schemas.android.com/tools">

    <data>
    </data>

    <androidx.constraintlayout.widget.ConstraintLayout
        android:layout_width="match_parent"
        android:layout_height="match_parent"
        tools:context=".DataBindViewModelLiveDataActivity">

        <TextView
            android:layout_marginTop="20dp"
            app:layout_constraintTop_toTopOf="parent"
            app:layout_constraintLeft_toLeftOf="parent"
            app:layout_constraintRight_toLeftOf="@+id/item2"
            android:id="@+id/item1"
            android:text="TeamA"
            android:textSize="25sp"
            android:layout_width="wrap_content"
            android:layout_height="wrap_content" />

        <TextView
            app:layout_constraintTop_toTopOf="@id/item1"
            app:layout_constraintLeft_toRightOf="@id/item1"
            app:layout_constraintRight_toRightOf="parent"
            android:id="@+id/item2"
            android:text="TeamB"
            android:textSize="25sp"
            android:layout_width="wrap_content"
            android:layout_height="wrap_content" />

        <TextView
            android:layout_marginTop="20dp"
            app:layout_constraintTop_toBottomOf="@+id/item1"
            app:layout_constraintLeft_toLeftOf="parent"
            app:layout_constraintRight_toLeftOf="@+id/textView2"
            android:id="@+id/textView1"
            android:text="0"
            android:textSize="45sp"
            android:layout_width="wrap_content"
            android:layout_height="wrap_content" />

        <TextView
            app:layout_constraintTop_toTopOf="@id/textView1"
            app:layout_constraintLeft_toRightOf="@id/textView1"
            app:layout_constraintRight_toRightOf="parent"
            android:id="@+id/textView2"
            android:text="0"
            android:textSize="45sp"
            android:layout_width="wrap_content"
            android:layout_height="wrap_content" />

        <Button
            android:text="+1"
            android:layout_marginTop="20dp"
            android:id="@+id/jiaOne1"
            app:layout_constraintTop_toBottomOf="@+id/textView1"
            app:layout_constraintLeft_toLeftOf="parent"
            app:layout_constraintRight_toLeftOf="@+id/jiaOne2"
            android:layout_width="wrap_content"
            android:layout_height="wrap_content" />

        <Button
            android:text="+1"
            android:id="@+id/jiaOne2"
            app:layout_constraintTop_toTopOf="@+id/jiaOne1"
            app:layout_constraintLeft_toRightOf="@id/jiaOne1"
            app:layout_constraintRight_toRightOf="parent"
            android:layout_width="wrap_content"
            android:layout_height="wrap_content" />

        <Button
            android:text="+2"
            android:layout_marginTop="20dp"
            android:id="@+id/jiaTwo1"
            app:layout_constraintTop_toBottomOf="@+id/jiaOne1"
            app:layout_constraintLeft_toLeftOf="parent"
            app:layout_constraintRight_toLeftOf="@+id/jiaTwo2"
            android:layout_width="wrap_content"
            android:layout_height="wrap_content" />

        <Button
            android:text="+2"
            android:id="@+id/jiaTwo2"
            app:layout_constraintTop_toTopOf="@+id/jiaTwo1"
            app:layout_constraintLeft_toRightOf="@id/jiaTwo1"
            app:layout_constraintRight_toRightOf="parent"
            android:layout_width="wrap_content"
            android:layout_height="wrap_content" />

        <Button
            android:text="+3"
            android:layout_marginTop="20dp"
            android:id="@+id/jiaThree1"
            app:layout_constraintTop_toBottomOf="@+id/jiaTwo1"
            app:layout_constraintLeft_toLeftOf="parent"
            app:layout_constraintRight_toLeftOf="@+id/jiaThree2"
            android:layout_width="wrap_content"
            android:layout_height="wrap_content" />

        <Button
            android:text="+3"
            android:id="@+id/jiaThree2"
            app:layout_constraintTop_toTopOf="@+id/jiaThree1"
            app:layout_constraintLeft_toRightOf="@id/jiaThree1"
            app:layout_constraintRight_toRightOf="parent"
            android:layout_width="wrap_content"
            android:layout_height="wrap_content" />

        <ImageButton
            android:background="@mipmap/reten"
            android:text="+3"
            android:layout_marginTop="20dp"
            android:id="@+id/imageBtn1"
            app:layout_constraintTop_toBottomOf="@+id/jiaThree1"
            app:layout_constraintLeft_toLeftOf="parent"
            app:layout_constraintRight_toLeftOf="@+id/imageBtn2"
            android:layout_width="50dp"
            android:layout_height="50dp" />

        <ImageButton
            android:text="+3"
            android:id="@+id/imageBtn2"
            android:background="@mipmap/reset"
            app:layout_constraintTop_toTopOf="@+id/imageBtn1"
            app:layout_constraintLeft_toRightOf="@id/imageBtn1"
            app:layout_constraintRight_toRightOf="parent"
            android:layout_width="50dp"
            android:layout_height="50dp" />

    </androidx.constraintlayout.widget.ConstraintLayout>
</layout>
2、创建ViewModel
public class MyViewModel extends ViewModel {

    private MutableLiveData<Integer> aTeamScore; //定义LiveData的变量
    private MutableLiveData<Integer> bTeamScore; //定义LiveData的变量
    private Integer aLast;
    private Integer bLast;

	//提供get方法
    public MutableLiveData<Integer> getaTeamScore() {
        if(aTeamScore == null){
            aTeamScore = new MutableLiveData<>();
            aTeamScore.setValue(0);
        }
        return aTeamScore;
    }
	//提供get方法
    public MutableLiveData<Integer> getbTeamScore() {
        if(bTeamScore == null){
            bTeamScore = new MutableLiveData<>();
            bTeamScore.setValue(0);
        }
        return bTeamScore;
    }
	//加法
    public void aTeamAdd(int i){
        saveLastScore();
        aTeamScore.setValue(aTeamScore.getValue() + i);
    }
    //加法
    public void bTeamAdd(int i){
        saveLastScore();
        bTeamScore.setValue(bTeamScore.getValue() + i);
    }
    //撤销
    public void undo(){
        aTeamScore.setValue(aLast);
        bTeamScore.setValue(bLast);
    }
    //重置
    public void reset(){
        aTeamScore.setValue(0);
        bTeamScore.setValue(0);
    }

    //记录上一次的分数
    private  void saveLastScore(){
        this.aLast = aTeamScore.getValue();
        this.bLast = bTeamScore.getValue();
    }
}
3、在布局文件中引用并使用
	//绑定viewmodel
    <data>
        <variable
            name="viewModel"
            type="com.kaiya.mvp.jetpacktest.dataBindViewModelLiveData.MyViewModel" />
    </data>

//将变量值赋给控件
<TextView
            android:layout_marginTop="20dp"
            app:layout_constraintTop_toBottomOf="@+id/item1"
            app:layout_constraintLeft_toLeftOf="parent"
            app:layout_constraintRight_toLeftOf="@+id/textView2"
            android:id="@+id/textView1"
            android:text="@{String.valueOf(viewModel.getaTeamScore())}" //赋值
            android:textSize="45sp"
            android:layout_width="wrap_content"
            android:layout_height="wrap_content" />
//让按钮点击事件调用加法方法
<Button
            android:onClick="@{()->viewModel.aTeamAdd(1)}" //调用加法,+1
            android:text="+1"
            android:layout_marginTop="20dp"
            android:id="@+id/jiaOne1"
            app:layout_constraintTop_toBottomOf="@+id/textView1"
            app:layout_constraintLeft_toLeftOf="parent"
            app:layout_constraintRight_toLeftOf="@+id/jiaOne2"
            android:layout_width="wrap_content"
            android:layout_height="wrap_content" />
<Button
            android:onClick="@{()->viewModel.aTeamAdd(2)}" //调用加法,+2
            android:text="+2"
            android:layout_marginTop="20dp"
            android:id="@+id/jiaTwo1"
            app:layout_constraintTop_toBottomOf="@+id/jiaOne1"
            app:layout_constraintLeft_toLeftOf="parent"
            app:layout_constraintRight_toLeftOf="@+id/jiaTwo2"
            android:layout_width="wrap_content"
            android:layout_height="wrap_content" />
//重置和撤销
<ImageButton
            android:onClick="@{()->viewModel.undo()}" //撤销
            android:background="@mipmap/reten"
            android:text="+3"
            android:layout_marginTop="20dp"
            android:id="@+id/imageBtn1"
            app:layout_constraintTop_toBottomOf="@+id/jiaThree1"
            app:layout_constraintLeft_toLeftOf="parent"
            app:layout_constraintRight_toLeftOf="@+id/imageBtn2"
            android:layout_width="50dp"
            android:layout_height="50dp" />

        <ImageButton
            android:onClick="@{()->viewModel.reset()}" //重置
            android:text="+3"
            android:id="@+id/imageBtn2"
            android:background="@mipmap/reset"
            app:layout_constraintTop_toTopOf="@+id/imageBtn1"
            app:layout_constraintLeft_toRightOf="@id/imageBtn1"
            app:layout_constraintRight_toRightOf="parent"
            android:layout_width="50dp"
            android:layout_height="50dp" />
4、界面调用
//获取DataBinding
        ActivityDataBindViewModelLiveDataBinding binding =
                DataBindingUtil.setContentView(this,R.layout.activity_data_bind_view_model_live_data);
        //获取ViewModel
        MyViewModel viewModel =
                new ViewModelProvider(this,new ViewModelProvider.AndroidViewModelFactory(getApplication()))
                        .get(MyViewModel.class);
        binding.setViewModel(viewModel);
        binding.setLifecycleOwner(this); //感知activity的生命周期
DataBinding总结
1、不在需要findViewById,项目更加简洁,可读性更高
2、布局文件可以包含简单的业务逻辑
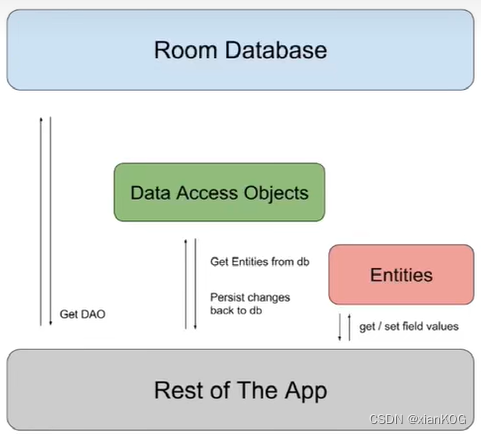
Room(Android官方ORM库Room)
Android采用SQLite作为数据库存储,开源社区常见的ORM(Object Relational Mapping)库有ORMLite、GreenDAO等。Room和其他库一样,也是在SQLite上提供一层封装
Room重要概念
- Entity: 实体类,对应的是数据库的一张表结构,使用注解@Entity标记
- Dao: 包含访问一系列访问数据库方法,使用注解@Dao标记
- Database: 数据库持有者,作与应用持久化相关数据的底层连接的主要接入点。使用@Database标记,另外需满足以下条件:定义的类必须是一个继承与RoomDatabase的抽象类,在注解中需要定义与数据库相关联的实体类列表。包含一个没有参数的抽象方法并返回一个Dao对象
Room应用
例子:对数据实现增删改查
1、布局文件
<androidx.constraintlayout.widget.ConstraintLayout xmlns:android="http://schemas.android.com/apk/res/android"
    xmlns:app="http://schemas.android.com/apk/res-auto"
    xmlns:tools="http://schemas.android.com/tools"
    android:layout_width="match_parent"
    android:layout_height="match_parent"
    tools:context=".RoomActivity">
    <Button
        android:text="增加"
        android:layout_marginTop="20dp"
        app:layout_constraintTop_toTopOf="parent"
        app:layout_constraintLeft_toLeftOf="parent"
        app:layout_constraintRight_toLeftOf="@+id/delete"
        android:id="@+id/add"
        android:layout_width="wrap_content"
        android:layout_height="wrap_content" />
    <Button
        android:text="删除"
        app:layout_constraintTop_toTopOf="@+id/add"
        app:layout_constraintLeft_toRightOf="@+id/add"
        app:layout_constraintRight_toRightOf="parent"
        android:id="@+id/delete"
        android:layout_width="wrap_content"
        android:layout_height="wrap_content" />
    <Button
        android:text="修改"
        app:layout_constraintTop_toBottomOf="@+id/add"
        android:layout_marginTop="20dp"
        app:layout_constraintLeft_toLeftOf="parent"
        app:layout_constraintRight_toLeftOf="@+id/search"
        android:id="@+id/change"
        android:layout_width="wrap_content"
        android:layout_height="wrap_content" />
    <Button
        android:text="查询"
        app:layout_constraintTop_toTopOf="@+id/change"
        app:layout_constraintLeft_toRightOf="@+id/change"
        app:layout_constraintRight_toRightOf="parent"
        android:id="@+id/search"
        android:layout_width="wrap_content"
        android:layout_height="wrap_content" />

    <androidx.recyclerview.widget.RecyclerView
        android:id="@+id/recycleview"
        app:layout_constraintTop_toBottomOf="@+id/change"
        app:layout_constraintLeft_toLeftOf="parent"
        app:layout_constraintRight_toRightOf="parent"
        app:layout_constraintBottom_toBottomOf="parent"
        android:layout_width="0dp"
        android:layout_height="0dp" />


</androidx.constraintlayout.widget.ConstraintLayout>
1、添加依赖
implementation 'androidx.room:room-runtime:2.2.5'
annotationProcessor 'androidx.room:room-compiler:2.2.5'
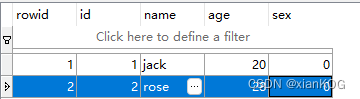
2、定义Entity(会自动创建表)
@Entity(tableName = "student") //表名
public class Student {

    @PrimaryKey(autoGenerate = true)  //主键,自动增长
    @ColumnInfo(name = "id", typeAffinity = ColumnInfo.INTEGER) //列名"id", 类型 INTEGER
    public int id;

    @ColumnInfo(name = "name", typeAffinity = ColumnInfo.TEXT)
    public String name;

    @ColumnInfo(name = "age", typeAffinity = ColumnInfo.INTEGER)
    public int age;

    public Student(int id, String name, int age) {
        this.id = id;
        this.name = name;
        this.age = age;
    }

    @Ignore  //忽略(仅自己使用,room不会管这个构造方法)
    public Student(String name, int age) {
        this.name = name;
        this.age = age;
    }

    @Ignore //忽略
    public Student(int id) {
        this.id = id;
    }
}
3、定义Dao
@Dao
public interface StudentDao {

    @Insert
    void insertStudent(Student... students);

    @Delete
    void deleteStudent(Student... students);

    @Update
    void updateStudent(Student... students);

    @Query("SELECT * FROM student")
    List<Student> getAllStudent();

    @Query("SELECT * FROM student WHERE id = :idd")
    List<Student> getStudentById(int idd);
}
4、定义MyDatabase
@Database(entities = {Student.class}, version = 1, exportSchema = false)
public abstract class MyDatabase extends RoomDatabase{
    private static final String DATABASE_NAME = "Download/jetpack.db"; //db文件名
    private static final String DB_PATH = String.format("%s/%s",
            Environment.getExternalStorageDirectory().getAbsolutePath(), DATABASE_NAME);


    private static MyDatabase mInstance;

    public static synchronized MyDatabase getInstance(Context context){
        Log.e("mylog",DB_PATH);
        if(mInstance == null)
            mInstance = Room.databaseBuilder(
                    context.getApplicationContext(),
                    MyDatabase.class,
                    //直接写db文件名,会默认创建到data/data路径下
                    //如果写具体路径,则会创建到具体路径下
                    DATABASE_NAME)
                    .build();
        return mInstance;
    }

    public abstract StudentDao getStudentDao();
}
5、定义RecycleView的adapter
public class StudentRecycleAdapter extends RecyclerView.Adapter{
    List<Student> students;

    public StudentRecycleAdapter(List<Student> students) {
        this.students = students;
    }

    public List<Student> getStudents() {
        return students;
    }

    public void setStudents(List<Student> students) {
        this.students = students;
    }

    @NonNull
    @Override
    public RecyclerView.ViewHolder onCreateViewHolder(@NonNull ViewGroup parent, int viewType) {
        View root = LayoutInflater.from(parent.getContext()).inflate(R.layout.room_item,parent,false);
        return new MyViewHolder(root);
    }

    @Override
    public void onBindViewHolder(@NonNull RecyclerView.ViewHolder holder, int position) {
        Student student = students.get(position);
        TextView id = holder.itemView.findViewById(R.id.userid);
        TextView name = holder.itemView.findViewById(R.id.username);
        TextView age = holder.itemView.findViewById(R.id.userage);
        id.setText(String.valueOf(student.id));
        name.setText(student.name);
        age.setText(String.valueOf(student.age));
    }

    @Override
    public int getItemCount() {
        return students.size();
    }

    static class MyViewHolder extends RecyclerView.ViewHolder{

        public MyViewHolder(@NonNull View itemView) {
            super(itemView);
        }
    }
}
6、使用
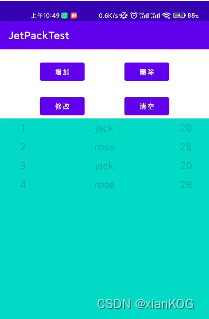
@Override
    protected void onCreate(Bundle savedInstanceState) {
        super.onCreate(savedInstanceState);
        setContentView(R.layout.activity_room);
        RecyclerView recyclerView = findViewById(R.id.recycleview);
        recyclerView.setLayoutManager(new LinearLayoutManager(this));
        List<Student> students = new ArrayList<>();
        students.add(new Student(1,"王丹江",19));
        adapter = new StudentRecycleAdapter(students);
        recyclerView.setAdapter(adapter);

        MyDatabase database = MyDatabase.getInstance(this);
        dao = database.getStudentDao();
    }
增删改查
public void mInsert(View view) {
        Log.e("mylog","mInsert");
        Student s1 = new Student("张三",20);
        Student s2 = new Student("李四",22);
        new InsertTask(dao).execute(s1,s2);
    }

    class InsertTask extends AsyncTask<Student,String,String> {
        private StudentDao studentDao;

        public InsertTask(StudentDao studentDao) {
            this.studentDao = studentDao;
        }

        @Override
        protected String doInBackground(Student... students) {
            studentDao.insertStudent(students);
            return null;
        }
    }

    public void mDelete(View view) {
        Log.e("mylog","mDelete");
        dao.deleteStudent();
    }

    public void mUpdate(View view) {
        Log.e("mylog","mUpdate");
        dao.updateStudent();
    }

    public void mSearch(View view) {
        Log.e("mylog","mSearch");
        new GetAllTask(dao).execute();
    }

    class GetAllTask extends AsyncTask<Void,Void,Void>{

        private StudentDao studentDao;

        public GetAllTask(StudentDao studentDao) {
            this.studentDao = studentDao;
        }

        @Override
        protected Void doInBackground(Void... voids) {
            List<Student> students = studentDao.getAllStudent();
            Log.e("mylog","getStudent:"+students.size());
            adapter.setStudents(students);
            return null;
        }

        @Override
        protected void onPostExecute(Void aVoid) {
            super.onPostExecute(aVoid);
            adapter.notifyDataSetChanged();
        }
    }
Room+ViewModel+LiveData
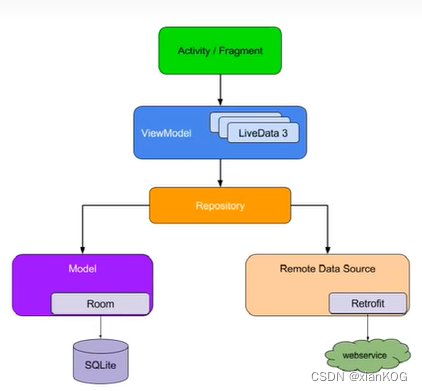
可以对上面的demo做修改,使用ViewModel+LiveData实现自动更新
1、创建 Repository,并持有Dao引用,然后操作数据库
//Repository 仓库
public class StudentRepository {
	//持有的dao层引用
    private StudentDao studentDao;

    public StudentRepository(Context context) {
        MyDatabase database = MyDatabase.getInstance(context);
        this.studentDao = database.getStudentDao();
    }

    public void insertStudent(Student... students){
        new InsertTask(studentDao).execute(students);
    }
    public void updateStudent(Student... students){
        new UpdateTask(studentDao).execute(students);
    }
    public void deleteStudent(Student... students){
        new DeleteTask(studentDao).execute(students);
    }
    public void deleteAllStudent(){
        new DeleteAllTask(studentDao).execute();
    }
    public LiveData<List<Student>> getAllStudentLive(){
        return studentDao.getAllStudentLive();
    }

    class InsertTask extends AsyncTask<Student,Void ,Void>{

        private StudentDao dao;

        public InsertTask(StudentDao dao) {
            this.dao = dao;
        }

        @Override
        protected Void doInBackground(Student... students) {
            dao.insertStudent(students);
            return null;
        }
    }
    class UpdateTask extends AsyncTask<Student,Void,Void>{

        private StudentDao dao;

        public UpdateTask(StudentDao dao) {
            this.dao = dao;
        }

        @Override
        protected Void doInBackground(Student... students) {
            dao.updateStudent(students);
            return null;
        }
    }
    class DeleteTask extends AsyncTask<Student,Void,Void>{
        private StudentDao dao;

        public DeleteTask(StudentDao dao) {
            this.dao = dao;
        }

        @Override
        protected Void doInBackground(Student... students) {
            dao.deleteStudent(students);
            return null;
        }
    }
    class DeleteAllTask extends AsyncTask<Void,Void,Void>{
        private StudentDao dao;

        public DeleteAllTask(StudentDao dao) {
            this.dao = dao;
        }

        @Override
        protected Void doInBackground(Void... voids) {
            dao.deleteAllStudent();
            dao.deleteSequence();
            return null;
        }
    }
}
2、创建ViewModel ,持有Repository引用 ,从而实现数据库操作
public class StudentViewModel extends AndroidViewModel {
    private StudentRepository repository;

    public StudentViewModel(@NonNull Application application) {
        super(application);
        repository = new StudentRepository(application);
    }

    public void insertStudent(Student... students){
        repository.insertStudent(students);
    }

    public void deleteStudent(Student... students){
        repository.deleteStudent(students);
    }
    public void deleteAllStudent(){
        repository.deleteAllStudent();
    }
    public void updateStudent(Student... students){
        repository.updateStudent(students);
    }
    public LiveData<List<Student>> getAllStudentLive(){
        return repository.getAllStudentLive();
    }

}
特别注意 getAllStudentLive() 方法
//返回类型是 LiveData
public LiveData<List<Student>> getAllStudentLive(){
	return repository.getAllStudentLive(); //直接返回dao层的方法,实现自动调用
}
3、需要在Dao层添加 getAllStudentLive 方法
@Query("SELECT * FROM student")
LiveData<List<Student>> getAllStudentLive(); //dao是直接 支持 LiveData的
4、使用
public class RoomVModelLDataActivity extends AppCompatActivity {
private StudentRecycleAdapter adapter;
private StudentViewModel studentViewModel;
@Override
protected void onCreate(Bundle savedInstanceState) {
super.onCreate(savedInstanceState);
setContentView(R.layout.activity_room_v_model_l_data);
RecyclerView recyclerView = findViewById(R.id.recycleview1);
recyclerView.setLayoutManager(new LinearLayoutManager(this));
List<Student> students = new ArrayList<>();
adapter = new StudentRecycleAdapter(students);
recyclerView.setAdapter(adapter);
//获取ViewModel
studentViewModel = new ViewModelProvider(this,new ViewModelProvider.AndroidViewModelFactory(getApplication()))
.get(StudentViewModel.class);
//监听数据变化,实现自动查询 更新
studentViewModel.getAllStudentLive().observe(this, new Observer<List<Student>>() {
@Override
public void onChanged(List<Student> students) {
for(Student s: students){
Log.e("mylog",s.name);
}
adapter.setStudents(students);
adapter.notifyDataSetChanged();
}
});
}
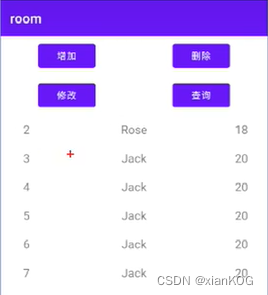
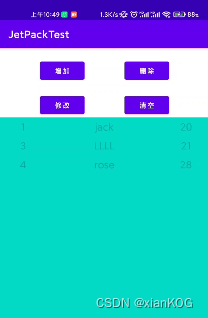
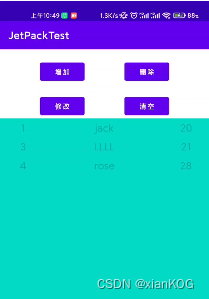
public void rmInsert(View view) {
Student s1 = new Student("jack",20);
Student s2 = new Student("rose",28);
studentViewModel.insertStudent(s1,s2);
}
public void rmDelete(View view) {
Student s1 = new Student(2);
studentViewModel.deleteStudent(s1);
}
public void rmUpdate(View view) {
Student s1 = new Student(3,"LLLL",21);
studentViewModel.updateStudent(s1);
}
public void rmClean(View view) {
studentViewModel.deleteAllStudent();
}
}
5、效果
升级数据库
1、在 MyDatabase 中添加
//从版本1升级到版本2
static final Migration MIGRATION_1_2 = new Migration(1,2){
        @Override
        public void migrate(@NonNull SupportSQLiteDatabase database) {
        	//添加字段 sex,数字类型,不为空,默认1
            database.execSQL("ALTER TABLE student ADD COLUMN sex INTEGER NOT NULL DEFAULT 1");
        }
    };
2、给 MyDatabase 添加
mInstance = Room.databaseBuilder(
                    context.getApplicationContext(),
                    MyDatabase.class,
                    DATABASE_NAME)
                    .addMigrations(MIGRATION_1_2) //添加Mirations
                    .build();
3、修改版本号在这里插入代码片
修改版本号为2
@Database(entities = {Student.class}, version = 2, exportSchema = false)
4、对应实体类也相应改变(增加字段sex)
@ColumnInfo(name = "sex", typeAffinity = ColumnInfo.INTEGER)
    public int sex;
5、效果
注意 :如果要从版本1 升级到版本3 。
当 存在 Migration_1_3 = new Migration(1,3){ 时,会调用
当不存在时,会依次调用 Migration_1_2 和 Migration_2_3
异常处理
- 假设我们将数据库版本升级到4,却没有为此写相应的Migration,则会出现一个 lllegalStrateException异常 ,加入 fallbackToDestructiveMigration() ,该方法在出现升级异常时,重建数据库,同时 数据也会丢失
mInstance = Room.databaseBuilder(
                    context.getApplicationContext(),
                    MyDatabase.class,
                    DATABASE_NAME)
                    .addMigrations(MIGRATION_1_2,MIGRATION_2_3)
                    .fallbackToDestructiveMigration()  //加入这句
                    .build();
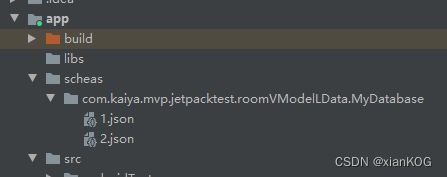
Schema文件
-
Room在每次数据库升级过程中,都会导出一个Schema文件,这是一个json格式的文件,其中包含了数据库的基本信息,有了该文件,开发者能清楚的知道数据库的历次变更情况,极大地方便了开发者排查问题
1、修改 exportSchema 属性
@Database(entities = {Student.class}, version = 3, exportSchema = true)2、在 build.gradle 中添加
defaultConfig {
        applicationId "com.kaiya.mvp.jetpacktest"
        minSdkVersion 28
        //noinspection ExpiredTargetSdkVersion
        targetSdkVersion 30
        versionCode 1
        versionName "1.0"

        testInstrumentationRunner "androidx.test.runner.AndroidJUnitRunner"
        javaCompileOptions{
            annotationProcessorOptions{
                //指定数据库schema导出的位置
                arguments = ["room.schemaLocation":"$projectDir/scheas".toString()]
            }
        }
    }
3、在每次数据库变更时,就会自动生成文件
销毁和重建策略
在SQLite中修改表结构比较麻烦,例如,我们想将Student表中的sex字段类型从INTEGER改为TEXT,最好的方式是采用销毁与重建策略,大致分为以下步骤:
-
创建一张符合表结构要求的临时表temp_student
-
将数据从旧表student赋值到临时表temp_sutdent中
-
删除旧表student
-
将临时表temp_student重命名为 student
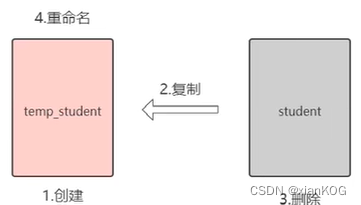
1、创建 MIGRATION_3_4static final Migration MIGRATION_3_4 = new Migration(3,4){ @Override public void migrate(@NonNull SupportSQLiteDatabase database) { //创建需要的临时表 database.execSQL("CREATE TABLE temp_student (" + "id INTEGER PRIMARY KEY AUTOINCREMENT NOT NULL," + "name TEXT,"+ "age INTEGER NOT NULL,"+ "sex TEXT DEFAULT 'M',"+ "bar_data INTEGER NOT NULL DEFAULT 1 )"); //将所有数据拷贝到 临时表中 database.execSQL("INSERT INTO tmep_student (name,age,sex,bar_data)" + " SELECT name,age,sex,bar_data FROM student"); // 删除student表 database.execSQL("DROP TABLE student"); // 将临时表改名为 student database.execSQL("ALTER TABLE temp_student RENAME TO student"); } };2、添加到 MyDatabase
public static synchronized MyDatabase getInstance(Context context){
        if(mInstance == null)
            mInstance = Room.databaseBuilder(
                    context.getApplicationContext(),
                    MyDatabase.class,
                    DATABASE_NAME)
                    .addMigrations(MIGRATION_2_3,MIGRATION_3_4) //添加
                    .fallbackToDestructiveMigration()
                    .build();
        return mInstance;
    }
3、修改版本号为4
@Database(entities = {Student.class}, version = 4, exportSchema = true)4、修改实体
//将  INTEGER 改为 TEXT,
    @ColumnInfo(name = "sex", typeAffinity = ColumnInfo.TEXT)
    public String sex;
5、效果

SEX 字段类型变为 TEXT 了
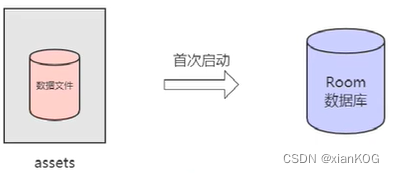
预填充数据库
-
有时候我们希望应用自带一些数据供我们使用,我们可以将数据库文件放入assets目录一起打包发布,在用户首次打开App时,使用 createFromAsset() 和 createFromFile() 创建Room数据库
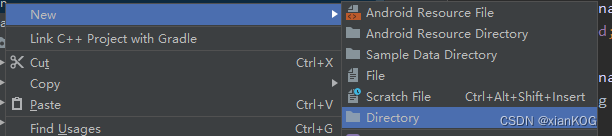
1、创建assets文件夹
对着 main目录右键,new - Directory - 选择 assets

1、先创建一个db数据库
2、将数据库放入assets中

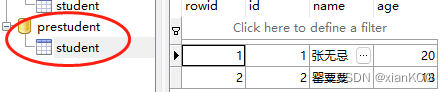
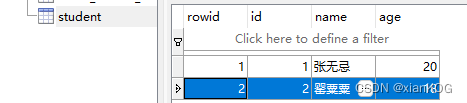
3、添加到 MyDatabase 中mInstance = Room.databaseBuilder( context.getApplicationContext(), MyDatabase.class, DATABASE_NAME) .addMigrations(MIGRATION_2_3,MIGRATION_3_4) //.fallbackToDestructiveMigration() .createFromAsset("prestudent.db") //添加 .build();4、效果

而且新创建的数据库中也存在这些数据:
Navigation诞生与优势
- Activity嵌套多个Fragment的UI架构模式已经非常普遍,但是对于Fragment的管理一直是一件比较麻烦的事情。我们需要通过FragmentManager和FragmentTransaction来管理Fragment之间的切换。页面的切换通常还包括对应用程序APP bar的管理、Fragment之间的切换动画,以及Fragment间的参数传递。纯代码的方式使用起来不是特别友好,并且Fragment和App bar在管理和使用的过程中显得混乱
- 为此,Jetpack提供了Navigation组件,旨在方便我们管理页面和App Bar。
优势
- 可视化的页面导航图,类似于Apple Xcode中的StoryBoard,便于我们理清页面关系
- 通过destination和action完成页面间的导航
- 方便添加页面切换动画
- 页面间类型安全的参数传递
- 通过NavigationUI,对菜单、底部导航、抽屉菜单导航进行统一管理
- 支持深度链接DeepLink
Navigation主要元素
- Navigation Graph,一种新的XML资源文件,包含应用程序所有的页面,以及页面间的关系
- NavHostFragment ,一个特殊的Fragment,可以将它看做是其他Fragment的容器,Navigation Graph中的Fragment正是通过NavHostFragment进行展示的
- NavControllor ,用于在代码中完成Navigation Graph中具体的页面切换工作
- 他们三者间的关系
当你想切换Fragment时,使用NavController对象,告诉它你想去Navigation Graph中的哪个Fragment,NavController会将你想去的Fragment展示在NavHostFragment中
Navigation应用
1、创建Fragment(HomeFragment和DetailFragment)
public class HomeFragment extends Fragment {

    public HomeFragment() {
    }

    @Override
    public void onCreate(Bundle savedInstanceState) {
        super.onCreate(savedInstanceState);
    }

    @Override
    public View onCreateView(LayoutInflater inflater, ViewGroup container,
                             Bundle savedInstanceState) {
        return inflater.inflate(R.layout.fragment_home, container, false);
    }

    @Override
    public void onActivityCreated(@Nullable Bundle savedInstanceState) {
        super.onActivityCreated(savedInstanceState);
    }
}
DetailFragment同上
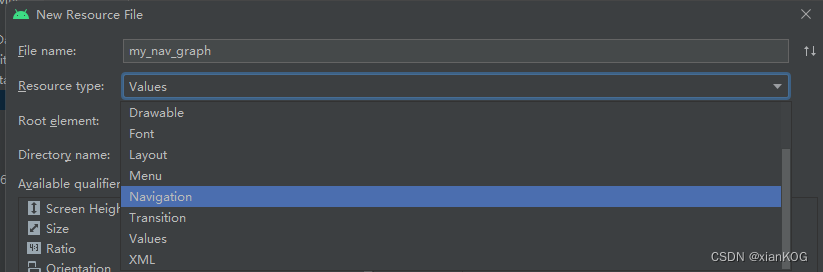
2、创建NavGraph配置文件
- 右键raw->New->New Resource File->创建NavGraph文件
- 在文件的Design中设置Fragment
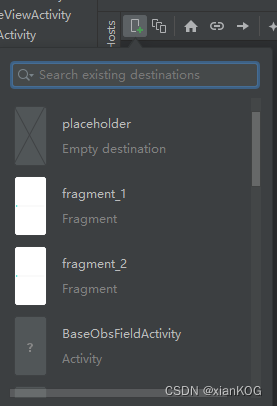
选择Fragment,并设置对应跳转关系
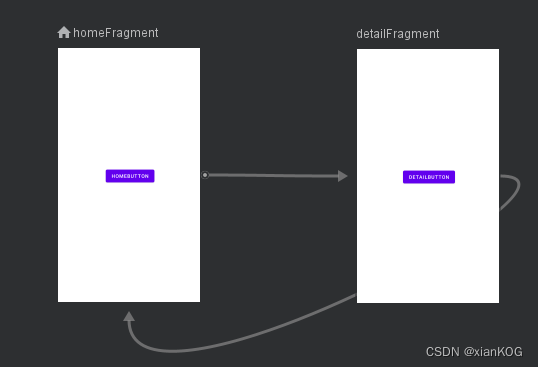
自动生成代码
<?xml version="1.0" encoding="utf-8"?>
<navigation xmlns:android="http://schemas.android.com/apk/res/android"
    xmlns:app="http://schemas.android.com/apk/res-auto"
    xmlns:tools="http://schemas.android.com/tools"
    android:id="@+id/my_nav_graph"
    app:startDestination="@id/homeFragment">

    <fragment
        android:id="@+id/homeFragment"
        android:name="com.kaiya.mvp.jetpacktest.navigation.HomeFragment"
        android:label="fragment_home"
        tools:layout="@layout/fragment_home" >
    </fragment>
    <fragment
        android:id="@+id/detailFragment"
        android:name="com.kaiya.mvp.jetpacktest.navigation.DetailFragment"
        android:label="fragment_detail"
        tools:layout="@layout/fragment_detail" >
        <action
            android:id="@+id/action_detailFragment_to_homeFragment"
            app:destination="@id/homeFragment" />
    </fragment>
</navigation>
创建NavHostFragment容器
<androidx.constraintlayout.widget.ConstraintLayout xmlns:android="http://schemas.android.com/apk/res/android"
    xmlns:app="http://schemas.android.com/apk/res-auto"
    xmlns:tools="http://schemas.android.com/tools"
    android:layout_width="match_parent"
    android:layout_height="match_parent"
    tools:context=".NavigationActivity">

    <fragment
        android:id="@+id/fragment"
        android:name="androidx.navigation.fragment.NavHostFragment"
        android:layout_width="match_parent"
        android:layout_height="match_parent"
        app:defaultNavHost="true"
        app:navGraph="@navigation/my_nav_graph" />

</androidx.constraintlayout.widget.ConstraintLayout>
然后在主界面的onCreate中加载NavHostFragment
// 通过NavController来控制NavHostFragment
NavController navController = Navigation.findNavController(this,R.id.fragment);
NavigationUI.setupActionBarWithNavController(this,navController);
在主界面中重写onSupportNavigateUp方法,使得返回键有效
 @Override
    public boolean onSupportNavigateUp() {
        NavController navController = Navigation.findNavController(this,R.id.fragment);
        return navController.navigateUp();
    }
在Fragment中设置跳转事件
@Override
    public void onActivityCreated(@Nullable Bundle savedInstanceState) {
        super.onActivityCreated(savedInstanceState);
        Button button = getView().findViewById(R.id.button1);
        button.setOnClickListener(v->{
            NavController navController = Navigation.findNavController(v);
            //R.id.action_homeFragment_to_detailFragment 就是在NavGraph配置文件中设置的跳转路径
            navController.navigate(R.id.action_homeFragment_to_detailFragment);
        });
    }
动画效果与safe args传参
1、动画效果添加
在NavGraph配置文件的Design视图中,选中某个跳转路线,在右侧设置动画
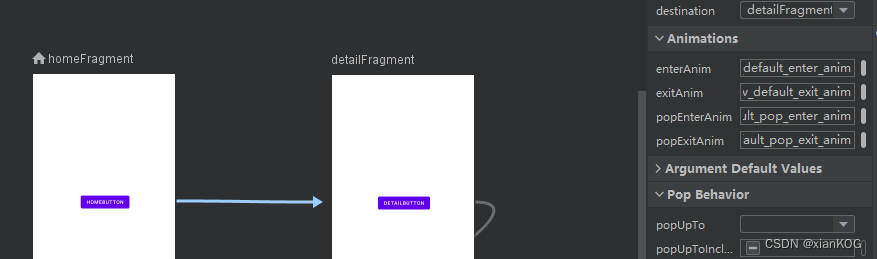
自动生成代码:
<?xml version="1.0" encoding="utf-8"?>
<navigation xmlns:android="http://schemas.android.com/apk/res/android"
    xmlns:app="http://schemas.android.com/apk/res-auto"
    xmlns:tools="http://schemas.android.com/tools"
    android:id="@+id/my_nav_graph"
    app:startDestination="@id/homeFragment">

    <fragment
        android:id="@+id/homeFragment"
        android:name="com.kaiya.mvp.jetpacktest.navigation.HomeFragment"
        android:label="fragment_home"
        tools:layout="@layout/fragment_home" >
        <action
            android:id="@+id/action_homeFragment_to_detailFragment"
            app:destination="@id/detailFragment"
            app:enterAnim="@anim/nav_default_enter_anim"
            app:exitAnim="@anim/nav_default_exit_anim"
            app:popEnterAnim="@anim/nav_default_pop_enter_anim"
            app:popExitAnim="@anim/nav_default_pop_exit_anim" />
    </fragment>
    <fragment
        android:id="@+id/detailFragment"
        android:name="com.kaiya.mvp.jetpacktest.navigation.DetailFragment"
        android:label="fragment_detail"
        tools:layout="@layout/fragment_detail" >
        <action
            android:id="@+id/action_detailFragment_to_homeFragment"
            app:destination="@id/homeFragment" />
    </fragment>
</navigation>
2、safe args 插件传参
- 普通方式传参
Button button = getView().findViewById(R.id.button1);
    button.setOnClickListener(v->{
        //1、普通方式传参
        Bundle bundle = new Bundle();
        bundle.putString("user_Name","jack");
        NavController navController = Navigation.findNavController(v);
        navController.navigate(R.id.action_homeFragment_to_detailFragment,bundle);
    });
Button button = getView().findViewById(R.id.button2); button.setOnClickListener(v->{ //1、普通方式传参的接收方式 Bundle args = getArguments(); String name = args.getString("user_Name"); NavController navController = Navigation.findNavController(v); navController.navigate(R.id.action_detailFragment_to_homeFragment); });
2、safe args插件传
个人感觉没必要!
NavigationUI
- Fragment的切换,除了Fragment页面本身的切换,通常还伴有APP bar的变化,为了方便统一管理,Navigation组件引入了NavigationUI类
深层链接DeepLink
例子:界面还是为两个Fragment之间的跳转,在第一个Fragment中点击按钮发送通知,点击通知会跳转到第二个Fragment中,并打印传送的参数
-
PendingIntent方式
当APP收到某个通知推送,我们希望用户在点击该通知时,能够直接跳转到展示该通知内容的页面,可以通过PendingIntent来完成1、在第一个fragment的按钮中添加事件
	@Override
    public void onActivityCreated(@Nullable Bundle savedInstanceState) {
        super.onActivityCreated(savedInstanceState);
        Button button = getView().findViewById(R.id.button1);
        button.setOnClickListener(v->{
            //发送通知代码
            sendNotification();
        });

    }
    private void sendNotification() {
        //通知渠道
        if(Build.VERSION.SDK_INT >= Build.VERSION_CODES.O){
            NotificationChannel channel = new NotificationChannel(
                    getActivity().getPackageName(), //包名
                    "MyChannel",
                    NotificationManager.IMPORTANCE_DEFAULT); //重要程度
            channel.setDescription("my NotificationChannel");
            NotificationManager notificationManager = getActivity().getSystemService(NotificationManager.class);
            notificationManager.createNotificationChannel(channel);
        }
        Notification notification = new NotificationCompat.Builder(getActivity(),getActivity().getPackageName())
                .setSmallIcon(R.drawable.ic_launcher_background)
                .setContentTitle("Deep Link")
                .setContentText("点击我试试")
                .setPriority(NotificationCompat.PRIORITY_DEFAULT)
                .setContentIntent(getPendingIntent()) //调用下面的方法
                .build();

        NotificationManagerCompat from = NotificationManagerCompat.from(getActivity());
        from.notify(notificationId++,notification);
	}
	private PendingIntent getPendingIntent() {
        Bundle args = new Bundle();
        args.putString("name","jack");
        return Navigation.findNavController(getActivity(),R.id.button1)
                .createDeepLink()
                .setGraph(R.navigation.my_nav_graph) //导航图
                .setDestination(R.id.detailFragment) //目标
                .setArguments(args)  //传参
                .createPendingIntent();
	}
2、当点击通知后,会跳转到第二个fragment中,并打印传的参数
@Override public void onActivityCreated(@Nullable Bundle savedInstanceState) { super.onActivityCreated(savedInstanceState); Button button = getView().findViewById(R.id.button2); Bundle args = getArguments(); if(args != null){ String name = args.getString("name"); Log.e("mylog","通过通知传递的参数:name="+name); } } -
URL方式
-
当用户通过手机浏览器浏览网站上某个页面时,可以在网页上放置一个类似于“在应用中打开”的按钮,如果用户的手机安装有我们的App,那么通过DeepLink就能打开相应的页面;如果没有安装,那么网站可以导航到应用程序的下载页面,引导用户安装应用程序
-
adb shell am start -a android.intent.action.VIEW -d
“http://www.dongnaoedu.com/fromWeb”1、在清单文件中的主界面下添加 nav-graph
<activity android:name=".MainActivity">
            <intent-filter>
                <action android:name="android.intent.action.MAIN" />

                <category android:name="android.intent.category.LAUNCHER" />
            </intent-filter>
            <nav-graph android:value="@navigation/my_nav_graph" /> //nav-graph
        </activity>
2、在nav-graph配置文件的首页上添加 deepLink
<fragment
        android:id="@+id/detailFragment"
        android:name="com.kaiya.mvp.jetpacktest.navigation.DetailFragment"
        android:label="fragment_detail"
        tools:layout="@layout/fragment_detail" >
        <action
            android:id="@+id/action_detailFragment_to_homeFragment"
            app:destination="@id/homeFragment" />
        <deepLink app:uri="www.dongnaoedu.com/{params}" /> //deeplink
    </fragment>
-
WorkManager
WorkManager 作用与特点
- 在后台执行任务的需求是非常常见的,Android也提供了多种解决方案,如JobScheduler、Loader、Service等,如果这些APIm左右被恰当利用,则可能会消耗大量电量。Android在解决应用程序耗电问题上做了各种尝试,从Doze到App Standby。通过各种方式限制和管理应用程序,以保证应用程序不会再后台小号过多的设备电量。WorkManager为应用程序中那些不需要及时完成的任务提供了一个同一的解决方案,以便在设备电量和用户体检之间达到一个比较好的平衡。
WorkManager兼容方案


 2万+
2万+


 被折叠的 条评论
为什么被折叠?
被折叠的 条评论
为什么被折叠?
 到【灌水乐园】发言


