


我们先简单了解一下security过滤链执行的大致流程:
注意一下过滤器链的执行顺序~~~~~~
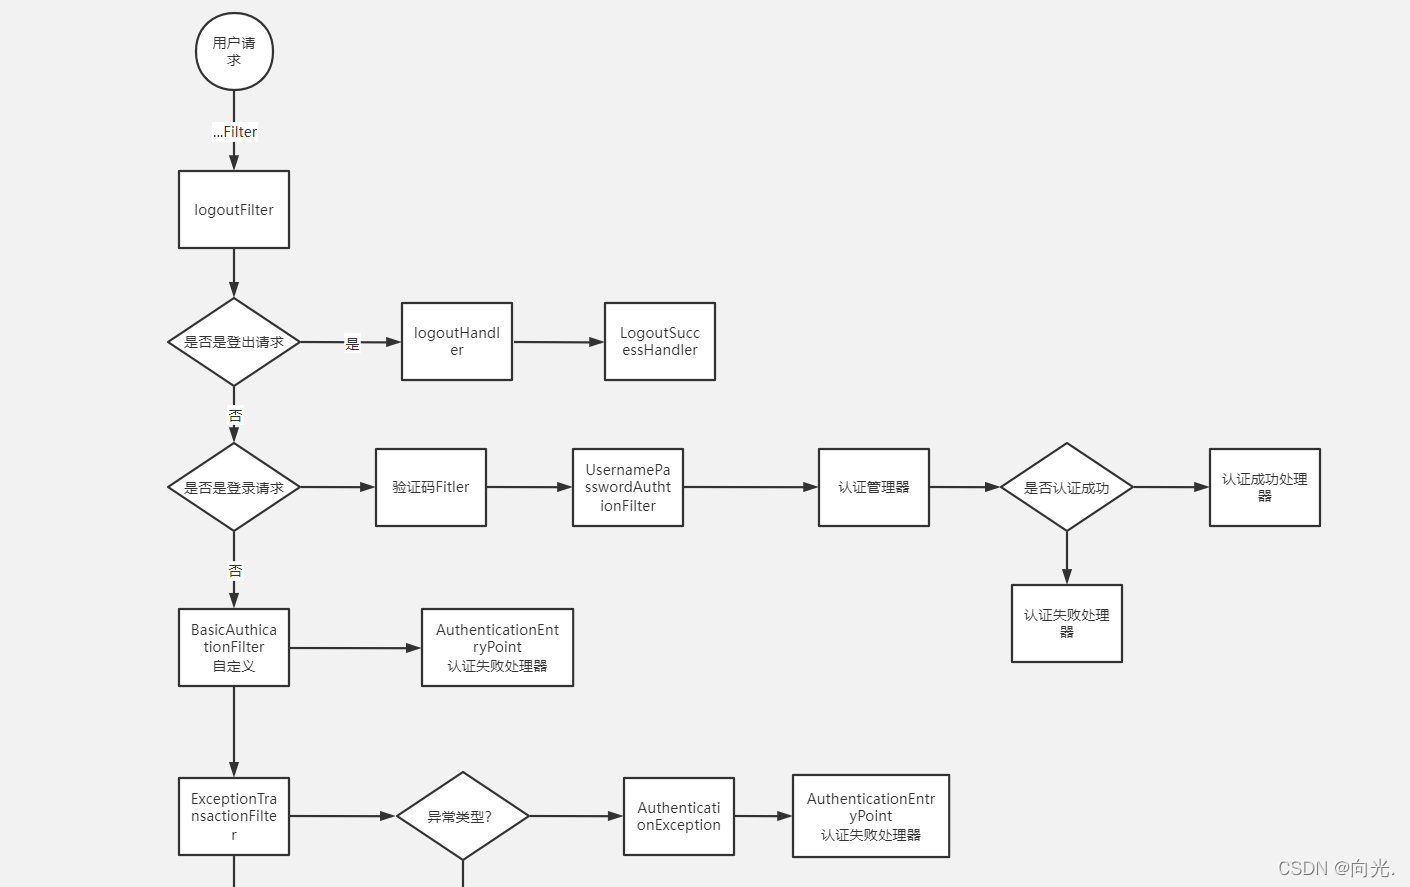
流程说明:
- 客户端发起一个请求,进入 Security 过滤器链。
- 当到 LogoutFilter 的时候判断是否是登出路径,如果是登出路径则到 logoutHandler ,如果登出成功则到 logoutSuccessHandler 登出成功处理。如果不是登出路径则直接进入下一个过滤器。
- 当到 UsernamePasswordAuthenticationFilter 的时候判断是否为登录路径,如果是,则进入该过滤器进行登录操作,如果登录失败则到 AuthenticationFailureHandler ,登录失败处理器处理,如果登录成功则到 AuthenticationSuccessHandler 登录成功处理器处理,如果不是登录请求则不进入该过滤器。
- 进入认证BasicAuthenticationFilter进行用户认证,成功的话会把认证了的结果写入到SecurityContextHolder中SecurityContext的属性authentication上面。如果认证失败就会交给AuthenticationEntryPoint认证失败处理类,或者抛出异常被后续ExceptionTranslationFilter过滤器处理异常,如果是AuthenticationException就交给AuthenticationEntryPoint处理,如果是AccessDeniedException异常则交给AccessDeniedHandler处理。
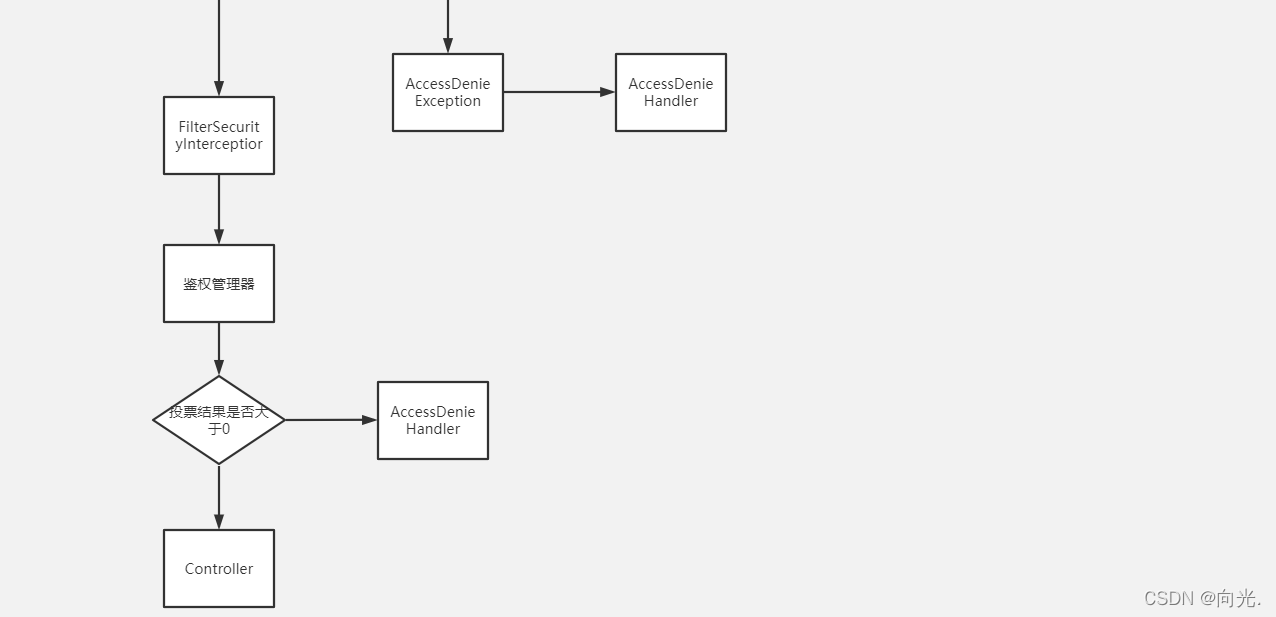
- 当到 FilterSecurityInterceptor 的时候会拿到 uri ,根据 uri 去找对应的鉴权管理器,鉴权管理器做鉴权工作,鉴权成功则到 Controller 层,否则到 AccessDeniedHandler 鉴权失败处理器处理。
我们先再总结一下我们需要了解的几个组件:
- LogoutFilter - 登出过滤器
- logoutSuccessHandler - 登出成功之后的操作类
- UsernamePasswordAuthenticationFilter - from提交用户名密码登录认证过滤器
- AuthenticationFailureHandler - 登录失败操作类
- AuthenticationSuccessHandler - 登录成功操作类
- BasicAuthenticationFilter - Basic身份认证过滤器
- SecurityContextHolder - 安全上下文静态工具类
- AuthenticationEntryPoint - 认证失败入口
- ExceptionTranslationFilter - 异常处理过滤器
- AccessDeniedHandler - 权限不足操作类
- FilterSecurityInterceptor - 权限判断拦截器、出口
接着我们要引入一些jar:
<!-- springboot security -->
<dependency>
    <groupId>org.springframework.boot</groupId>
    <artifactId>spring-boot-starter-security</artifactId>
</dependency>
<dependency>
    <groupId>org.springframework.boot</groupId>
    <artifactId>spring-boot-starter-data-redis</artifactId>
</dependency>
<!-- jwt -->
<dependency>
    <groupId>io.jsonwebtoken</groupId>
    <artifactId>jjwt</artifactId>
    <version>0.9.1</version>
</dependency>
<dependency>
    <groupId>com.github.axet</groupId>
    <artifactId>kaptcha</artifactId>
    <version>0.0.9</version>
</dependency>
<!-- hutool工具类-->
<dependency>
    <groupId>cn.hutool</groupId>
    <artifactId>hutool-all</artifactId>
    <version>5.3.3</version>
</dependency>
<dependency>
    <groupId>org.apache.commons</groupId>
    <artifactId>commons-lang3</artifactId>
    <version>3.11</version>
</dependency>
接下来明白大致原理和导入jar包后我们就开始分析我们要实现的功能
-
因为我们是想要实现图片验证码功能,但是我们发现security给我们默认提供的UsernamePasswordAuthentication的filter是不能用的,因为他那里只是对用户名和密码进行校验,因此我们可以这样想,我们使用验证码其实就是在用户名和密码的校验上多了一层而已,因此我们可以在这个过滤器之前再加一个过滤器来进行验证码校验,当然我们也可以通过自定义过滤器继承UsernamePasswordAuthenticationFilter,然后自己把验证码验证逻辑和认证逻辑写在一起,这也是一种解决方式。
-
这里我们便采用加前置图片过滤器CaptchaFilter来提前校验验证码是否正确,这样的话我们是可以继续使用security给我们提供的用户名与密码的过滤器的,然后登录正常或失败我们都可以通过对应的Handler来返回我们特定格式的封装结果数据。
生成验证码
@Configuration
public class KaptchaConfig {
   @Bean
   public DefaultKaptcha producer() {
      Properties properties = new Properties();
      properties.put("kaptcha.border", "no");
      properties.put("kaptcha.textproducer.font.color", "black");
      properties.put("kaptcha.textproducer.char.space", "4");
      properties.put("kaptcha.image.height", "40");
      properties.put("kaptcha.image.width", "120");
      properties.put("kaptcha.textproducer.font.size", "30");
      Config config = new Config(properties);
      DefaultKaptcha defaultKaptcha = new DefaultKaptcha();
      defaultKaptcha.setConfig(config);
      return defaultKaptcha;
   }
}
验证码的字体长宽等可以自己调整;
接着需要一个controller来接收生成验证码的需求并生成验证码放到redis中进行缓存存储;
@RestController
@Api(tags = {"图片验证码"})
@CrossOrigin(origins = "*")
public class CaptchaController {

    @Autowired
    Producer producer;
    @Autowired
    RedisUtil redisUtil;
    @PostMapping("/getcaptcha")
    @ApiOperation(httpMethod = "POST", value = "获取验证码")
    public ApiResponse<CaptchaVO> getcaptcha() throws IOException {
//        String key = UUID.randomUUID().toString();
					//上下这俩才是真正的实现验证码随机,但测试阶段可以先不随机
//        String code = producer.createText();
        String key = "a";  //测试阶段可以先让验证码的key和v定死
        String code = "1";

        BufferedImage image = producer.createImage(code);
        ByteArrayOutputStream outputStream = new ByteArrayOutputStream();
        ImageIO.write(image, "jpg", outputStream);
        BASE64Encoder encoder = new BASE64Encoder();
        String str = "data:image/jpeg;base64,";
        String base64Img = str + encoder.encode(outputStream.toByteArray());
        redisUtil.hset(Constant.CAPTCHA_KEY, key, code, 1200);
        CaptchaVO captchaVO = new CaptchaVO();
        captchaVO.setBase64Img(base64Img).setCaptchakey(key);
        return new ApiResponse(captchaVO);
    }

}
- 因为前后端分离,我们禁用了session,所以我们把验证码放在了redis中,使用一个随机字符串作为key,并传送到前端,前端再把随机字符串和用户输入的验证码提交上来,这样我们就可以通过随机字符串获取到保存的验证码和用户的验证码进行比较了是否正确了。
- 然后因为图片验证码的方式,所以我们进行了encode,把图片进行了base64编码,这样前端就可以显示图片了。
图片验证码的VO
@Data
@Accessors(chain = true)
public class CaptchaVO implements Serializable {

    @ApiModelProperty("图片Img")
    String base64Img;

    @ApiModelProperty("通过key值去redis中查")
    String captchakey;

}
验证码认证过滤器
图片验证码进行认证验证码是否正确。
@Component
public class CaptchaFilter extends OncePerRequestFilter {

	@Autowired
	RedisUtil redisUtil;

	@Autowired
	LoginFailureHandler loginFailureHandler;

	@Override
	protected void doFilterInternal(HttpServletRequest httpServletRequest, HttpServletResponse httpServletResponse, FilterChain filterChain) throws ServletException, IOException {

		String url = httpServletRequest.getRequestURI();

		if ("/login".equals(url) && httpServletRequest.getMethod().equals("POST")) {
			try{
				// 校验验证码
				validate(httpServletRequest);
			} catch (CaptchaException e) {
				// 交给认证失败处理器
				loginFailureHandler.onAuthenticationFailure(httpServletRequest, httpServletResponse, e);
			}
		}

		filterChain.doFilter(httpServletRequest, httpServletResponse);
	}

	// 校验验证码逻辑
	private void validate(HttpServletRequest httpServletRequest) {
		String code = httpServletRequest.getParameter("code");
		String key = httpServletRequest.getParameter("captchakey");
		if (StringUtils.isBlank(code) || StringUtils.isBlank(key)) {
			throw new CaptchaException("验证码错误");
		}
		System.out.println("redis中的"+redisUtil.hget(Constant.CAPTCHA_KEY, key));
		System.out.println("redis中的"+redisUtil.hget(Constant.CAPTCHA_KEY, key));
		System.out.println("参数中的"+code);
		if (!code.equals(redisUtil.hget(Constant.CAPTCHA_KEY, key))) {
			throw new CaptchaException("验证码错误");
		}

		// 一次性使用
		redisUtil.hdel(Constant.CAPTCHA_KEY, key);
	}
}
RedisUtil类工程中都有就不贴了,redis章节也会介绍;
- 接着由于本来security的校验只有用户名和密码,因此正常情况下就算验证码出错也不会到登录失败处理器中,因为登录失败处理器接收的异常类型为**AuthenticationException **类型,因此我们如果想要验证码失败后也走登录失败处理器,要对其自定义异常,这个验证码异常要继承 **AuthenticationException **,这样的话在图片验证码校验时,如果捕获到了验证码异常则就可以正常交给登录失败处理器处理了,因为异常类型对的上;
public class CaptchaException extends AuthenticationException {

	public CaptchaException(String msg) {
		super(msg);
	}
}
- 其中在存入redis的集合名称为固定的:
    /*
    * 存到redis中的key,封装在一个常量类中
    * */
    public final static String CAPTCHA_KEY = "captcha";
- 因为我们存入redis中是按照集合的形式进行的存储,集合的名字为定死的,key是随机的;
redisUtil.hset(Constant.CAPTCHA_KEY, key, code, 1200);
封装登录失败处理器
- 然后认证失败的话,我们之前说过,登录失败的时候交给AuthenticationFailureHandler,所以我们自定义了LoginFailureHandler :
//认证失败处理器,即让他捕获所有认证失败的异常,统一返回异常信息
@Component
public class LoginFailureHandler implements AuthenticationFailureHandler {

	@Override
	public void onAuthenticationFailure(HttpServletRequest request, HttpServletResponse response, AuthenticationException exception) throws IOException, ServletException {

		response.setContentType("application/json;charset=UTF-8");
		ServletOutputStream outputStream = response.getOutputStream();

		outputStream.write(JSONUtil.toJsonStr(new ApiResponse<>().setReMsg(exception.getMessage())).getBytes("UTF-8"));

		outputStream.flush();
		outputStream.close();
	}
}
- 其实主要就是获取异常的消息,然后封装到Result,最后转成json返回给前端而已哈。
封装登录成功处理器
我们封装好了登录失败处理器,同样要封装登录成功处理器,因为我们是前后端分离项目,我们需要的是在前台接收到json形式的登录成功提示信息。
@Component
public class LoginSuccessHandler implements AuthenticationSuccessHandler {

//	@Autowired
//	JwtUtils jwtUtils;   自动注入失败使用另一种手动实现
//
	@Override
	public void onAuthenticationSuccess(HttpServletRequest request, HttpServletResponse response, Authentication authentication) throws IOException, ServletException {
		JwtUtils jwtUtils = BeanUtils.getBean(JwtUtils.class);   //手动实现
		response.setContentType("application/json;charset=UTF-8");
		ServletOutputStream outputStream = response.getOutputStream();
		// 生成jwt,并放置到响应头中
		String jwt = jwtUtils.generateToken(authentication.getName());
		response.setHeader(jwtUtils.getHeader(), jwt);
		outputStream.write(JSONUtil.toJsonStr(new ApiResponse<>().setReMsg("登录成功")).getBytes("UTF-8"));
		outputStream.flush();
		outputStream.close();
	}

}
登录成功之后我们利用用户名生成jwt,jwtUtils这个工具类和 redis工具类一样,分别放在自己的板块里,然后把jwt作为请求头返回回去,名称就叫Authorization。我们需要在配置文件中配置一些jwt的一些密钥信息:
matrix:
  jwt:
    header: authorization
    expire: 604800
    secret: ji8n3439n439n43ld9ne9343fdfer49h
定义JWT过滤器
而由于我们是一个JWT的项目,且前面我们在登录成功时生成了JWT放在了响应头部传给了前端,因此我们在后面用户访问的时候是需要对JWT进行验证的,JWT的知识可见JWT专栏;

因此我们定义一个过滤器来对jwt进行过滤,这里我们的过滤器是继承的BasicAuthenticationFilter,为什么是他呢?
-
我们从开始的第一张原理图可以知道,用户会先进登出登录的过滤器进行判断,当不是上述请求时,他便会进一个自定义过滤器BasicAuthenticationFilter,而对我们来说,需要进行jwt过滤器判断的就是除了登出登录之外的所有请求,因此在这个过滤器链位置设置 我们的jwt过滤器是最好的选择~
-
这个过滤器的任务就是先对用户是否含有jwt进行判断,如果没有jwt,且在这个位置也肯定不是登录登出请求了,因此我们直接放行即可,剩下的交给鉴权过滤器去做,即限制了没有jwt只能访问那种不需要任何权限,且在securityConfig中默认的“白名单”,如果一个请求没有设置权限,也没有在“白名单”中进行体现,那么他会默认被security保护,即必须有登录权限才能访问 !!!
-
如果有jwt,但是是异常的或者过期了,那么便抛出异常且不能像没有jwt那样直接放行了,因为这个时候是不符合常理的异常情况,因此不能让其继续向下进行访问!!!!
-
如果是有jwt且为正常的jwt,那么我们根据设置 jwt 的思想可知,设置jwt的原因就是为了在客户端保存用户的凭证信息,因此拿到用户的凭证信息后我们就可以得到用户名等信息,即可以完成“帮用户自动登录”的效果,不然每次访问内容都需要用户自己登录一下太麻烦了,而如果jwt正常则也恰好代表用户原先是登录成功的,所以完成了一个对用户登录状态的保留!
public class JwtAuthenticationFilter extends BasicAuthenticationFilter {

	@Autowired
	UserService userService;

	@Autowired
	JwtUtils jwtUtils;
	@Autowired
	UserDetailServiceImpl userDetailService;
	public JwtAuthenticationFilter(AuthenticationManager authenticationManager) {
		super(authenticationManager);
	}

	@Override
	protected void doFilterInternal(HttpServletRequest request, HttpServletResponse response, FilterChain chain) throws IOException, ServletException {

		String jwt = request.getHeader(jwtUtils.getHeader());
		if (StrUtil.isBlankOrUndefined(jwt)) {
			// 没有jwt直接放行,即匿名访问就交给鉴权过滤器去做
			chain.doFilter(request, response);
			return;
		}
		System.out.println(12312);

		Claims claim = jwtUtils.getClaimByToken(jwt);
		if (claim == null) {
			throw new JwtException("token 异常");
		}
		if (jwtUtils.isTokenExpired(claim)) {
			// 会注入进验证失败的异常中
			throw new JwtException("token已过期");
		}

        //此时jwt正常,因此我们通过jwt来得到用户的凭证信息,进而为其进行自动登录操作

		String username = claim.getSubject();
		// 获取用户的权限等信息
		User user = userService.getByUsername(username);

		// 将token信息存放
		UsernamePasswordAuthenticationToken token = new UsernamePasswordAuthenticationToken(username, null, userDetailService.getUserAuthority(user.getId()));

		//“自动登录”,这样不用每每次访问资源都登录一次了
		SecurityContextHolder.getContext().setAuthentication(token);
		// 放行
		chain.doFilter(request, response);
	}
}
对认证异常和权限异常进行处理
-
AuthenticationException(认证异常)和AccessDeniedException(权限异常),因此我们需要定义两个类来对这两个异常进行处理。
-
AuthenticationEntryPoint主要是用来处理匿名用户访问无权限资源时的异常(即未登录,或者登录状态过期失效),而我们要屏蔽重定向的登录页面,并返回统一的json格式的返回体。而实现这一功能的核心就是实现AuthenticationEntryPoint并在WebSecurityConfig中注入。AccessDeineHandler 用来解决认证过的用户访问无权限资源时的异常。
-
当认证失败的时候会进入AuthenticationEntryPoint,于是我们自定义认证失败返回的数据:
这里我们就是通过提前拿到异常,然后改了一些操作,使得当没登录的用户访问无权限资源时,我们不让它去重定向访问原先内置的那个登录页面了,而是给前端返回一些json数据表示其没登陆即可,因为我们是前后端分离的项目,这样的话内置登陆页面被屏蔽后,就可以用前端自定义的了,只要前端的表单提交时向我们的/login发请求就行了,不会被重定向了~~~
// AuthenticationEntryPoint 用来解决匿名用户访问无权限资源时的异常,这里我们给它改了
//即不让它去重定向到那个登录页面了!!!!!!
@Component
public class JwtAuthenticationEntryPoint implements AuthenticationEntryPoint {

	@Override
	public void commence(HttpServletRequest request, HttpServletResponse response, AuthenticationException authException) throws IOException, ServletException {

		response.setContentType("application/json;charset=UTF-8");
		response.setStatus(HttpServletResponse.SC_UNAUTHORIZED);
		ServletOutputStream outputStream = response.getOutputStream();

		outputStream.write(JSONUtil.toJsonStr(new ApiResponse<>().setReMsg("请先登录")).getBytes("UTF-8"));

		outputStream.flush();
		outputStream.close();
	}
}
// AccessDeineHandler 用来解决认证过的用户访问无权限资源时的异常
@Component
public class JwtAccessDeniedHandler implements AccessDeniedHandler {

	@Override
	public void handle(HttpServletRequest request, HttpServletResponse response, AccessDeniedException accessDeniedException) throws IOException, ServletException {

		response.setContentType("application/json;charset=UTF-8");
		response.setStatus(HttpServletResponse.SC_FORBIDDEN);

		ServletOutputStream outputStream = response.getOutputStream();

		// jwt出现异常
		outputStream.write(JSONUtil.toJsonStr(new ApiResponse<>().setReCode("405").setReMsg(accessDeniedException.getMessage())).getBytes("UTF-8"));

		outputStream.flush();
		outputStream.close();

	}
}
解决用户账号和密码查库问题
-
之前我们的用户名密码配置在配置文件中的,而且密码也用的是明文,这明显不符合我们的要求,我们的用户必须是存储在数据库中,密码也是得经过加密的。所以我们先来解决这个问题,然后再去弄授权。
-
首先来插入一条用户数据,但这里有个问题,就是我们的密码怎么生成?密码怎么来的?这里我们使用Security内置了的BCryptPasswordEncoder,里面就有生成和匹配密码是否正确的方法,也就是加密和验证策略。因此我们在SecurityConfig中进行配置:
@Bean
BCryptPasswordEncoder bCryptPasswordEncoder() {
   return new BCryptPasswordEncoder();
}
- 然后在注册时,需要用到这个加密策略,之所以用它是因为我们把它配置进了security中,所以后面security也会用这个规则来进行校验:
@Override
    public ApiResponse<Void> register(UserInfoPO po) {
        User user = BeanUtil.beanA2beanB(po, User.class);
        String password = po.getPassword();
        BCryptPasswordEncoder encoder = new BCryptPasswordEncoder();
        user.setPassword(encoder.encode(password));
        save(user);
        return new ApiResponse().setReMsg("注册成功");
    }
- 注册成功后,但是原先我们登录过程系统不是从我们数据库中获取数据的,因此,我们需要重新定义这个查用户数据的过程,我们需要重写UserDetailsService接口,来自己定义一套查询用户数据的规则。
@Service
public class UserDetailServiceImpl implements UserDetailsService {


	@Autowired
	UserService userService;

	@Override
	public UserDetails loadUserByUsername(String username) throws UsernameNotFoundException {

	    User user= userService.getByUsername(username);
		if (user == null) {
			throw new UsernameNotFoundException("用户名或密码不正确");
		}

		return new AccountUser(user.getId(), user.getUsername(), user.getPassword(), getUserAuthority(user.getId()));
	}

	/**
	 * 获取用户权限信息(角色、菜单权限)
	 * @param userId
	 * @return list
	 */
	public List<GrantedAuthority> getUserAuthority(Long userId){

		// 角色(ROLE_admin)、菜单操作权限 sys:user:list
		String authority = userService.getUserAuthorityInfo(userId);  // ROLE_admin,ROLE_normal,sys:user:list,....

		// 将当前的 格式化字符串转化为权限集合
		return AuthorityUtils.commaSeparatedStringToAuthorityList(authority);
	}
}
因为security在认证用户身份的时候会调用UserDetailsService.loadUserByUsername()方法,因此我们重写了之后security就可以根据我们的流程去查库获取用户了。然后我们把UserDetailsServiceImpl配置到SecurityConfig中就行。
然后上面**UserDetailsService.loadUserByUsername()**默认返回的UserDetails,我们自定义了AccountUser去重写了UserDetails,这也是为了后面我们可能会调整用户的一些数据等,因为不只是用户名和密码而已,还有权限及其状态等等。
此返回类中,最重要的三个构造参数如下,也是我们必须传入的参数:
- username:用户名
- password:密码
- authorities:用户具有的权限。此处不允许为 null
这里要注意:
自定义的用户需要实现UserDetails接口,Security这个框架不关心你的应用时怎么存储用户和权限信息的。只要取出来的时候把它包装成一个UserDetails对象就OK
public class AccountUser implements UserDetails {

	private Long userId;

	private String password;

	private final String username;

	private final Collection<? extends GrantedAuthority> authorities;

	private final boolean accountNonExpired;

	private final boolean accountNonLocked;

	private final boolean credentialsNonExpired;

	private final boolean enabled;

	public AccountUser(Long userId, String username, String password, Collection<? extends GrantedAuthority> authorities) {
		this(userId, username, password, true, true, true, true, authorities);
	}


	public AccountUser(Long userId, String username, String password, boolean enabled, boolean accountNonExpired,
                       boolean credentialsNonExpired, boolean accountNonLocked,
                       Collection<? extends GrantedAuthority> authorities) {

		Assert.isTrue(username != null && !"".equals(username) && password != null,
				"Cannot pass null or empty values to constructor");
		this.userId = userId;
		this.username = username;
		this.password = password;
		this.enabled = enabled;
		this.accountNonExpired = accountNonExpired;
		this.credentialsNonExpired = credentialsNonExpired;
		this.accountNonLocked = accountNonLocked;
		this.authorities = authorities;
	}


	@Override
	public Collection<? extends GrantedAuthority> getAuthorities() {
		return this.authorities;
	}

	@Override
	public String getPassword() {
		return this.password;
	}

	@Override
	public String getUsername() {
		return this.username;
	}

	@Override
	public boolean isAccountNonExpired() {
		return this.accountNonExpired;
	}

	@Override
	public boolean isAccountNonLocked() {
		return this.accountNonLocked;
	}

	@Override
	public boolean isCredentialsNonExpired() {
		return this.credentialsNonExpired;
	}

	@Override
	public boolean isEnabled() {
		return this.enabled;
	}
}
定义登出成功处理器
- 即清除token即可
@Component
public class JwtLogoutSuccessHandler implements LogoutSuccessHandler {

	@Autowired
	JwtUtils jwtUtils;

	@Override
	public void onLogoutSuccess(HttpServletRequest request, HttpServletResponse response, Authentication authentication) throws IOException, ServletException {

		if (authentication != null) {
			new SecurityContextLogoutHandler().logout(request, response, authentication);
		}

		response.setContentType("application/json;charset=UTF-8");
		ServletOutputStream outputStream = response.getOutputStream();

		// 清空请求头
		response.setHeader(jwtUtils.getHeader(), "");

		outputStream.write(JSONUtil.toJsonStr(new ApiResponse<>().setReMsg("成功登出")).getBytes("UTF-8"));

		outputStream.flush();
		outputStream.close();
	}
}
解决跨域问题
@Configuration
public class CorsConfig implements WebMvcConfigurer {

    private CorsConfiguration buildConfig() {
        CorsConfiguration corsConfiguration = new CorsConfiguration();
        corsConfiguration.addAllowedOrigin("*");
        corsConfiguration.addAllowedHeader("*");
        corsConfiguration.addAllowedMethod("*");
        corsConfiguration.addExposedHeader("authorization");
        return corsConfiguration;
    }

    @Bean
    public CorsFilter corsFilter() {
        UrlBasedCorsConfigurationSource source = new UrlBasedCorsConfigurationSource();
        source.registerCorsConfiguration("/**", buildConfig());
        return new CorsFilter(source);
    }

    @Override
    public void addCorsMappings(CorsRegistry registry) {
        registry.addMapping("/**")
                .allowedOrigins("*")
//          .allowCredentials(true)
                .allowedMethods("GET", "POST", "DELETE", "PUT")
                .maxAge(3600);
    }

}
然后在securityConfig中设置 http.cors().and().csrf().disable() 即可。
以上的话,基本的认证与授权流程就大致解决了,但目前来说权限方面只有登录和未登录之分,同样我们发现这里的话我们在访问login请求时,用的是POST请求的param传参方式,这种的话账号和密码是直接拼接在请求地址后面的,很不安全,因此我们想使用json形式进行用户名和密码以及验证码的提交,具体可见另一篇。


 797
797


 被折叠的 条评论
为什么被折叠?
被折叠的 条评论
为什么被折叠?
 到【灌水乐园】发言


