


过程如下:
1 安装Maven 、 eclipse 、 Nexus
2 Maven配入Nexus仓库地址
1)修改Maven settting.xml文件 (常见默认路径:C:\Users\Administrator\.m2)
- <?xml version="1.0" encoding="UTF-8"?>
- <settings xmlns="http://maven.apache.org/SETTINGS/1.0.0"
- xmlns:xsi="http://www.w3.org/2001/XMLSchema-instance"
- xsi:schemaLocation="http://maven.apache.org/SETTINGS/1.0.0 http://maven.apache.org/xsd/settings-1.0.0.xsd">
- <localRepository>D:\Repositories\BeijingMaven\</localRepository>
- <pluginGroups></pluginGroups>
- <proxies></proxies>
- <servers>
- <server>
- <id>Demo-Snapshot</id>
- <username>cj</username>
- <password>123456</password>
- </server>
- </servers>
- <mirrors>
- <mirror>
- <id>cj-nexus</id>
- <name>cj internal nexus repository</name>
- <url>http://192.168.3.10:88/nexus/content/groups/public/</url>
- <mirrorOf>central</mirrorOf>
- </mirror>
- </mirrors>
- <profiles>
- <profile>
- <id>dev</id>
- <repositories>
- <repository>
- <id>cj-nexus</id>
- <url>http://192.168.3.10:88/nexus/content/groups/public/</url>
- <releases>
- <enabled>true</enabled>
- </releases>
- <snapshots>
- <enabled>true</enabled>
- </snapshots>
- </repository>
- </repositories>
- </profile>
- </profiles>
- <activeProfiles>
- <activeProfile>dev</activeProfile>
- </activeProfiles>
- </settings>
注:http://192.168.3.10:88/nexus/content/groups/public/ 为Demo(Maven android项目)配置的公共的仓库组group,存储公共的JAR包,可以不用配置
- localRepository本地MAVEN仓库存放JAR包的位
- D:\Repositories\BeijingMaven\</span>
3 eclipse 配置
1)eclipse 内 Demo项目:
pom.xml配置,指定Nexus 私服主仓库 hosted ,如下:
- <distributionManagement>
- <repository>
- <id><span style="background-color: rgb(255, 0, 0);">Demo-Release</span></id>
- <name>Demo Release Repository</name>
- <url><span style="color:#FF6666;">http://192.168.3.10:88/nexus/content/repositories/Demo-Release/</span></url>
- </repository>
- <snapshotRepository>
- <id><span style="color:#CC0000;">Demo-Snapshot</span></id>
- <name>Demo Snapshot Repository</name>
- <url><span style="color:#FF0000;">http://192.168.3.10:88/nexus/content/repositories/Demo-Snapshot/</span></url>
- </snapshotRepository>
- </distributionManagement>
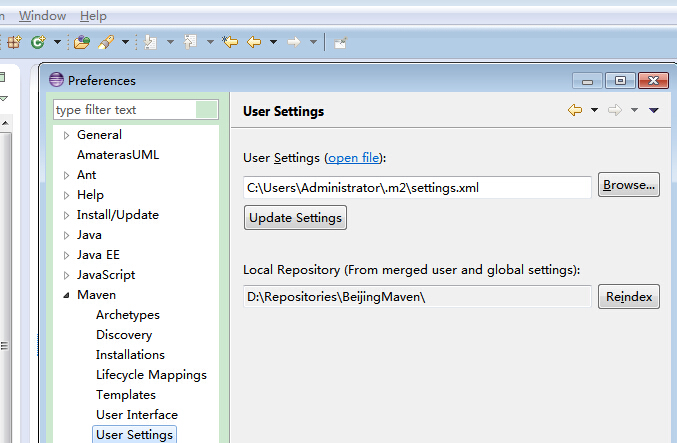
- 2)eclipse 内Maven项<span style="color:#FF0000;"></span>配置
常见默认路径:C:\Users\Administrator\.m2\settting.xml ) , 操作如图1:
4 将Demo项目部署到Tomcat v6.0 Server 内,启动Server,完成项目的运行(Maven、eclipse会分别根据settting.xml、pom.xml去远程私服下载公共的JAR包、
主仓库 hosted 内全部JAR包,存放位置为:本地MAVEN仓库位置:D:\Repositories\BeijingMaven\)
二:eclipse 使用Maven deploy命令部署构建到Nexus上,(只测试过‘项目JAR’部署、构建)
应用场景:SYS-UTIL(系统工具)项目部署、构建成JAR包(SYS-UTIL-1.0.0.jar)存储到Nexus私服上,以供其它项目(依赖)使用
过程如下:
1) 创建SYS-UTIL(系统工具)项目,即Maven 项目
2 配置SYS-UTIL(系统工具)项目POM.xml文件,指定项目存储的Nexus URL 位置(具体可参考上面配置)
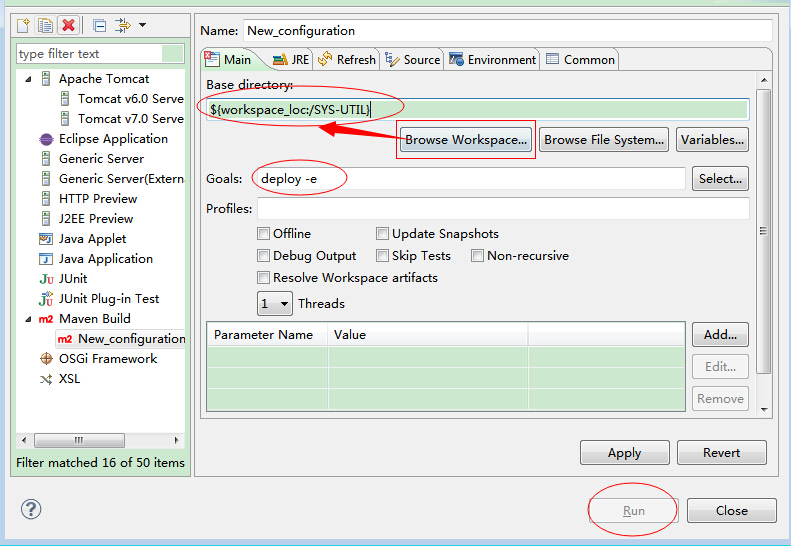
3) 右击项目,依次执行:Run As --> Run Configurations ---> Maven Build --->New _Configuration(双击Maven Build可生成) --> Browse Workspace 选中项目,
Goals输入 : deploy -e 后,点击 Run
如图2:
4)SYS-UTIL(系统工具)项目会重新构建生成JAR包,并生成、并更新(当已存在此JAR包时)远程Nexus仓库
提交到nexus时候报错:
[ERROR] Failed to execute goal org.apache.maven.plugins:maven-deploy-plugin:2.7:deploy (default-deploy) on project *: Failed to deploy artifacts: Could not transfer artifact *:jar:1.0 from/to releases (http://10.1.81.199:8081/nexus/content/repositories/releases/): Failed to transfer file: http://10.1.81.199:8081/nexus/content/repositories/releases/com/cs2c/security-management-client* /1.0/*-1.0.jar. Return code is: 401, ReasonPhrase:Unauthorized.
原来是没有配置认证。
maven目录conf的setting.xml里,
- < server >
- < id > releases </ id >
- < username > admin </ username >
- < password > admin123 </ password >
- </ server >
- < server >
- < id > snapshots </ id >
- < username > admin </ username >
- < password > admin123 </ password >
- </ server >
- </ servers >
用户名和密码都是nexus的。再次deploy即可。
注意这里的id要和pom.xml里远程deploy的地址对应一致,我的pom.xml里配置:
- <!-- 配置远程发布到私服,mvn deploy -->
- < distributionManagement >
- < repository >
- < id > releases </ id >
- < name > Nexus Release Repository </ name >
- < url > http://10.1.81.199:8081/nexus/content/repositories/releases/ </ url >
- </ repository >
- < snapshotRepository >
- < id > snapshots </ id >
- < name > Nexus Snapshot Repository </ name >
- < url > http://10.1.81.199:8081/nexus/content/repositories/snapshots/ </ url >
- </ snapshotRepository >
- </ distributionManagement >
如果这里不配置,会报错: 报 错:Failed to execute goal org.apache.maven.plugins:maven-deploy-plugin:2.5:deploy (default-deploy) on project git-demo: Deployment failed: repository element was not specified in the POM inside distributionManagement element or in -DaltDeploymentRepository=id::layout::url parameter
参照:http://blog.csdn.net/jun55xiu/article/details/39671907
http://comeonbabye.iteye.com/blog/1742506


 8461
8461

 被折叠的 条评论
为什么被折叠?
被折叠的 条评论
为什么被折叠?
 到【灌水乐园】发言


