


目录
到上文为止,我们已经初步的学习完了线性表的相关知识。从本篇开始开始学习非线性表,首先了解非线性表中的树的相关知识。
一、树
1、概念
树是一种非线性的数据结构,它是由n(n>=0)个有限结点组成一个具有层次关系的集合。把它叫做树是因为它看起来像一棵倒挂的树,也就是说它是根朝上,而叶朝下的。· 有一个特殊的结点,称为根结点,根节点没有前驱结点。· 除根节点外,其余结点被分成M(M>0)个互不相交的集合T1、T2、……、Tm,其中每一 个集 合Ti(1<= i <= m)又是一棵结构与树类似的子树。每棵子树的根结点有且只有一个前 驱,可以有 0个或多个后继。· 因此,树是递归定义的。

2、树的相关概念
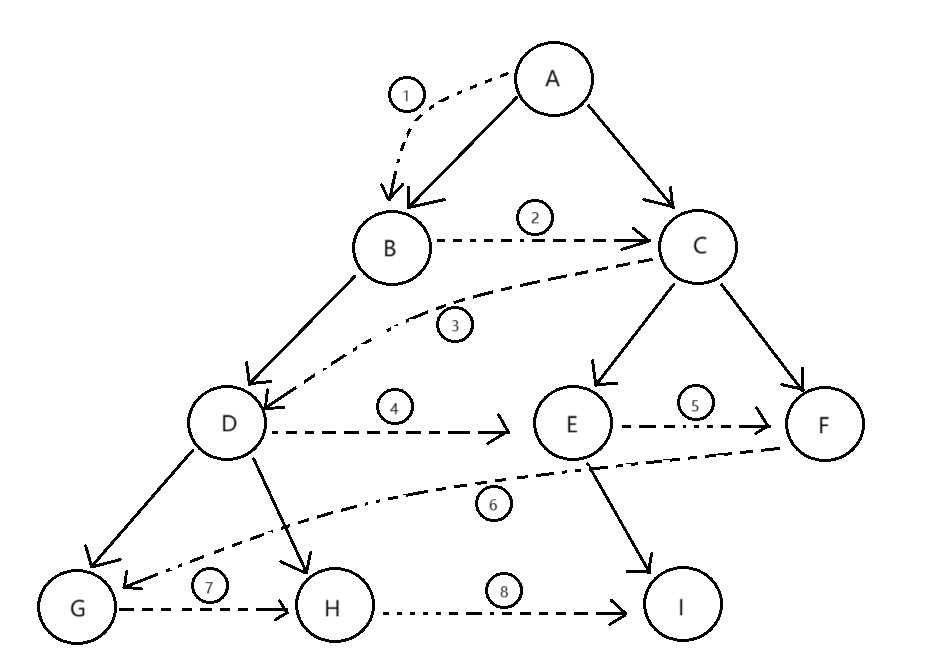
节点的度:一个节点含有的子树的个数称为该节点的度; 如上图:A的为6叶节点或终端节点:度为0的节点称为叶节点; 如上图:B、C、H、I...等节点为叶节点非终端节点或分支节点:度不为0的节点; 如上图:D、E、F、G...等节点为分支节点双亲节点或父节点:若一个节点含有子节点,则这个节点称为其子节点的父节点; 如上图:A是B的父节点孩子节点或子节点:一个节点含有的子树的根节点称为该节点的子节点; 如上图:B是A的孩子节点兄弟节点:具有相同父节点的节点互称为兄弟节点; 如上图:B、C是兄弟节点树的度:一棵树中,最大的节点的度称为树的度; 如上图:树的度为6节点的层次:从根开始定义起,根为第1层,根的子节点为第2层,以此类推;树的高度或深度:树中节点的最大层次; 如上图:树的高度为4堂兄弟节点:双亲在同一层的节点互为堂兄弟;如上图:H、I互为兄弟节点节点的祖先:从根到该节点所经分支上的所有节点;如上图:A是所有节点的祖先子孙:以某节点为根的子树中任一节点都称为该节点的子孙。如上图:所有节点都是A的子孙森林:由m(m>0)棵互不相交的树的集合称为森林;
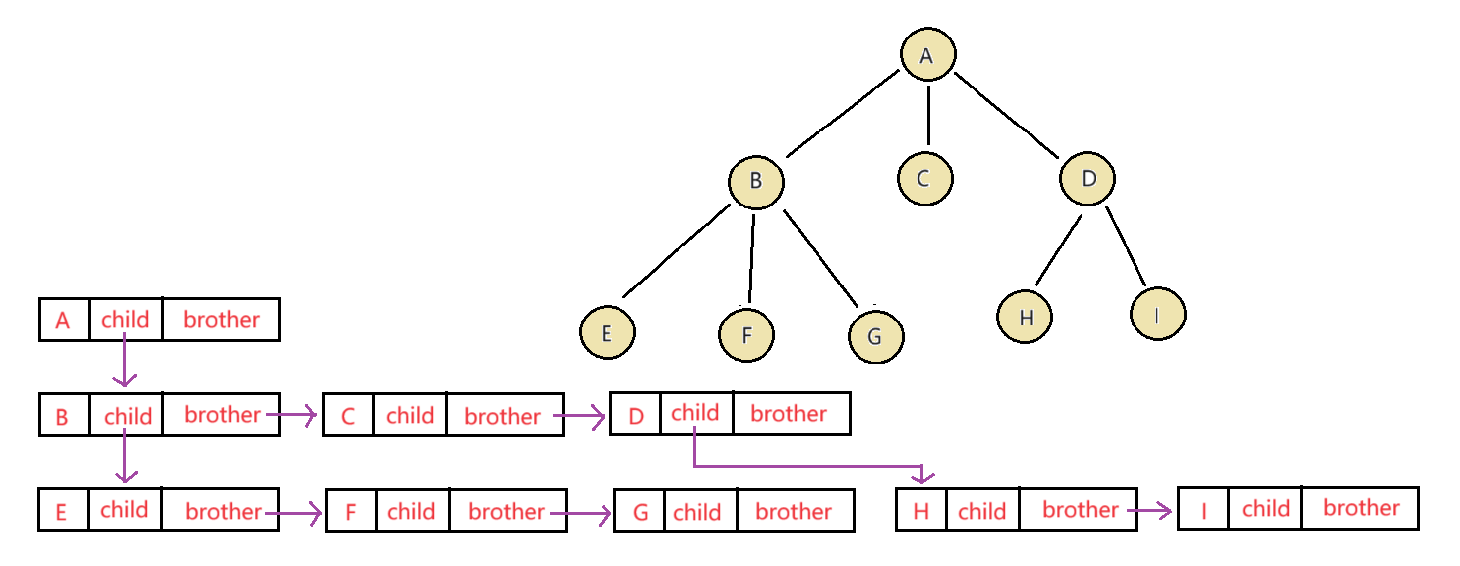
3、树的表示
typedef int DataType;
struct Node
{
 struct Node* firstChild1; // 第一个孩子结点
 struct Node* pNextBrother; // 指向其下一个兄弟结点
 DataType data; // 结点中的数据域
};
如图:
4、应用

二、二叉树
1、概念
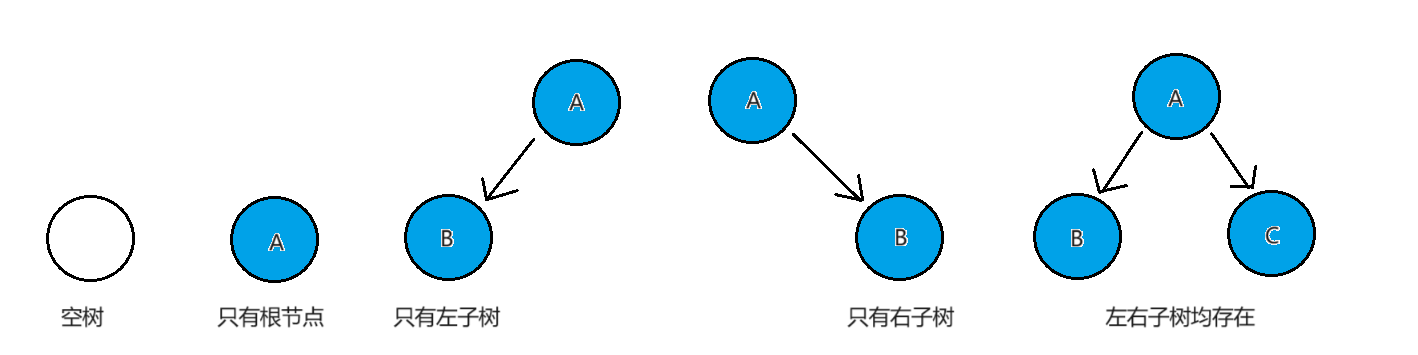
一棵二叉树是结点的一个有限集合,该集合:· 或者为空· 由一个根节点加上两棵别称为左子树和右子树的二叉树组成
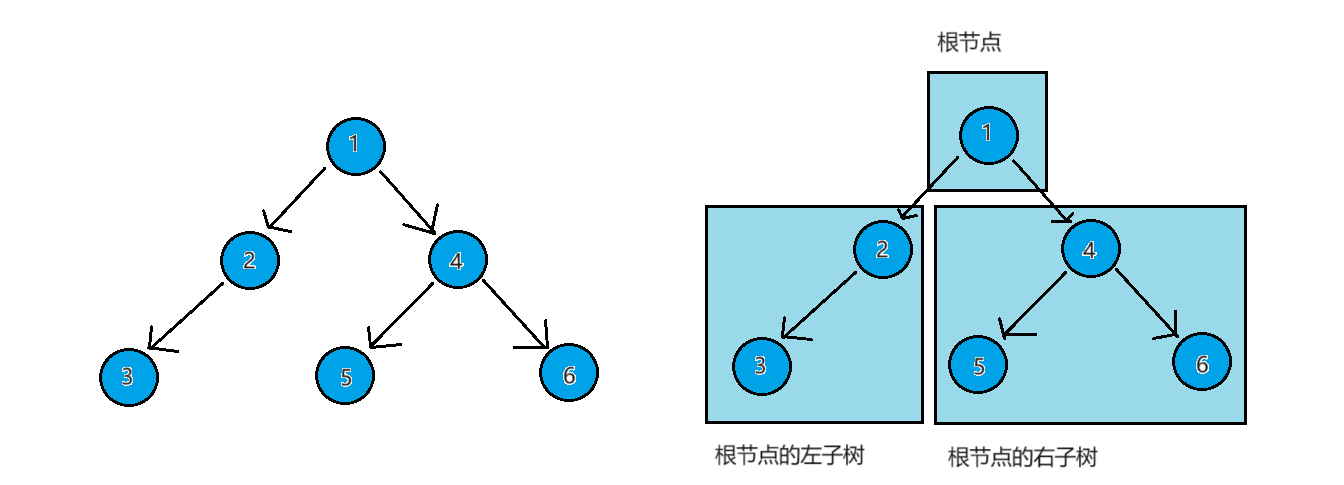
从上图可以看出:1. 二叉树不存在度大于2的结点2. 二叉树的子树有左右之分,次序不能颠倒,因此二叉树是有序树
2、特殊的二叉树
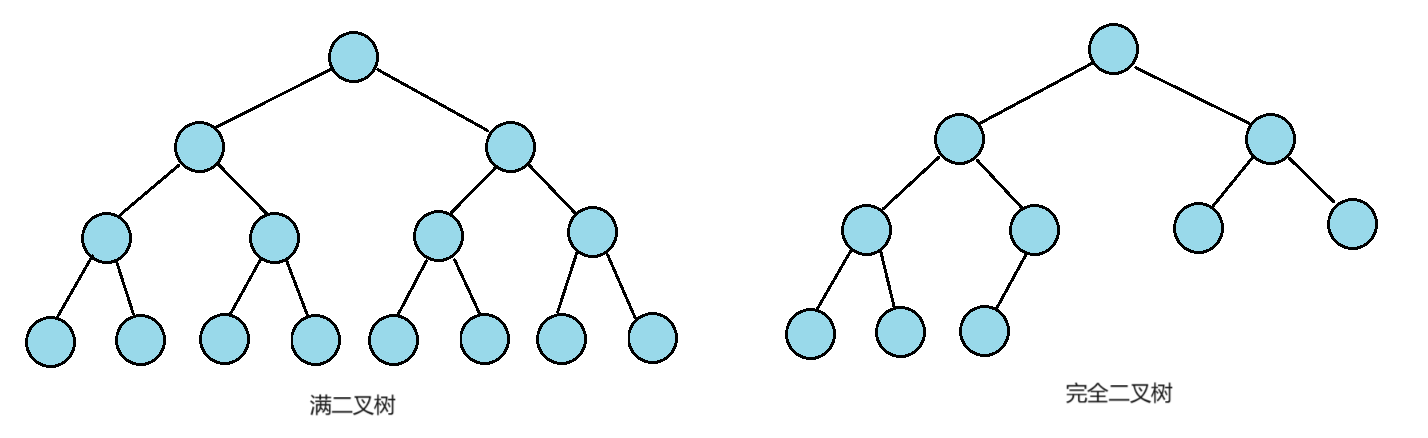
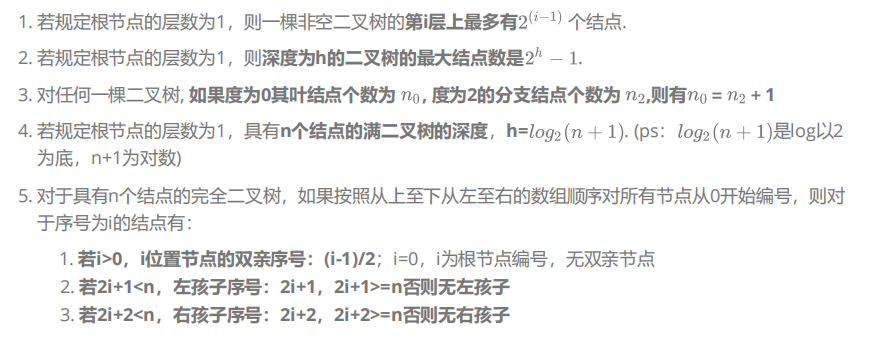
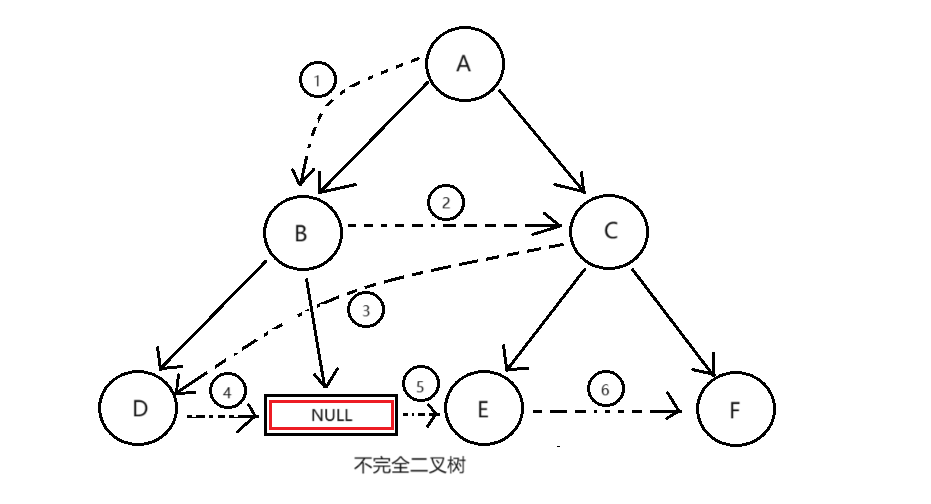
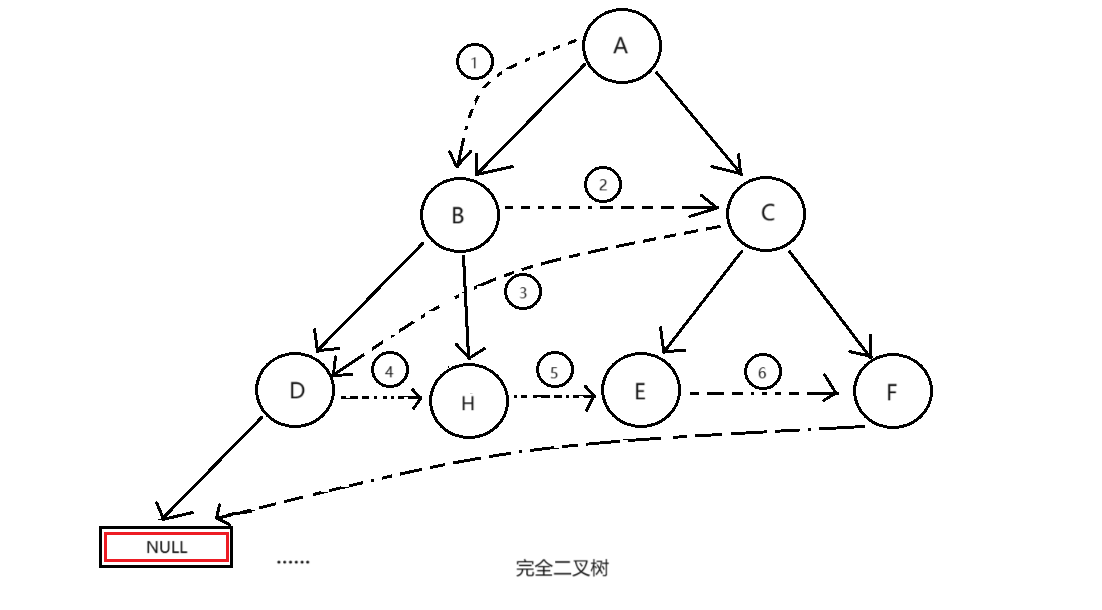
1. 满二叉树:一个二叉树,如果每一个层的结点数都达到最大值,则这个二叉树就是满二叉树。也就是 说,如果一个二叉树的层数为K,且结点总数是 ,则它就是满二叉树。2. 完全二叉树:完全二叉树是效率很高的数据结构,完全二叉树是由满二叉树而引出来的。对于深度为K的,有n个结点的二叉树,当且仅当其每一个结点都与深度为K的满二叉树中编号从1至n的结点一一对应时称之为完全二叉树。 要注意的是满二叉树是一种特殊的完全二叉树。
3、二叉树的性质
4、二叉树的存储结构
顺序结构存储就是使用数组来存储,一般使用数组只适合表示完全二叉树,因为不是完全二叉树会有空间的浪费。而现实中使用中只有堆才会使用数组来存储,二叉树顺序存储在物理上是一个数组,在逻辑上是一颗二叉树。

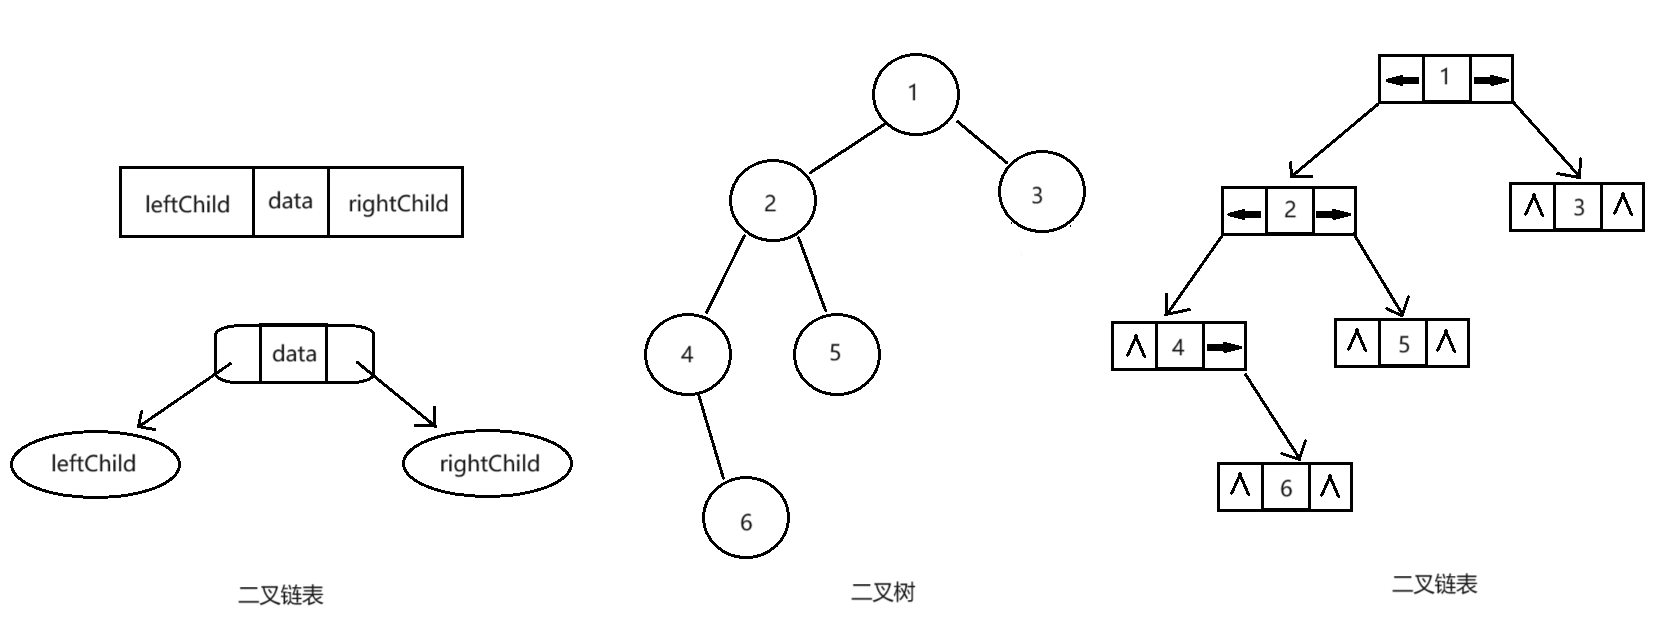
二叉树的链式存储结构是指,用链表来表示一棵二叉树,即用链来指示元素的逻辑关系。 通常的方法是链表中每个结点由三个域组成,数据域和左右指针域,左右指针分别用来给出该结点左孩子和右孩子所在的链结点的存储地址 。链式结构又分为二叉链和三叉链。目前为止学习使用的还是二叉链。
typedef int BTDataType;
// 二叉链
struct BinaryTreeNode
{
    BTDataType _data; // 当前节点值域
    struct BinTreeNode* _pLeft; // 指向当前节点左孩子
    struct BinTreeNode* _pRight; // 指向当前节点右孩子
}三、二叉树的顺序结构及实现
1、二叉树的顺序结构

2、堆

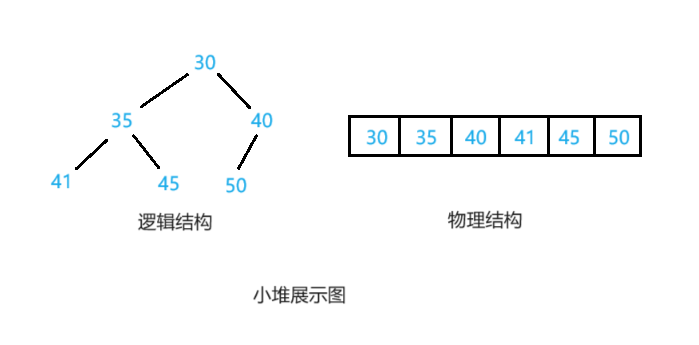
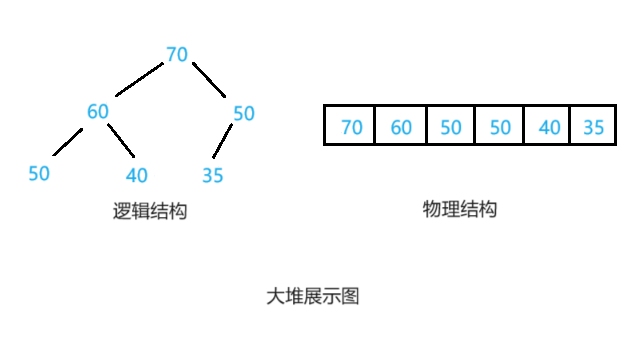
· 堆中某个节点的值总是不大于或不小于其父节点的值;· 堆总是一棵完全二叉树。
3、堆的实现
建堆
给定一个数组,逻辑上是完全二叉树,但是不构成堆。以小堆为例,通过向上调整算法(前提是调整的节点的上面满足堆),从根节点的左子树开始调整,子节点值小于等于父节点的值就进行交换,一直调整到最后一个叶子节点,就可以调整成堆。如图:
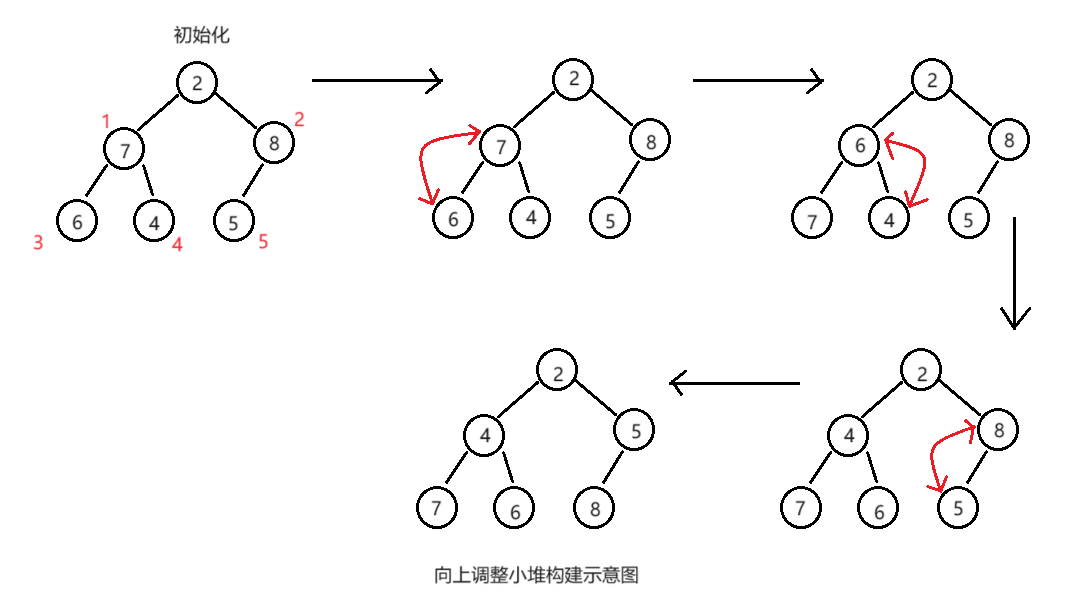
此时的数组逻辑上构成小堆。
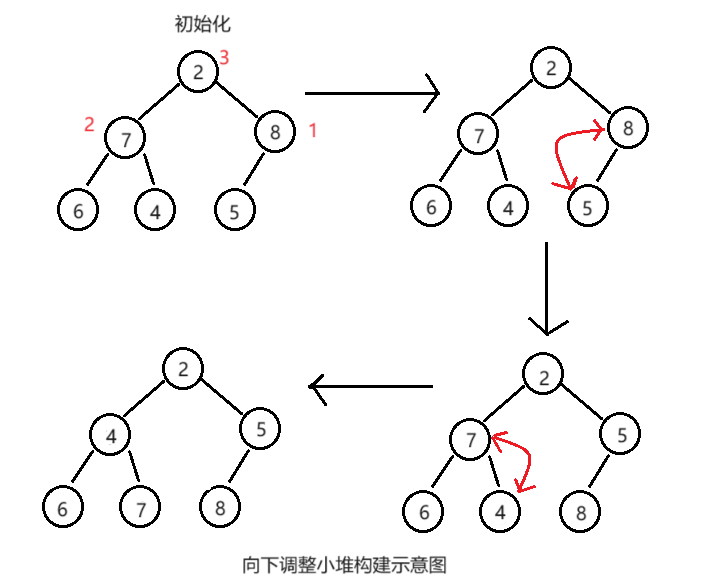
同样的,也可以向下调整建堆(前提是调整的节点的下面满足堆)。从最后一个叶子节点的父节点开始向下调整,与左右子树中小的子树进行比较。如图:
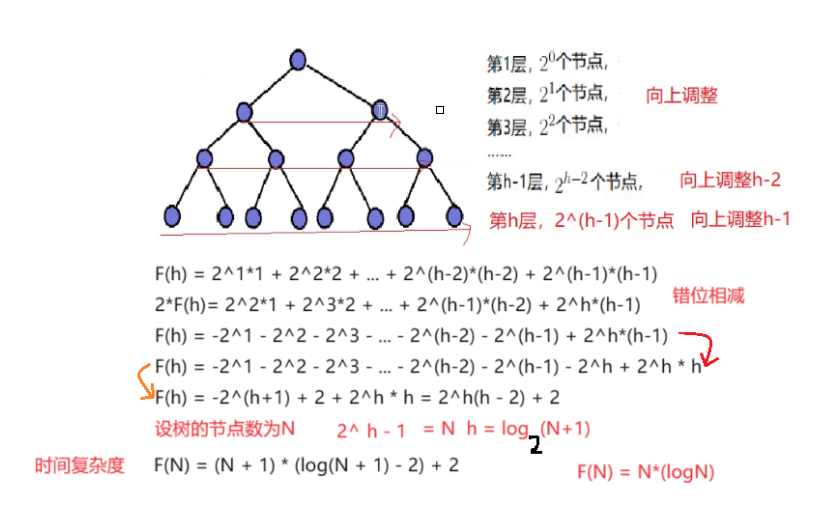
建堆的时间复杂度

堆的插入
在数组的尾插入一个2,再进行向上调整算法,直到满足堆
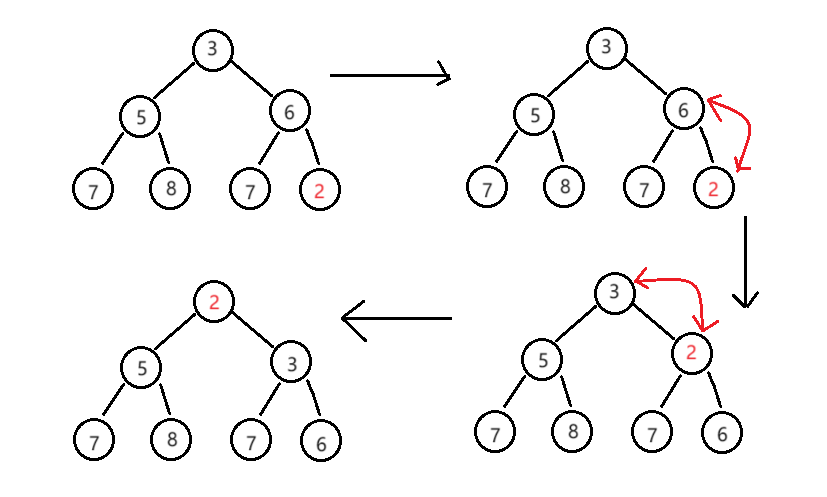
堆的删除
删除堆是删除堆顶的数据,将堆顶数据与数组的最后一个数据交换,再将最后一个数据删除,并进行向下调整算法,重新构成堆。如图:

代码实现
//初始化
void HeapCreate(HP* hp);
//销毁
void HeapDestroy(HP* hp);
//插入
void HeapPush(HP* hp, HPDateType x);
//删除  删除栈顶
void HeapPop(HP* hp);
//堆顶元素
HPDateType HeapTop(HP* hp);
//判空
bool HeapEmpty(HP* hp);
//大小
int HeapSize(HP* hp);
//向上调整
void adjustUp(HPDateType* a, int child);
//向下调整
void adjustDown(HPDateType* a, int n, int parent);
//交换
void Swap(HPDateType* p1, HPDateType* p2);
//初始化
void HeapCreate(HP* hp)
{
hp->pa = (HPDateType*)malloc(sizeof(HPDateType) * 4);
hp->size = 0;
hp->capacity = 4;
}
//销毁
void HeapDestroy(HP* hp)
{
free(hp->pa);
hp->pa = NULL;
hp->capacity = 0;
hp->size = 0;
}
//交换
void Swap(HPDateType* p1, HPDateType* p2)
{
HPDateType tmp = *p1;
*p1 = *p2;
*p2 = tmp;
}
//向上调整 上面的满足堆
void adjustUp(HPDateType* a, int child)
{
int parent = (child - 1) / 2;
while (child > 0)
{
if (a[child] < a[parent])//成小堆
{
//父节点大于子节点则交换
Swap(&a[child], &a[parent]);
child = parent;
parent = (child - 1) / 2;
//更新父子坐标
}
else
{
break;
}
}
}
//向下调整 最坏的情况调整高度次
//前提是左右子树是堆
void adjustDown(HPDateType* a, int n, int parent)
{
int child = parent * 2 + 1;
while (child < n)
{//子节点下标小于数组个数
if (child + 1 < n && a[child + 1] < a[child])//成小堆
{//先判断右孩子存在
child++;
}
if (a[child] < a[parent])//成小堆
{
Swap(&a[child], &a[parent]);
//交换后更新父节点, 继续向下寻找比父节点小的子节点
parent = child;
child = parent * 2 + 1;
}
else
{
break;
}
}
}
//插入
void HeapPush(HP* hp, HPDateType x)
{
if (hp->size == hp->capacity)
{
HPDateType* tmp = (HPDateType*)realloc(hp->pa, sizeof(HPDateType) * hp->capacity * 2);
if (tmp == NULL)
{
perror("realloc");
return;
}
hp->pa = tmp;
hp->capacity *= 2;
}
hp->pa[hp->size++] = x;
adjustUp(hp->pa, hp->size - 1);
}
//删除 删除堆顶
void HeapPop(HP* hp)
{
assert(hp);
assert(!HeapEmpty(hp));
//交换头尾
Swap(&hp->pa[0], &hp->pa[hp->size - 1]);
hp->size--;
//将堆顶向下调整 它的左右子树要都是堆
adjustDown(hp->pa, hp->size, 0);
}
//堆顶元素
HPDateType HeapTop(HP* hp)
{
assert(hp);
return hp->pa[0];
}
//判空
bool HeapEmpty(HP* hp)
{
assert(hp);
return hp->size == 0;
}
//大小
int HeapSize(HP* hp)
{
return hp->size;
}4、堆的应用
堆排序:分为两个步骤
1、建堆
· 升序建大堆
· 降序建小堆
2、利用堆删除的思想进行排序
以升序为例,将数组建成大堆,堆顶元素与数组最后一个元素交换,数组下标减1,再将交换过后的堆顶元素向下调整重新构成大堆,循环操作直至数组完成升序排列。
代码实现:
//交换
void Swap(HPDateType* p1, HPDateType* p2)
{
	HPDateType tmp = *p1;
	*p1 = *p2;
	*p2 = tmp;
}

void adjustDown(HPDateType* a, int n, int parent)
{
	int child = parent * 2 + 1;
	while (child < n)
	{//子节点下标小于数组个数
		if (child + 1 < n && a[child + 1] < a[child])//成小堆
		{//先判断右孩子存在
			child++;
		}
		if (a[child] < a[parent])//成小堆
		{
			Swap(&a[child], &a[parent]);
			//交换后更新父节点, 继续向下寻找比父节点小的子节点
			parent = child;
			child = parent * 2 + 1;
		}
		else
		{
			break;
		}
	}
}

//堆排序
void heapsort1(int* a, int n)
{
	for (int i = (n - 1 - 1) / 2; i >= 0; i--)
	{//先找最后一个叶子节点的父节点
		adjustDown(a, n, i);
	}
	int end = n - 1;
	while (end > 0)
	{
		Swap(&a[0], &a[end]);
		//交换头尾
		adjustDown(a, end, 0);
		//每次交换后的尾部数据不用调整
		end--;
	}
}

void Test2()
{
	int a[] = { 32,65,9,6,59,23,548,2352,63,5,26,54,6 };
	heapsort1(a, sizeof(a) / sizeof(a[0]));
	for (int i = 0; i < sizeof(a) / sizeof(a[0]); i++)
	{
		printf("%d ", a[i]);
	}
}

int main()
{
	Test1();
	return 0;
}
5、TOPK
即求N个数据的前K个最大或者最小的元素。基本思想如下:
用数据集合中的前K个元素来建堆。
· 求前K个最小的元素,则建大堆
· 求前K个最大的元素,则建小堆
用剩下的N - K个元素依次与堆顶进行比较,求最小元素时,小于堆顶元素则交换、求最大的元素时,大于堆顶则进行交换。剩余N - K个元素与堆顶比较完后,堆中的K个元素就是要求的最大或最小的K个元素。
示例:在文件中写入1000个随机数,求最大的前K个数据
void Swap(int* x1, int* x2)
{
	int tmp = *x1;
	*x1 = *x2;
	*x2 = tmp;
}

void AdjustDown(int* a, int n, int parent)
{
	int child = parent * 2 + 1;
	while (child < n)
	{
		if (a[child] > a[child + 1])
		{
			child++;
		}
		if (a[child] < a[parent])
		{
			Swap(&a[child], &a[parent]);
			parent = child;
			child = parent * 2 + 1;
		}
		else
		{
			break;
		}
	}
}

void Createdata()
{//在文件中存放1000个0-1000000的整数
	int n = 1000;
	srand(time(NULL));
	FILE* pf = fopen("data.txt", "w");
	if (pf == NULL)
	{
		perror("fopen");
		return;
	}
	for (int i = 0; i < n; i++)
	{
		int x = rand() % 1000000;
		fprintf(pf, "%d\n", x);
	}
	fclose(pf);
	pf = NULL;
}

void TopK(int k)
{//取前K个最大的数
	FILE* fout = fopen("data.txt", "r");
	if (fout == NULL)
	{
		perror("fopen");
		return;
	}
	int* Kminheap = (int*)malloc(sizeof(int) * k);
	if (Kminheap == NULL)
	{
		perror("malloc");
		return;
	}
	int i = 0;
	for (i = 0; i < k; i++)
	{//取5个数据
		fscanf(fout, "%d", &Kminheap[i]);
	}
	//向下调整建小堆
	for (i = (k - 1 - 1) / 2; i >= 0; i--)
	{
		AdjustDown(Kminheap, k, i);
	}
	int val = 0;
	while (!feof(fout))
	{//文件没有读取结束
		fscanf(fout, "%d", &val);
		if (Kminheap[0] < val)
		{//将读取的每一个数据与堆顶比较,如果有变化则重新调整成堆
			Kminheap[0] = val;
			AdjustDown(Kminheap, k, 0);
		}
	}
	for (i = 0; i < k; i++)
	{
		printf("%d ", Kminheap[i]);
	}
}

int main()
{
	Createdata();
	TopK(5);
	return 0;
}
四、二叉树的链式结构及实现
1、二叉树的创建
二叉树的创建主要的思想在于创建节点后链接,以前序遍历出创建二叉树为例:
· 按照前序遍历的结果创建节点
· 满足递归退出条件,从叶子向上链接到根部。
//创建二叉树
typedef char DateType;
typedef struct TreeNode {
    DateType val;
    struct TreeNode* left;
    struct TreeNode* right;
} TNode;

TNode* CreateNode(DateType x) {
    TNode* node = (TNode*)malloc(sizeof(TNode));
    if (node == NULL) {
        perror("malloc");
        return NULL;
    }
    node->val = x;
    node->left = NULL;
    node->right = NULL;
    return node;
}

TNode* CreateTree(char* a, int* pi)
{//前序创建二叉树
    if (a[*pi] == '#')
    {
        (*pi)++;
        return NULL;
    }
    TNode* root = CreateNode(a[(*pi)++]);
    root->left = CreateTree(a, pi);
    root->right = CreateTree(a, pi);
    return root;
}

int main()
{//输入前序遍历结果 abc##de#g##f###
 //#表示空节点
    char a[100] = { 0 };
    scanf("%s", a);
    int i = 0;
    TNode* root = CreateTree(a, &i);
    return 0;
}
2、二叉树的遍历
前序、中序以及后序遍历
1. 前序遍历:访问根结点的操作发生在遍历其左右子树之前,又称先根遍历。2. 中序遍历:访问根结点的操作发生在遍历其左右子树之间,又称中根遍历。3. 后序遍历:访问根结点的操作发生在遍历其左右子树之后,又称后根遍历。
代码实现:
先使用简单创建的方式创建二叉树,分别调用前、中、后序遍历。如下:
typedef int BTDateType;
typedef struct BinaryTreeNode
{
	BTDateType data;
	struct BinaryTreeNode* left;
	struct BinaryTreeNode* right;
}BTNode;

//创造节点
BTNode* CreateNode(BTDateType x)
{
	BTNode* newndoe = (BTNode*)malloc(sizeof(BTNode));
	if (newndoe == NULL)
	{
		perror("malloc");
		return NULL;
	}
	newndoe->data = x;
	newndoe->left = NULL;
	newndoe->right = NULL;
}

//构建二叉树
BTNode* CreateBinaryTree()
{
	BTNode* n1 = CreateNode(1);
	BTNode* n2 = CreateNode(2);
	BTNode* n3 = CreateNode(3);
	BTNode* n4 = CreateNode(4);
	BTNode* n5 = CreateNode(5);
	BTNode* n6 = CreateNode(6);

	n1->left = n2;
	n1->right = n4;
	n2->left = n3;
	n4->left = n5;
	n4->right = n6;
	return n1;
}

//前序
void Preorder(BTNode* root)
{
	if (root == NULL)
	{
		printf("N ");
		return;
	}
	printf("%d ", root->data);
	Preorder(root->left);
	Preorder(root->right);
}

//中序
void inorder(BTNode* root)
{
	if (root == NULL)
	{
		printf("N ");
		return;
	}
	inorder(root->left);
	printf("%d ", root->data);
	inorder(root->right);
}

//后序
void postorder(BTNode* root)
{
	if (root == NULL)
	{
		printf("N ");
		return;
	}
	postorder(root->left);
	postorder(root->right);
	printf("%d ", root->data);

}

int main()
{
    BTNode* root = CreateBinaryTree();
    Preorder(root);
	printf("\n");

	inorder(root);
	printf("\n");

	postorder(root);
	printf("\n");
    return 0;
}
递归解析图:
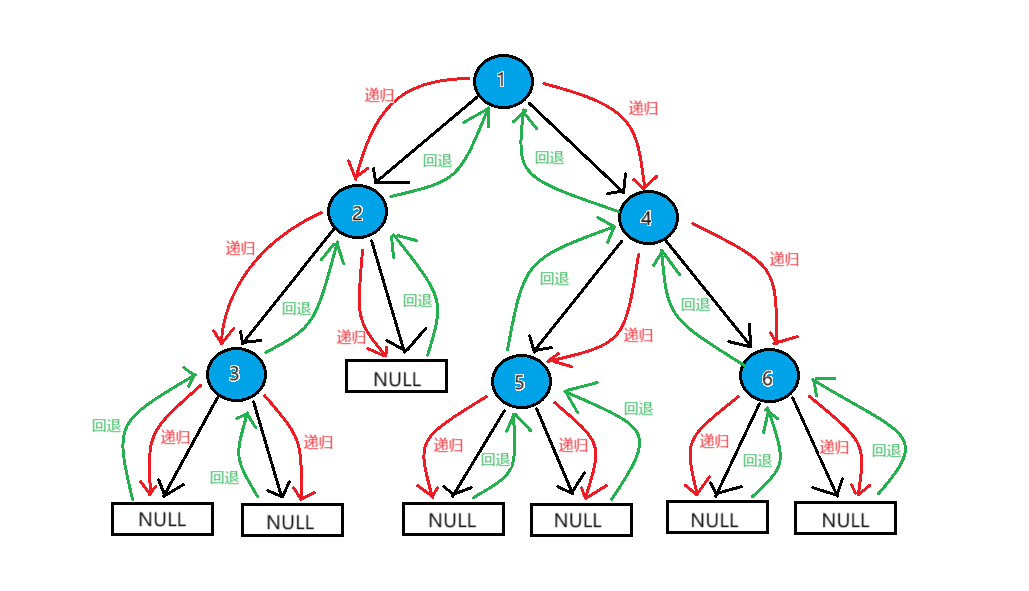
三种遍历的输出:
前序遍历:1 2 3 4 5 6
中序遍历:3 2 1 5 4 6
后序遍历:3 2 5 6 4 1
层序遍历
如图:
代码实现:
//层序遍历
void levelOrder(BTNode* root)
{
	Qe q;
	InitQueue(&q);
	if (root)
	{
		QueuePush(&q, root);
	}
	while (!isEmpty(&q))
	{
		BTNode* front = Queuefront(&q);
		QueuePop(&q);
		printf("%d ", front->data);
		if (front->left)
		{
			QueuePush(&q, front->left);
		}
		if (front->right)
		{
			QueuePush(&q, front->right);
		}
	}
	printf("\n");
	DestroyQueue(&q);
}
3、高度、节点数等问题
//节点数
int BinaryTreeSize1(BTNode* root)
{
	if (root == NULL)
	{
		return 0;
	}
	return BinaryTreeSize1(root->left) +
		BinaryTreeSize1(root->right) + 1;
}

//求叶子节点个数
int BinaryleafSize(BTNode* root)
{
	if (root == NULL)
	{
		return 0;
	}
	if (root->left == NULL && root->right == NULL)
	{
		return 1;
	}
	return BinaryleafSize(root->left)
		+ BinaryleafSize(root->right);
}

//qiu树的高度
int BinaryTreeHeight(BTNode* root)
{
	if (root == NULL)
	{
		return 0;
	}
	int leftheight = BinaryTreeHeight(root->left);
	int rightheight = BinaryTreeHeight(root->right);
	//记录每一次的结果
	return leftheight > rightheight ? leftheight + 1 : rightheight + 1;

	//return BinaryTreeHeight(root->left) > BinaryTreeHeight(root->right)
	//	? BinaryTreeHeight(root->left) + 1 : BinaryTreeHeight(root->right) + 1;
	// 每一层都是二倍 ,效率低
}

//求第k层的节点数
//变为 k - 1 层  ,问题分解
//1为根 求第三层, 2 求第二层, 3 求 第一层
int BinaryTreeKSize(BTNode* root, int k)
{
	assert(k > 0);
	if (root == NULL)
	{
		return 0;
	}
	if (k == 1)
	{//以自己为根,只有一个节点
		return 1;
	}
	return BinaryTreeKSize(root->left, k - 1) +
	 BinaryTreeKSize(root->right, k - 1);
}

//寻找指定节点并返回
BTNode* BinaryTreeFind(BTNode* root, BTDateType x)
{
	if (root == NULL)
	{
		return NULL;
	}
	if (root->data == x)
	{
		return root;
	}
	BTNode* left =  BinaryTreeFind(root->left, x);
	if (left)
	{
		return left;
	}
	BTNode* right = BinaryTreeFind(root->right, x);
	if (right)
	{
		return right;
	}
	return NULL;
}
4、二叉树的销毁
前、中、后序遍历都可以实现,但是一般情况使用后序遍历销毁二叉树更为方便。
代码实现:
//销毁二叉树
void DestroyTree(BTNode* root)
{
	if (root == NULL)
	{
		return;
	}
	DestroyTree(root->left);
	DestroyTree(root->right);
	free(root);
}
5、判断是否为完全二叉树
思想上类似层序遍历;将二叉树放入队列中,循环操作,取出队头,直到取到NULL,结束循环。再次进行循环操作,取队头,如果是完全二叉树,则此时队列内没有非空节点存在;如果不是完全二叉树,则此时队列内还有非空节点。
前提是需要构建一个栈。在作者介绍栈和队列的文章中就有。
//判断完全二叉树
bool TreeComplete(BTNode* root)
{
	Qe q;
	InitQueue(&q);
	if (root)
	{
		QueuePush(&q, root);
	}
	while (!isEmpty(&q))
	{
		BTNode* front = Queuefront(&q);
		QueuePop(&q);
		if (front == NULL)
		{
			break;
		}
		//所有节点放入队列中
		QueuePush(&q, front->left);
		QueuePush(&q, front->right);
	}
	//遇空结束层序
	//再次遍历队列,如果有非空节点,说明此树不是完全二叉树,没有则是完全二叉树
	while (!isEmpty(&q))
	{
		BTNode* front = Queuefront(&q);
		QueuePop(&q);
		if (front != NULL)
		{
			return false;
		}
	}
	DestroyQueue(&q);
	return true;
}


 2970
2970


 被折叠的 条评论
为什么被折叠?
被折叠的 条评论
为什么被折叠?
 到【灌水乐园】发言


