


使用VSCode中的CMake插件,配置VS编译器并生成构建系统。
一、软件安装
1.1 软件下载
VS和VSCode下载:Visual Studio 2022 + Visual Studio Code
CMake下载:cmake-4.0.2-windows-x86_64.msi
1.2 安装
(1)cmake安装
默认是勾选将cmake路径添加到环境变量中的,如果没有则要手动添加到PATH环境变量下。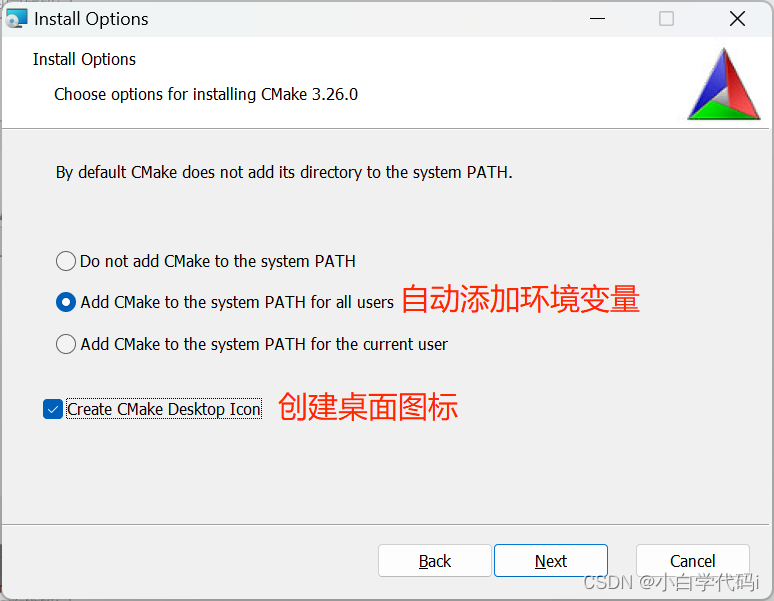
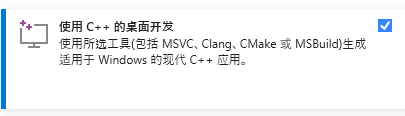
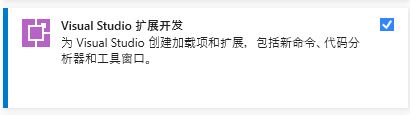
(2)VS安装
注意:选好要下载的部分:
- 使用C++的桌面开发
- Visual Studio扩展开发
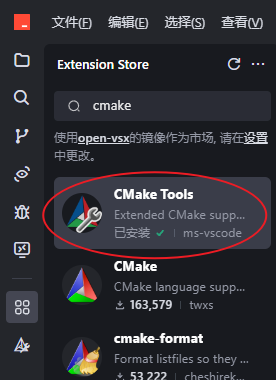
(3)vscode和cmake插件安装
二、配置使用
2.1 准备文件
创建如下的目录和文件:
# tree TestDemon/
TestDemon/
├── CMakeLists.txt    # cmake配置文件
└── hello.c           # 源码
CMakeLists.txt文件内容如下:
cmake_minimum_required(VERSION 3.10)
project(hello VERSION 1.0)

set(CXX_STANDARD 11)
set(CXX_STANDARD_REQUIRED True)

add_executable(hello hello.c)
hello.c文件内容如下:
#include <stdio.h>
int main()
{
    printf("hello ffmpeg \r\n");
    return 0;
}
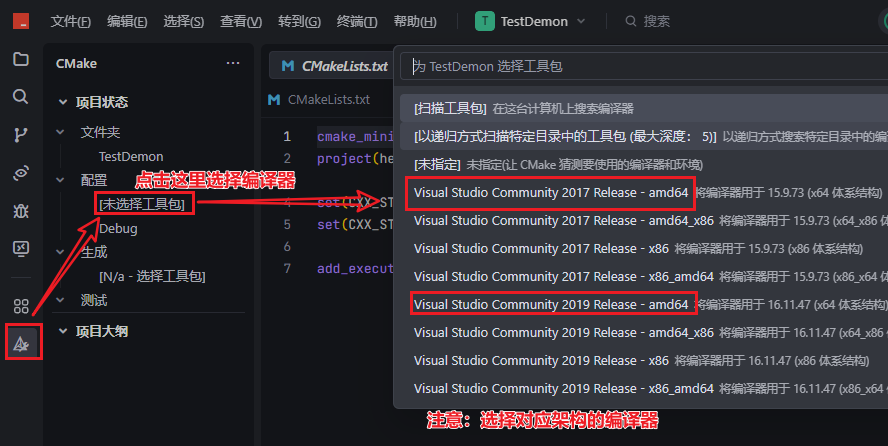
2.2 配置VS编译器 并生成构建系统
选择VS编译器:
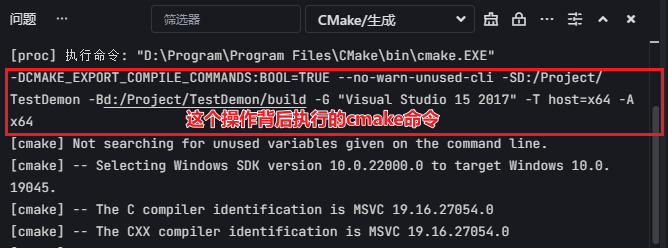
这个操作背后 是执行的cmake命令生成构建系统:
cmake -DCMAKE_EXPORT_COMPILE_COMMANDS:BOOL=TRUE --no-warn-unused-cli -S./ -B./build -G "Visual Studio 16 2019" -T host=x64 -A x64
-DCMAKE_EXPORT_COMPILE_COMMANDS:BOOL=TRUE启用生成compile_commands.json文件,这个文件被许多代码分析工具(如clangd)使用:BOOL=TRUE显式指定这是一个布尔值并设为TRUE(注意:VS+CMake是不会生成compile_commands.json文件,即使设置了DCMAKE_EXPORT_COMPILE_COMMANDS也不会生成)--no-warn-unused-cli禁止显示未使用的命令行参数的警告,当你在命令行传递一些CMakeLists.txt中没有使用变量时不会警告-S./指定源目录(项目根目录,即包含CMakeLists.txt的地方)./ 表示当前目录-B./build指定构建目录(生成构建系统文件将放在这里)-G "Visual Studio 15 2017"指定生成器(Generator)- Visual Studio 15 2017 是vs2017的CMake标识符
- Visual Studio 16 2019
- Visual Studio 17 2022
-T host=x64指定工具集(Toolset)表示使用64位版本构建工具-A x64指定平台(Architecture) x64 表示生成64位目标平台
2.3 编译
# 使用原来生成的配置
cd build
cmake --build . --config Debug
cmake --build . --config Release

# 重新生成配置(要先删除build目录)
mkdir build && cd build
cmake ..  # 生成配置
cmake --build . --config Debug
cmake --build . --config Release


 928
928

 被折叠的 条评论
为什么被折叠?
被折叠的 条评论
为什么被折叠?
 到【灌水乐园】发言


