


终于来到了我们的Spring Aop的位置,为什么非要剖析一下这个源码呢?是因为之前在这块遇到过坑儿啊。图片 之前一直也没有搞明白是怎么回事,现在终于是弄懂了
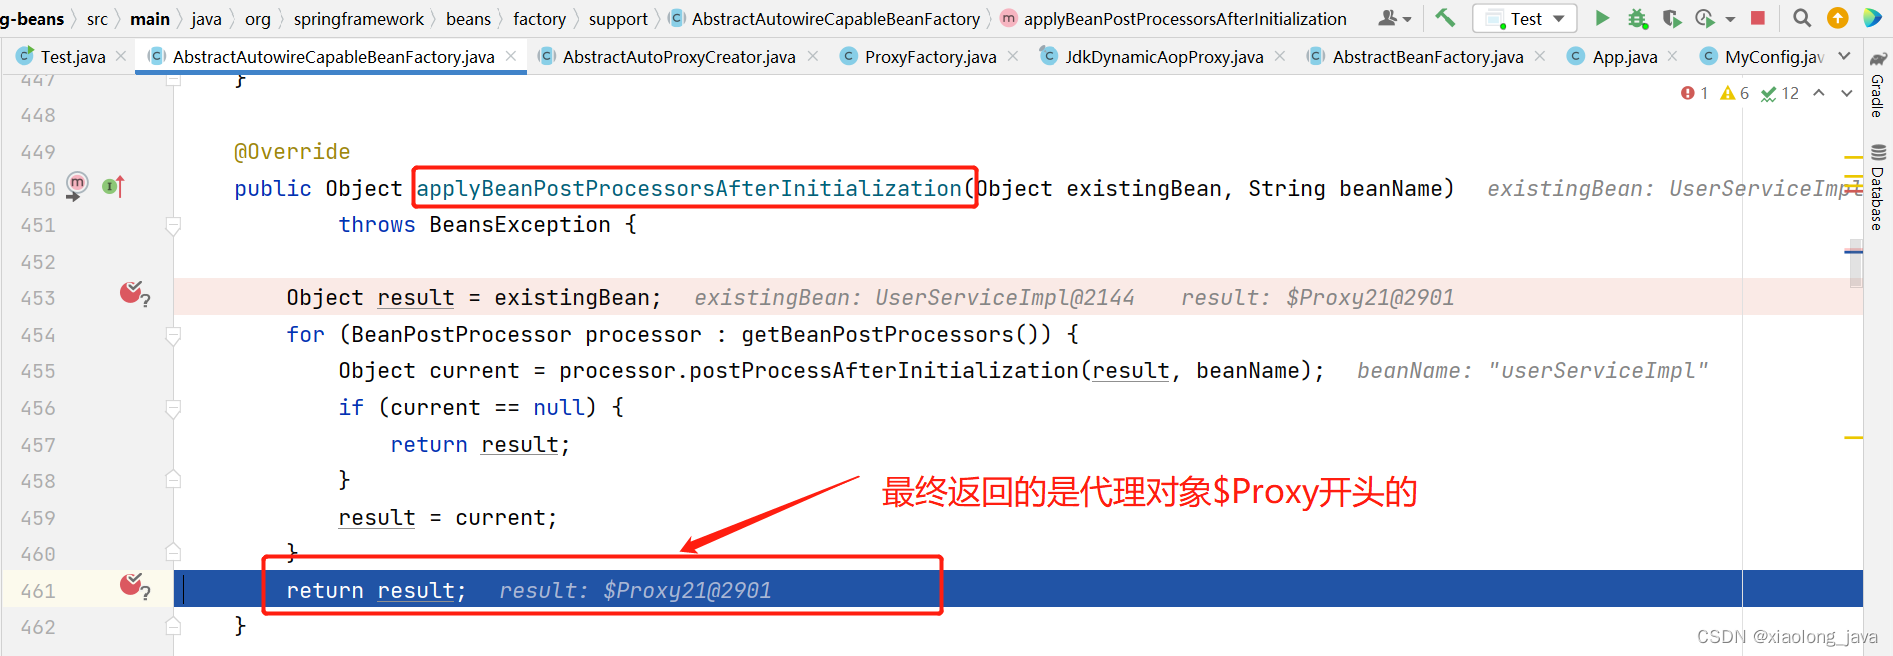
书接上回,话说Spring启动之后,创建初始化Bean的时候 使用了 BeanPostProcessor 对Bean 对象进行了增强,
Spring Aop 也不例外,也是基于 BeanPostProcessor 做的增强扩展,将原来的Bean 实例对象,切换成了具有增强功能的代理对象
当然底层是基于之前我们讲过的Jdk的动态代理和CGlib的代理
话不多说,上图
一、Spring Aop 代理的流程:

从图上可知 在Spring Ioc 初始化bean对象的时候,使用了 BeanPostProcessor 增强
AbstractAutowireCapableBeanFactory.initializeBean() 方法
protected Object initializeBean(String beanName, Object bean, @Nullable RootBeanDefinition mbd) {
if (System.getSecurityManager() != null) {
AccessController.doPrivileged((PrivilegedAction<Object>) () -> {
invokeAwareMethods(beanName, bean);
return null;
}, getAccessControlContext());
}
else {
// 调用 Aware 方法 将对应容器信息设置到bean 对象里面去
invokeAwareMethods(beanName, bean);
}
Object wrappedBean = bean;
if (mbd == null || !mbd.isSynthetic()) {
// 调用 beanPostProcessor 的前置增强方法
wrappedBean = applyBeanPostProcessorsBeforeInitialization(wrappedBean, beanName);
}
try {
// 调用初始化方法 afterProperties() -- 和指定的init-method
invokeInitMethods(beanName, wrappedBean, mbd);
}
catch (Throwable ex) {
throw new BeanCreationException(
(mbd != null ? mbd.getResourceDescription() : null),
beanName, "Invocation of init method failed", ex);
}
if (mbd == null || !mbd.isSynthetic()) {
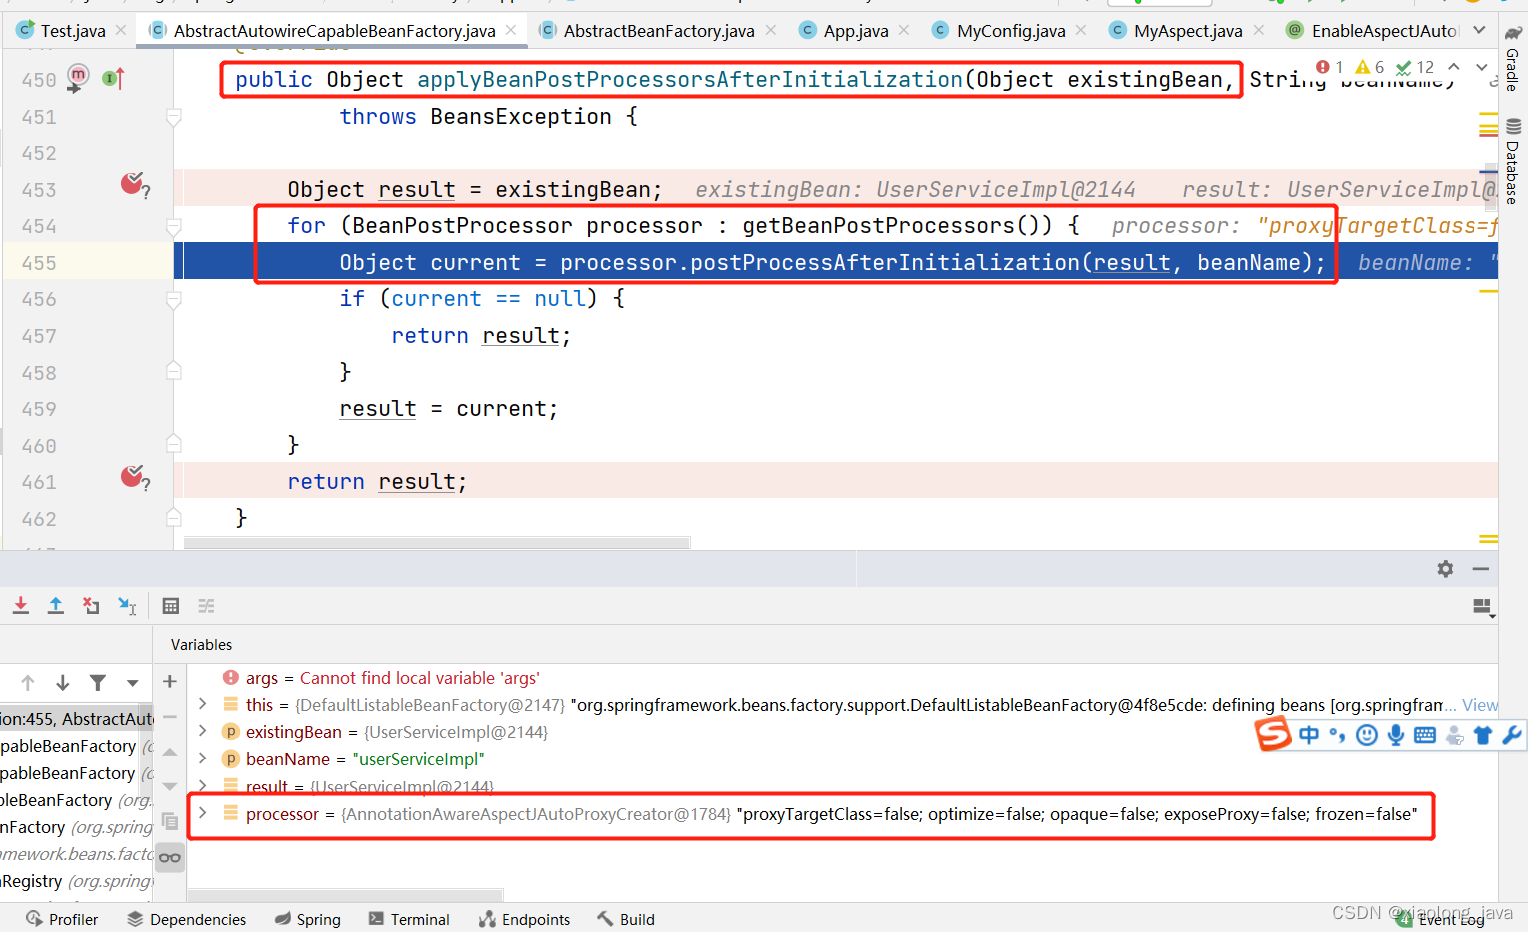
// 调用 beanPostProcessor 的后置增强
wrappedBean = applyBeanPostProcessorsAfterInitialization(wrappedBean, beanName);
}
return wrappedBean;
}
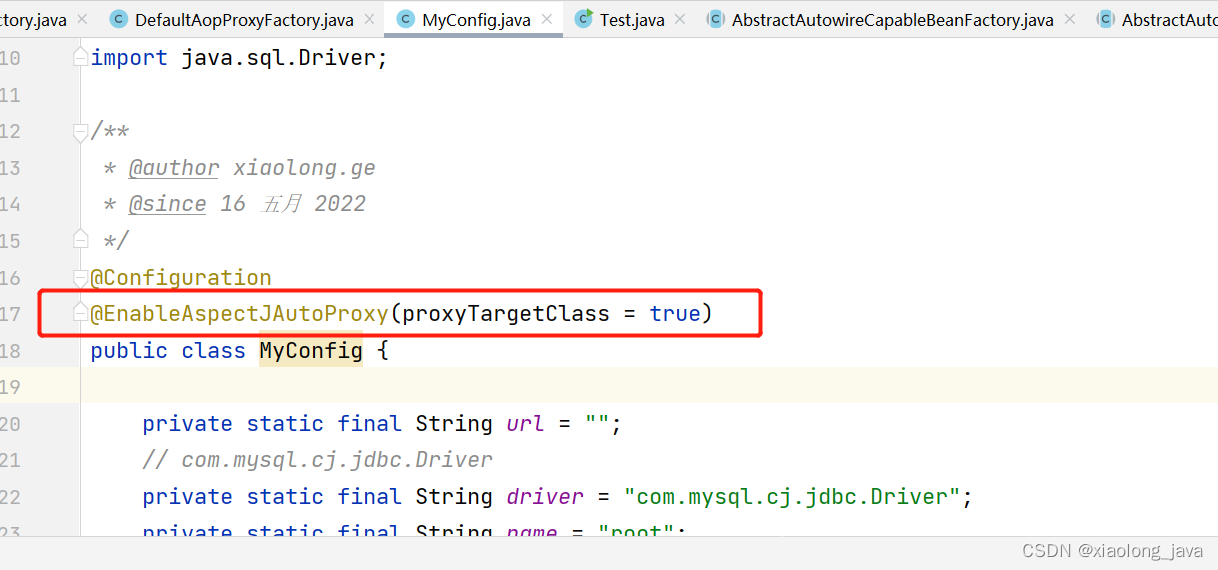
最终会根据是否配置的有@EnableAspectJAutoProxy 是否开启Aop自动代理
[配置的切面自动代理增强器的对象在容器启动的时候会被自动注入到BeanFactory 容器中的 List beanPostProcessors 属性中
(AnnotationAwareAspectJAutoProxyCreator ----> 实现了BeanPostProcessor 接口)]
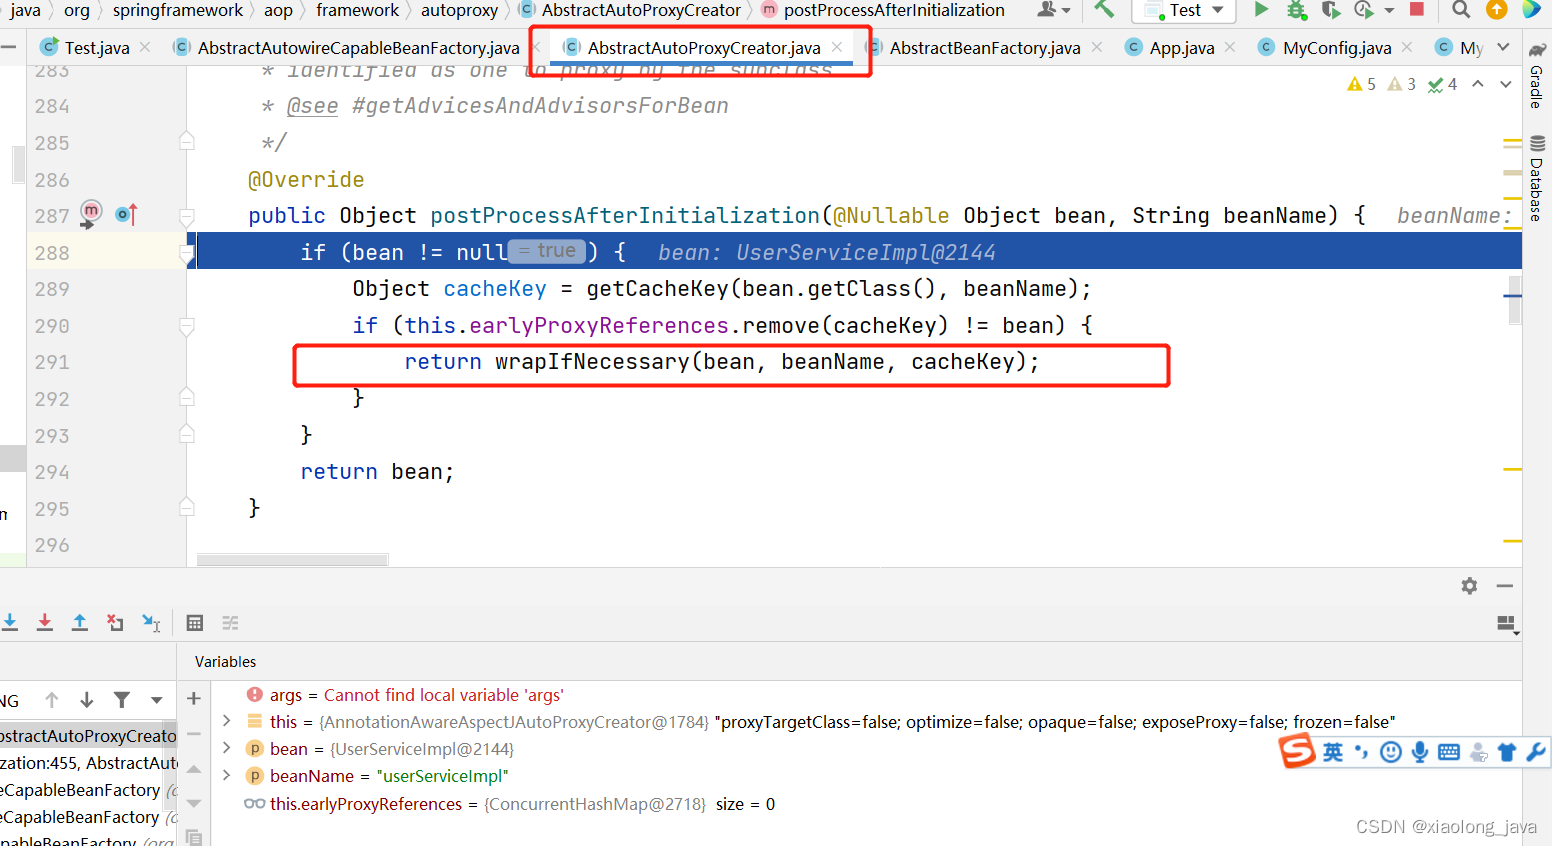
来调用 AnnotationAwareAspectJAutoProxyCreator的postProcessAfterInitialization() 方法
// AnnotationAwareAspectJAutoProxyCreator的此方法
// 继承自 AbstractAutoProxyCreator
public Object postProcessAfterInitialization(@Nullable Object bean, String beanName) {
if (bean != null) {
Object cacheKey = getCacheKey(bean.getClass(), beanName);
if (this.earlyProxyReferences.remove(cacheKey) != bean) {
return wrapIfNecessary(bean, beanName, cacheKey);
}
}
return bean;
}
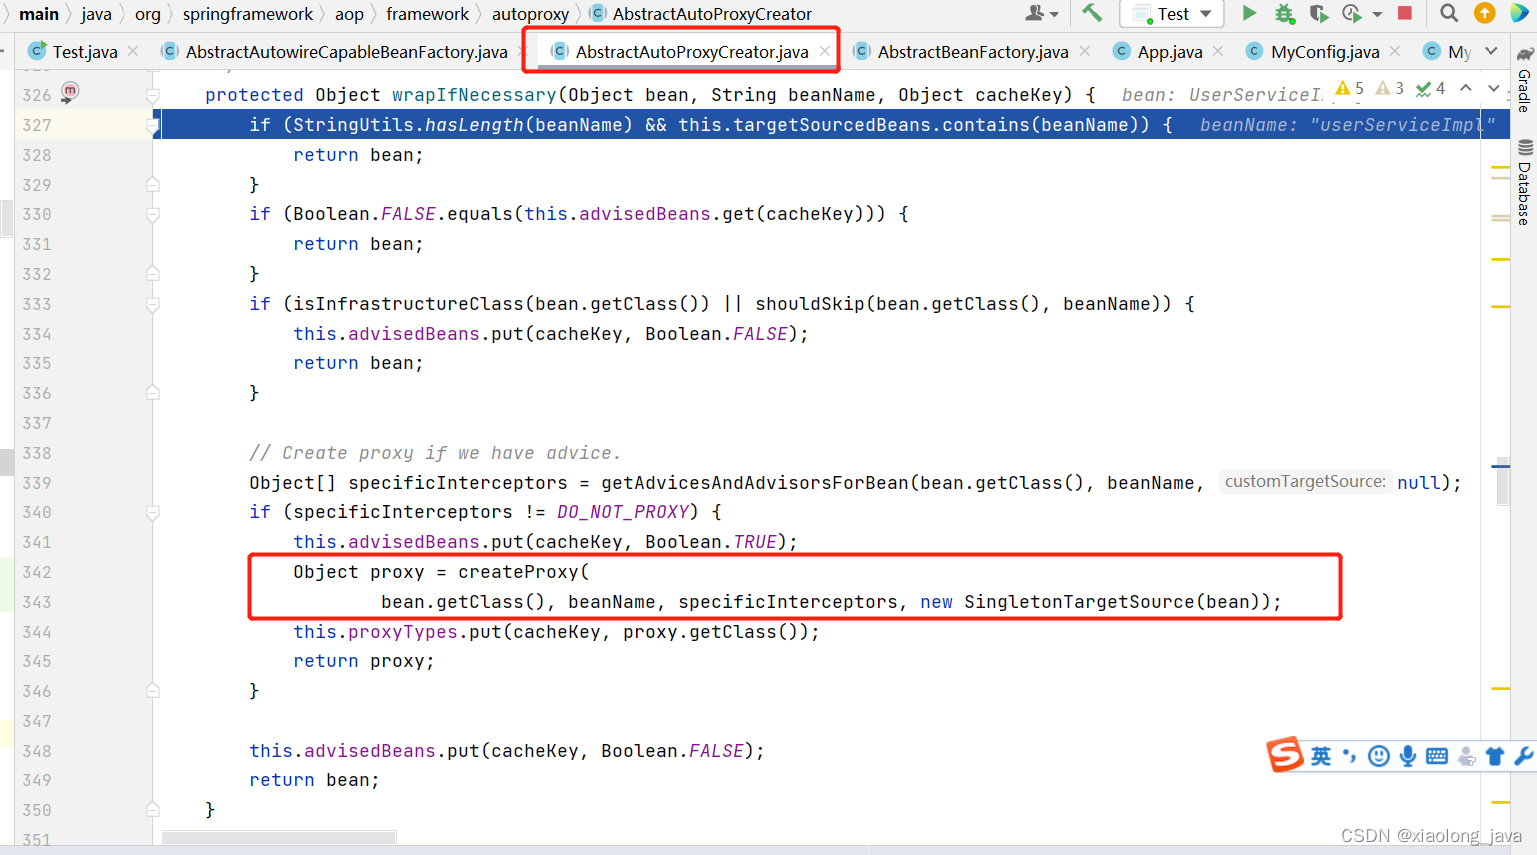
// 最终调用到了 AbstractAutoProxyCreator.wrapIfNecessary() 方法
protected Object wrapIfNecessary(Object bean, String beanName, Object cacheKey) {
if (StringUtils.hasLength(beanName) && this.targetSourcedBeans.contains(beanName)) {
return bean;
}
if (Boolean.FALSE.equals(this.advisedBeans.get(cacheKey))) {
return bean;
}
if (isInfrastructureClass(bean.getClass()) || shouldSkip(bean.getClass(), beanName)) {
this.advisedBeans.put(cacheKey, Boolean.FALSE);
return bean;
}
// Create proxy if we have advice.
Object[] specificInterceptors = getAdvicesAndAdvisorsForBean(bean.getClass(), beanName, null);
if (specificInterceptors != DO_NOT_PROXY) {
this.advisedBeans.put(cacheKey, Boolean.TRUE);
// 最后在此处 创建需要的代理对象 返回
Object proxy = createProxy(
bean.getClass(), beanName, specificInterceptors, new SingletonTargetSource(bean));
this.proxyTypes.put(cacheKey, proxy.getClass());
return proxy;
}
this.advisedBeans.put(cacheKey, Boolean.FALSE);
return bean;
}
具体方法调用链图如下:
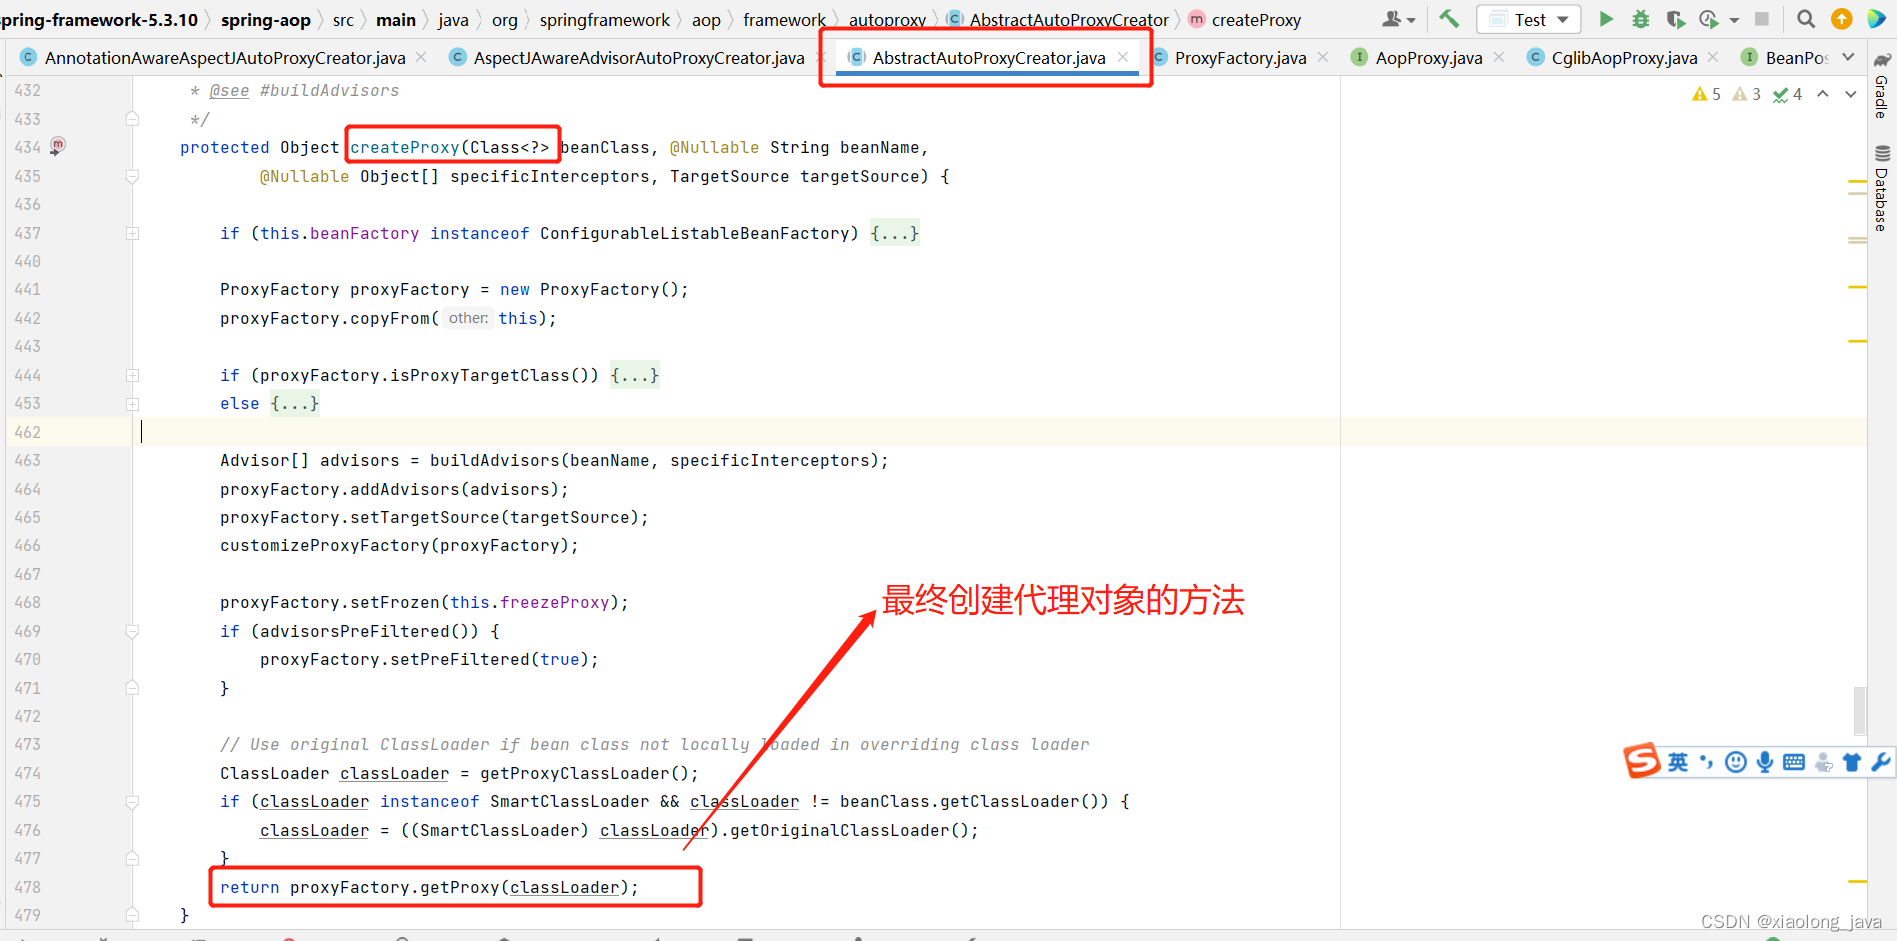
AbstractAutoProxyCreator
至此 最终代理对象的创建还是调用底层的 两个
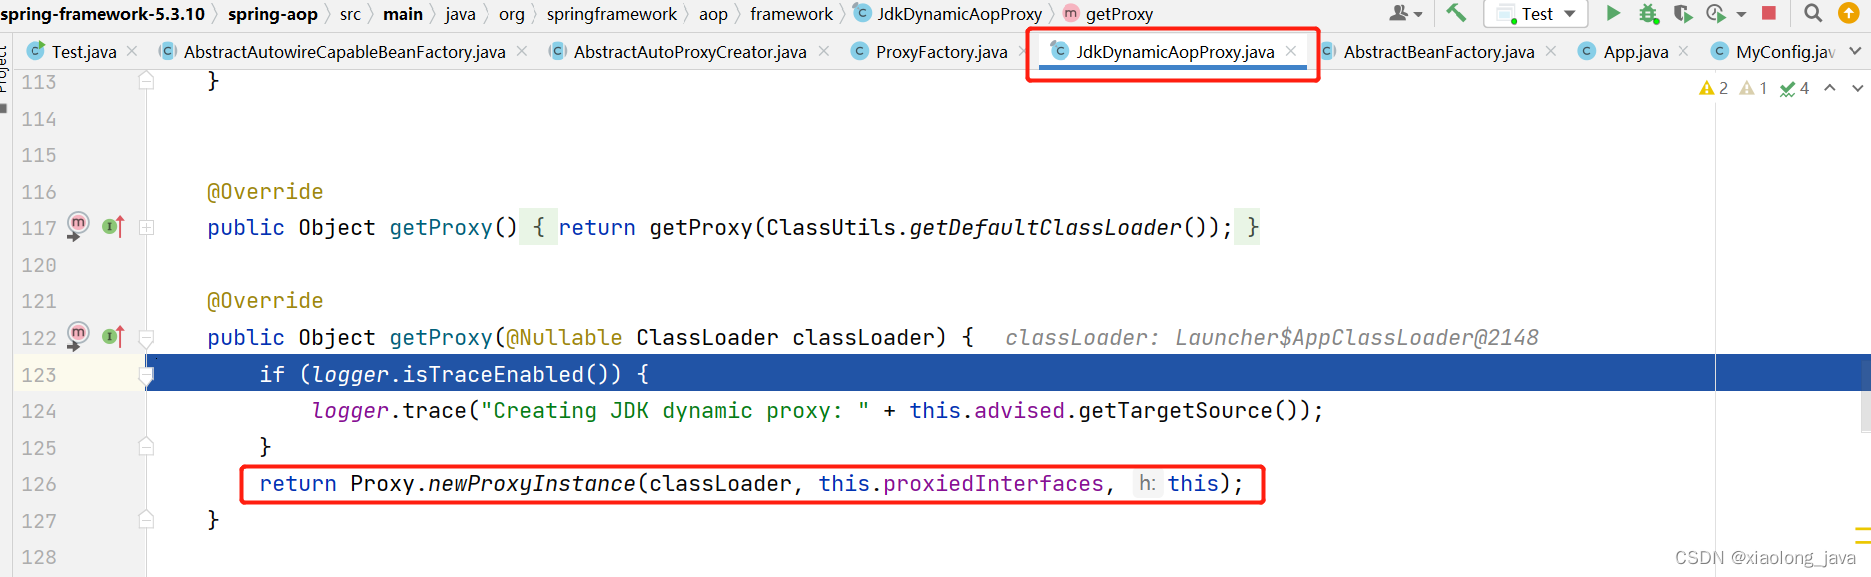
JdkDynamicAopProxy的getProxy() 方法
或者
CglibAopProxy的getProxy() 方法
【此处如图:若配置@EnableAspectJAutoProxy 指定了 proxyTargetClass=true
则会调用CglibAopProxy的getProxy() 方法来创建代理对象
如果没有配置proxyTargetClass,& 目标对象如果实现了接口,则使用jdk动态代理,如果没有就采用cglib的方式–>cglib 是基于继承的方式实现代理的】
jdk的动态代理,底层还是调用的Proxy.newInstance() 方法,此时就又回到了我们之前讲的代理模式下的应用和创建
CglibAopProxy动态代理 则是调用的
spring.cglib包下面的类库
org.springframework.cglib.proxy.Enhancer.create() 方法来创建代理对象的
这里的代理机制和原理跟上篇 java 代理模式[Proxy]–AOP 中的 Cglib 代理的原理机制是一样的
这里spring用的是自己写的一些包和类库,方法调用链和类库还是比较多的,感兴趣的话可以再往下跟跟
我这里就暂时先到这里
二、Spring Aop代理中之前遇到的坑儿
我们来自定义一个增强器CacheAspect,解析增强带有自定义注解@CacheEnable的方法,实现切面编程,实现无侵入式扩展增强
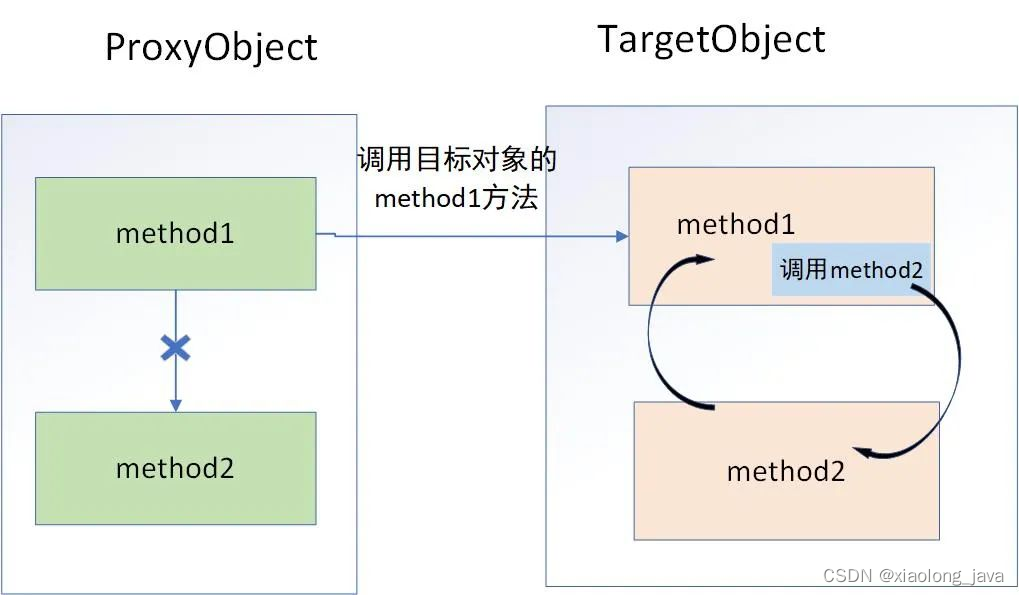
然而,如果在同一个类中,如果有两个方法同时被@CacheEnable 标注为增强,并且第一个方法又调用了第二个方法,调用了自己的被代理的方法二,就会造成第二个方法的增强功能失效
大致流程如下图:
举例代码如下:
/**
 * @author xiaolong.ge
 * @since 16 五月 2022
 */
@Service
public class UserServiceImpl implements UserService {
  @Autowired
  private UserDao userDao;
  @Autowired
  private RedisService redisService;
  /**
   * 若缓存可用 则从缓存获取数据
   * @param id
   * @return
   */
  @CacheEnable
  @Override
  public User getById(Integer id) {
    System.out.println("调用 getById方法");
    return getUserFromRedis();
  }
// 在本类的其他方法中调用此方法 则该注解的增强效果会失效
  @CacheEnable
  public User getUserFromRedis() {
    return redisService.getUserData();
  }
}
-----------------------------------------
@Service
public class RedisService {
    @Autowired
    private UserService userService;

    public User getUserData() {
      return new User("redis",50);
    }
}
切面类代码:
@Aspect
@Component
public class CacheAspect {

  @Around("@annotation(com.gexl.annotation.CacheEnable)")
  public Object aroundCacheEnable(ProceedingJoinPoint joinPoint) throws Throwable {
    //获取目标对象
    Object tarObj = joinPoint.getTarget();
    // 获取代理对象
    Object proxyObj = joinPoint.getThis();
    // 获取到 CacheEnable 注解
    String methodName = joinPoint.getSignature().getName();
    System.out.println("代理对象proxy="+proxyObj+"--调用methodName="+methodName);
    return joinPoint.proceed();
  }
}
测试类:
// 测试类
public class Test {
  public static void main(String[] args) {
//    ApplicationContext ac = new ClassPathXmlApplicationContext("applicationContext.xml");
    AbstractApplicationContext ac = new AnnotationConfigApplicationContext(App.class);
    UserService userService = (UserService)ac.getBean("userServiceImpl");
    User user = userService.getById(1);
    System.out.println(user);
   }
}
// 执行结果如下:
代理对象proxy=com.gexl.service.impl.UserServiceImpl@2d9d4f9d--调用methodName=getById
调用 getById方法
User{name='redis', age=50}
从测试类的执行结果看,Aop只拦截到了getById方法,而getUserFromRedis() 方法并未被拦截
是为getUserFromRedis()方法上加的@CacheEnable 注解增强失效了
解决方案:
最好就是梳理好自己的代码逻辑,尽量不要在本类的方法中调用本类的其他代理方法,若要使其生效,可以做如下修改:
1.修改 UserServiceImpl 类
/**
 * @author xiaolong.ge
 * @since 16 五月 2022
 */
@Service
public class UserServiceImpl implements UserService, BeanNameAware {
  @Autowired
  private UserDao userDao;
  @Autowired
  private RedisService redisService;

  private String beanName;

  // 添加容器对象
  @Autowired
  private ApplicationContext applicationContext;

  @Override
  public void setBeanName(String name) {
    this.beanName = name;
  }
  /**
   * 若缓存可用 则从缓存获取数据
   * @param id
   * @return
   */
  @CacheEnable
  @Override
  public User getById(Integer id) {
    System.out.println("调用 getById方法");
    //return getUserFromRedis();
    // 从容器中获取代理对象
    UserService userServiceProxy = (UserService) applicationContext.getBean(beanName);
    Method method = userServiceProxy.getClass().getMethod("getUserFromRedis",null);
    // 调用 代理对象的 代理方法 注解才会生效
    return (User)method.invoke(userServiceProxy,null);
  }
// 在本类的其他方法中调用此方法 则该注解的增强效果会失效
  @CacheEnable
  public User getUserFromRedis() {
    return redisService.getUserData();
  }
}
修改完成再次运行测试类:结果如下:
getUserFromRedis() 也被代理增强了,注解@CacheEnable 生效
代理对象proxy=com.gexl.service.impl.UserServiceImpl@22635ba0--调用methodName=getById
调用 getById方法
代理对象proxy=com.gexl.service.impl.UserServiceImpl@22635ba0--调用methodName=getUserFromRedis
User{name='redis', age=50}
2. 设置@EnableAspectJAutoProxy的 expostProxy 的属性为true
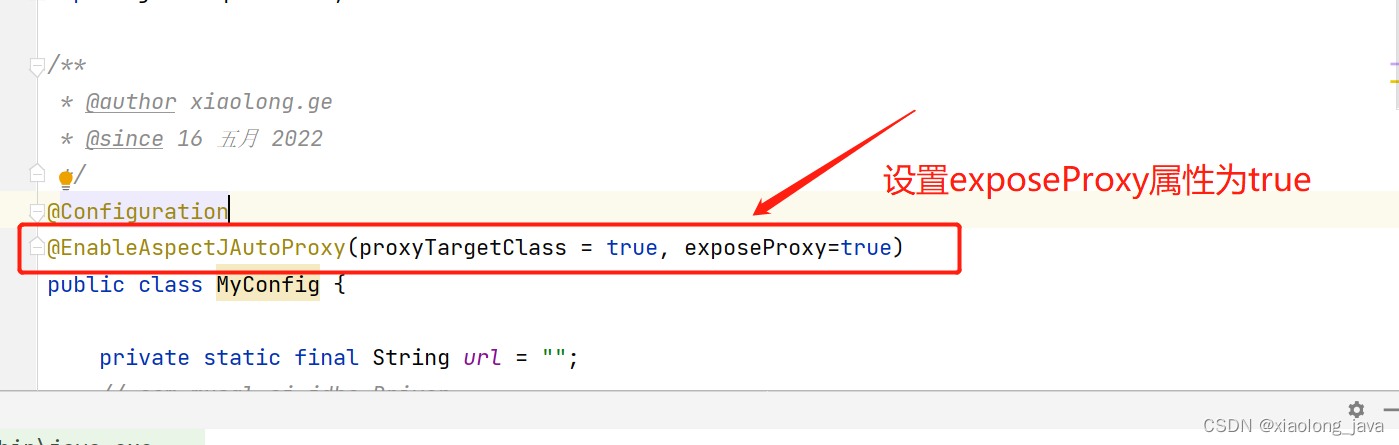
然后在修改UserServiceImpl.java 在方法中如下调用
@CacheEnable
  @Override
  public User getById(Integer id,String name) throws InvocationTargetException, IllegalAccessException, NoSuchMethodException {

    System.out.println("调用 getById方法");
//    UserService userServiceProxy = (UserService) applicationContext.getBean(beanName);
//    Method method = userServiceProxy.getClass().getMethod("getUserFromRedis",null);
//    return (User)method.invoke(userServiceProxy,null);
    // 获取到当前类的代理对象  注:设置getUserFromRedis为接口方法
    UserService userServiceProxy = (UserService)AopContext.currentProxy();
    // 由代理类调用 增强之后的方法,则 注解增强生效
    return userServiceProxy.getUserFromRedis();
  }
再次运行测试类:
代理对象proxy=com.gexl.service.impl.UserServiceImpl@23282c25--调用methodName=getById
调用 getById方法
代理对象proxy=com.gexl.service.impl.UserServiceImpl@23282c25--调用methodName=getUserFromRedis
User{name='redis', age=50}
至此,问题解决


 627
627


 被折叠的 条评论
为什么被折叠?
被折叠的 条评论
为什么被折叠?
 到【灌水乐园】发言


