


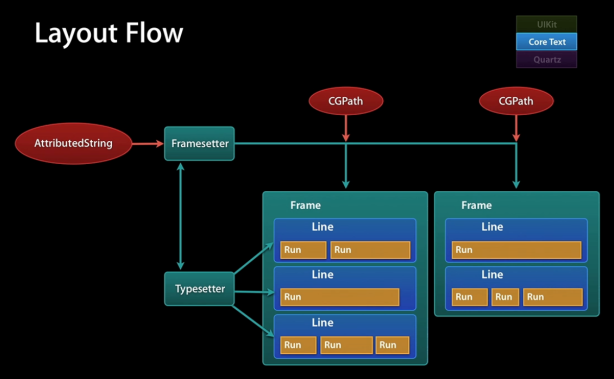
一、步骤
- 获取上下文
- 翻转坐标系
- 创建NSAttributedString
- 根据NSAttributedString创建CTFramesetterRef
- 创建绘制区域CGPathRef(该CGPathRef是库CoreGraphics里边的,初始原点为左上角;翻转后,原点为左下角)
- 根据CTFramesetterRef和CGPathRef创建CTFrame
- CTFrameDraw绘制。
二、字符属性名称
(1)、//字体形状属性  必须是CFNumberRef对象默认为0,非0则对应相应的字符形状定义,如1表示传统字符形状
const CFStringRef kCTCharacterShapeAttributeName;
(2)、//字体属性   必须是CTFont对象
const CFStringRef kCTFontAttributeName;
(3)、//字符间隔属性 必须是CFNumberRef对象
const CFStringRef kCTKernAttributeName;
(4)、//设置是否使用连字属性,设置为0,表示不使用连字属性。标准的英文连字有FI,FL.默认值为1,既是使用标准连字。也就是当搜索到f时候,会把fl当成一个文字。必须是CFNumberRef 默认为1,可取0,1,2
const CFStringRef kCTLigatureAttributeName;
(5)、//字体颜色属性  必须是CGColor对象,默认为black
const CFStringRef kCTForegroundColorAttributeName;
(6)、 //上下文的字体颜色属性 必须为CFBooleanRef 默认为False,
const CFStringRef kCTForegroundColorFromContextAttributeName;
(7)、//段落样式属性 必须是CTParagraphStyle对象 默认为NIL
const CFStringRef kCTParagraphStyleAttributeName;
(8)、//笔画线条宽度 必须是CFNumberRef对象,默为0.0f,标准为3.0f
const CFStringRef kCTStrokeWidthAttributeName;
(9)、//笔画的颜色属性 必须是CGColorRef 对象,默认为前景色
const CFStringRef kCTStrokeColorAttributeName;
(10)、//设置字体的上下标属性 必须是CFNumberRef对象 默认为0,可为-1为下标,1为上标,需要字体支持才行。如排列组合的样式Cn1
const CFStringRef kCTSuperscriptAttributeName;
(11)、//字体下划线颜色属性 必须是CGColorRef对象,默认为前景色
const CFStringRef kCTUnderlineColorAttributeName;
(12)、//字体下划线样式属性 必须是CFNumberRef对象,默为kCTUnderlineStyleNone 可以通过CTUnderlineStypleModifiers 进行修改下划线风格
const CFStringRef kCTUnderlineStyleAttributeName;
(13)、//文字的字形方向属性 必须是CFBooleanRef 默认为false,false表示水平方向,true表示竖直方向
const CFStringRef kCTVerticalFormsAttributeName;
(14)、//字体信息属性 必须是CTGlyphInfo对象
const CFStringRef kCTGlyphInfoAttributeName;
(15)、//CTRun 委托属性 必须是CTRunDelegate对象
const CFStringRef kCTRunDelegateAttributeName
三、属性介绍
1、设置字符串
NSMutableAttributedString *mabstring = [[NSMutableAttributedString alloc]initWithString:@"This is a test of characterAttribute. 中文字符"]; 2、设置字体属性
 CTFontRef font = CTFontCreateWithName(CFSTR("Georgia"), 40, NULL);
[mabstring addAttribute:(id)kCTFontAttributeName value:(id)font range:NSMakeRange(0, 4)];
3、置斜体字
CTFontRef font = CTFontCreateWithName((CFStringRef)[UIFont italicSystemFontOfSize:20].fontName, 14, NULL);
    [mabstring addAttribute:(id)kCTFontAttributeName value:(id)font range:NSMakeRange(0, 4)];
4、设置下划线
[mabstring addAttribute:(id)kCTUnderlineStyleAttributeName value:(id)[NSNumber numberWithInt:kCTUnderlineStyleDouble] range:NSMakeRange(0, 4)]; 5、设置下划线颜色
[mabstring addAttribute:(id)kCTUnderlineColorAttributeName value:(id)[UIColor redColor].CGColor range:NSMakeRange(0, 4)]; 6、设置字体简隔 eg:test
long number = 10;
CFNumberRef num = CFNumberCreate(kCFAllocatorDefault,kCFNumberSInt8Type,&number);
[mabstring addAttribute:(id)kCTKernAttributeName value:(id)num range:NSMakeRange(10, 4)];
7、设置字体颜色
CFBooleanRef flag = kCFBooleanTrue;
[mabstring addAttribute:(id)kCTForegroundColorFromContextAttributeName value:(id)flag range:NSMakeRange(5, 10)];
8、设置空心字及颜色
long number = 2;
CFNumberRef num = CFNumberCreate(kCFAllocatorDefault,kCFNumberSInt8Type,&number);
[mabstring addAttribute:(id)kCTStrokeWidthAttributeName value:(id)num range:NSMakeRange(0, [str length])];
//设置空心字颜色
[mabstring addAttribute:(id)kCTStrokeColorAttributeName value:(id)[UIColor greenColor].CGColor range:NSMakeRange(0, [str length])];
四、绘制纯文本
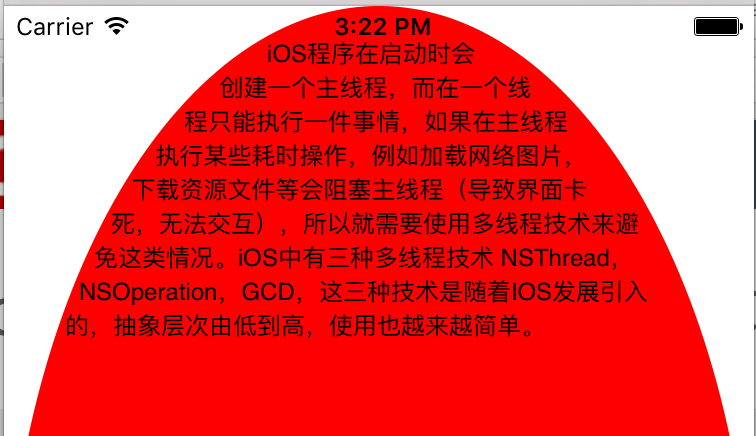
我们创建一个继承于UIView的类,重写他的drawRect方法,来绘制纯文本。
- (void)drawRect:(CGRect)rect {
[super drawRect:rect];
// 步骤1:得到当前用于绘制画布的上下文,用于后续将内容绘制在画布上
// 因为Core Text要配合Core Graphic 配合使用的,如Core Graphic一样,绘图的时候需要获得当前的上下文进行绘制
CGContextRef context = UIGraphicsGetCurrentContext();
// 步骤2:翻转当前的坐标系(因为对于底层绘制引擎来说,屏幕左下角为(0,0))
CGContextSetTextMatrix(context, CGAffineTransformIdentity);
CGContextTranslateCTM(context, 0, self.bounds.size.height);
CGContextScaleCTM(context, 1.0, -1.0);
// 步骤3:创建NSAttributedString
NSMutableAttributedString *attrString = [[NSMutableAttributedString alloc] initWithString:@"iOS程序在启动时会创建一个主线程,而在一个线程只能执行一件事情,如果在主线程执行某些耗时操作,例如加载网络图片,下载资源文件等会阻塞主线程(导致界面卡死,无法交互),所以就需要使用多线程技术来避免这类情况。iOS中有三种多线程技术 NSThread,NSOperation,GCD,这三种技术是随着IOS发展引入的,抽象层次由低到高,使用也越来越简单。"];
// 步骤4:根据NSAttributedString创建CTFramesetterRef
CTFramesetterRef frameSetter = CTFramesetterCreateWithAttributedString((CFAttributedStringRef)attrString);
// 步骤5:创建绘制区域CGPathRef
CGMutablePathRef path = CGPathCreateMutable();
CGPathAddEllipseInRect(path, NULL, self.bounds);
[[UIColor redColor]set];
CGContextFillEllipseInRect(context, self.bounds);
// 步骤6:根据CTFramesetterRef和CGPathRef创建CTFrame;
CTFrameRef frame = CTFramesetterCreateFrame(frameSetter, CFRangeMake(0, [attrString length]), path, NULL);
// 步骤7:CTFrameDraw绘制
CTFrameDraw(frame, context);
// 步骤8.内存管理
CFRelease(frame);
CFRelease(path);
CFRelease(frameSetter);
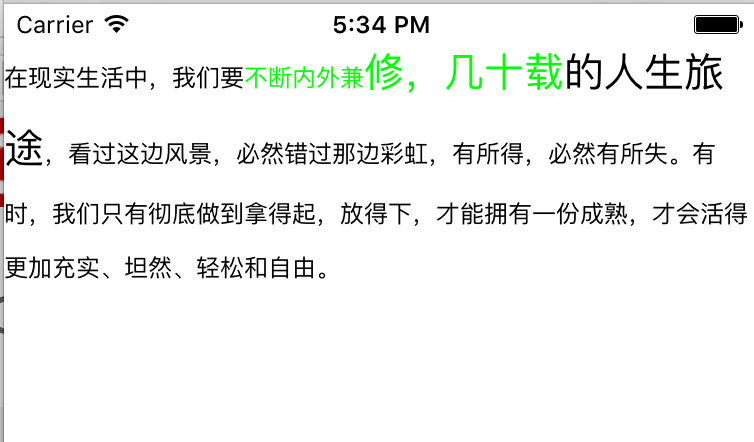
}五、自定义文本的颜色,字体与行间距
- (void)drawRect:(CGRect)rect {

    [super drawRect:rect];
    //步骤1:获取上下文
    CGContextRef context = UIGraphicsGetCurrentContext();

    //步骤2:翻转坐标系;
    CGContextSetTextMatrix(context, CGAffineTransformIdentity);
    CGAffineTransform flipVertical = CGAffineTransformMake(1, 0, 0, -1, 0, self.bounds.size.height);
    //将当前context的坐标系进行flip
    CGContextConcatCTM(context, flipVertical);

    //步骤3:创建NSAttributedString
    NSMutableAttributedString* attributeString = [[NSMutableAttributedString alloc]initWithString:@"在现实生活中,我们要不断内外兼修,几十载的人生旅途,看过这边风景,必然错过那边彩虹,有所得,必然有所失。有时,我们只有彻底做到拿得起,放得下,才能拥有一份成熟,才会活得更加充实、坦然、轻松和自由。"];
    //设置部分颜色
    [attributeString addAttribute:(NSString *)kCTForegroundColorAttributeName value:(id)[UIColor greenColor].CGColor range:NSMakeRange(10, 10)];
    //设置部分文字
    CGFloat fontSize = 20;
    CTFontRef fontRef = CTFontCreateWithName((CFStringRef)@"ArialMT", fontSize, NULL);
    [attributeString addAttribute:(NSString *)kCTFontAttributeName value:(__bridge id)fontRef range:NSMakeRange(15, 10)];
    CFRelease(fontRef);
    // 设置行距等样式
    CGFloat lineSpace = 10; // 行距一般取决于这个值
    CGFloat lineSpaceMax = 20;
    CGFloat lineSpaceMin = 2;
    const CFIndex kNumberOfSettings = 3;
    // 结构体数组
    CTParagraphStyleSetting theSettings[kNumberOfSettings] = {
        {kCTParagraphStyleSpecifierLineSpacingAdjustment,sizeof(CGFloat),&lineSpace},
        {kCTParagraphStyleSpecifierMaximumLineSpacing,sizeof(CGFloat),&lineSpaceMax},
        {kCTParagraphStyleSpecifierMinimumLineSpacing,sizeof(CGFloat),&lineSpaceMin}

    };
    CTParagraphStyleRef theParagraphRef = CTParagraphStyleCreate(theSettings, kNumberOfSettings);
    // 单个元素的形式
    // CTParagraphStyleSetting theSettings = {kCTParagraphStyleSpecifierLineSpacingAdjustment,sizeof(CGFloat),&lineSpace};
    // CTParagraphStyleRef theParagraphRef = CTParagraphStyleCreate(&theSettings, kNumberOfSettings);
    // 两种方式皆可
    // [attributed addAttribute:(id)kCTParagraphStyleAttributeName value:(__bridge id)theParagraphRef range:NSMakeRange(0, attributed.length)];

    [attributeString addAttribute:(id)kCTParagraphStyleAttributeName value:(__bridge  id)theParagraphRef range:NSMakeRange(0, attributeString.length)];
    CFRelease(theParagraphRef);

    //步骤4:根据NSAttributedString创建CTFramesetterRef
    CTFramesetterRef framesetterRef = CTFramesetterCreateWithAttributedString((CFAttributedStringRef)attributeString);

    //步骤5:创建绘制区域CGPathRef
    CGMutablePathRef pathRef = CGPathCreateMutable();
    CGPathAddRect(pathRef, NULL, CGRectInset(self.bounds, 0, 20));

    //步骤6:根据CTFramesetterRef和CGPathRef创建CTFrame;
    CTFrameRef frameRef = CTFramesetterCreateFrame(framesetterRef, CFRangeMake(0, [attributeString length]), pathRef, NULL);

    //步骤7:CTFrameDraw绘制。
    CTFrameDraw(frameRef, context);


    //内存管理
    CFRelease(frameRef);
    CFRelease(pathRef);
    CFRelease(framesetterRef);

}


 462
462

 被折叠的 条评论
为什么被折叠?
被折叠的 条评论
为什么被折叠?
 到【灌水乐园】发言


