前言
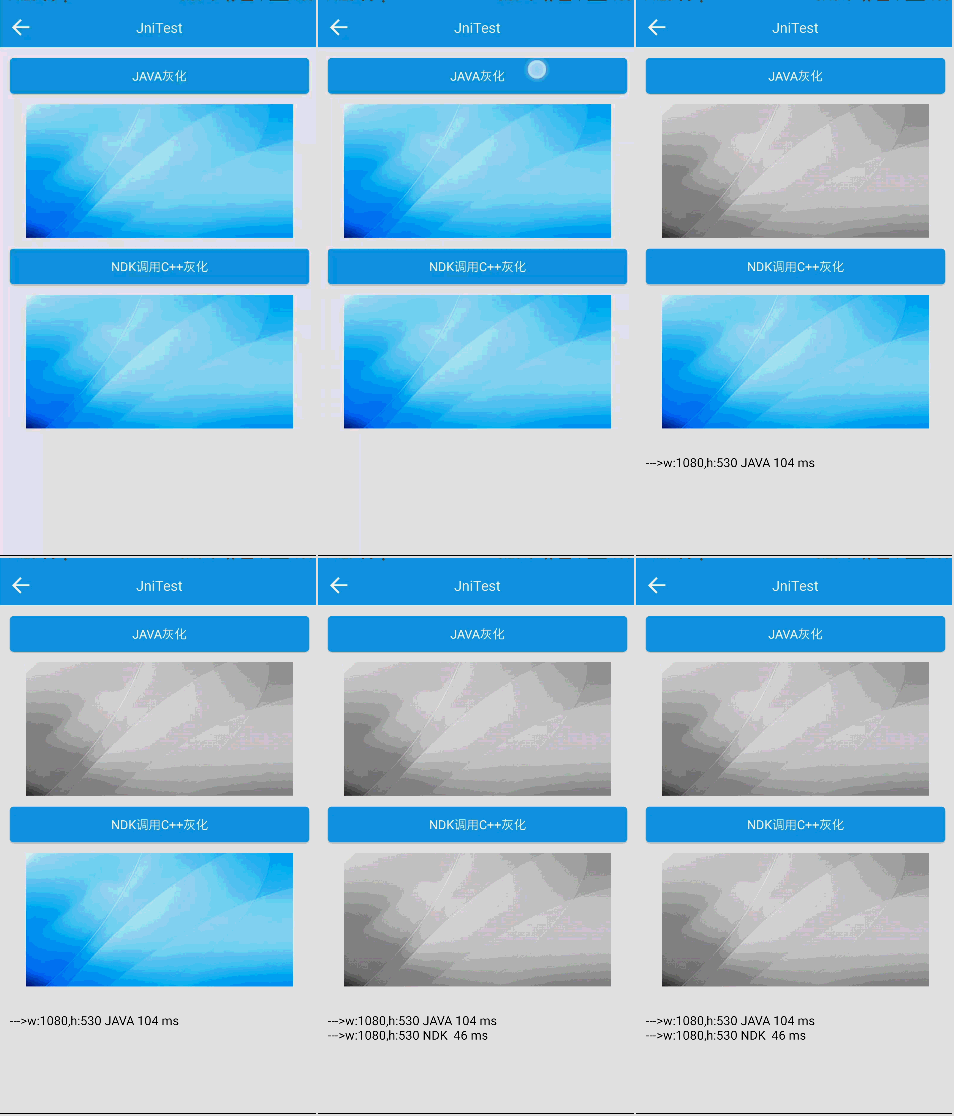
前面我们提及了NDK开发的一些优势,也讲解了NDK开发的一些入门基础。在此,我们将分别使用java代码以及C++代码对同一张图片做同样的灰化处理,来比较两种方式的耗时以验证NDK开发的高效性。
该实例中,将只给出关键部分代码(Android.mk以及Application.mk以后都不再给出)。为了巩固之前的知识,我们使用动态注册JNI的方式。
简单实例
同样,我们先上JNI类:
public class JNIDynamicUtils {
    /**
     * 调用C++代码的方法,灰化图片
     * @param buf
     * @param w
     * @param h
     * @return
     */
    public static native int[] grayPic(int[] buf, int w, int h);

    /**
     * 加载so库或jni库
     */
    static {
        System.loadLibrary("JNI_DYNAMIC_ANDROID_TEST");
    }
}
动态注册JNI的C++代码:
#include <stdio.h>
#include <jni.h>
#include <stdlib.h>

// C++灰化图片的方法
jintArray nativeGrayPic(JNIEnv *env, jclass clazz, jintArray buf, jint w, jint h) {
    jint *cbuf;
    cbuf = env->GetIntArrayElements(buf, JNI_FALSE);
    if (cbuf == NULL) {
        return 0; /* exception occurred */
    }
    jint alpha = 0xFF << 24;
    for (jint i = 0; i < h; i++) {
        for (jint j = 0; j < w; j++) {
            // 获得像素的颜色
            jint color = cbuf[w * i + j];
            jint red = ((color & 0x00FF0000) >> 16);
            jint green = ((color & 0x0000FF00) >> 8);
            jint blue = color & 0x000000FF;
            color = (red + green + blue) / 3;
            color = alpha | (color << 16) | (color << 8) | color;
            cbuf[w * i + j] = color;
        }
    }
    jint size=w * h;
    jintArray result = env->NewIntArray(size);
    env->SetIntArrayRegion(result, 0, size, cbuf);
    env->ReleaseIntArrayElements(buf, cbuf, 0);
    return result;
}

/**
 * JNINativeMethod由三部分组成:
 * (1)Java中的函数名;
 * (2)函数签名,格式为(输入参数类型)返回值类型;
 *  ([III)[I ([III)表示三个参数,依次为int[]、int、int;[I 表示返回值类型为int[]
 * (3)native函数名
 */
static JNINativeMethod gMethods[] = {
    {"grayPic", "([III)[I", (void *) nativeGrayPic }
                                    };

//System.loadLibrary过程中会自动调用JNI_OnLoad,在此进行动态注册
JNIEXPORT jint JNICALL JNI_OnLoad(JavaVM *jvm, void *reserved) {
    JNIEnv *env = NULL;
    jint result = JNI_FALSE;

    //获取env指针
    if (jvm->GetEnv((void**) &env, JNI_VERSION_1_6) != JNI_OK) {
        return result;
    }
    if (env == NULL) {
        return result;
    }
    //获取类引用
    jclass clazz = env->FindClass("<包名>/JNIDynamicUtils");
    if (clazz == NULL) {
        return result;
    }
    //注册方法
    if (env->RegisterNatives(clazz, gMethods, sizeof(gMethods) / sizeof(gMethods[0])) < 0) {
        return result;
    }
    //成功
    result = JNI_VERSION_1_6;
    return result;
}
测试方法很简单,当点击java方法时使用java代码对图片进行灰化,且记录耗时:
long javaTimeBefore = System.currentTimeMillis();
// 使用java代码把彩色像素转为灰度像素
Bitmap img = ConvertGrayImg(R.mipmap.bg_header);
long javaTime = System.currentTimeMillis() - javaTimeBefore;
//显示灰度图
ivPic1.setImageBitmap(img);

tvInfo.setText(tvInfo.getText().toString() + "\n" + "--->w:" + img.getWidth() + ",h:"
+ img.getHeight() + " JAVA TIME: " + javaTime + " ms");其中,ConvertGrayImg方法的代码如下:
/**
 * 把资源图片转为灰度图
 *
 * @param resID 资源ID
 * @return
 */
public Bitmap ConvertGrayImg(int resID) {
    Bitmap img1 = ((BitmapDrawable) getResources().getDrawable(resID)).getBitmap();

    int w = img1.getWidth(), h = img1.getHeight();
    int[] pix = new int[w * h];
    img1.getPixels(pix, 0, w, 0, 0, w, h);

    int alpha = 0xFF << 24;
    for (int i = 0; i < h; i++) {
        for (int j = 0; j < w; j++) {
            // 获得像素的颜色
            int color = pix[w * i + j];
            int red = ((color & 0x00FF0000) >> 16);
            int green = ((color & 0x0000FF00) >> 8);
            int blue = color & 0x000000FF;
            color = (red + green + blue) / 3;
            color = alpha | (color << 16) | (color << 8) | color;
            pix[w * i + j] = color;
        }
    }
    Bitmap result = Bitmap.createBitmap(w, h, Bitmap.Config.RGB_565);
    result.setPixels(pix, 0, w, 0, 0, w, h);
    return result;
}
当点击NDK方法时使用C++代码对图片进行灰化,且记录耗时:
long current = System.currentTimeMillis();
// 先打开图像并读取像素
Bitmap img1 = ((BitmapDrawable) ContextCompat.getDrawable(activity, R.mipmap.bg_header)).getBitmap();
int w = img1.getWidth();
int h = img1.getHeight();
int[] pix = new int[w * h];
img1.getPixels(pix, 0, w, 0, 0, w, h);
// 通过C++把彩色像素转为灰度像素
int[] resultInt = JNIDynamicUtils.grayPic(pix, w, h);
Bitmap resultImg = Bitmap.createBitmap(w, h, Bitmap.Config.RGB_565);
resultImg.setPixels(resultInt, 0, w, 0, 0, w, h);
long ndkTime = System.currentTimeMillis() - current;
// 显示灰度图
ivPic2.setImageBitmap(resultImg);

tvInfo.setText(tvInfo.getText().toString() + "\n" + "--->w:" + img1.getWidth() + ",h:"
 + img1.getHeight() + " NDK  TIME: " + ndkTime+ " ms");
我们看到,两种代码的灰化处理方式是一致的,那么执行效率如何呢?结果是java代码完败,C++代码的耗时不到java代码的一半。


 4284
4284

 被折叠的 条评论
为什么被折叠?


