


1. tauri 是什么?
Tauri 是一个构建适用于所有主流桌面和移动平台的轻快二进制文件的框架。开发者们可以集成任何用于创建用户界面的可以被编译成 HTML、JavaScript 和 CSS 的前端框架,同时可以在必要时使用 Rust、Swift 和 Kotlin 等语言编写后端逻辑。
Tauri 有三个主要优势:
- 构建应用所需的可靠基础:由于 Tauri 是使用 Rust 构建的,它可以利用 Rust 提供的内存、线程和类型安全方面的优势。Tauri 的每一个主要和次要版本都会接受安全审计。这一审计不光涵盖了 Tauri 组织范围内的代码,还包括了 Tauri 所使用的上游依赖。当然,这些举措不能消除所有的风险,但它们能够为开发者提供一个坚实的基础。
- 更小打包体积:Tauri 利用了已经存在于每一个用户系统的 webview。Tauri 应用中只包含了该应用专属的代码和资源文件,不需要在每个应用中都打包一个浏览器引擎,这意味着一个最小化的 Tauri 应用体积可能小于 600KB。
- 灵活的架构:由于 Tauri 使用了 web 技术,这也意味着几乎所有的前端框架都与 Tauri 兼容。
开发者可以在 JavaScript 中使用 invoke 函数实现 JavaScript 与 Rust 绑定,而 Swift 和 Kotlin 绑定则是作为 Tauri 插件。
TAO 被用于管理 Tauri 窗口创建,WRY 则被用于管理 webview 渲染。这些库由 Tauri 维护,并且如果需要 Tauri 没有暴露的更深入的系统集成时可以直接使用。
除此之外,Tauri 还维护了一些插件拓展 Tauri 核心暴露的系统能力。
2. 创建以一个简单的 tauri 项目
在创建项目之前,你需要确保已经安装了 rust 的运行环境,并且确保它能正常工作:
rustc --version
cargo version
使用 npm 创建 tauri 项目:
npm create tauri-app@latest
这是更为完整的过程:
# 创建项目
>npm create tauri-app@latest
Need to install the following packages:
create-tauri-app@4.5.7
Ok to proceed? (y) y


> npx
> create-tauri-app

# 项目名称
✔ Project name · tauri-app
✔ Identifier · com.tauri-app.app
# 选择用于前端的语言
✔ Choose which language to use for your frontend · TypeScript / JavaScript - (pnpm, yarn, npm, deno, bun)
# 包管理器,这里使用 npm
✔ Choose your package manager · npm
# 使用的前端框架模板
✔ Choose your UI template · Vue - (https://vuejs.org/)
# 前端用 JavaScript 还是 Typescript 这用了 JS
✔ Choose your UI flavor · JavaScript

# 进入项目后要执行的操作
Template created! To get started run:
  cd tauri-app
  npm install
  # 这个操作可忽略,如果你没有开发安卓端的想法(我是还没有)
  npm run tauri android init

# 运行项目
For Desktop development, run:
  npm run tauri dev

# 安卓开发运行
For Android development, run:
  npm run tauri android dev
3. 运行 tauri 项目
>cd tauri-app
>npm i                     # 等待依赖安装完成
>npm run tauri dev         # 在启动过程中,会顺带把 rust 依赖下载下来,前端 vite 启动还是飞快的
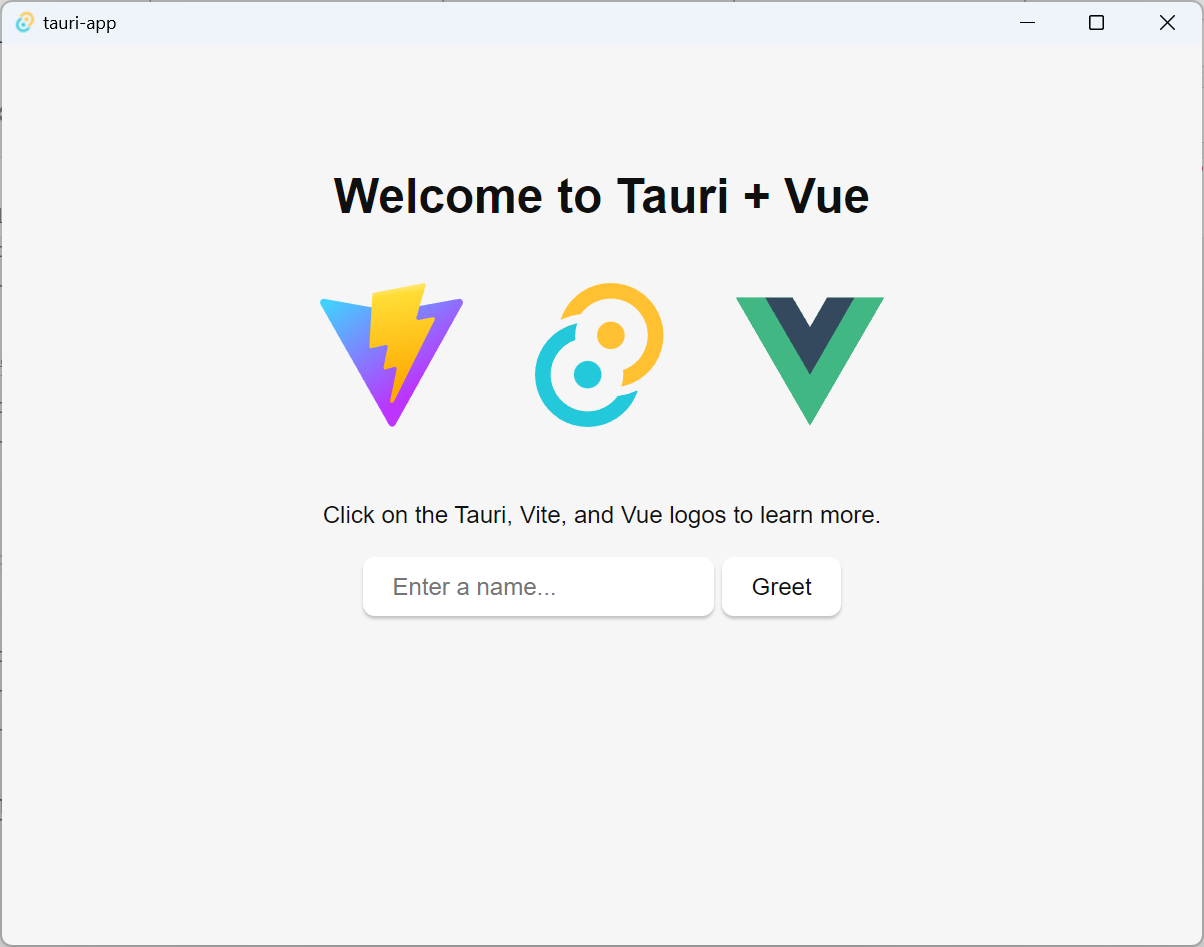
见到这个页面就说明启动完成了:
项目文件结构:
tauri-app     # 项目根目录
|__ dist      # vite 前端构建目录
|__ node_modules # npm 包目录
|__ public    # 前端公共目录
|__ src       # 前端的代码目录
   |__ assets # 存放应用的静态资源(图片、字体、样式等)
   |__ App.vue
   |__ main.js
|__ src-tauri # Tauri-specific Rust 部分
   |__ capabilities tauri   # 功能权限目录
      |__ default.json      # tauri 权限设置
      |__ gen
   |__ icons   # 存放 tauri 应用的静态资源(图片、字体、样式等)
   |__ src     # rust 代码主目录
   |__ target  # tauri 构建目录
     |__ debug
        |__ tauri-app.exe # 构建出来的可执行程序
        |__  ....
   |__ build.rs
   |__ Cargo.toml      # Rust 项目的配置文件,定义了项目依赖(例如 Tauri 库)
   |__ tauri.conf.json # Tauri 配置文件,包含应用的设置
|__ index.html
|__ package.json
|__ vite.config.js
4. 为 Vue 添加 @/,与 scss 支持:
- 安装 scss 依赖:
npm i sass sass-loader -D
- @/:在项目的根目录创建
jsconfig.json文件,在里面输入如下内容:
当然还没结束,修改{ "compilerOptions": { "target": "ES2022", "module": "ES2022", "moduleResolution": "node", "strict": true, "esModuleInterop": true, "forceConsistentCasingInFileNames": true, "resolveJsonModule": true, "baseUrl": "./", "paths": { "@/*": ["src/*"] } } }vite.config.js,+ 号区域为新增内容 :import { defineConfig } from "vite"; import vue from "@vitejs/plugin-vue"; + import path from "path"; const host = process.env.TAURI_DEV_HOST; export default defineConfig(async () => ({ plugins: [vue()], clearScreen: false, server: { port: 1420, strictPort: true, host: host || false, hmr: host ? { protocol: "ws", host, port: 1421, } : undefined, watch: { ignored: ["**/src-tauri/**"], }, }, + css: { + preprocessorOptions: { + scss: { + api: 'modern-compiler' + } + } + }, + resolve: { + alias: { + '@': path.resolve(__dirname, "src") + }, + } }));
5. 窗口自定义
创建自定义标题栏:
- 首先,我们要隐藏系统自带的拖拽栏,设置
src-tauri/tauri.conf.json文件的app.windows.decorations为false。
注意:在 tauri 2.0 中,tauri 键被重命名为 app,更多配置变化请参阅:https://tauri.app/zh-cn/start/migrate/from-tauri-1/{ "$schema": "https://schema.tauri.app/config/2", "productName": "tauri-app", "version": "0.1.0", "identifier": "com.tauri-app.app", "build": { "beforeDevCommand": "npm run dev", "devUrl": "http://localhost:1420", "beforeBuildCommand": "npm run build", "frontendDist": "../dist" }, "app": { "windows": [ { # 注意,在 JSON 中不允许出现任何形式的注释,在复制完后注意把注释删掉,虽然也会报错就是了 "title": "tauri-app", "width": 800, "height": 600, # 窗体最小宽高 "minWidth": 800, "minHeight": 600, # 窗体居中显示 "center": true, # 隐藏系统标题栏 "decorations": false } ], "security": { "csp": null } }, "bundle": { "active": true, "targets": "all", "icon": [ "icons/32x32.png", "icons/128x128.png", "icons/128x128@2x.png", "icons/icon.icns", "icons/icon.ico" ] } } - 设置权限:在
src-tauri/capabilities/default.json的permissions数组中添加"core:window:default"、"core:window:allow-start-dragging"这两项权限:{ "$schema": "../gen/schemas/desktop-schema.json", "identifier": "default", "description": "Capability for the main window", "windows": ["main"], "permissions": [ "core:default", "shell:allow-open", # 下方这五行 "core:window:default", "core:window:allow-start-dragging", "core:window:allow-minimize", "core:window:allow-toggle-maximize", "core:window:allow-hide" ] } - 在 App.vue 添加 css:
.container { width: 100%; height: 100%; font-family: "Geneva CE",lucida,'Microsoft YaHei',sans-serif; /** tauri 自定义标题栏样式 */ --titlebar-height: 30px; .titlebar { height: var(--titlebar-height); background: #EDEEF3; user-select: none; display: flex; justify-content: space-between; } .titlebar-button { display: inline-flex; justify-content: center; align-items: center; width: 30px; height: var(--titlebar-height); user-select: none; -webkit-user-select: none; } .titlebar-button:hover { background: #DDDDE0; } .titlebar-drag-region { display: flex; .titlebar-logo { padding: 5px 5px; img { width: 20px; height: 20px; } } .titlebar-title { font-size: 14px; line-height: var(--titlebar-height); } } /* 内容 */ .content { width: 100%; height: calc(100% - var(--titlebar-height)); overflow: hidden; } } - 修改 html :
<div class="container"> <div data-tauri-drag-region class="titlebar"> <div class="titlebar-drag-region"> <!-- 标题logo --> <div class="titlebar-logo"> <img src="./assets/32x32.png" alt="logo"> </div> <!-- 标题 --> <div class="titlebar-title">app</div> </div> <div> <div class="titlebar-button" id="titlebar-minimize" @click="appWindow.minimize()"> <img src="./assets/svg/window-minimize.svg" alt="minimize" /> </div> <div class="titlebar-button" id="titlebar-maximize" @click="appWindow.toggleMaximize()"> <img src="./assets/svg/window-maximize.svg" alt="maximize" /> </div> <div class="titlebar-button" id="titlebar-close" @click="appWindow.hide()"> <img src="./assets/svg/close.svg" alt="close" /> </div> </div> </div> <div class="content"> </div> </div> - JavaScript:
import { ref } from 'vue'; import { getCurrentWindow } from '@tauri-apps/api/window'; const appWindow = ref(getCurrentWindow()); - index.html 还得加上这段 CSS:
*{ box-sizing: border-box; margin: 0; padding: 0; } html,body, #app{ width: 100%; height: 100%; } - 这里用的本地图片其实就是官方文档里的
svg链接下载的,以及项目里src-tauri/icons/32x32.png的图片
其他链接:window-minimize.svg,window-maximize.svg,close.svg,请根据 html src 里的路径放置在合适的位置32x32.png与三个 svg有一个文件夹的差别。 - 最终的
App.vue:<script setup> import { ref } from 'vue'; import { getCurrentWindow } from '@tauri-apps/api/window'; const appWindow = ref(getCurrentWindow()); </script> <template> <div class="container"> <div data-tauri-drag-region class="titlebar"> <div class="titlebar-drag-region"> <!-- 标题logo --> <div class="titlebar-logo"> <img src="./assets/32x32.png" alt="logo"> </div> <!-- 标题 --> <div class="titlebar-title">app</div> </div> <div> <div class="titlebar-button" id="titlebar-minimize" @click="appWindow.minimize()"> <img src="./assets/svg/window-minimize.svg" alt="minimize" /> </div> <div class="titlebar-button" id="titlebar-maximize" @click="appWindow.toggleMaximize()"> <img src="./assets/svg/window-maximize.svg" alt="maximize" /> </div> <div class="titlebar-button" id="titlebar-close" @click="appWindow.hide()"> <img src="./assets/svg/close.svg" alt="close" /> </div> </div> </div> <div class="content"> </div> </div> </template> <style lang="scss" scoped> .container { width: 100%; height: 100%; font-family: "Geneva CE", lucida, 'Microsoft YaHei', sans-serif; /** tauri 自定义标题栏样式 */ --titlebar-height: 30px; .titlebar { height: var(--titlebar-height); background: #EDEEF3; user-select: none; display: flex; justify-content: space-between; } .titlebar-button { display: inline-flex; justify-content: center; align-items: center; width: 30px; height: var(--titlebar-height); user-select: none; -webkit-user-select: none; } .titlebar-button:hover { background: #DDDDE0; } .titlebar-drag-region { display: flex; .titlebar-logo { padding: 5px 5px; img { width: 20px; height: 20px; } } .titlebar-title { font-size: 14px; line-height: var(--titlebar-height); } } /* 内容 */ .content { width: 100%; height: calc(100% - var(--titlebar-height)); overflow: hidden; } } </style>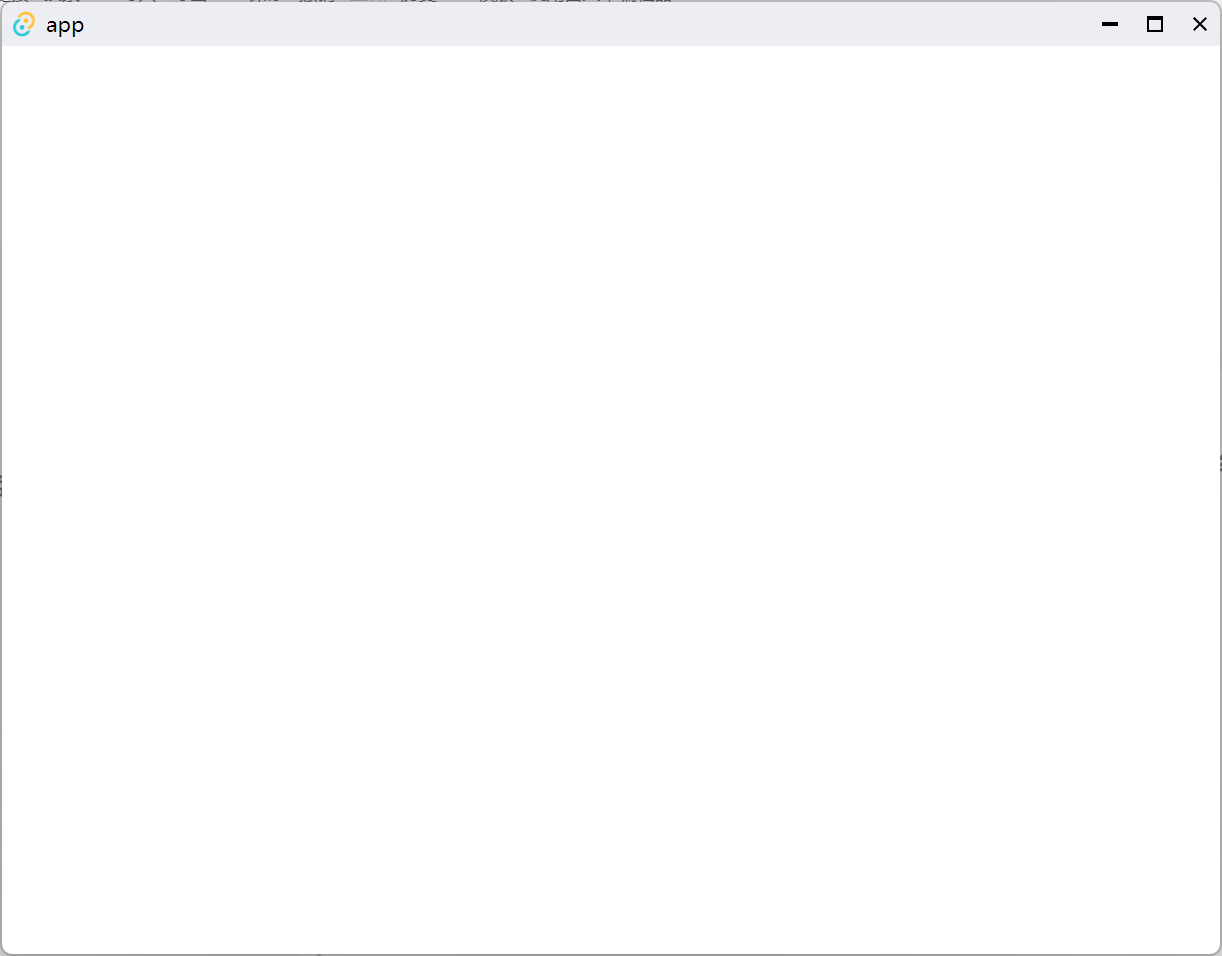
最后:我们完成了 tauri 项目的创建运行,以及替换系统自带的拖拽栏,之后的系统托盘啥的,下回再来。
至于打包可以通过这个命令,可以不需要进行任何配置:npm run tauri build,在没有嵌入任何外部文件以及外部二进制文件的情况下,你安装出来的程序只有一个 exe 程序以及卸载的快捷方式


 2344
2344

 被折叠的 条评论
为什么被折叠?
被折叠的 条评论
为什么被折叠?
 到【灌水乐园】发言


