基于ESP32的RGB点阵显示器

        分享一个之前制作的RGB彩灯点阵控制器。

    硬件介绍:

    1.主控芯片ESP32;

    2.RGB灯为内置控制IC类型的,IC型号为WS2812B;

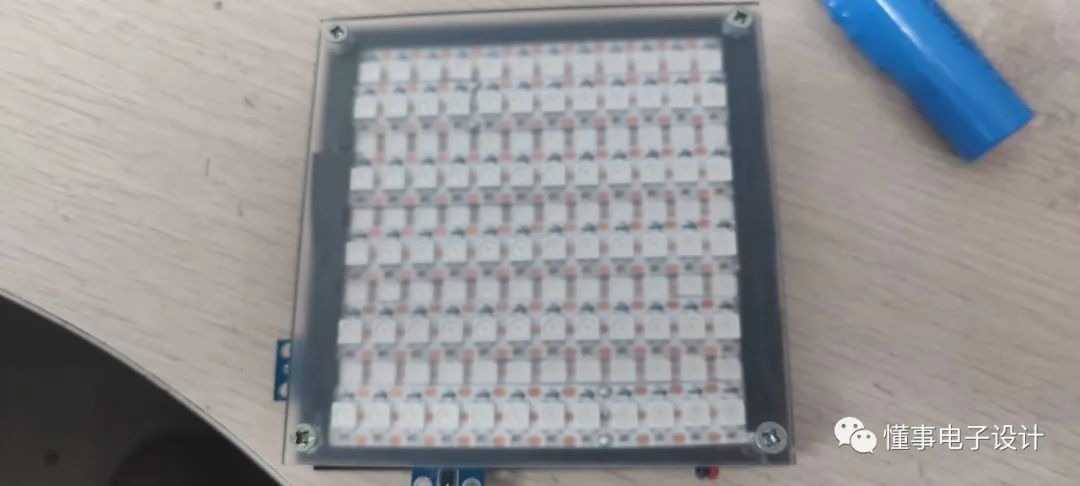
    3.点阵的大小为12X10,分别使用ESP32的10个IO来控制点阵的10个显示行;

    4.设置有BH1750光照传感器,对环境光线强度进行检测;

    5.设置有红外接近开关,可以对物体遮挡进行检测;

    6.设置有ADXL345三轴加速度传感器,可以进行加速度和倾角的检测;

    7.外部接了一个3.7转5V升压模块,可以使用锂电池进行供电。

点阵控制引脚表:

行号ESP32引脚号
123
233
318
425
522
627
719
826
921
1032

    三个传感器模块均为I2C通讯接口,分别与ESP32的4脚和5脚相连。

    为了使点阵看起来美观一些,这里使用三片10cmX10cm的亚克力板进行安装固定,其中最前面的为单面磨砂,后面的两块为黑色。

    下面分享一下4个简单的小应用。

    第一个应用中使用ADXL3453轴加速度传感器读取点阵当前的倾角,然后利用箭头进行方向指示。

应用1

    第二个应用中箭头按照一定的速度滚动,转动一圈后,利用随机数获取下一次转动的速度。

应用2

    第三个应用中,箭头随机转动,当用手遮住红外接近开关时,箭头固定。

    第四个应用中,上电以后控制器连接WIFI,并通过网络同步本地RTC时间,然后滚动显示日期和时间。

 有需要源码的小伙伴可以关注"懂事电子设计"

  • 0
    点赞
  • 1
    收藏
    觉得还不错? 一键收藏
  • 打赏
    打赏
  • 1
    评论
以下是基于ESP8266门禁系统显示器的代码示例: ``` #include <ESP8266WiFi.h> #include <WiFiClient.h> #include <ESP8266WebServer.h> #include <ESP8266HTTPClient.h> #include <LiquidCrystal_I2C.h> // Replace with your network credentials const char* ssid = "Your_SSID"; const char* password = "Your_PASSWORD"; // Set web server port number to 80 ESP8266WebServer server(80); // Set LCD pins LiquidCrystal_I2C lcd(0x3F, 16, 2); // Set the LCD I2C address and dimensions String serverUrl = "http://your-server-url.com/"; // Replace with your server URL void setup() { // Initialize Serial Monitor Serial.begin(115200); // Connect to Wi-Fi WiFi.begin(ssid, password); while (WiFi.status() != WL_CONNECTED) { delay(1000); Serial.println("Connecting to WiFi..."); } Serial.println("Connected to WiFi"); // Start LCD lcd.init(); // Initialize the LCD lcd.backlight(); // Turn on the backlight lcd.setCursor(0, 0); // Set the cursor to the first row lcd.print("Connected to WiFi"); // Display message on LCD } void loop() { // Handle client requests server.handleClient(); // Check if there is a new message from the server HTTPClient http; http.begin(serverUrl); // Specify the URL int httpCode = http.GET(); // Make the request if (httpCode == 200) { // Check if the response is successful String message = http.getString(); // Get the message Serial.println(message); // Print the message to Serial Monitor lcd.clear(); // Clear the LCD lcd.setCursor(0, 0); // Set the cursor to the first row lcd.print(message); // Display the message on the LCD } http.end(); // Close the connection } ``` 这个示例代码连接到Wi-Fi网络,然后初始化LCD显示器。它会从服务器获取消息并在LCD上显示。你需要把`Your_SSID`和`Your_PASSWORD`替换成你的Wi-Fi网络凭据,把`your-server-url.com`替换成你的服务器URL。

“相关推荐”对你有帮助么?

  • 非常没帮助
  • 没帮助
  • 一般
  • 有帮助
  • 非常有帮助
提交
评论 1
添加红包

请填写红包祝福语或标题

红包个数最小为10个

红包金额最低5元

当前余额3.43前往充值 >
需支付:10.00
成就一亿技术人!
领取后你会自动成为博主和红包主的粉丝 规则
hope_wisdom
发出的红包

打赏作者

西天取经的熊猫

你的鼓励将是我创作的最大动力

¥1 ¥2 ¥4 ¥6 ¥10 ¥20
扫码支付:¥1
获取中
扫码支付

您的余额不足,请更换扫码支付或充值

打赏作者

实付
使用余额支付
点击重新获取
扫码支付
钱包余额 0

抵扣说明:

1.余额是钱包充值的虚拟货币,按照1:1的比例进行支付金额的抵扣。
2.余额无法直接购买下载,可以购买VIP、付费专栏及课程。

余额充值