


1. ListView 的使用方法一: 用一般的activity调用布局文件
可参考 : http://blog.csdn.net/xj626852095/article/details/22048949
需要自定义的View的时候可以 重写 自己的adapter, 实现getView方法
listView还可以通过android:entries="@array/strList" 直接给数据进去
MyActivity3.java
public class MyActivity3 extends Activity {

	private final String TAG = "myLog";
	private ListView listView;

	@Override
	protected void onCreate(Bundle savedInstanceState) {
		// TODO Auto-generated method stub
		super.onCreate(savedInstanceState);
		setContentView(R.layout.layout_3);
		showListView();
	}

	//方式一: 一般的activity, 通过layout设置控件
	private void showListView() {
		listView = (ListView) findViewById(R.id.listView1);
		String[] listStr = {"changsha", "guangzhou", "shanghai", "beijing", "zhongshan" };
		ArrayAdapter<String> adapter = new ArrayAdapter<String>(this, android.R.layout.simple_list_item_multiple_choice, listStr);
		listView.setAdapter(adapter);
	}

}<?xml version="1.0" encoding="utf-8"?>
<LinearLayout xmlns:android="http://schemas.android.com/apk/res/android"
android:layout_width="match_parent"
android:layout_height="match_parent"
android:orientation="vertical" >
<ListView
android:id="@+id/listView1"
android:layout_width="match_parent"
android:layout_height="wrap_content"
android:background="#AAAAAA"
android:dividerHeight="5dp"
android:entries="@array/strList"
android:choiceMode="multipleChoice" >
</ListView>
<LinearLayout
android:layout_width="match_parent"
android:layout_height="match_parent"
android:orientation="vertical"
android:gravity="bottom">
<EditText
android:id="@+id/editText1"
android:layout_width="match_parent"
android:layout_height="wrap_content"
android:ems="10"
>
<requestFocus />
</EditText>
</LinearLayout>
</LinearLayout>2. ListView的使用方法二: 用ListActivity , 这个ListActivity 里面已经包含有一个ListView
内部有getListView() 可以获得这个ListView, 更新数据后通过adapter.notifyDataSetChanged(); 来更新UI
MyActivity3.java
package com.example.uitest;

import java.util.ArrayList;

import android.app.Activity;
import android.app.ListActivity;
import android.inputmethodservice.Keyboard.Key;
import android.os.Bundle;
import android.view.KeyEvent;
import android.view.View;
import android.view.View.OnKeyListener;
import android.widget.ArrayAdapter;
import android.widget.EditText;
import android.widget.ListView;

public class MyActivity3 extends ListActivity {

	private final String TAG = "myLog";
	private EditText editText;
	private ArrayAdapter<String> adapter;
	private ArrayList<String> arrayList;

	@Override
	protected void onCreate(Bundle savedInstanceState) {
		// TODO Auto-generated method stub
		super.onCreate(savedInstanceState);
		//通过listActivity可以不同setContentView,直接用内部的listView
		//但是要用自己的layout话,listView的id应设为 @android:id/list
		setContentView(R.layout.layout_3);
		showListViewByListActivity();
	}

	//方式二: 通过ListActivity 实现, 数据改变时通过notifyDataSetChanged通知 并修改UI
	private void showListViewByListActivity() {
		//通过ListActivity的getListView()方法可以直接获得一个listview
		arrayList = new ArrayList<String>();
		arrayList.add("Red");
		arrayList.add("Green");
		arrayList.add("Blue");
		adapter = new ArrayAdapter<String>(this, android.R.layout.simple_list_item_1, arrayList);
		//ListActivity的方法 setListAdapter
		setListAdapter(adapter);

		editText = (EditText) findViewById(R.id.editText1);
		editText.setOnKeyListener(new OnKeyListener() {
			@Override
			public boolean onKey(View v, int keyCode, KeyEvent event) {

				if(keyCode==KeyEvent.KEYCODE_ENTER && event.getAction()==KeyEvent.ACTION_UP){
					String value = editText.getText().toString();
					arrayList.add(value);
					//通知数据已改变
					adapter.notifyDataSetChanged();
					editText.setText("");
				}
				return false;
			}
		});
	}

	@Override
	protected void onListItemClick(ListView l, View v, int position, long id) {
		// TODO Auto-generated method stub
		super.onListItemClick(l, v, position, id);
		arrayList.remove(position);
		adapter.notifyDataSetChanged();
	}

}
<?xml version="1.0" encoding="utf-8"?>
<LinearLayout xmlns:android="http://schemas.android.com/apk/res/android"
android:layout_width="match_parent"
android:layout_height="match_parent"
android:orientation="vertical" >
<ListView
android:id="@android:id/list"
android:layout_width="match_parent"
android:layout_height="wrap_content"
android:background="#AAAAAA"
android:dividerHeight="5dp"
android:entries="@array/strList"
android:choiceMode="multipleChoice" >
</ListView>
<LinearLayout
android:layout_width="match_parent"
android:layout_height="match_parent"
android:orientation="vertical"
android:gravity="bottom">
<EditText
android:id="@+id/editText1"
android:layout_width="match_parent"
android:layout_height="wrap_content"
android:ems="10"
>
<requestFocus />
</EditText>
</LinearLayout>
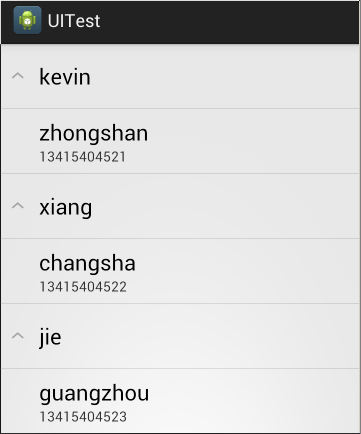
</LinearLayout>3. ExpandableListActivity 可伸缩的ListView
ExpandableListView 的使用和ListView相似,也可以继承ExpandableListActivity 来直接包含一个ExpandableListView.
如果要自定义UI,可以在创建adapter时 引用自己的layout
package com.example.uitest;

import java.util.ArrayList;
import java.util.HashMap;
import java.util.List;
import java.util.Map;

import android.app.ExpandableListActivity;
import android.os.Bundle;
import android.view.View;
import android.widget.ExpandableListView;
import android.widget.SimpleExpandableListAdapter;
import android.widget.TextView;
import android.widget.Toast;

public class MyActivity4 extends ExpandableListActivity {

	@Override
	protected void onCreate(Bundle savedInstanceState) {
		super.onCreate(savedInstanceState);
		showExpandableListActivity();
	}

	private void showExpandableListActivity() {

		//groupData
		ArrayList<HashMap<String, String>> groupData = new ArrayList<HashMap<String, String>>();
		HashMap<String, String> groupMap1 = new HashMap<String, String>();
		groupMap1.put("name","kevin");
		HashMap<String, String> groupMap2 = new HashMap<String, String>();
		groupMap2.put("name","xiang");
		HashMap<String, String> groupMap3 = new HashMap<String, String>();
		groupMap3.put("name","jie");
		groupData.add(groupMap1);
		groupData.add(groupMap2);
		groupData.add(groupMap3);

		//childData
		ArrayList<ArrayList<HashMap<String, String>>> childData = new ArrayList<ArrayList<HashMap<String,String>>>();
		ArrayList<HashMap<String, String>> childItem1 = new ArrayList<HashMap<String,String>>();
		HashMap<String, String> childItemMap1 = new HashMap<String, String>();
		childItemMap1.put("address", "zhongshan");
		childItemMap1.put("phone", "13415404521");
		childItem1.add(childItemMap1);

		ArrayList<HashMap<String, String>> childItem2 = new ArrayList<HashMap<String,String>>();
		HashMap<String, String> childItemMap2 = new HashMap<String, String>();
		childItemMap2.put("address", "changsha");
		childItemMap2.put("phone", "13415404522");
		childItem2.add(childItemMap2);

		ArrayList<HashMap<String, String>> childItem3 = new ArrayList<HashMap<String,String>>();
		HashMap<String, String> childItemMap3 = new HashMap<String, String>();
		childItemMap3.put("address", "guangzhou");
		childItemMap3.put("phone", "13415404523");
		childItem3.add(childItemMap3);

		childData.add(childItem1);
		childData.add(childItem2);
		childData.add(childItem3);

		//simple_expandable_list_item_1 只有text1, simple_expandable_list_item_2 有text1 和 text2
		//还可自定义layout文件,实现自己的UI
		SimpleExpandableListAdapter adapter = new SimpleExpandableListAdapter(this,
				groupData, android.R.layout.simple_expandable_list_item_1,
				new String[]{"name"}, new int[]{android.R.id.text1},
				childData, android.R.layout.simple_expandable_list_item_2,
				new String[]{"address", "phone"}, new int[]{android.R.id.text1,android.R.id.text2})  ;
		setListAdapter(adapter);
	}

	@Override
	public boolean onChildClick(ExpandableListView parent, View v,
			int groupPosition, int childPosition, long id) {
			 TextView tv1 = (TextView) v.findViewById(android.R.id.text1);
			 TextView tv2 = (TextView) v.findViewById(android.R.id.text2);
			 String address = tv1.getText().toString();
			 String phone = tv2.getText().toString();
			 Toast.makeText(this, "address: "+address+" phone: "+phone, Toast.LENGTH_SHORT).show();
		return false;
	}


}


 532
532

 被折叠的 条评论
为什么被折叠?
被折叠的 条评论
为什么被折叠?
 到【灌水乐园】发言


