


示例一
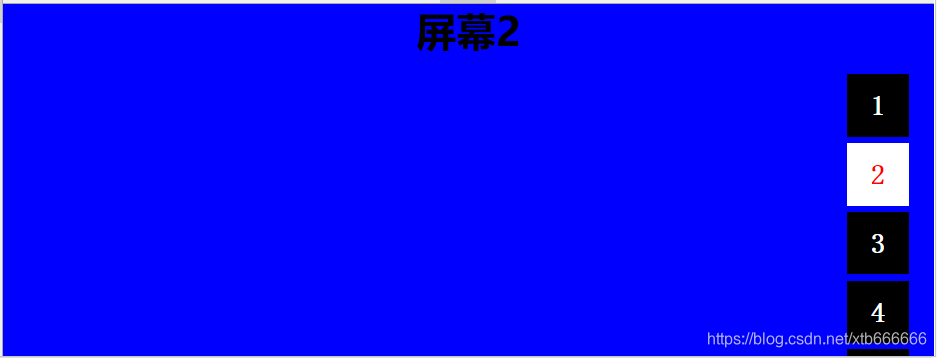
效果展示:(每一个屏幕都是一个div,屏幕里想放的内容,放到对应div里即可,各个屏幕互相不受影响)
对应的html代码:
<!doctype html>
<html>
 <head>
 <meta charset="UTF-8">
 <title>Document</title>
 <link rel="stylesheet" type="text/css" href="style.css" />
 </head>
 <body>
 <div class="big-box" id="bigBox">
  <div class="item item1"><h1>屏幕1</h1></div>
  <div class="item item2"><h1>屏幕2</h1></div>
  <div class="item item3"><h1>屏幕3</h1></div>
  <div class="item item4"><h1>屏幕4</h1></div>
  <div class="item item5"><h1>屏幕5</h1></div>
 </div>
 <ul class="controls">
  <li class="active">1</li>
  <li>2</li>
  <li>3</li>
  <li>4</li>
  <li>5</li>
 </ul>
 <script src="behavior.js"></script>
 </body>
</html>
对应的js代码:
 思路:
 第一步:当页面加载完后,获取所要操作的节对象
 第二步:为document添加一个滚轮滚动事件
 第三步:滚轮滚动切换
  获取当前浏览器可视区域的高度
  var viewHeight = document.body.clientHeight
  滚轮切换的目的:就是更改bigBox的top值
  top:最大0
  top:最小 viewHeight*-4
  从上到下或从下到上:最多走4次(5个页面) 每一次走viewHeight
  控制的关键点:索引 定一个索引 2
  滚轮↓
  索引+1
  滚轮↑
  索引-1
  bigBox.style.top = -索引*viewHeihgt
*/
var bigBox = document.getElementById("bigBox");//获取bigBox节点对象
var lis = document.querySelectorAll(".controls li");//获取所有的li节点对象
var viewHeight = document.body.clientHeight;//获取当前页面高度
var flag = true;//设置开关
var index = 0;//设置索引
//封装事件,兼容浏览器
function on(obj,eventType,fn){
 if(obj.addEventListener){
 obj.addEventListener(eventType, fn);
 }else{
 obj.attachEvent("on" + eventType, fn);
 }
}
//鼠标滚动事件处理函数
function handler(e){
 var _e = window.event || e;
 if(flag){
 flag = false;
 if(_e.wheelDelta==120 || _e.detail==-3){//如果鼠标滚轮向上滚动,detail为火狐判断条件
  index--;
  if(index<0){
  index = 0;
  }
 }else{//向下滚动
  index++;
  if(index>lis.length-1){//如果索引大于页面数,就是滚到最后一张页面时,再滚动鼠标页面不再滚动
  index = lis.length-1;
  }
 }
 bigBox.style.top = -index*viewHeight + "px";//bigBox整体上移index个页面
 for(var i=0; i<lis.length; i++){
  lis[i].className = "";//重置全部li的类
 }
 lis[index].className = "active";//设置当前li的类名
 setTimeout(function(){//页面滚动间隔一秒,防止滚动太快
  flag = true;//重新开启开关
 },1000);
 }
}
on(document,"mousewheel",handler);//滚轮滚动事件
on(document,"DOMMouseScroll",handler);//滚轮滚动事件,适配火狐浏览器
//数字标签点击处理
for(var i=0; i<lis.length; i++){
 lis[i].tag = i;
 lis[i].onclick = function(){
 for(var j=0; j<lis.length; j++){
  lis[j].className = "";
 }
 lis[this.tag].className = "active";
 bigBox.style.top = -this.tag*viewHeight + "px";
 }
}
对应的css代码:
*{margin:0; padding:0;}
html,body{
 width:100%;
 height:100%;
 overflow:hidden;
}
.big-box {
 width:100%;
 height:500%;
 text-align:center;
 position:absolute;
}
.big-box .item{
 height:20%;
}
.big-box .item1 {
 background-color:red;
}
.big-box .item2 {
 background-color:blue;
}
.big-box .item3 {
 background-color:purple;
}
.big-box .item4 {
 background-color:gold;
}
.big-box .item5 {
 background-color:pink;
}
.controls {
 list-style:none;
 position:absolute;
 top:20%;
 right:20px;
}
.controls li {
 width:50px;
 height:50px;
 font:bold 22px/50px "宋体";
 text-align:center;
 background-color:#000;
 color:#fff;
 cursor:pointer;
}
.controls li+li {
 margin-top:5px;
}
.controls li.active {
 background-color:#fff;
 color:red;
}
示例二
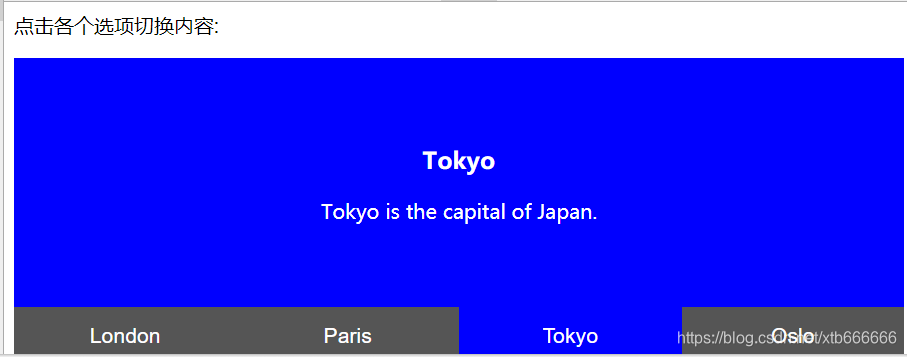
效果展示:(每一个屏幕都是一个div,屏幕里想放的内容,放到对应div里即可,各个屏幕互相不受影响)
对应的html代码:
<p>点击各个选项切换内容:</p>

<div id="London" class="tabcontent">
  <h3>London</h3>
  <p>London is the capital city of England.</p>
</div>

<div id="Paris" class="tabcontent">
  <h3>Paris</h3>
  <p>Paris is the capital of France.</p>
</div>

<div id="Tokyo" class="tabcontent">
  <h3>Tokyo</h3>
  <p>Tokyo is the capital of Japan.</p>
</div>

<div id="Oslo" class="tabcontent">
  <h3>Oslo</h3>
  <p>Oslo is the capital of Norway.</p>
</div>

<button class="tablink" onclick="openCity('London', this, 'red')" id="defaultOpen">London</button>
<button class="tablink" onclick="openCity('Paris', this, 'green')">Paris</button>
<button class="tablink" onclick="openCity('Tokyo', this, 'blue')">Tokyo</button>
<button class="tablink" onclick="openCity('Oslo', this, 'orange')">Oslo</button>
对应的js代码:
function openCity(cityName,elmnt,color) {
    var i, tabcontent, tablinks;
    tabcontent = document.getElementsByClassName("tabcontent");
    for (i = 0; i < tabcontent.length; i++) {
        tabcontent[i].style.display = "none";
    }
    tablinks = document.getElementsByClassName("tablink");
    for (i = 0; i < tablinks.length; i++) {
        tablinks[i].style.backgroundColor = "";
    }
    document.getElementById(cityName).style.display = "block";
    elmnt.style.backgroundColor = color;

}
// 触发 id="defaultOpen" click 事件
document.getElementById("defaultOpen").click();
对应的css代码:
body {font-family: "Lato", sans-serif;}

.tablink {
    background-color: #555;
    color: white;
    float: left;
    border: none;
    outline: none;
    cursor: pointer;
    padding: 14px 16px;
    font-size: 17px;
    width: 25%;
}

.tablink:hover {
    background-color: #777;
}

/* Style the tab content */
.tabcontent {
    color: white;
    display: none;
    padding: 50px;
    text-align: center;
}

#London {background-color:red;}
#Paris {background-color:green;}
#Tokyo {background-color:blue;}
#Oslo {background-color:orange;}


 1335
1335


 被折叠的 条评论
为什么被折叠?
被折叠的 条评论
为什么被折叠?
 到【灌水乐园】发言


