


文章目录
1. 前提说明
- 之前无疑中看见小组长使用了Maps.newHashMapWithExpectedSize(int),因此来了解一下。
2. 区别
- new HashMap()大家都应该很熟悉了,就不过多介绍,即key value结构,链表+红黑树…
0. 导入相关jar包
 <!-- https://mvnrepository.com/artifact/com.google.guava/guava -->
        <dependency>
            <groupId>com.google.guava</groupId>
            <artifactId>guava</artifactId>
            <version>30.1.1-jre</version>
        </dependency>
1. Maps.newHashMap()
- 当我们点进 其源码,发现也就是new HashMap() 跟 普通new HashMap()没区别。
- 可能只是为了美观吧(这个不是重点)

2. Maps.newHashMapWithExpectedSize(int)
-
Maps.newHashMapWithExpectedSize(int):创建hashMap的时候事先设置其期望的大小。
-
这个时候就会有人问:new HashMap(int initialCapacity) 也有实现设置大小值,有什么区别?
-
从源码来看清楚:
public static <K, V> HashMap<K, V> newHashMapWithExpectedSize(int expectedSize) { // 确实底层还是使用了 new HashMap(int initialCapacity) 设置大小值 // 但是 先对 initialCapacity 做了处理 return new HashMap(capacity(expectedSize)); } static int capacity(int expectedSize) { // 期望值小于3 则 就期望值+1 返回 if (expectedSize < 3) { CollectPreconditions.checkNonnegative(expectedSize, "expectedSize"); return expectedSize + 1; } else { // 若期望值不小于3,则 先扩大1/4倍,为什么要扩大,请看后文 return expectedSize < 1073741824 ? (int)((float)expectedSize / 0.75F + 1.0F) : 2147483647; } } -
为什么要先将期望值扩大呢?
- HashMap本身是会扩容的,扩容是先将原来的数组大小*2 再将原来数组上的值迁移到新的数组上,这个过程是有开销的。
- 而hashMap本身的负载因子是0.75 若你初始化容器大小为16,则到了 16*0.75 = 12 的时候会进行扩容。
- 而在你本身初始化的时候,是大概率知道这个Map的容器有多大,应该装多少,因此才去设置了初始值16。
- 而又因为HashMap有提前阈值(即容器达到12的时候)就扩容的,因此设置初始值就可以有点变化。
- 比如容器感觉只会用到10,你就初始化new HashMap(14) 即 14 = 10/0.75 + 1 (加1 是为了向上取整)
- 那么这个HashMap到达 14*0.75 = 10.5 的时候才会扩容,即你容器存到10个时候,都不会扩容
- 典型的用空间 减少其他开销。
-
代码测试:
public class demoMap {
    public static void main(String[] args) {
        long start = System.currentTimeMillis();
        Map<Object, Object> map1 = new HashMap<>(10000000);
        for (int i = 0; i < 8000000; i++) {
            map1.put(i,i);
        }
        System.out.println("hashMap end: " + (System.currentTimeMillis() - start));

        start = System.currentTimeMillis();
        Map<Object, Object> map2 = Maps.newHashMapWithExpectedSize(10000000);
        for (int i = 0; i < 8000000; i++) {
            map2.put(i,i);
        }
        System.out.println("newHashMapWithExpectedSize end: " + (System.currentTimeMillis() - start));
    }
}
hashMap end: 12590 newHashMapWithExpectedSize end: 3356
3. Maps中其他方法
1. Maps.filterKeys 过滤key 得到全新Map(Maps.filterEntries(),Maps.filterKeys()同理)
-
我们知道对于Map来说,想根据key来过滤一些值,代码写起来很繁琐,不想List一样有stream流写法。
-
因此 Maps.filterKeys 出现的挺好的,简化很多代码书写:
public class demoMap {
    public static void main(String[] args) {
        Map<Integer,String> map = new HashMap<>();
        map.put(1,"1");
        map.put(2,"1");
        map.put(3,"1");
        map.put(4,"1");
        map.put(5,"1");
        map.put(6,"1");
        final Map<Integer, String> map1 = Maps.filterKeys(map, key -> Objects.equals(key, 5));
        final Map<Integer, String> map2 = Maps.filterKeys(map, key -> key > 2);
        System.out.println(map1);
        System.out.println(map2);
    }
}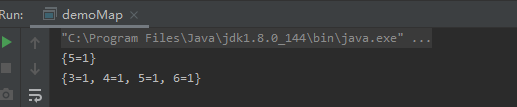
2. Maps.difference(map,map) 比较两个map的内容
public class demoMap {
    public static void main(String[] args) {
        Map<Integer, String> map1 = new HashMap<>();
        map1.put(1, "1");
        map1.put(2, "1");
        map1.put(3, "1");
        map1.put(7, "1");

        Map<Integer, String> map2 = new HashMap<>();
        map2.put(1, "1");
        map2.put(2, "1");
        map2.put(3, "1");
        map2.put(4, "1");
        map2.put(5, "1");
        map2.put(6, "1");

        final MapDifference<Integer, String> difference = Maps.difference(map1, map2);
        // 两个map是否相同
        System.out.println(difference.areEqual());
        // 两个map共同部分
        System.out.println(difference.entriesInCommon());
        // 第一次参数中特有的值
        System.out.println(difference.entriesOnlyOnLeft());
        // 第二个参数中特有的值
        System.out.println(difference.entriesOnlyOnRight());
    }
}


 459
459


 被折叠的 条评论
为什么被折叠?
被折叠的 条评论
为什么被折叠?
 到【灌水乐园】发言


