


1,多线程创建与使用
创建好后,调用start()方法来运行线程
public static void main(String[] args) {
    Thread t = new Thread(() -> {    //直接编写逻辑
        System.out.println("我是另一个线程!");
    });
    t.start();   //调用此方法来开始执行此线程
}
2.run方法只能在当前线程执行,不能创建新的线程
3.线程的休眠和中断
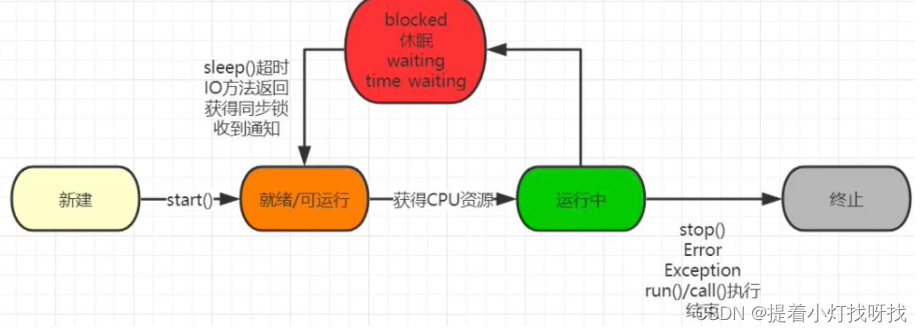
一个线程处于运行状态下,其下一个状态可能会是以下几种:
- 当CPU给的时间结束时,会从运行状态回到就绪状态,等待下一次获得CPU资源
- 当线程进入休眠、阻塞(如等待IO请求)、手动调用wait()时,会使得线程进入等待状态,当等待状态结束后进入就绪状态
- 当线程出现异常或者错误、被stop()方法强制停止/所有代码执行结束时,会使得线程运行结束。
睡眠
public static void main(String[] args) {
    Thread t = new Thread(() -> {
        try {
            System.out.println("l");
            Thread.sleep(1000);   //sleep方法是Thread的静态方法,它只作用于当前线程(它知道当前线程是哪个)
            System.out.println("b");    //调用sleep后,线程会直接进入到等待状态,直到时间结束
        } catch (InterruptedException e) {
            e.printStackTrace();
        }
    });
    t.start();
}
中止线程
stop()方法强制中断线程,简单粗暴,可能导致资源没有释放,为了叫线程自己处理自己资源,可以调用interrupt方法
public static void main(String[] args) {
    Thread t = new Thread(() -> {
        try {
            Thread.sleep(10000);  //休眠10秒
        } catch (InterruptedException e) {
            e.printStackTrace();
        }
    });
    t.start();
    try {
        Thread.sleep(3000);   //休眠3秒,一定比线程t先醒来
        t.interrupt();   //调用t的interrupt方法
    } catch (InterruptedException e) {
        e.printStackTrace();
    }
}
4.线程优先级
-
MIN_PRIORITY 最低优先级
-
MAX_PRIORITY 最高优先级
-
NOM_PRIORITY 常规优先级
public static void main(String[] args) {
    Thread t = new Thread(() -> {
        System.out.println("线程开始运行!");
    });
    t.start();
    t.setPriority(Thread.MIN_PRIORITY);  //通过使用setPriority方法来设定优先级
}
5,线程礼让加入
我们还可以在当前线程的工作不重要时,将CPU资源让位给其他线程,通过使用yield()方法来将当前资源让位给其他同优先级线程:
public static void main(String[] args) {
    Thread t1 = new Thread(() -> {
        System.out.println("线程1开始运行!");
        for (int i = 0; i < 50; i++) {
            if(i % 5 == 0) {
                System.out.println("让位!");
                Thread.yield();
            }
            System.out.println("1打印:"+i);
        }
        System.out.println("线程1结束!");
    });
    Thread t2 = new Thread(() -> {
        System.out.println("线程2开始运行!");
        for (int i = 0; i < 50; i++) {
            System.out.println("2打印:"+i);
        }
    });
    t1.start();
    t2.start();
} 当我们希望一个线程等待另一个线程执行完成后再继续进行,我们可以使用join()方法来实现线程的加入:
public static void main(String[] args) {
    Thread t1 = new Thread(() -> {
        System.out.println("线程1开始运行!");
        for (int i = 0; i < 50; i++) {
            System.out.println("1打印:"+i);
        }
        System.out.println("线程1结束!");
    });
    Thread t2 = new Thread(() -> {
        System.out.println("线程2开始运行!");
        for (int i = 0; i < 50; i++) {
            System.out.println("2打印:"+i);
            if(i == 10){
                try {
                    System.out.println("线程1加入到此线程!");
                    t1.join();    //在i==10时,让线程1加入,先完成线程1的内容,在继续当前内容
                } catch (InterruptedException e) {
                    e.printStackTrace();
                }
            }
        }
    });
    t1.start();
    t2.start();
}
6.线程锁和线程同步
通过synchronized关键字来创造一个线程锁,首先我们来认识一下synchronized代码块,它需要在括号中填入一个内容,必须是一个对象或是一个类,我们在value自增操作外套上同步代码块:
private static int value = 0;

public static void main(String[] args) throws InterruptedException {
    Thread t1 = new Thread(() -> {
        for (int i = 0; i < 10000; i++) {
            synchronized (Main.class){  //使用synchronized关键字创建同步代码块
                value++;
            }
        }
        System.out.println("线程1完成");
    });
    Thread t2 = new Thread(() -> {
        for (int i = 0; i < 10000; i++) {
            synchronized (Main.class){
                value++;
            }
        }
        System.out.println("线程2完成");
    });
    t1.start();
    t2.start();
    Thread.sleep(1000);  //主线程停止1秒,保证两个线程执行完成
    System.out.println(value);
}
7.死锁
public static void main(String[] args) throws InterruptedException {
    Object o1 = new Object();
    Object o2 = new Object();
    Thread t1 = new Thread(() -> {
        synchronized (o1){
            try {
                Thread.sleep(1000);
                synchronized (o2){
                    System.out.println("线程1");
                }
            } catch (InterruptedException e) {
                e.printStackTrace();
            }
        }
    });
    Thread t2 = new Thread(() -> {
        synchronized (o2){
            try {
                Thread.sleep(1000);
                synchronized (o1){
                    System.out.println("线程2");
                }
            } catch (InterruptedException e) {
                e.printStackTrace();
            }
        }
    });
    t1.start();
    t2.start();
}
8.wait和notify方法
Object类还有三个方法我们从来没有使用过,分别是wait()、notify()以及notifyAll(),他们其实是需要配合synchronized来使用的(实际上锁就是依附于对象存在的,每个对象都应该有针对于锁的一些操作,所以说就这样设计了)当然,只有在同步代码块中才能使用这些方法,正常情况下会报错
public static void main(String[] args) throws InterruptedException {
    Object o1 = new Object();
    Thread t1 = new Thread(() -> {
        synchronized (o1){
            try {
                System.out.println("开始等待");
                o1.wait();     //进入等待状态并释放锁
                System.out.println("等待结束!");
            } catch (InterruptedException e) {
                e.printStackTrace();
            }
        }
    });
    Thread t2 = new Thread(() -> {
        synchronized (o1){
            System.out.println("开始唤醒!");
            o1.notify();     //唤醒处于等待状态的线程
          	for (int i = 0; i < 50; i++) {
               	System.out.println(i);
            }
          	//唤醒后依然需要等待这里的锁释放之前等待的线程才能继续
        }
    });
    t1.start();
    Thread.sleep(1000);
    t2.start();
}我们可以发现,对象的wait()方法会暂时使得此线程进入等待状态,同时会释放当前代码块持有的锁,这时其他线程可以获取到此对象的锁,当其他线程调用对象的notify()方法后,会唤醒刚才变成等待状态的线程(这时并没有立即释放锁)。注意,必须是在持有锁(同步代码块内部)的情况下使用,否则会抛出异常!
9.ThreadLocal的使用
ThreadLocal类,来创建工作内存中的变量,它将我们的变量值存储在内部(只能存储一个变量),不同的线程访问到ThreadLocal对象时,都只能获取到当前线程所属的变量
public static void main(String[] args) throws InterruptedException {
    ThreadLocal<String> local = new ThreadLocal<>();  //注意这是一个泛型类,存储类型为我们要存放的变量类型
    Thread t1 = new Thread(() -> {
        local.set("lbwnb");   //将变量的值给予ThreadLocal
        System.out.println("变量值已设定!");
        System.out.println(local.get());   //尝试获取ThreadLocal中存放的变量
    });
    Thread t2 = new Thread(() -> {
        System.out.println(local.get());   //尝试获取ThreadLocal中存放的变量
    });
    t1.start();
    Thread.sleep(3000);    //间隔三秒
    t2.start();
}


 508
508


 被折叠的 条评论
为什么被折叠?
被折叠的 条评论
为什么被折叠?
 到【灌水乐园】发言


