


allure添加日志和失败截图
使用python run_all_case.py命令运行pytest,然后通过allure生成报告。
1. allure说明
Allure是一款轻量级并且非常灵活的开源测试报告框架。 它支持绝大多数测试框架, 例如TestNG、Pytest、JUint等。它简单易用,易于集成。
1.1 使用方法
#  if __name__ == '__main__'::这是Python的一种常见模式。
#  如果这个文件被直接运行(例如你打开它并运行),那么__name__变量将被设置为'__main__'。
# 为python主函数入口。
if __name__ == '__main__':
    # 用于运行测试用例并生成 allure 报告内容。
    pytest.main(["-vqs", "./xxx.py", "--alluredir=temp/html"])

    # 使用os模块的system函数执行了一个shell命令。生成一个allure网页报告
    # "allure generate": 用于从测试运行结果生成一个 Allure 报告。
    # "./temp/html": 指定输入目录的参数,表示从"./temp/html"目录下的结果文件生成 Allure 报告。
    # "-o ./report": 指定输出目录的参数,表示生成的 Allure 报告将存储在"./report"目录下。
    # "--clean": 这是一个选项参数,用于清空之前生成的 Allure 报告文件。
    os.system("allure generate ./temp/html -o ./report  --clean")

    # 打开这份allure网页报告
    os.system('allure open ./report')
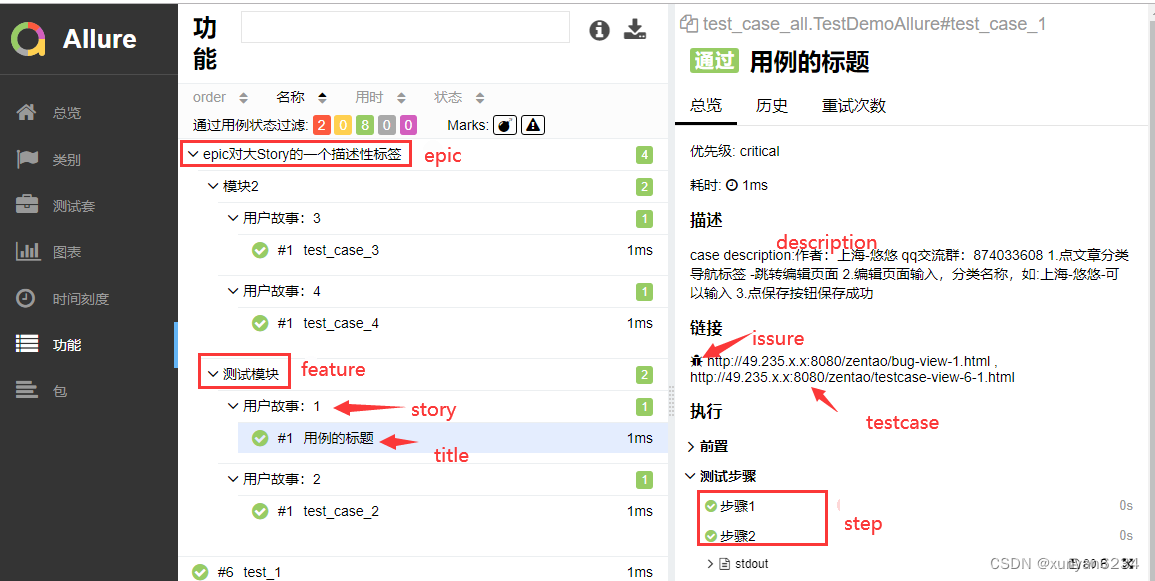
1.2 报告解读
![[图片]](https://img-blog.csdnimg.cn/0a43257551e248d3a696b5a2998d3fb4.png#pic_center)
- Overview: 总览,显示用例执行情况、严重程度分布、环境信息等。
- Categories: 分类,按用例执行结果分类,异常错误和失败错误。
- Suites: 套件,按测试用例套件分类,目录 ->测试文件 -> 测试类 ->测试方法。
- Graphs: 图表,显示用例执行分布情况,状态、严重程度、持续时间、持续时间趋势、重试趋势、类别趋势、整体趋势。
- Timeline: 时间线,显示用例耗时情况,具体到各个时间点用例执行情况。
- Behaviors: 行为,按用例行为举止分类(以标记文字形式显示,需要用例添加allure相关装饰器)。
- Package: 配套,按目录形式分类,显示不同的目录用例执行情况。
1.3 allure相关装饰器
| 使用方法 | 参数值 | 参数说明 |
|---|---|---|
| @allure.epic() | epic描述 | 敏捷里面的概念,定义史诗,往下是feature |
| @allure.feature() | 模块名称 | 功能点的描述,往下是story |
| @allure.story | 用户故事 | 用户故事,往下是title |
| @allure.title(用例的标题) | 用例的标题 | 重命名html报告的名称 |
| @allure.testcase() | 测试用例的链接地址 | 对应功能测试用例系统里面的case |
| @allure.issue() | 缺陷 | 对应缺陷管理系统里的链接 |
| @allure.description | 用例描述 | 测试用例的描述 |
| @allure.step() | 操作步骤 | 测试用例的步骤 |
| @allure.severity() | 用例等级 | blocker, critical, normal,minor,trivial |
| @allure.link() | 链接 | 定义一个链接,在报告中展现 |
| @allure.attachment() | 附件 | 报告添加附件 |
2. pytest说明
pytest 是一个全功能的 Python 测试工具,可以帮助您编写更好的程序。它与 Python 自带的 unittest 测试框架类似,但 pytest 使用起来更简洁和高效,并且兼容 unittest 框架。pytest 支持简单的单元测试和复杂的功能测试,可以结合 requests 实现接口测试,结合 selenium、appium 实现自动化功能测试。
# "--clean-alluredir"清空上一次的记录,运行"xxx.py"
# 将运行结果输出到"temp/html"中
#   -v, --verbose         Increase verbosity         | 输出详细日志
#   -q, --quiet           Decrease verbosity         | 该参数选项与 -v 整好相反,是简化输出
#   -s                    Shortcut for --capture=no  | 允许终端在测试运行时输出如print
pytest.main(["-vqs", "xxx.py", "--alluredir=temp/html", "--clean-alluredir"])

# 上文提到的allure装饰器
@allure.feature("phone_status")
@allure.story("get cpu info")

# 这是定义的测试函数。
# 所有pytest的测试函数都应以"test_"开头。
# 在这个函数中,你应该编写实际的测试代码。
def test_phone_status(self):
3. allure添加失败日志
3.1 pytest.ini文件讲解
pytest.ini为pytest本身自带的配置文件,主要作用例如:制定用例发现规则、定义标签、配置日志信息、以及其他一些pytest运行时的参数均可以在该配置文件中配置,简化运行复杂度。
引言: 通过读取pytest.ini全局配置文件执行程序
1)如pytest.ini有该参数值,在执行的时候,先读取配置文件中的参数;
2)如没有,则取其他地方的(主函数/命令行中)。
pytest.ini全局配置文件,是pytest单元测试框架的核心配置文件。
作用: pytest.ini 可以改变 pytest 的默认行为
位置: 一般放在项目的根目录(即当前项目的顶级文件夹下)
命名: pytest.ini,不能使用任何中文符号,包括汉字、空格、引号、冒号等等
新建配置文件,点击鼠标右键(New->File->pytest.ini)
编码格式: GBK或者ANSI,可以使用notepad++修改编码格式
运行的规则:不管是主函数模式运行,命令行模式运行,都会去读取这个全局配置文件。
暂时无法在飞书文档外展示此内容
# logging不同调试等级的输出方法
logging.debug('debug级别,一般用来打印一些调试信息,级别最低')
logging.info('info级别,一般用来打印一些正常的操作信息')
logging.warning('waring级别,一般用来打印警告信息')
logging.error('error级别,一般用来打印一些错误信息')
logging.critical('critical级别,一般用来打印一些致命的错误信息,等级最高')
# 这段代码中的两个print函数调用分别将消息输出到标准输出(stdout)和标准错误(stderr)。
print('Message outputted to stdout')
print('Message outputted to stderr', file=sys.stderr)
格式一般是固定的,建议将中文删掉。可以使用pytest --help指令可以查看pytest.ini的设置选项。处理器决定输出到终端还是输出到文件中。
这里重定向了两个logging输出的位置,实现控制台和allure报告都有logging日志。
对于print输出,只能输出到控制台或者allure报告中,下面使用-s使print输出到控制台而不是报告,去掉-s即可在allure报告中生成print的日志。
debug等级的日志为python最细的日志,以下设置会让控制台和报告中都有debug、info等日志。
[pytest]
; 在命令行界面(CLI)上打开实时日志监测。
log_cli = true

; 命令行显示的日志为debug及以上
log_cli_level = debug
; 这是一个命令行选项的赋值语句,-v -s 表示输出详细日志包括print,--alluredir ./temp/html为输出的目录
; 这里使用-s则print输出到控制台,否则输出到allure中、
addopts = -v -s --alluredir ./temp/html
; log_cli_format和log_date_format一样是格式规则,如果没有该行则默认使用log_date_format的,可能存在编码异常
log_cli_format = %(asctime)s [%(levelname)s] %(message)s (%(filename)s:%(lineno)s)

;文件显示的日志在debug以上
log_file_level = debug
log_format = %(asctime) s  [%(levelname) 5s] %(message)s [%(filename) s:%(lineno)-4s]
log_date_format = %Y-%m-%d %H:%M:%S
去掉-s效果如图,如果加上-s就只有log这个日志文件:
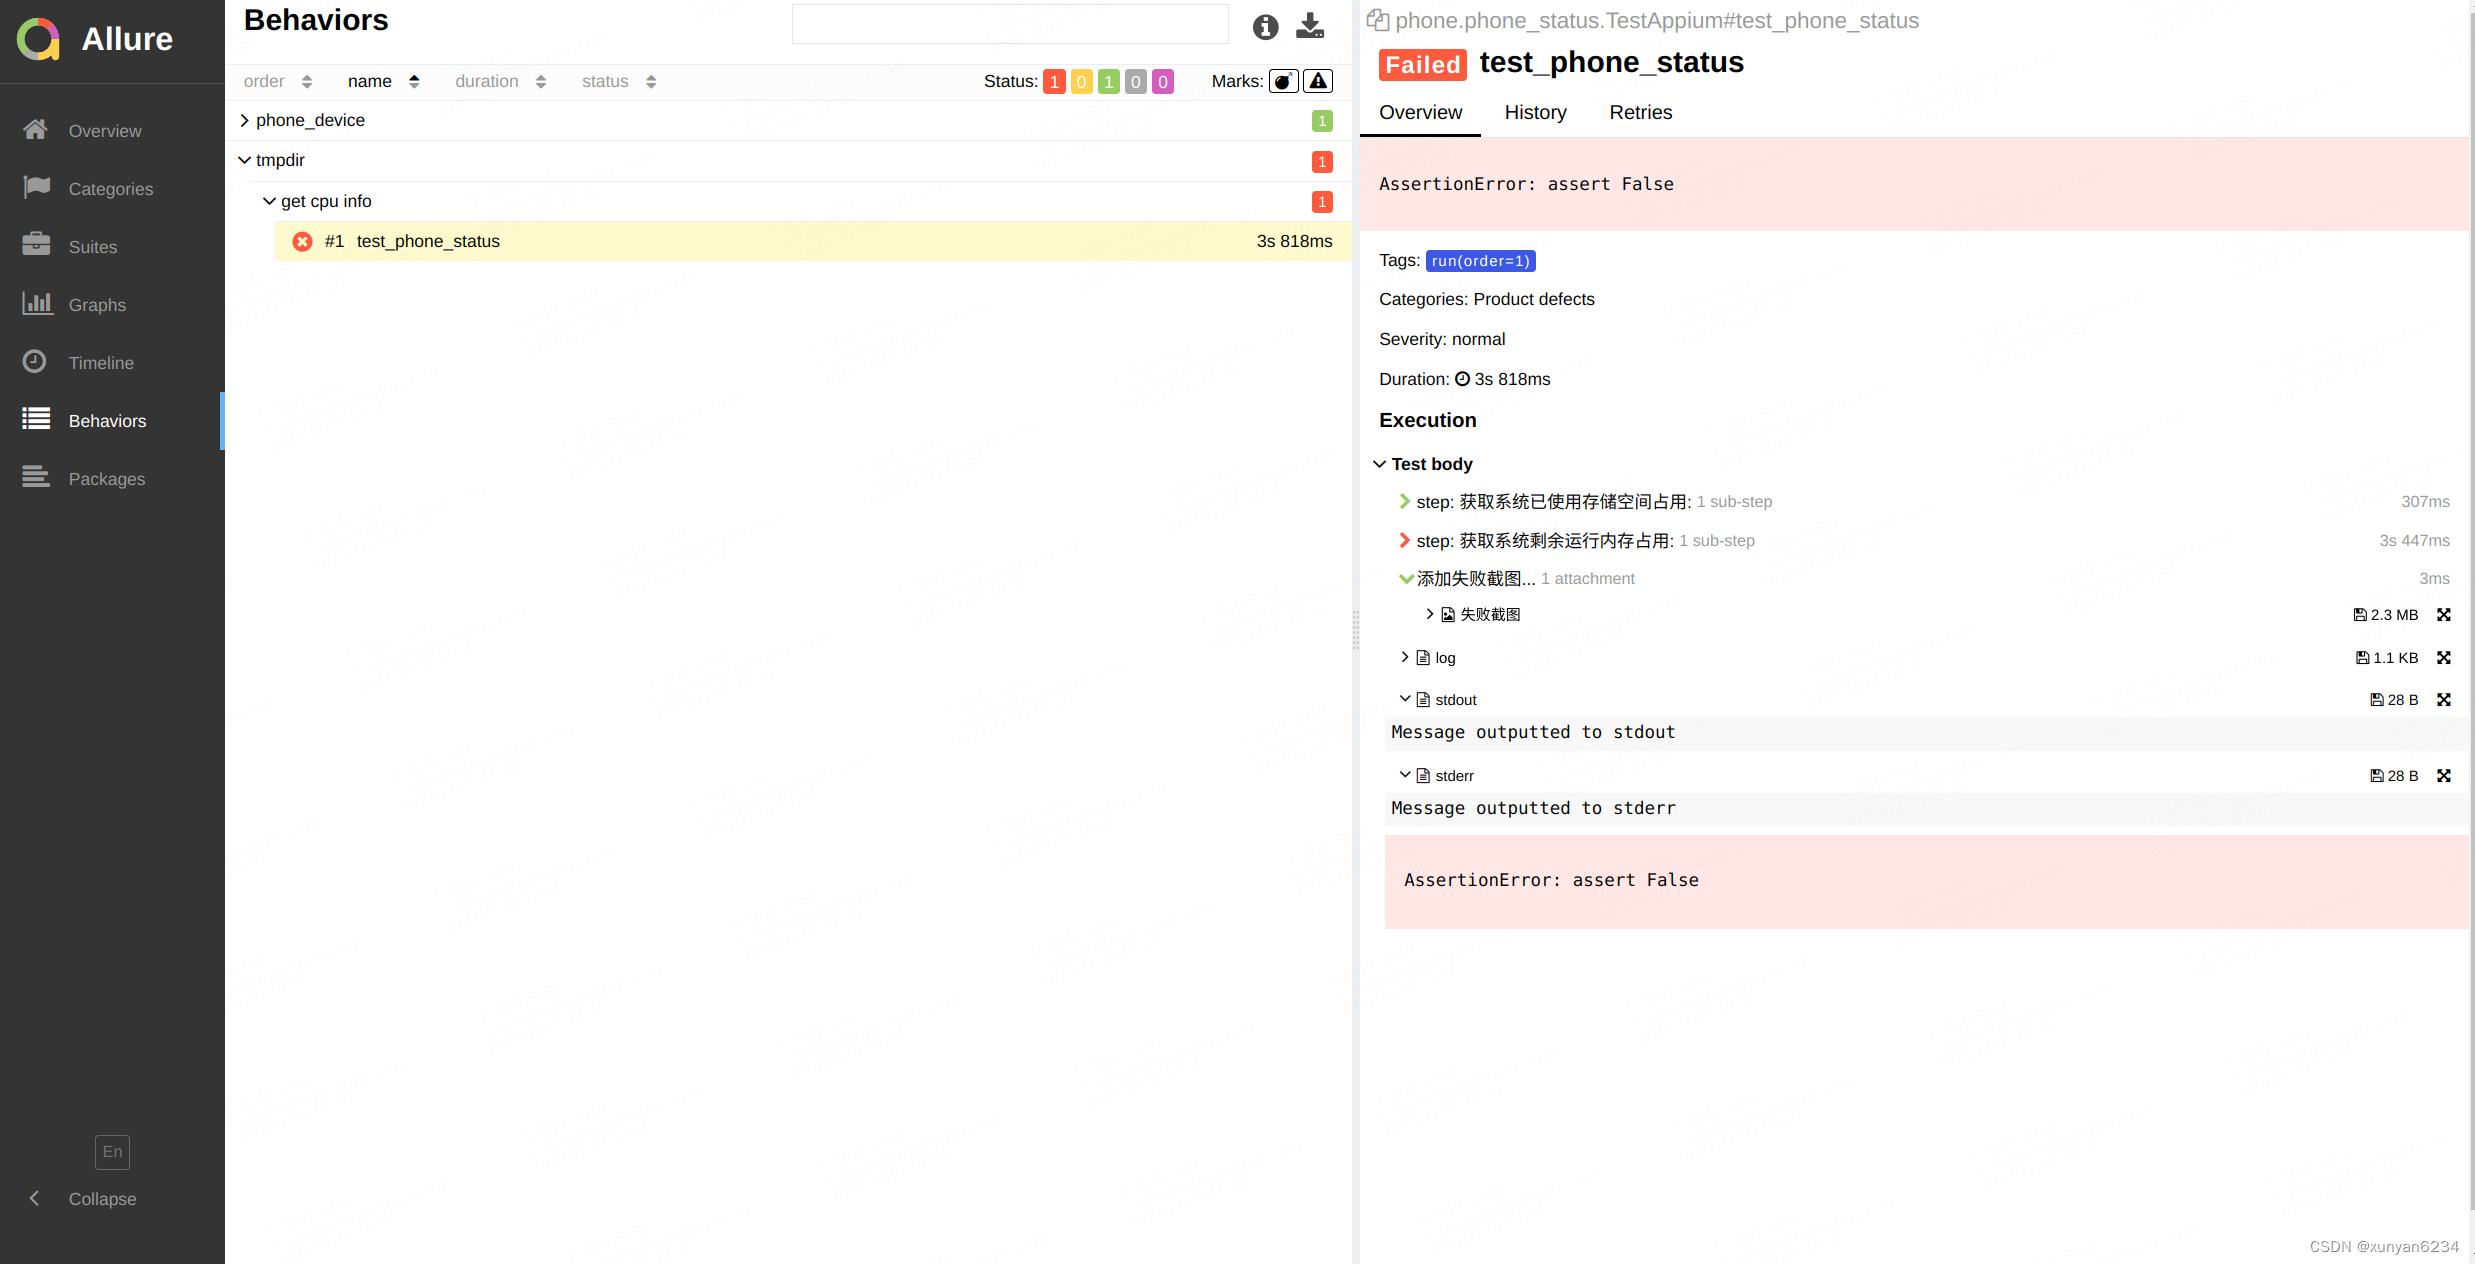
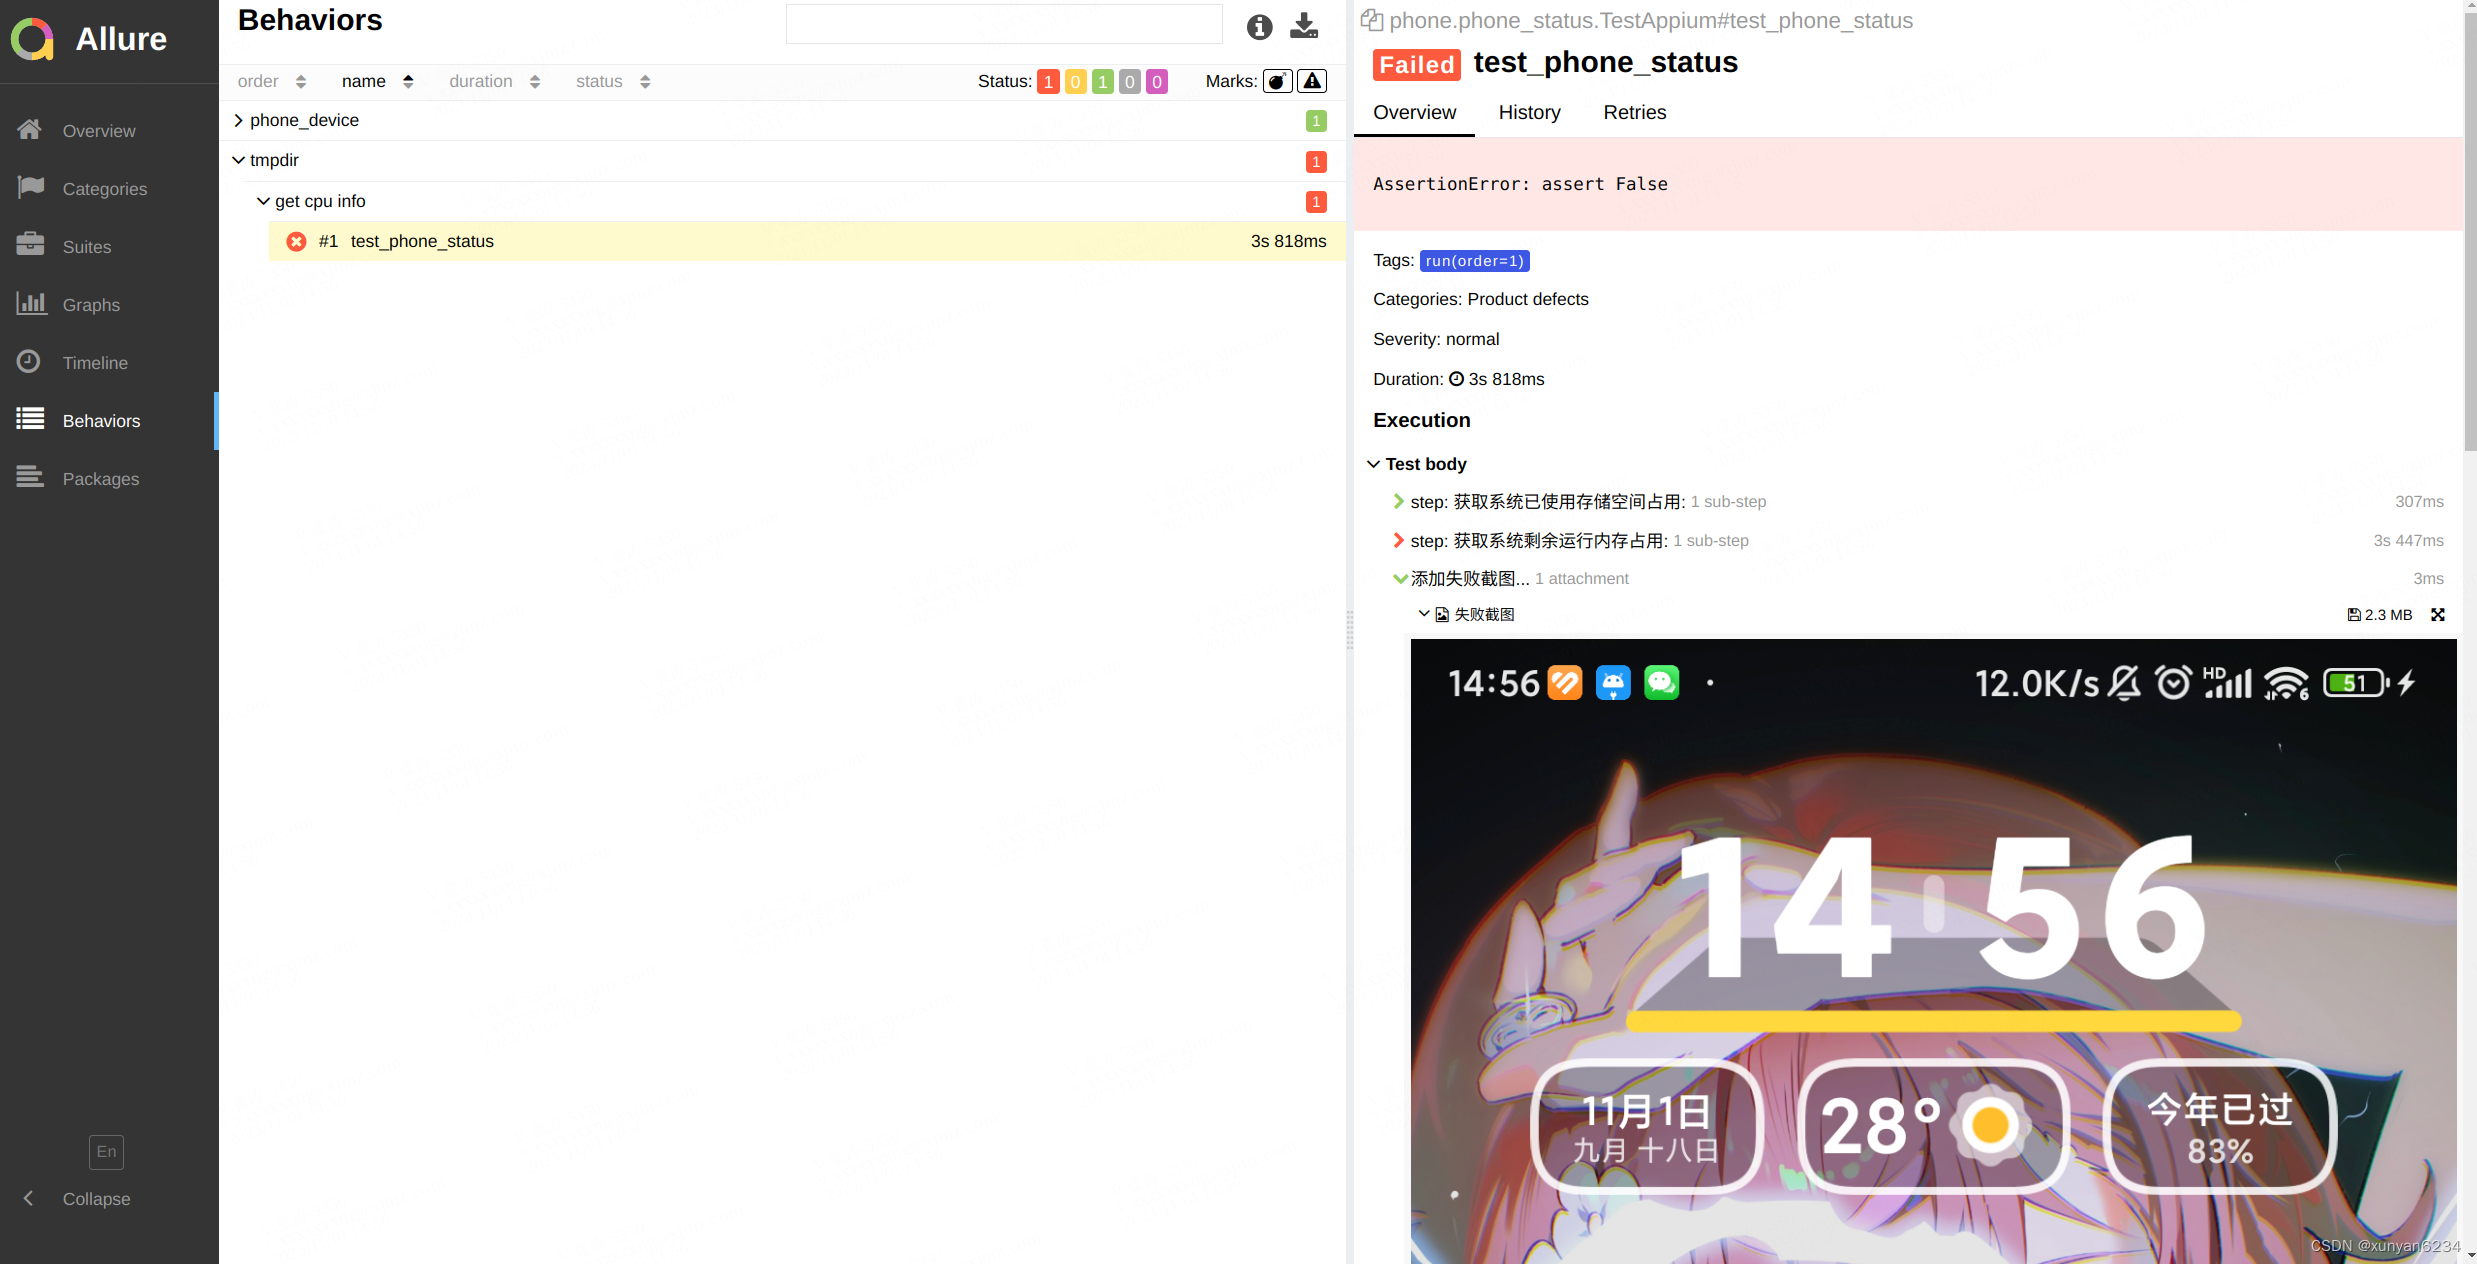
4. allure添加失败截图
4.1 conftest.py文件讲解
该文件主要用来做全局用例共享使用,如参数的共享、测试fixture的定义等,一些初始化的操作通常会放到该文件中,该文件名不能改变,在整个工程中可以有多个,但需要在不同的目录层级下,其应用范围也不一样。
使用pytest_runtest_makereport钩子函数,实现在case执行结束后,获得case的结果。如果case结果failed,则进行截图操作。使用driver截图获取driver会相对改动更多(网上有使用Feature标签传入driver来实现的),这里使用的是adb进行系统截图,然后pull到项目目录,最后显示在报告中的方式。
# @pytest.hookimpl(tryfirst=True, hookwrapper=True)是一个装饰器,
# 它告诉 pytest 将这个函数作为插件钩子实现注册,并确保这个钩子在执行其他测试用例之前优先执行。
# tryfirst=True 表示这个钩子在测试函数执行之前执行,hookwrapper=True 表示这个钩子可以包装其他钩子。
@pytest.hookimpl(tryfirst=True, hookwrapper=True)
def pytest_runtest_makereport(item, call):
    """
    本hook用于在例子错误时,进行截图
    :param item:测试用例对象
    :param call:测试用例的测试步骤
            执行完常规钩子函数返回的report报告有个属性叫report.when
          when=’call’ 代表返回call 的执行结果
          when='setup'  代表返回setup的结果
    """
    outcome = yield   # 创建了一个生成器,yield关键字使得函数变成了一个生成器。
    rep = outcome.get_result()  # 获取生成器的返回结果。
    # when属性可能为"call"、"setup"或"teardown",分别对应用例的执行环节、环境初始化环节和环境清理环节。
    # 代码关注执行环节(即when == "call")并且用例执行失败的情况(即rep.failed)或者跳过部分。
    if rep.when in ('setup', 'call') and rep.outcome in ('failed', 'skipped'):
------------------------------------------------------------------------------------------------------------
# 使用driver方式截图

        if hasattr(_driver, "get_screenshot_as_png"):
            with allure.step('添加失败截图...'):
                allure.attach(_driver.get_screenshot_as_png(), "失败截图", allure.attachment_type.PNG)

        _driver.quit()
------------------------------------------------------------------------------------------------------------
# 使用adb截图
        formatted_date = datetime.now().strftime("%Y_%m_%d_%H_%M_%S")
        image_path = f"/sdcard/{formatted_date}.png"

        # 创建用于存储拉取的图片的文件夹
        output_dir = 'pulled_images'
        if not os.path.exists(output_dir):
            os.makedirs(output_dir)

        # 截图
        os.popen(f"adb shell screencap -p {image_path}")
        time.sleep(1)

        # 将截图提取出来
        os.popen(f"adb pull {image_path} {output_dir}")
        time.sleep(1)

        # 删除设备上的截图
        os.popen(f"adb shell rm {image_path}")

        print(os.getcwd())  # 打印当前工作目录
        if os.path.exists(f"{output_dir}/{formatted_date}.png"):
            with allure.step('添加失败截图...'):
                allure.attach.file(f"{output_dir}/{formatted_date}.png", "失败截图", allure.attachment_type.PNG)
        else:
            print("截图失败")
效果如图:


 2107
2107


 被折叠的 条评论
为什么被折叠?
被折叠的 条评论
为什么被折叠?
 到【灌水乐园】发言


