


什么是输入子系统
输入子系统基本框架
ubuntu@xubuntu:~/share/rk3399/kernel/drivers$ cd inputubuntu@xubuntu:~/share/rk3399/kernel/drivers/input$ ls evdev.*evdev.c evdev.o # 编译过了ubuntu@xubuntu:~/share/rk3399/kernel/drivers/input$ ls input.*input.c input.o # 编译过了ubuntu@xubuntu:~/share/rk3399/kernel/drivers/input$
设备驱动层:自己写驱动。
编写一个简单的按键输入子系统驱动框架
1.确保 input 子系统中的 handler 层和 core 层的源代码被编译进了内核镜像中。
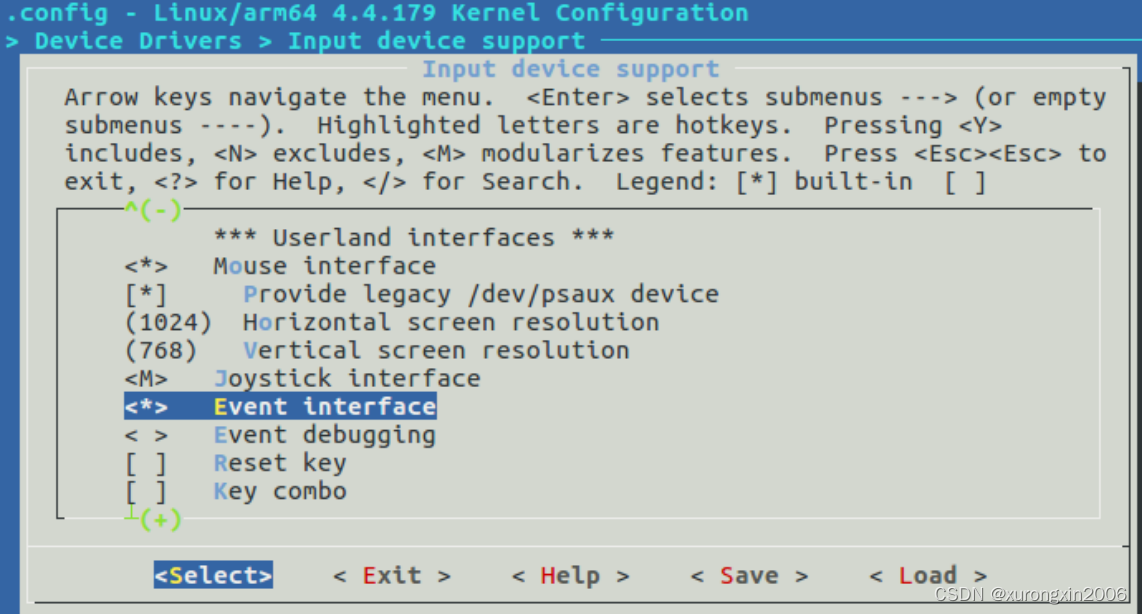
make menuconfigDevice Drivers --->Input device support ---> //核心层: drivers/input/input.c<*> Event interface // handler 层: drivers/input/evdev.c
ubuntu@xubuntu:~/share/rk3399/kernel/drivers/input$ ls input*
input.c input-compat.h input-core.o input-leds.o input-mt.o input-polldev.cinput-compat.c input-compat.o input-leds.c input-mt.c input.o input-polldev.oubuntu@xubuntu:~/share/rk3399/kernel/drivers/input$ ls evdev.*evdev.c evdev.o
默认已编译进内核了
2.编写驱动程序
// button_input_drv.c
/*
	pwr_button {
		compatible = "rk3399,power-button";
		gpios = <&gpio0 5 GPIO_ACTIVE_LOW>;
		interrupt-parent = <&gpio0>;//对应的上级中断控制器是 gpio0
		interrupts = <5 IRQ_TYPE_EDGE_BOTH>; //中断号 触发方式 GPIO0 A5
	};

*/


#include <linux/init.h>
#include <linux/module.h>
#include <linux/platform_device.h>
#include <linux/of.h> // of
#include <linux/of_gpio.h> //gpio
#include <linux/gpio.h>
#include <dt-bindings/gpio/gpio.h>
#include <linux/fs.h>
#include <linux/device.h>
#include <linux/slab.h>
#include <linux/gpio.h>
#include <linux/interrupt.h>
#include <linux/input.h>


static int gpio_button;//引脚号
static int irqno;//中断号
//1.声明一个输入设备对象
static struct input_dev *button_dev;

static irqreturn_t button_handler(int irq, void *dev)
{
	int value;
	value = gpio_get_value(gpio_button);
	if(value) {
		input_report_key(button_dev, KEY_A, 0);//上报 键码 松开
	} else {
		input_report_key(button_dev,KEY_A, 1);//上报 键码 按下
	}
	input_sync(button_dev); //上报完毕
	printk("call %s() @ %d\n ", __func__, __LINE__);
	return IRQ_HANDLED;
}

//当驱动和设备树节点匹配时调用 参数pdev就是设备层定义的pdev对象
static int button_drv_probe(struct platform_device *pdev)
{
	int ret;
	enum of_gpio_flags flags;
	//获得匹配的device_node对象
	struct device_node *button_ctrl_node = pdev->dev.of_node;

	//2.分配一个 input_device 对象的空间
	button_dev = input_allocate_device();
	if (!button_dev) {
		printk("input_allocate_device fail\n");
		return -ENOMEM;
	}

	//3.初始化 input device 对象
	//set_bit(EV_KEY, button_dev->evbit); //设置输入设备产生的事件类型:EV_KEY 按键事件
	button_dev->evbit[0]=BIT_MASK(EV_KEY); //支持按键


	//set_bit(KEY_A, button_dev->keybit); //设置输入设备产生的按键键码:'A'
	button_dev->keybit[BIT_WORD(KEY_A)] = BIT_MASK(KEY_A); // 键 码A
	//设置调试信息
	button_dev->name = "xyd power key button";
	button_dev->phys = "rk3399 power key";
	button_dev->id.vendor= 0x20;
	button_dev->id.product = 48;
	button_dev->id.version =0x100;


	//4.注册 input device 对象到系统中
	ret = input_register_device(button_dev);
	if(ret) {
		printk("input_register_device fail\n");
		goto err_input_register_device;
	}

	//5.硬件的初始化,申请中断
	//获取引脚号,有效电平
	gpio_button = of_get_named_gpio_flags(button_ctrl_node, "gpios", 0, &flags);
	if (gpio_is_valid(gpio_button)) { //引脚号验证是否有效
		printk("gpio_button=%d\n", gpio_button);
	} else {
		printk("of_get_named_gpio_flags fail\n");
		ret= -EFAULT;
		goto err_request_irq;
	}

	//获取中断号
	irqno = gpio_to_irq(gpio_button);
	//申请中断
	ret = request_irq(irqno, button_handler,IRQ_TYPE_EDGE_BOTH , "power_key_irq", NULL);
	if (ret) {
		printk("request_irq fail\n");
		goto err_request_irq;
	}

	printk("call %s() @ %d\n ", __FUNCTION__, __LINE__);

	return 0;

err_request_irq:
	input_unregister_device(button_dev);
err_input_register_device:
	input_free_device(button_dev);
	return ret;

}

//驱动和设备分离时调用
static int button_drv_remove(struct platform_device *pdev)
{

	free_irq(irqno, NULL);
	input_unregister_device(button_dev);
	input_free_device(button_dev);
	printk("<kernel> call %s()\n", __func__);
	return 0;
}

static const struct platform_device_id button_platform_ids[] = {
	{
		.name	= "rk3288_button",
		.driver_data = 0x1,
	},{
		.name	= "rk3399_button",
		.driver_data = 0x2,
	}

};

static const struct of_device_id button_ctrl_match_table[] = {
	{ .compatible = "rk3399,power-button", }, //非常关键
	{}
};


static struct platform_driver rk_button_driver = {
	.probe = button_drv_probe,
	.remove  = button_drv_remove,
	.driver = {
		.name = "rk_button", //驱动名字
		.of_match_table = button_ctrl_match_table,
	},
	.id_table = button_platform_ids,//驱动可操作的设备
};

static int __init driver_mod_init(void)
{
	printk("<kernel> call %s()\n", __func__);
	return platform_driver_register(&rk_button_driver);
}

static void __exit driver_mod_exit(void)
{
	printk("<kernel> call %s()\n", __func__);

	platform_driver_unregister(&rk_button_driver);
}

module_init(driver_mod_init);
module_exit(driver_mod_exit);
MODULE_LICENSE("GPL");
// button_input_test.c
/*
	用来测试button_drv驱动的应用程序
	设备文件名: /dev/input/event5

	读取power key的键值

	键码: A B
	键值: 按下、松开

*/

#include <stdio.h>
#include <stdlib.h>
#include <unistd.h>
#include <sys/types.h>
#include <sys/stat.h>
#include <fcntl.h>
#include <string.h>
#include <sys/ioctl.h>
#include <linux/input.h>
#include <errno.h>

struct input_event ev_button; //创建接收用的输入事件对象
int main(int argc, char **argv)
{
	int fd;
	int on=0;
	int ret;
	if(argc!=2) {
		printf("usage: %s /dev/input/eventx \n",argv[0]);
		exit(1);
	}
	fd = open(argv[1], O_RDWR);
	if(fd < 0) {
		perror("open");
		exit(1);
	}
	#if 1
	while (1) {
		bzero(&ev_button, sizeof(ev_button));
		ret = read(fd, &ev_button, sizeof(ev_button));
		if(ret<0) {
			perror("read");
			exit(1);
		}
		if (ev_button.type == EV_KEY) { //判断事件类型
			if (ev_button.code == KEY_A) {
				if(ev_button.value) {
					printf("power key pressed\n");
				} else {
					printf("power key release\n");
				}
			}
		}

	}
	#endif
	close(fd);
	return 0;
}root@SOM-RK3399v2:/drv_module# lsbutton_input_drv.ko button_input_testroot@SOM-RK3399v2:/drv_module# insmod button_input_drv.ko[ 1276.300800] input: Unspecified device as /devices/virtual/input/input7[ 1276.302922] <ron> call button_drvier_init()[rootrk3399:/drv_code]#lsbutton_drv.ko button_test[root@rk3399:/drv_code]# ./button_test/dev/input/event3^C # 无结果 , 没找对设备节点 , 查看[root@rk3399:/drv_code]# cat /proc/bus/input/devicesI: Bus=0000 Vendor=1234 Product=5678 Version=0011N: Name="xskj input button"P: Phys=gpio-keyS: Sysfs=/devices/virtual/input/input0U: Uniq=H: Handlers=kbd event5B: PROP=0B: EV=3B: KEY=8000000000 0I:Bus=0019Vendor=0001Product=0001Version=0100N:Name="ff420030.pwm"P:Phys=gpio-keys/remotectlS:Sysfs=/devices/platform/ff420030.pwm/input/input1U:Uniq=H:Handlers=kbdevent1root@SOM-RK3399v2:/drv_module# ls /dev/input/event5 -al # 自动创建设备节点crw-rw---- 1 root input 13, 69 May 28 01:38 /dev/input/event5root@SOM-RK3399v2:/drv_module# ./button_input_testopen: Bad addressroot@SOM-RK3399v2:/drv_module# ./button_input_test /dev/input/event5[ 1325.655662] <robin> call button_handler()power key pressed
驱动开发用到的结构体和函数
1.struct input_dev 结构体
struct input_dev ----->struct input_dev 用来描述一个输入设备
{
     const char *name; /*设备名字*/
     const char *phys;
     struct input_id id; /*用来匹配事件处理层*/
     unsigned long evbit[NBITS(EV_MAX)]; /*表示能产生哪类事件*/
     unsigned long keybit[NBITS(KEY_MAX)]; /*表示能产生哪些按键事件*/
     unsigned long relbit[NBITS(REL_MAX)]; /*表示能产生哪些相对位移事件,一般鼠标不采用绝对坐标系统*/
     unsigned long absbit[NBITS(ABS_MAX)]; /*表示能产生哪些绝对位移事件,用于摇杆,数字仪*/
     unsigned long mscbit[NBITS(MSC_MAX)]; /*其他事件*/
     unsigned long ledbit[NBITS(LED_MAX)]; /*LEDs 事件*/
     unsigned long sndbit[NBITS(SND_MAX)]; /*音频输入事件*/
     unsigned long ffbit[NBITS(FF_MAX)]; /*Force feedback 事件*/
     unsigned long swbit[NBITS(SW_MAX)];
     unsigned int keycodemax; /*支持按键值得个数*/
     unsigned int keycodesize; /*每个键值的字节数*/
     void *keycode; /*存储按键值的数组首地址*/
     /*修改键值的函数,可选*/
     int (*setkeycode)(struct input_dev *dev, int scancode, int keycode);
     /*获取扫描码的键值,可选*/
     int (*getkeycode)(struct input_dev *dev, int scancode, int *keycode);
     unsigned int repeat_key; /*最近一次按键值,用于连击*/
     struct timer_list timer; /*自动连击计时器*/
     int sync; /*最后一次同步后没有新的事件置 1*/
     int abs[ABS_MAX + 1]; /*当前各个坐标的值*/
     int rep[REP_MAX + 1]; /*自动连击的参数*/
     struct list_head h_list; /*handle 链表*/
     struct list_head node; /*input_dev 链表*/
     ....
     ....
}unsigned long evbit[NBITS(EV_MAX)]; // 能产生哪类事件 每一种类型的事件都
在 input_dev.evbit 中用一个位来表示,构成
//一个位图,某位为 1 表示该输入设备支持这类事件,否则不支持. 可查看 EV_MAX 宏可知
支持 10 多种类型
unsigned long keybit[NBITS(KEY_MAX)]; // 能产生哪些按键
unsigned long relbit[NBITS(REL_MAX)]; // 能产生哪些相对位移: x,y,z
unsigned long absbit[NBITS(ABS_MAX)]; // 能产生哪些绝对位移: x,y,z
buttons_dev->evbit[0] |= BIT(EV_KEY); /* 能产生按键类事件 */struct input_dev *input_allocate_device(void) 分配输入设备
void input_free_device(struct input_dev *dev) 释放输入设备
int input_register_device(struct input_dev *dev) 注册输入设备,返回值为 0 成功
void input_unregister_device(struct input_dev *dev) 注销输入设备struct input_event {struct timeval time; //时间戳__u16 type; //事件类型__u16 code; //事件代码__s32 value; //事件值,如坐标的偏移值 如果是按键 0 松开 ,1 按下};
代码分析:
原则
1.两条主线
2.见名之意 函数名 宏名 猜是什么功能
3.搜索引擎===================================
1.看分层1.1看自己写的驱动层
ret = input_register_device(button_dev);
|
|
list_add_tail(&dev->node, &input_dev_list);//输入设备dev加入链表input_dev_list
list_for_each_entry(handler, &input_handler_list, node)
input_attach_handler(dev, handler);//搜索input_handler_list链表,每搜索一个handler
//调用input_attach_handler
|
|
id = input_match_device(handler, dev);//输入设备dev和handler事件处理器匹配
error = handler->connect(handler, dev, id);//匹配成功调用connect函数指针
//谁来定义这个函数???
1.2看事件处理层 evdev.cinput_register_handler(&evdev_handler);
|
|
list_add_tail(&handler->node, &input_handler_list);//handler事件处理对象加入链表input_handler_list
list_for_each_entry(dev, &input_dev_list, node)//搜索input_dev_list链表,每搜索一个dev
input_attach_handler(dev, handler);
|
|
id = input_match_device(handler, dev);//输入设备dev和handler事件处理器匹配
error = handler->connect(handler, dev, id);//匹配成功调用connect函数指针
小结:
dev和handler匹配最终会调用connect函数
这个connect函数的定义是在evdev.c evdev_connect函数中实现
//evdev_handler对象是evdev.c创建的
static struct input_handler evdev_handler = {
.event = evdev_event,
.events = evdev_events,
.connect = evdev_connect,
.disconnect = evdev_disconnect,
.legacy_minors = true,
.minor = EVDEV_MINOR_BASE,
.name = "evdev",
.id_table = evdev_ids,
};//本地结构体
struct evdev {
int open;
struct input_handle handle;//保存 dev和handler相关信息
wait_queue_head_t wait;
...
struct list_head client_list;
...
struct device dev;
struct cdev cdev;
};
.connect = evdev_connect,
static int evdev_connect(struct input_handler *handler, struct input_dev *dev,
const struct input_device_id *id)
|
|
minor = input_get_new_minor(EVDEV_MINOR_BASE, EVDEV_MINORS, true);//申请次设备号
//从64开始分配 最多32个 minor=0----31
evdev = kzalloc(sizeof(struct evdev), GFP_KERNEL);
init_waitqueue_head(&evdev->wait); //初始化等待队列
dev_no = minor;
dev_set_name(&evdev->dev, "event%d", dev_no); //设备文件名 eventx
//初始化handle对象
evdev->handle.dev = input_get_device(dev);
evdev->handle.name = dev_name(&evdev->dev);
evdev->handle.handler = handler;
evdev->handle.private = evdev;
//创建设备文件准备的
evdev->dev.devt = MKDEV(INPUT_MAJOR, minor);
evdev->dev.class = &input_class;
evdev->dev.parent = &dev->dev;
evdev->dev.release = evdev_free;
device_initialize(&evdev->dev);
//初始化handle对象
error = input_register_handle(&evdev->handle);
//字符设备驱动注册
cdev_init(&evdev->cdev, &evdev_fops);
error = cdev_add(&evdev->cdev, evdev->dev.devt, 1);
// 创建设备文件
error = device_add(&evdev->dev);
/*
参考
device_create
device_initialize(dev)
retval = device_add(dev);
*/
1.3看核心层 input.c
__init input_init(void)
|
|
err = class_register(&input_class); // sys/class
err = input_proc_init(); //cat /proc/bus/input/devices
err = register_chrdev_region(MKDEV(INPUT_MAJOR, 0),
INPUT_MAX_CHAR_DEVICES, "input");//申请主设备号
2.应用和驱动调用关系
应用===》驱动open(argv[1], O_RDWR)
|
|
sys_open
|
|
evdev_open
|
|
struct evdev *evdev = container_of(inode->i_cdev, struct evdev, cdev);//注册cdev找到本地对象evdev
struct evdev_client *client;
client = kzalloc(size, GFP_KERNEL | __GFP_NOWARN);
client->evdev = evdev;//保存evdev到client对象中
file->private_data = client;//将client保存私有数据对象中
static const struct file_operations evdev_fops = {
.owner = THIS_MODULE,
.read = evdev_read,
.write = evdev_write,
.poll = evdev_poll,
.open = evdev_open,
.release = evdev_release,
.unlocked_ioctl = evdev_ioctl,
#ifdef CONFIG_COMPAT
.compat_ioctl = evdev_ioctl_compat,
#endif
.fasync = evdev_fasync,
.flush = evdev_flush,
.llseek = no_llseek,
};//读输入设备的函数
static ssize_t evdev_read(struct file *file, char __user *buffer,
size_t count, loff_t *ppos)
|
|
struct evdev_client *client = file->private_data;//读私有数据的client对象
struct evdev *evdev = client->evdev;
input_event_to_user(buffer + read, &event); //拷贝数据到用户空间
if (!(file->f_flags & O_NONBLOCK)) {
error = wait_event_interruptible(evdev->wait, //休眠
client->packet_head != client->tail ||
!evdev->exist || client->revoked);
if (error)
return error;
}
//硬件产生中断
input_report_key(button_dev, KEY_A, 0);//上报 键码 松开
|
|
input_event
|
|
if (handler->events)
handler->events(handle, vals, count);
else if (handler->event)
for (v = vals; v != vals + count; v++)
handler->event(handle, v->type, v->code, v->value);
实际上是调用
static struct input_handler evdev_handler = {
.event = evdev_event,
.events = evdev_events,}
|
|
if (wakeup)
wake_up_interruptible(&evdev->wait);


 1096
1096


 被折叠的 条评论
为什么被折叠?
被折叠的 条评论
为什么被折叠?
 到【灌水乐园】发言


