


hive的部署是要基于hadoop的,hadoop的安装部署请参考另外一篇博客。
基于虚拟机搭建Hadoop大数据平台集群![]() https://mp.csdn.net/mp_blog/creation/editor/104598362
https://mp.csdn.net/mp_blog/creation/editor/104598362
(1)hive安装包下载
百度搜索hive,找到官网。
hive官网![]() http://hive.apache.org进入下载网址,本次以3.1.3版本为案例进行介绍。
http://hive.apache.org进入下载网址,本次以3.1.3版本为案例进行介绍。
Index of /hive/hive-3.1.3![]() https://dlcdn.apache.org/hive/hive-3.1.3/下载安装包。
https://dlcdn.apache.org/hive/hive-3.1.3/下载安装包。
apache-hive-3.1.3-bin.tar.gz
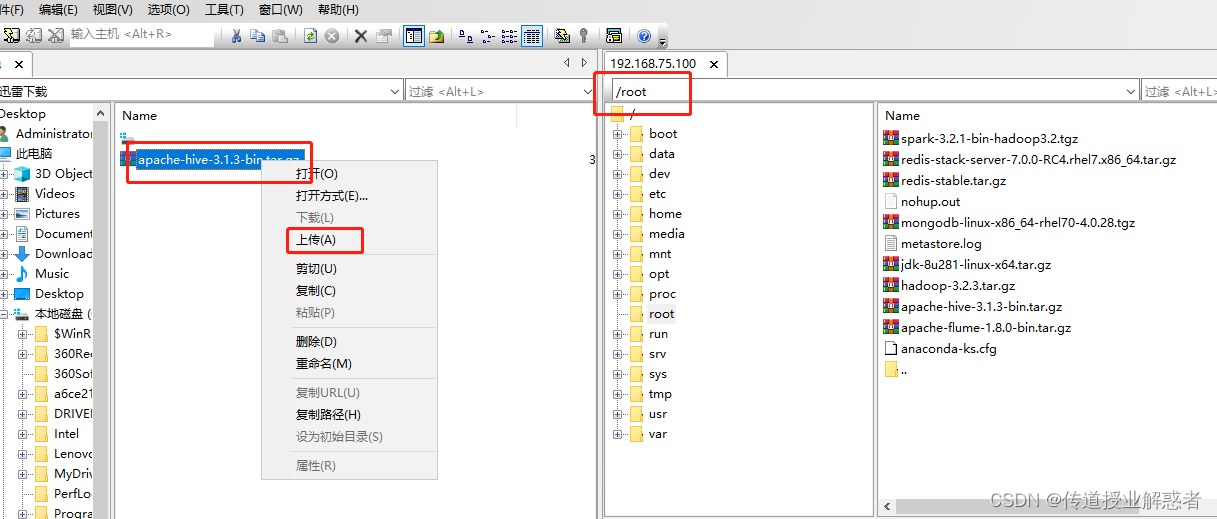
(2)安装包上传到虚拟机。
通过终端工具,把安装包上传到虚拟机/root目录下。
(3)解压安装
# tar -zxvf /root/apache-hive-3.1.3-bin.tar.gz -C /usr/local/
# mv /usr/local/apache-hive-3.1.3-bin /usr/local/hive
(4)配置环境变量
# vi /etc/profile在最底部增加一行:
export HIVE_HOME=/usr/local/hive
修改一行:
export PATH=$HIVE_HOME/bin:$PATH
# source /etc/profile(5)验证hive版本
#hive --version输出如下内容即表示成功。
[root@master ~]# hive --version
SLF4J: Class path contains multiple SLF4J bindings.
SLF4J: Found binding in [jar:file:/usr/local/hive/lib/log4j-slf4j-impl-2.17.1.jar!/org/slf4j/impl/StaticLoggerBinder.class]
SLF4J: Found binding in [jar:file:/usr/hadoop-3.2.3/share/hadoop/common/lib/slf4j-log4j12-1.7.25.jar!/org/slf4j/impl/StaticLoggerBinder.class]
SLF4J: See http://www.slf4j.org/codes.html#multiple_bindings for an explanation.
SLF4J: Actual binding is of type [org.apache.logging.slf4j.Log4jLoggerFactory]
Hive 3.1.3
Git git://MacBook-Pro.fios-router.home/Users/ngangam/commit/hive -r 4df4d75bf1e16fe0af75aad0b4179c34c07fc975
Compiled by ngangam on Sun Apr 3 16:58:16 EDT 2022
From source with checksum 5da234766db5dfbe3e92926c9bbab2af
(6)安装mariadb mariadb-server 及mysql-connector-java
# yum install mariadb mariadb-server mysql-connector-java -y(7)启动mariadb并进行初始化安装配置。
# systemctl start mariadb
# systemctl enable mariadb
# mysql_secure_installation执行过程中,需要严格按照如下提示进行操作:
[root@master ~]# mysql_secure_installation
NOTE: RUNNING ALL PARTS OF THIS SCRIPT IS RECOMMENDED FOR ALL MariaDB
SERVERS IN PRODUCTION USE! PLEASE READ EACH STEP CAREFULLY!
In order to log into MariaDB to secure it, we'll need the current
password for the root user. If you've just installed MariaDB, and
you haven't set the root password yet, the password will be blank,
so you should just press enter here.
Enter current password for root (enter for none): 第一次交互,直接回车。
OK, successfully used password, moving on...
Setting the root password ensures that nobody can log into the MariaDB
root user without the proper authorisation.
Set root password? [Y/n] y 第二次交互,输入 y 设置密码
New password: 输入密码:bigdata
Re-enter new password: 再次输入密码:bigdata
Password updated successfully!
Reloading privilege tables..
... Success!
By default, a MariaDB installation has an anonymous user, allowing anyone
to log into MariaDB without having to have a user account created for
them. This is intended only for testing, and to make the installation
go a bit smoother. You should remove them before moving into a
production environment.
Remove anonymous users? [Y/n] y 输入 y
... Success!
Normally, root should only be allowed to connect from 'localhost'. This
ensures that someone cannot guess at the root password from the network.
Disallow root login remotely? [Y/n] n 输入n
... skipping.
By default, MariaDB comes with a database named 'test' that anyone can
access. This is also intended only for testing, and should be removed
before moving into a production environment.
Remove test database and access to it? [Y/n] y 输入y
- Dropping test database...... Success!
- Removing privileges on test database...... Success!
Reloading the privilege tables will ensure that all changes made so far
will take effect immediately.
Reload privilege tables now? [Y/n] y 输入y
... Success!
Cleaning up...
All done! If you've completed all of the above steps, your MariaDB
installation should now be secure.
Thanks for using MariaDB!
(8)配置hive
8.1 hive-env.sh文件
# cd /usr/local/hive/conf/
# cp hive-env.sh.template hive-env.sh
# vi hive-env.sh在hive-env.sh中最后增加三行内容,其中等号右边的路径一定要按照自己实际的路径进行修改。
export HADOOP_HOME=/usr/local/hadoop-3.2.2
export HIVE_CONF_DIR=/usr/local/hive/conf
export HIVE_AUX_JARS_PATH=/usr/local/hive/lib
8.2 hive-site.xml文件
# cp hive-default.xml.template hive-site.xml
修改方式:
先下载到windows本地,用文本编辑器(editplus notepad++ 记事本)进行修改,然后修改完成后,再上传到源路径。
 ①582行开始
<property>
<name>javax.jdo.option.ConnectionURL</name>
<value>jdbc:mysql://master:3306/hive?createDatabaseIfNotExist=true</value>
<description>
JDBC connect string for a JDBC metastore.
To use SSL to encrypt/authenticate the connection, provide database-specific SSL flag in the connection URL.
For example, jdbc:postgresql://myhost/db?ssl=true for postgres database.
</description>
</property>
②1100行
<property>
<name>javax.jdo.option.ConnectionDriverName</name>
<value>com.mysql.jdbc.Driver</value>
<description>Driver class name for a JDBC metastore</description>
</property>
③1125行
<property>
<name>javax.jdo.option.ConnectionUserName</name>
<value>root</value>
<description>Username to use against metastore database</description>
</property>
④567行
<property>
<name>javax.jdo.option.ConnectionPassword</name>
<value>bigdata</value>
<description>password to use against metastore database</description>
</property>
⑤796行
<property>
<name>hive.metastore.schema.verification</name>
<value>false</value>
<description>
Enforce metastore schema version consistency.
True: Verify that version information stored in is compatible with one from Hive jars.  Also disable automatic
schema migration attempt. Users are required to manually migrate schema after Hive upgrade which ensures
proper metastore schema migration. (Default)
False: Warn if the version information stored in metastore doesn't match with one from in Hive jars.
</description>

⑥460行
<property>
<name>hive.metastore.uris</name>
<value>thrift://master:9083</value>
<description>Thrift URI for the remote metastore. Used by metastore client to connect to remote metastore.</description>
</property>

⑦4147行
<property>
<name>hive.server2.thrift.bind.host</name>
<value>master</value>
<description>Bind host on which to run the HiveServer2 Thrift service.</description>
</property>

⑧将以下位置的 ${system:java.io.tmpdir}/${system:user.name} 替换为 “/usr/local/src/hive/tmp”目录及其子目录。

<name>hive.querylog.location</name>
<value>/usr/local/src/hive/tmp</value>
<description>Location of Hive run time structured log file</description>
<name>hive.exec.local.scratchdir</name>
<value>/usr/local/src/hive/tmp</value>
<name>hive.downloaded.resources.dir</name>
<value>/usr/local/src/hive/tmp/resources</value>
<name>hive.server2.logging.operation.log.location</name>
<value>/usr/local/src/hive/tmp/operation_logs</value>
其中3215行有个隐藏bug。
<description>
Ensures commands with OVERWRITE (such as INSERT OVERWRITE) acquire Exclusive locks fortransactional tables. This ensures that inserts (w/o overwrite) running concurrently
are not hidden by the INSERT OVERWRITE.
</description>
要把上面红色字体的内容删除掉,否则在初始化hive数据库时,会保存。
(9)解决jar包版本不一致的问题。
guava 包hadoop和hive的版本不一致,复制hadoop下的一份到hive中,删除hive中的低版本。
# cp /usr/local/hadoop-3.2.2/share/hadoop/hdfs/lib/guava-27.0-jre.jar /usr/local/hive/lib/
# rm -rf /usr/local/hive/lib/guava-19.0.jar
(10)mysql-connector-java 包复制一份到hive中
# cp /usr/share/java/mysql-connector-java.jar /usr/local/hive/lib(11)初始化hive数据库
# schematool -initSchema -dbType mysql -verbose(12)开启metastore服务。后台启动方式。
# nohup hive --service metastore > metastore.log 2>&1 &(13)验证,执行hive命令,能正常进入hive即表示成功。
# hiveSLF4J: Class path contains multiple SLF4J bindings.
SLF4J: Found binding in [jar:file:/usr/local/hive/lib/log4j-slf4j-impl-2.17.1.jar!/org/slf4j/impl/StaticLoggerBinder.class]
SLF4J: Found binding in [jar:file:/usr/hadoop-3.2.3/share/hadoop/common/lib/slf4j-log4j12-1.7.25.jar!/org/slf4j/impl/StaticLoggerBinder.class]
SLF4J: See http://www.slf4j.org/codes.html#multiple_bindings for an explanation.
SLF4J: Actual binding is of type [org.apache.logging.slf4j.Log4jLoggerFactory]
which: no hbase in (/usr/local/hive/bin:/usr/jdk64/jdk1.8.0_281/bin:/usr/hadoop-3.2.3/bin:/usr/local/apache-flume-1.8.0-bin/bin:/usr/jdk64/jdk1.8.0_281/bin:/usr/local/sbin:/usr/local/bin:/usr/sbin:/usr/bin:/root/bin)
SLF4J: Class path contains multiple SLF4J bindings.
SLF4J: Found binding in [jar:file:/usr/local/hive/lib/log4j-slf4j-impl-2.17.1.jar!/org/slf4j/impl/StaticLoggerBinder.class]
SLF4J: Found binding in [jar:file:/usr/hadoop-3.2.3/share/hadoop/common/lib/slf4j-log4j12-1.7.25.jar!/org/slf4j/impl/StaticLoggerBinder.class]
SLF4J: See http://www.slf4j.org/codes.html#multiple_bindings for an explanation.
SLF4J: Actual binding is of type [org.apache.logging.slf4j.Log4jLoggerFactory]
Hive Session ID = 427fdf24-6835-40b6-8b9b-9316db6fe3e2
Logging initialized using configuration in jar:file:/usr/local/hive/lib/hive-common-3.1.3.jar!/hive-log4j2.properties Async: true
Hive-on-MR is deprecated in Hive 2 and may not be available in the future versions. Consider using a different execution engine (i.e. spark, tez) or using Hive 1.X releases.
Hive Session ID = f94ef6b0-d359-40a4-b0dc-77a0350b910b
hive> show databases;
OK
default
test
Time taken: 0.918 seconds, Fetched: 2 row(s)
hive>
(14)实现分布式部署,把master节点hive的安装文件及环境变量配置文件复制到另外一个节点上。
# scp -r /usr/local/hive/ slave1:/usr/local/
# scp /etc/profile slave1:/etc/
(15)用终端连接工具连接slave1节点。
重新加载环境变量配置文件。
# source /etc/profile修改从节点slave1上的hive-site.xml
#vi /usr/local/hive/conf/hive-site.xml<property>
<name>hive.metastore.uris</name>
<value>thrift://master:9083</value>
</property>
启动hive服务。
# nohup hive --service metastore > metastore.log 2>&1 &输入hive命令。
# hive能正常进入hive即表示成功。
----------------------------------------------
*********************
安装过程中,如果有什么问题,请关注我,并及时留言,作者看到会及时回复的。


 1977
1977


 被折叠的 条评论
为什么被折叠?
被折叠的 条评论
为什么被折叠?
 到【灌水乐园】发言


