


要实现上面的效果流程如下
- 1,获取4个随机数
- 2,将4个随机数绘制出来,并随机着色
- 3,绘制障碍
实现流程:
- 1,创建一个Bitmap
- 2,在Bitmap上绘制我们随机数并且着色
- 3,在View的onDraw里将我们准备好的Bitmap绘制出来
核心代码:
 Bitmap mBitmap = Bitmap.createBitmap(width, height,     Bitmap.Config.ARGB_8888);
        Canvas mCanvas = new Canvas(mBitmap);//在这个bitmap上绘制验证码
        Paint mPaint = new Paint();//画笔
        Matrix mMatrix = new Matrix();//3*3矩阵
        mPaint.setTextSize(height / 2);//高度的一半
        mPaint.setAntiAlias(true);//设置抗锯齿
        mPaint.setFakeBoldText(true);//粗体
        mPaint.setColor(0xFFD0CCC7);
        mCanvas.drawRect(0, 0, width, height, mPaint);//绘制矩形

        mPaint.setColor(getRandomColor(255, 255, 255));
        mCanvas.drawText(result[0], width / 10, height / 2, mPaint);//第一个数字
        mMatrix.setRotate(10);
        mCanvas.setMatrix(mMatrix);

        mPaint.setColor(getRandomColor(255, 255, 255));
        mCanvas.drawText(result[1], width * 2 / 5, height / 2, mPaint);//第二个数字
        mMatrix.setRotate(15);

        mPaint.setColor(getRandomColor(255, 255, 255));
        mCanvas.drawText(result[2], width * 3 / 5, height / 2 - 10, mPaint);//第三个数字
        mMatrix.setRotate(15);

        mPaint.setColor(getRandomColor(255, 255, 255));
        mCanvas.drawText(result[3], width * 4 / 5, height / 2 - 15, mPaint);//第四个数字
        mMatrix.setRotate(10);

        //接下来绘制背景障碍,绘制短线条
        int startX = 0;
        int startY = 0;
        int endX = 0;
        int endY = 0;

        for (int i = 0; i < 50; i++) {
            startX = getRandomPosition(width);
            startY = getRandomPosition(height);
            endX = getRandomPosition(15);
            endY = getRandomPosition(15);
            mPaint.setColor(getRandomColor(255, 255, 255));
            mCanvas.drawLine(startX, startY - 20, startX + endX, startY + endY - 20, mPaint);
        }

        mCanvas.save();
        return mBitmap;

    }
通过Canvas的drawBitmap就能实现上述效果
具体实现:
1,声明自定义属性,目的是为了控制我们的验证码图片显示的宽高
<resources>
    <declare-styleable name="VerifyCodeView">
        <attr name="view_show_height" format="dimension" />
        <attr name="view_show_width" format="dimension" />
    </declare-styleable>
</resources>
2,自定义属性的获取
public class VerifyCodeView extends View {

    /**
     * 带验证码的bitmap
     */
    private Bitmap mBitmap;

    /**
     * 验证码的内容
     */
    private String[] result;

    /**
     * 随机工具类
     */
    Random mRandom = new Random();
    /**
     * 验证码图片的宽高
     */
    private int width, height;

    private final String TAG = "qfxl";

    public VerifyCodeView(Context context) {
        this(context, null);
    }

    public VerifyCodeView(Context context, AttributeSet attrs) {
        super(context, attrs);
        TypedArray a = context.obtainStyledAttributes(attrs, R.styleable.VerifyCodeView);
        width = a.getdimensionpixelsize(R.styleable.VerifyCodeView_view_show_width, 0);//需要显示的宽
        height = a.getdimensionpixelsize(R.styleable.VerifyCodeView_view_show_height, 0);//需要显示的高
        a.recycle();
        result = getResource();//验证码内容
    }

    public VerifyCodeView(Context context, AttributeSet attrs, int defStyleAttr) {
        super(context, attrs, defStyleAttr);
    }
3,准备随机数
     */
    private String[] getResource() {
        String[] datas = new String[4];
        for (int i = 0; i < 4; i++) {
            datas[i] = String.valueOf(mRandom.nextInt(10));
        }
        return datas;
    }
4,准备随机颜色
 /**
     * 获取随机颜色
     *
     * @param r (0 ~ 255)
     * @param g (0 ~ 255)
     * @param b (0 ~ 255)
     * @return
     */
    private int getRandomColor(int r, int g, int b) {
        if (r > 255)
            r = 255;
        if (g > 255)
            g = 255;
        if (b > 255)
            b = 255;

        int mr = mRandom.nextInt(r);
        int mg = mRandom.nextInt(g);
        int mb = mRandom.nextInt(b);

        return Color.rgb(mr, mg, mb);
    }
5,准备随机点,目的是为了跟另一个起点连线,绘制障碍
   /**
     * 获取随机点,不超过宽高
     *
     * @param n
     * @return
     */
    private int getRandomPosition(int n) {
        return mRandom.nextInt(n);
    }
6,准备我们需要的Bitmap
/**
     * 绘制流程
     * 1,先绘制一个矩形
     * 2,在矩形里面绘制验证码
     *
     * @param result
     * @return
     */
    private Bitmap getBitmap(String[] result) {
        Bitmap mBitmap = Bitmap.createBitmap(width, height, Bitmap.Config.ARGB_8888);
        Canvas mCanvas = new Canvas(mBitmap);//在这个bitmap上绘制验证码
        Paint mPaint = new Paint();//画笔
        Matrix mMatrix = new Matrix();//3*3矩阵
        mPaint.setTextSize(height / 2);//高度的一半
        mPaint.setAntiAlias(true);//设置抗锯齿
        mPaint.setFakeBoldText(true);//粗体
        mPaint.setColor(0xFFD0CCC7);
        mCanvas.drawRect(0, 0, width, height, mPaint);//绘制矩形

        mPaint.setColor(getRandomColor(255, 255, 255));
        mCanvas.drawText(result[0], width / 10, height / 2, mPaint);//第一个数字
        mMatrix.setRotate(10);
        mCanvas.setMatrix(mMatrix);

        mPaint.setColor(getRandomColor(255, 255, 255));
        mCanvas.drawText(result[1], width * 2 / 5, height / 2, mPaint);//第二个数字
        mMatrix.setRotate(15);

        mPaint.setColor(getRandomColor(255, 255, 255));
        mCanvas.drawText(result[2], width * 3 / 5, height / 2 - 10, mPaint);//第三个数字
        mMatrix.setRotate(15);

        mPaint.setColor(getRandomColor(255, 255, 255));
        mCanvas.drawText(result[3], width * 4 / 5, height / 2 - 15, mPaint);//第四个数字
        mMatrix.setRotate(10);

        //接下来绘制背景障碍,绘制短线条
        int startX = 0;
        int startY = 0;
        int endX = 0;
        int endY = 0;

        for (int i = 0; i < 50; i++) {
            startX = getRandomPosition(width);
            startY = getRandomPosition(height);
            endX = getRandomPosition(15);
            endY = getRandomPosition(15);
            mPaint.setColor(getRandomColor(255, 255, 255));
            mCanvas.drawLine(startX, startY - 20, startX + endX, startY + endY - 20, mPaint);
        }

        mCanvas.save();
        return mBitmap;

    }
7,测量,如果我们的View设置Wrap_Content则默认宽200高100
  @Override
    protected void onMeasure(int widthMeasureSpec, int heightMeasureSpec) {
        setMeasuredDimension(measureWidth(widthMeasureSpec), measureheight(heightMeasureSpec));
    }
 /**
     * 测量宽度
     *
     * @param measureSpec
     */
    private int measureWidth(int measureSpec) {
        int mode = MeasureSpec.getMode(measureSpec);
        int size = MeasureSpec.getSize(measureSpec);
        int measureResult;
        if (mode == MeasureSpec.EXACTLY) {
            measureResult = size;
        } else {
            measureResult = 200;
            if (mode == MeasureSpec.AT_MOST) {
                measureResult = Math.min(size, measureResult);
            }
        }
        return measureResult;
    }

    /**
     * 测量高度
     *
     * @param measureSpec
     * @return
     */
    private int measureheight(int measureSpec) {
        int mode = MeasureSpec.getMode(measureSpec);
        int size = MeasureSpec.getSize(measureSpec);
        int measureResult;
        if (mode == MeasureSpec.EXACTLY) {
            measureResult = size;
        } else {
            measureResult = 100;
            if (mode == MeasureSpec.AT_MOST) {
                measureResult = Math.min(size, measureResult);
            }
        }
        return measureResult;
    }
8,绘制
/**
     * 绘制
     *
     * @param canvas
     */
    @Override
    protected void onDraw(Canvas canvas) {
        if (width == 0 )//如果不设置验证码要显示的宽高,或者大于控件宽高则默认显示为控件的宽高
            width = getWidth();
        if (height == 0 )
            height = getHeight();
        mBitmap = getBitmap(result);//需要画的bitmap
        if (mBitmap != null) {
            canvas.drawBitmap(mBitmap, 0, 0, null);
        } else {
            Paint errorPaint = new Paint();
            errorPaint.setColor(Color.GRAY);
            errorPaint.setTextSize(sp2px(14));
            canvas.drawText("点击切换", 10, height / 2, errorPaint);
        }
    }
通过以上的操作就能绘制出我们的验证码图形
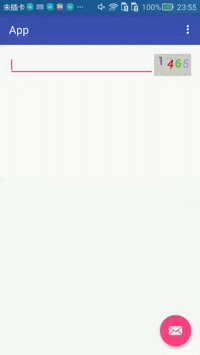
Xml调用
<RelativeLayout xmlns:android="http://schemas.android.com/apk/res/android"
    xmlns:app="http://schemas.android.com/apk/res-auto"
    xmlns:tools="http://schemas.android.com/tools"
    android:layout_width="match_parent"
    android:layout_height="match_parent"
    android:paddingBottom="@dimen/activity_vertical_margin"
    android:paddingLeft="@dimen/activity_horizontal_margin"
    android:paddingRight="@dimen/activity_horizontal_margin"
    android:paddingTop="@dimen/activity_vertical_margin"
    tools:context="com.xz.android.MainActivityFragment"
    tools:showIn="@layout/activity_main">

    <LinearLayout
        android:layout_width="match_parent"
        android:layout_height="40dp"
        android:orientation="horizontal">
        <EditText
            android:id="@+id/et_input"
            android:layout_width="0dp"
            android:layout_height="match_parent"
            android:layout_weight="1"
            android:inputType="number"
            android:imeOptions="actionDone"
            android:singleLine="true"
            />
        <com.xz.android.View.VerifyCodeView
            android:id="@+id/vcv_check_view"
            android:layout_width="wrap_content"
            android:layout_height="match_parent"
            <!--app:view_show_width="自定义想要显示的宽"-->
            <!--app:view_show_height=""-->
            />
    </LinearLayout>


</RelativeLayout>
调用代码:
public class MainActivity extends AppCompatActivity {
    private String[] result;

    @Override
    protected void onCreate(Bundle savedInstanceState) {
        super.onCreate(savedInstanceState);
        setContentView(R.layout.activity_main);
        Toolbar toolbar = (Toolbar) findViewById(R.id.toolbar);
        setSupportActionBar(toolbar);

        final EditText mEditText = (EditText) findViewById(R.id.et_input);
        final VerifyCodeView mVerifyCodeView = (VerifyCodeView) findViewById(R.id.vcv_check_view);
        FloatingActionButton fab = (FloatingActionButton) findViewById(R.id.fab);
        mVerifyCodeView.setOnClickListener(new View.OnClickListener() {
            @Override
            public void onClick(View v) {
                mVerifyCodeView.change();
            }
        });
        fab.setOnClickListener(new View.OnClickListener() {
            @Override
            public void onClick(View view) {
                char[] c = mEditText.getText().toString().toCharArray();
                result = new String[c.length];
                for (int i = 0; i < c.length; i++) {
                    result[i] = String.valueOf(c[i]);
                }
                boolean isTrue = mVerifyCodeView.checkResult(result);
                Log.e("qfxl","isTrue ? " + isTrue);
                if (isTrue) {
                    Snackbar.make(view, "输入一致", Snackbar.LENGTH_SHORT).show();
                }
                else {
                    Snackbar.make(view, "输入有误", Snackbar.LENGTH_SHORT).show();
                }
            }
        });


    }
//下面是切换验证码跟校验验证码的代码
    /**
     * 切换就重绘
     */
    public void change() {
        result = getResource();
        invalidate();
    }

    /**
     * 检验输入结果
     *
     * @param input 输入的结果
     * @return 是否正确
     */
    public boolean checkResult(String[] input) {
        if (input == null || input.length != result.length) {
            return false;
        } else {
            for (int i = 0; i < result.length; i++) {
                if (!input[i].equals(result[i])) {
                    return false;
                }
            }
            return true;
        }

}最后献上源码:点这里


 901
901

 被折叠的 条评论
为什么被折叠?
被折叠的 条评论
为什么被折叠?
 到【灌水乐园】发言


