


opencv是一个非常优秀的图形图像处理类库,里面的类或者结构体,封装了很多实用的图像处理算法,我们只需要调用其提供的API就可以用一些复杂的图像处理算法进行相应的工作。opencv的强大之处在于计算机视觉库,但是它在gui方面却不尽人意。因此想简单的利用opencv做出很好的人机交互界面是不现实的。Qt 是一个跨平台的C++图形用户界面应用程序框架。它提供给应用程序开发者建立艺术级的图形用户界面所需的所用功能,但是QT却没有专门操作摄像头的类,因此,我们可以将opencv与Qt结合起来发挥其各自强大的功能。于是就有了本博文。
现在就开始详细的介绍如何在QT中用opencv实现摄像头拍照功能。(本文搭建平台 ubuntu 14.04+ Qt 5.2.1 + opencv 2.4.8 )
Are you ready? Go
打开QtCreator,新建一个widget工程。
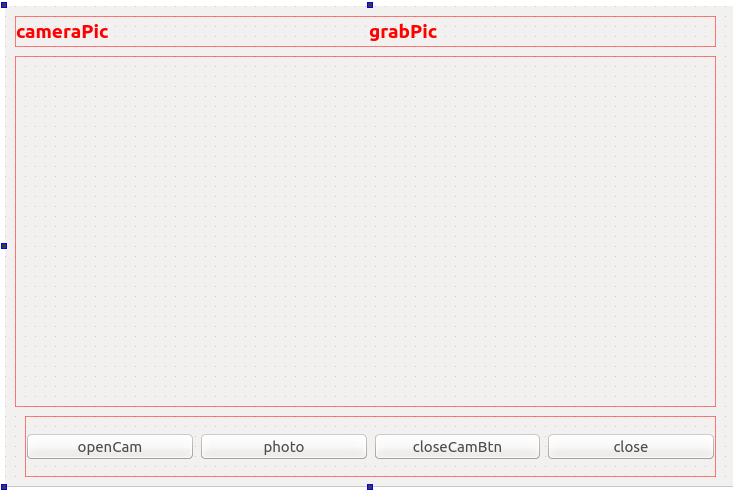
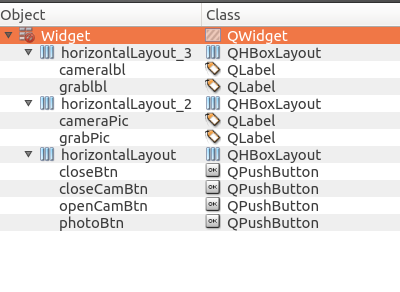
其UI设计和布局如下所示:
写头文件widget.h
#ifndef WIDGET_H
#define WIDGET_H

#include <QWidget>
#include <QDialog>
#include <QDebug>
#include <QTimer>
#include <QImage>

#include <opencv2/highgui/highgui.hpp>
#include <opencv2/imgproc/imgproc.hpp>
using namespace cv;

namespace Ui {
class Widget;
}

class Widget : public QWidget
{
    Q_OBJECT

public:
    explicit Widget(QWidget *parent = 0);
    ~Widget();
    Mat frame;//video frame
    VideoCapture capture;

    QTimer *timer;
    QImage img;


private:
    Ui::Widget *ui;

private slots:

   void openCamaraSlot();
   void readFrameSlot();
   void closeCamaraSlot();
   void takingPicturesSlot();
   void closeSlot();
};

#endif // WIDGET_H
#include "widget.h"
#include "ui_widget.h"

Widget::Widget(QWidget *parent) :
    QWidget(parent),
    ui(new Ui::Widget)
{
    ui->setupUi(this);
    timer   = new QTimer(this);
    QObject::connect(timer,SIGNAL(timeout()),this,SLOT(readFrameSlot()));
    QObject::connect(ui->openCamBtn,SIGNAL(clicked()),this,SLOT(openCamaraSlot()));
    QObject::connect(ui->closeBtn,SIGNAL(clicked()),this,SLOT(closeSlot()));
    QObject::connect(ui->photoBtn,SIGNAL(clicked()),this,SLOT(takingPicturesSlot()));
    QObject::connect(ui->closeCamBtn,SIGNAL(clicked()),this,SLOT(closeCamaraSlot()));
}

Widget::~Widget()
{
    delete ui;
}

void Widget::openCamaraSlot()
{
    capture.open(-1);
    if( !capture.isOpened())
    {
       qDebug()<< "open camera error"<<endl;
       this->close();
    }
    else
    {
        timer->start(33);
    }
}

void Widget::readFrameSlot()
{
    capture >> frame;
    if(!frame.empty())
    {
        img = QImage((const unsigned char*)(frame.data),frame.cols,frame.rows,
                     QImage::Format_RGB888).rgbSwapped();
        img = img.scaled(
                            ui->cameraPic->width(),
                            ui->cameraPic->height(),
                            Qt::IgnoreAspectRatio,
                            Qt::FastTransformation
                        );//调整图片大小,使图片和显示的label控件一样大
        ui->cameraPic->setPixmap(QPixmap::fromImage(img));
    }
}

void Widget::closeCamaraSlot()
{
    timer->stop();
    ui->cameraPic->setPixmap(QPixmap());
}

void Widget::takingPicturesSlot()
{

    if(!frame.empty())
    {
        img =img.scaled(
                            ui->grabPic->width(),
                            ui->grabPic->height(),
                            Qt::IgnoreAspectRatio,
                            Qt::FastTransformation
                        );

        ui->grabPic->setPixmap(QPixmap::fromImage(img));
    }

}
void Widget::closeSlot()
{
    this->close();
}
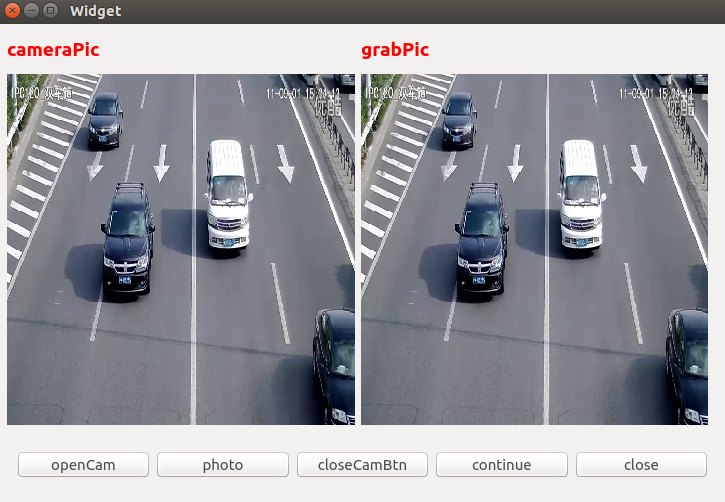
至此,实现该功能的全部代码都完成了,点击运行就行。一下是运行结果实例。我的是打开一段视频文件,你只需将capture.open(-1)改成相应的视频文件路径就可以了。效果图如下:
当然可能报错,有可能是没有包含Opencv的库文件 ,我们只需在qtCamera.pro中添加
INCLUDEPATH+= /usr/local/include
INCLUDEPATH+=/usr/local/include/opencv
LIBS+=/usr/local/lib/libopencv_core.so
LIBS+= /usr/local/lib/libopencv_highgui.so
LIBS+= /usr/local/lib/libopencv_imgproc.so


 6万+
6万+

 被折叠的 条评论
为什么被折叠?
被折叠的 条评论
为什么被折叠?
 到【灌水乐园】发言


