


但凡讲解Springboot Security的教程,都是根据其本身的定义,前后端整合在一起,登录采用form或者basic。我们现在的很多项目,前后端分离,form登录已经不适用了。很多程序的架构要求所有的接口都采用application/json方式,因此basic登录模式也几乎不用。我们需要纯粹使用自己的自由接口来实现注册登录,以及其他业务接口访问的身份验证和授权。这里的设计是用户身份验证与授权的模块跟业务模块的身份权限验证是分开的。不过为了紧凑,我把两部分放在一起做了一个最小工作模型。
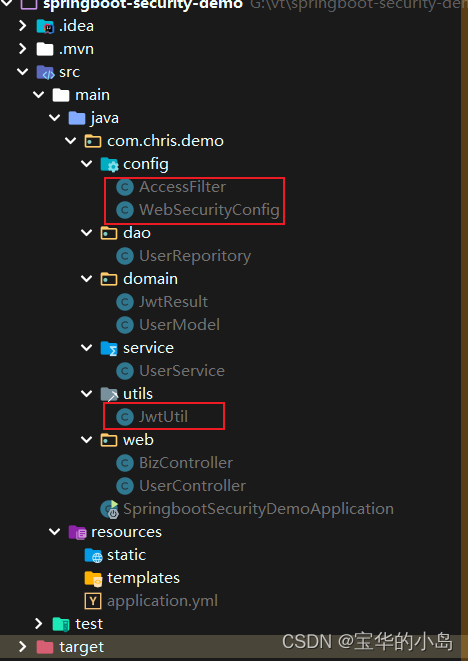
这是最小模型的基本结构,核心的类就config中两个。其他的都是工作模型。
一、创建Springboot web项目,添加pom
<dependency>
    <groupId>org.springframework.boot</groupId>
    <artifactId>spring-boot-starter-web</artifactId>
</dependency>
<dependency>
    <groupId>org.springframework.boot</groupId>
    <artifactId>spring-boot-starter-security</artifactId>
</dependency>
<dependency>
    <groupId>io.jsonwebtoken</groupId>
    <artifactId>jjwt</artifactId>
    <version>0.9.1</version>
</dependency>
二、一个用户构建token签发数据的类
package com.chris.demo.domain;

/**
 * @author Chris Chan
 * Create On 2022/11/24 10:19
 * Use for:
 * Explain:
 */
public class JwtResult {
    /**
     * 访问令牌
     */
    private String accessToken;
    /**
     * 访问令牌过期时间(毫秒)
     */
    private Long accessTokenExpire;
    /**
     * 刷新令牌
     */
    private String refreshToken;
    /**
     * 刷新令牌过期时间(毫秒)
     */
    private Long refreshExpire;

    public String getAccessToken() {
        return accessToken;
    }

    public void setAccessToken(String accessToken) {
        this.accessToken = accessToken;
    }

    public Long getAccessTokenExpire() {
        return accessTokenExpire;
    }

    public void setAccessTokenExpire(Long accessTokenExpire) {
        this.accessTokenExpire = accessTokenExpire;
    }

    public String getRefreshToken() {
        return refreshToken;
    }

    public void setRefreshToken(String refreshToken) {
        this.refreshToken = refreshToken;
    }

    public Long getRefreshExpire() {
        return refreshExpire;
    }

    public void setRefreshExpire(Long refreshExpire) {
        this.refreshExpire = refreshExpire;
    }
}
我们构架一个数据类在内存中存放用户数据,实际上存取数据库也应该有一个ORM类。
package com.chris.demo.domain;

/**
 * @author Chris Chan
 * Create On 2022/11/23 16:03
 * Use for:
 * Explain:
 */
public class UserModel {
    private String username;
    private String password;
    private String authorities;

    public String getUsername() {
        return username;
    }

    public void setUsername(String username) {
        this.username = username;
    }

    public String getPassword() {
        return password;
    }

    public void setPassword(String password) {
        this.password = password;
    }

    public String getAuthorities() {
        return authorities;
    }

    public void setAuthorities(String authorities) {
        this.authorities = authorities;
    }
}
三、设计JavaWebToken的工具
package com.chris.demo.utils;

import com.chris.demo.domain.JwtResult;
import io.jsonwebtoken.Claims;
import io.jsonwebtoken.Jwts;
import io.jsonwebtoken.SignatureAlgorithm;

import java.util.Date;
import java.util.HashMap;
import java.util.Map;

/**
 * @author Chris Chan
 * Create On 2022/11/24 10:18
 * Use for: JWT工具
 * Explain:
 */
public class JwtUtil {
    /**
     * 访问令牌过期时间(天)
     */
    private static int ACCESS_TOKEN_XPIRE_DAYS = 7;
    /**
     * 刷新令牌过期时间(天)
     */
    private static int REFRESH_TOKEN_EXPIRE_DAYS = 30;
    /**
     * 签名指纹 加密解密要一致
     */
    private static String SIGN_KEY = "NDHHKHJKFWHEUIFKK8384SDNJAFYQJ723HF7823F3BJ";

    /**
     * 通过用户名构建jwt
     *
     * @param username
     * @param authorties
     * @param expire
     * @return
     */
    public static String buildJwtByUsername(String username, String authorties, long expire) {
        //有效载荷
        Map<String, Object> claims = new HashMap<>();
        claims.put("username", username);
        claims.put("authorities", authorties);

        //过期时间
        Date now = new Date();
        Date expireTime = new Date(expire);

        return Jwts.builder()
                .setId("yyds")
                .setSubject("chris_jwt")
                .setClaims(claims)
                .setIssuedAt(now)
                .setExpiration(expireTime)
                .signWith(SignatureAlgorithm.HS512, SIGN_KEY)
                .compact();
    }

    /**
     * 从jwt中解析出用户名
     *
     * @param token
     * @return
     */
    public static String getUsernameFromJwt(String token) {
        Object obj = parseClaimsBody(token)
                .get("username");
        return String.valueOf(obj);
    }

    /**
     * 从jwt中解析出权限
     *
     * @param token
     * @return
     */
    public static String getAuthoritiesFromJwt(String token) {
        Object obj = parseClaimsBody(token)
                .get("authorities");
        return String.valueOf(obj);
    }

    private static Claims parseClaimsBody(String token) {
        return Jwts.parser()
                .setSigningKey(SIGN_KEY)
                .parseClaimsJws(token)
                .getBody();
    }

    /**
     * 构建登录结果JwtResult
     *
     * @param username
     * @param authorities
     * @return
     */
    public static JwtResult buildJwtResultByUsername(String username, String authorities) {
        Date now = new Date();

        JwtResult jwtResult = new JwtResult();

        long accessTokenExpire = now.getTime() + 3600000 * 24 * ACCESS_TOKEN_XPIRE_DAYS;
        long refreshTokenExpire = now.getTime() + 3600000 * 24 * REFRESH_TOKEN_EXPIRE_DAYS;

        jwtResult.setAccessToken(buildJwtByUsername(username, authorities, accessTokenExpire));
        jwtResult.setAccessTokenExpire(accessTokenExpire);
        jwtResult.setRefreshToken(buildJwtByUsername(username, authorities, refreshTokenExpire));
        jwtResult.setRefreshExpire(refreshTokenExpire);

        return jwtResult;
    }
}
工具中三个主要方法,构建jwt,解析用户名、权限列表和构建登录结果。其中解析方法适用于一般业务模块验证token使用的。可以分离出去,但是key一定要保持一致。
四、正菜之一:访问过滤器。调用一般业务接口时需要检查是否携带令牌,格式是否正确,验证之后进行授权。
package com.chris.demo.config;

import com.chris.demo.utils.JwtUtil;
import org.springframework.security.authentication.AuthenticationManager;
import org.springframework.security.authentication.UsernamePasswordAuthenticationToken;
import org.springframework.security.core.GrantedAuthority;
import org.springframework.security.core.authority.AuthorityUtils;
import org.springframework.security.core.context.SecurityContextHolder;
import org.springframework.security.web.authentication.www.BasicAuthenticationFilter;

import javax.servlet.FilterChain;
import javax.servlet.ServletException;
import javax.servlet.http.HttpServletRequest;
import javax.servlet.http.HttpServletResponse;
import java.io.IOException;
import java.util.Arrays;
import java.util.List;
import java.util.stream.Collectors;

/**
 * @author Chris Chan
 * Create On 2022/11/23 17:07
 * Use for:
 * Explain:
 */
public class AccessFilter extends BasicAuthenticationFilter {
    private static List<String> passList;

    public static void setPassList(List<String> passList) {
        AccessFilter.passList = passList;
    }

    public AccessFilter(AuthenticationManager authenticationManager, List<String> passList) {
        super(authenticationManager);
        AccessFilter.passList = passList;
    }

    /**
     * 传入白名单和用户服务
     *
     * @param authenticationManager
     * @param passes
     */
    public AccessFilter(AuthenticationManager authenticationManager, String... passes) {
        super(authenticationManager);
        AccessFilter.passList = Arrays.stream(passes).collect(Collectors.toList());
    }

    @Override
    protected void doFilterInternal(HttpServletRequest request, HttpServletResponse response, FilterChain chain)
            throws IOException, ServletException {
        //白名单放行
        String requestURI = request.getRequestURI();

        if (passList.contains(requestURI)) {
            chain.doFilter(request, response);
            return;
        }
        //读取Authorization
        String authorization = request.getHeader("Authorization");
        if (null == authorization) {
            throw new RuntimeException("没有发现令牌");
        }
        //格式校验
        if (!authorization.startsWith("Bearer ")) {
            throw new RuntimeException("令牌格式错误");
        }

        //取得token
        String jwt = authorization.replace("Bearer ", "");
        //todo 尝试解析jwt,获取用户名,有异常抛出,
        String username = JwtUtil.getUsernameFromJwt(jwt);
        String authorities = JwtUtil.getAuthoritiesFromJwt(jwt);

        //构建权限token,放入上下文
        List<GrantedAuthority> authorityList = AuthorityUtils.commaSeparatedStringToAuthorityList(authorities);
        UsernamePasswordAuthenticationToken token = new UsernamePasswordAuthenticationToken(username, null, authorityList);
        SecurityContextHolder.getContext().setAuthentication(token);

        chain.doFilter(request, response);
    }
}
五、正菜之二:Security配置文件
package com.chris.demo.config;

import org.springframework.context.annotation.Bean;
import org.springframework.context.annotation.Configuration;
import org.springframework.security.authentication.AuthenticationManager;
import org.springframework.security.config.annotation.method.configuration.EnableGlobalMethodSecurity;
import org.springframework.security.config.annotation.web.builders.HttpSecurity;
import org.springframework.security.config.annotation.web.builders.WebSecurity;
import org.springframework.security.config.annotation.web.configuration.EnableWebSecurity;
import org.springframework.security.config.annotation.web.configuration.WebSecurityConfigurerAdapter;
import org.springframework.security.crypto.bcrypt.BCryptPasswordEncoder;
import org.springframework.security.crypto.password.PasswordEncoder;

/**
 * @author Chris Chan
 * Create On 2022/11/23 16:04
 * Use for:
 * Explain:
 * @link . https://blog.csdn.net/weixin_46684099/article/details/117434577
 * @link . https://blog.csdn.net/chihaihai/article/details/104678864
 */
@EnableWebSecurity
@EnableGlobalMethodSecurity(jsr250Enabled = true)
@Configuration
public class WebSecurityConfig extends WebSecurityConfigurerAdapter {

    @Override
    public void configure(WebSecurity web) throws Exception {
        web
                .ignoring()
                .mvcMatchers("/");
    }

    @Override
    protected void configure(HttpSecurity http) throws Exception {
        //通关白名单
        String[] passes = {
                "/api/user/reg",
                "/api/user/login"
        };
        http
                .authorizeRequests()
                .antMatchers(passes).permitAll()
                .anyRequest().authenticated()
                .and()
                .cors()
                .and()
                .csrf().disable()
                .addFilter(new AccessFilter(authenticationManager(), passes));
    }

    @Bean
    @Override
    protected AuthenticationManager authenticationManager() throws Exception {
        return super.authenticationManager();
    }

    @Bean
    public PasswordEncoder passwordEncoder() {
        return new BCryptPasswordEncoder();
    }
}
核心在第二个configre方法,没有配置form和basic登录,只是对某些接口放行。包含一个访问过滤器设置。过滤器设置的白名单跟此处配置的完全授权的白名单没有必然的关系。不过一般是一致的。他们作用于两个过滤器,要都能通过才行。
六、模型文件:模拟数据管理类,业务处理类,接口类等
package com.chris.demo.dao;

import com.chris.demo.domain.UserModel;
import org.springframework.stereotype.Repository;

import java.util.concurrent.ConcurrentHashMap;

/**
 * @author Chris Chan
 * Create On 2022/11/24 9:57
 * Use for: 模拟数据库管理用户
 * Explain:
 */
@Repository
public class UserReporitory {
    private static ConcurrentHashMap<String, UserModel> userMap = new ConcurrentHashMap<>();

    /**
     * 保存用户
     * @param userModel
     */
    public void save(UserModel userModel) {
        userMap.put(userModel.getUsername(), userModel);
    }

    /**
     * 获取用户信息
     *
     * @param username
     * @return
     */
    public UserModel findByUsername(String username) {
        return userMap.get(username);
    }
}
package com.chris.demo.service;

import com.chris.demo.dao.UserReporitory;
import com.chris.demo.domain.JwtResult;
import com.chris.demo.domain.UserModel;
import com.chris.demo.utils.JwtUtil;
import org.springframework.beans.factory.annotation.Autowired;
import org.springframework.security.core.userdetails.UsernameNotFoundException;
import org.springframework.security.crypto.password.PasswordEncoder;
import org.springframework.stereotype.Service;

import javax.security.auth.login.CredentialException;

/**
 * @author Chris Chan
 * Create On 2022/11/23 16:25
 * Use for:
 * Explain:
 */
@Service
public class UserService {

    @Autowired
    PasswordEncoder passwordEncoder;
    @Autowired
    UserReporitory userReporitory;

    /**
     * 注册
     *
     * @param username
     * @param password
     */
    public void reg(String username, String password) {
        reg(username, password, "USER");
    }

    /**
     * 注册
     *
     * @param username
     * @param password
     */
    public void reg(String username, String password, String roles) {
        UserModel userModel = new UserModel();
        userModel.setUsername(username);
        userModel.setPassword(passwordEncoder.encode(password));
        userModel.setAuthorities(roles);

        userReporitory.save(userModel);
    }

    /**
     * 登录
     *
     * @param username
     * @param password
     * @return
     */
    public JwtResult login(String username, String password) {
        //检查用户是否存在
        UserModel userModel = userReporitory.findByUsername(username);
        if (null == userModel) {
            throw new UsernameNotFoundException("用户不存在");
        }
        //匹配密码
        String passwordEnc = userModel.getPassword();
        if (!passwordEncoder.matches(password, passwordEnc)) {
            try {
                throw new CredentialException("密码错误");
            } catch (CredentialException e) {
                e.printStackTrace();
            }
            return null;
        }
        return JwtUtil.buildJwtResultByUsername(username, userModel.getAuthorities());
    }

}
这个UserService并没有去实现Securty的UserDetailService接口,因为逻辑完全是由我们自己处理的。
package com.chris.demo.web;

import com.chris.demo.domain.JwtResult;
import com.chris.demo.service.UserService;
import org.springframework.beans.factory.annotation.Autowired;
import org.springframework.web.bind.annotation.GetMapping;
import org.springframework.web.bind.annotation.RequestMapping;
import org.springframework.web.bind.annotation.RestController;

/**
 * @author Chris Chan
 * Create On 2022/11/23 16:09
 * Use for: 用户接口
 * Explain:
 */
@RestController
@RequestMapping("api/user")
public class UserController {
    @Autowired
    UserService accountService;

    /**
     * 模拟注册
     *
     * @param username
     * @param password
     * @return
     */
    @GetMapping("reg")
    public String reg(String username, String password, String roles) {
        accountService.reg(username, password, roles);
        return "reg success";
    }

    /**
     * 模拟登录
     *
     * @param username
     * @param password
     * @return
     */
    @GetMapping("login")
    public JwtResult login(String username, String password) {
        return accountService.login(username, password);
    }


}
package com.chris.demo.web;

import org.springframework.security.access.annotation.Secured;
import org.springframework.web.bind.annotation.GetMapping;
import org.springframework.web.bind.annotation.RequestMapping;
import org.springframework.web.bind.annotation.RestController;

import javax.annotation.security.RolesAllowed;

/**
 * @author Chris Chan
 * Create On 2022/11/23 16:41
 * Use for: 业务接口
 * Explain:
 */
@RestController
@RequestMapping("api/biz")
public class BizController {
    /**
     * 模拟业务调用
     *
     * @return
     */
    @GetMapping("test")
    public String test() {
        return "test success.";
    }

    /**
     * 权限验证
     * @return
     */
    @RolesAllowed({"ADMIN"})
    @GetMapping("test2")
    public String test2() {
        return "test2 success.";
    }
}
两个接口文件,一个设计为UAA模块,一个设计为业务模块。业务接口有一个是测试权限的。
测试结果:
1.先注册一个用户:
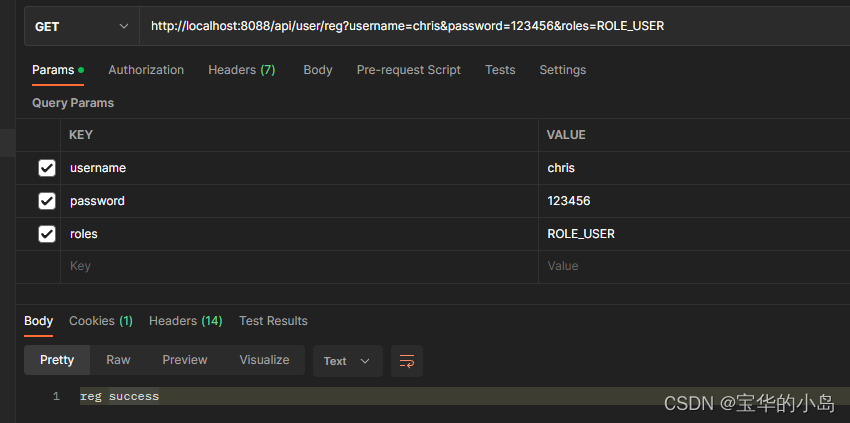
给定的权限是ROLE_USER,前面的ROLE_前缀是必须要加的,这是jsr250的权限校验规范要求的。
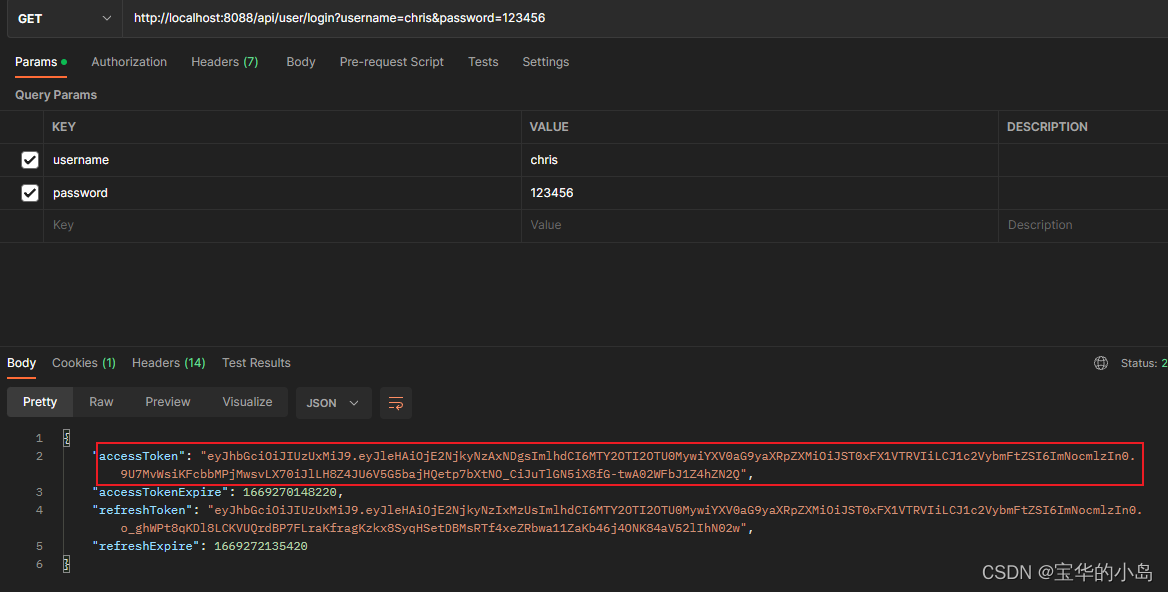
2.登录,获得jwt
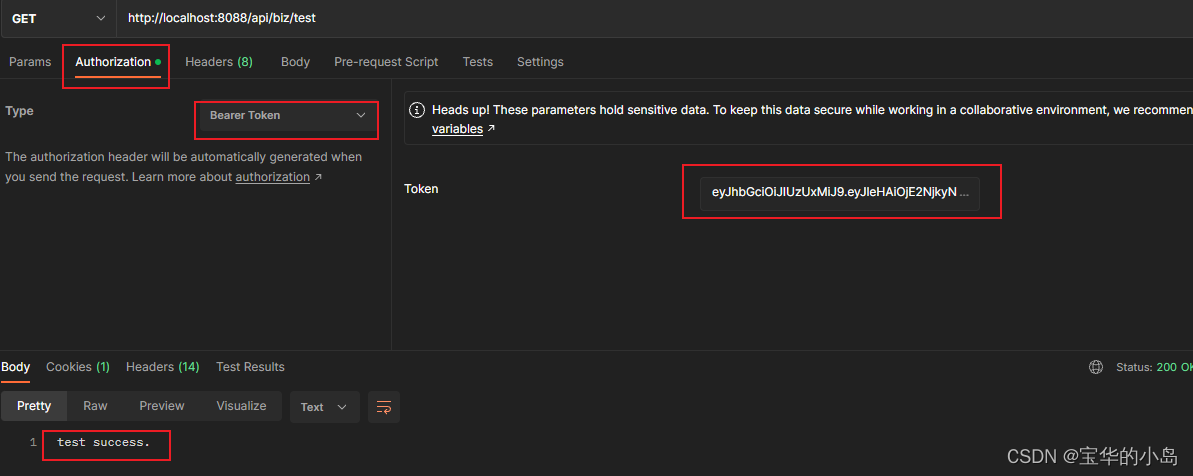
3.将accessToken填入Authorization的Bearer Token模式,调用没有权限限制的接口
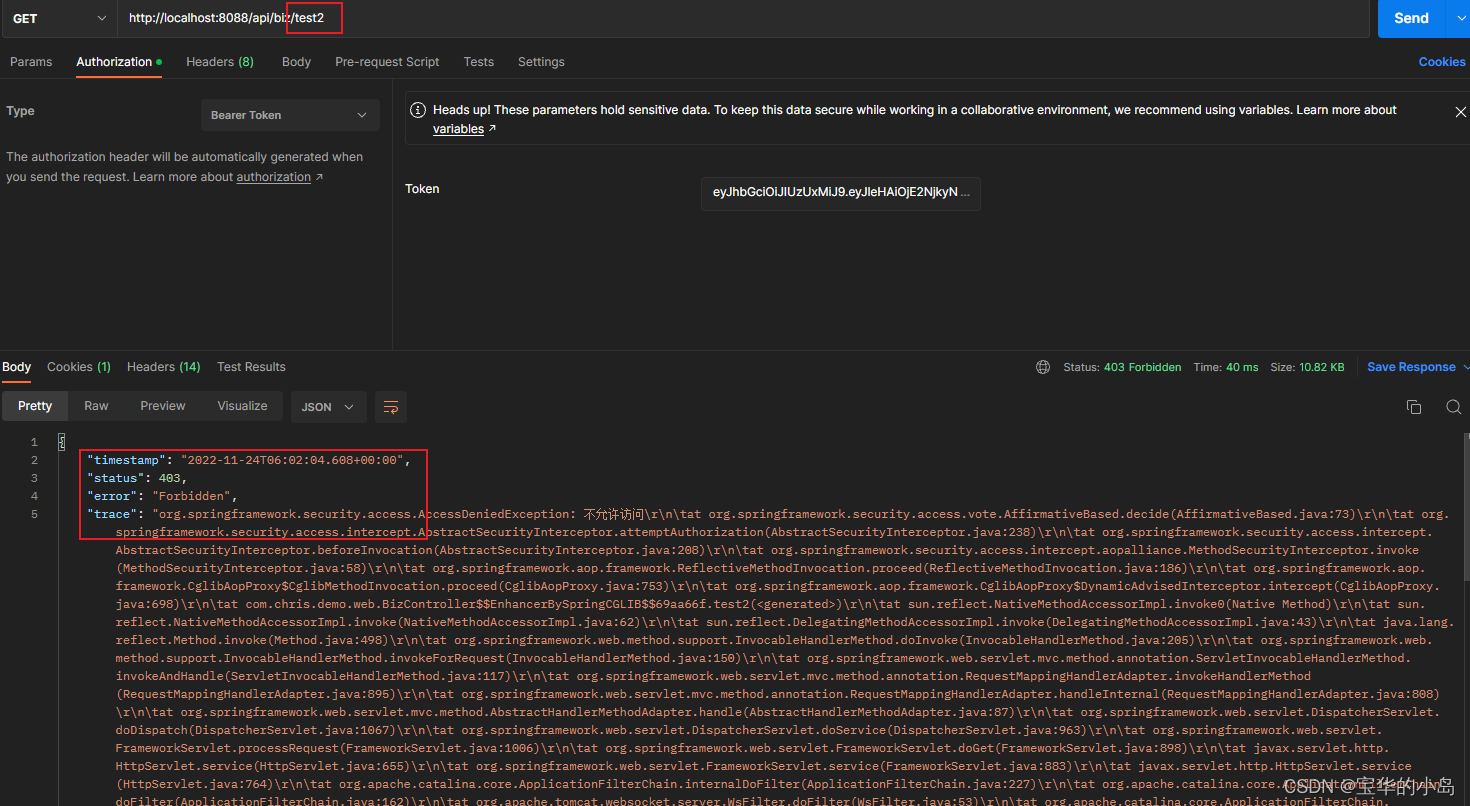
4. 调用有权限限制的接口,报403
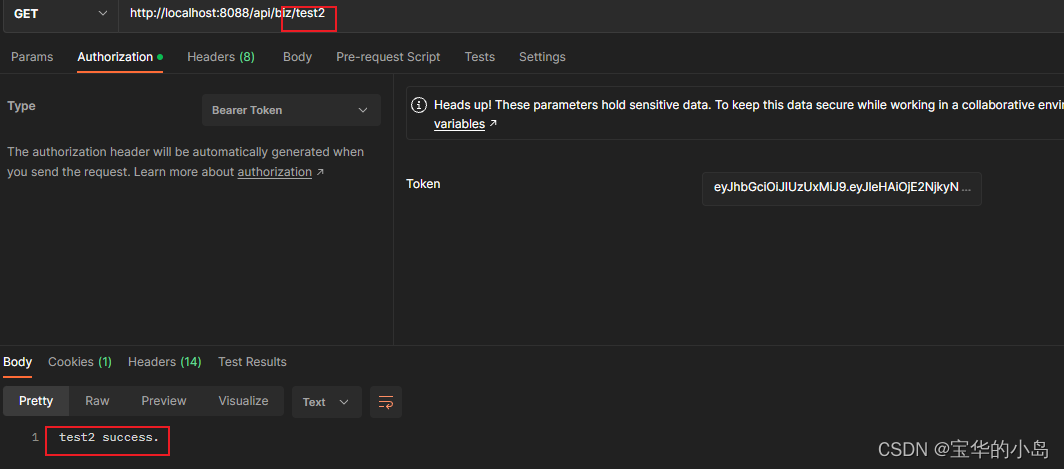
5.另外注册一个用户权限设置为ROLE_ADMIN,登录获取accessToken,重新调用限权接口
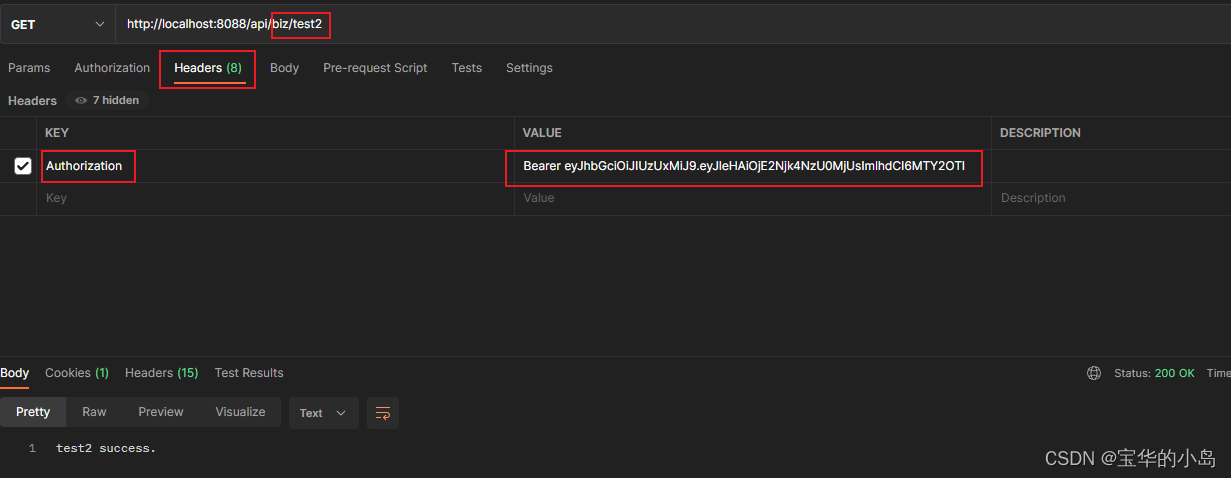
6.前端调用接口的时候实在header中增加一个key为Authorization的数据,其值为accessToken加上bearer+一个空格的前缀,就像这样
完美!!


 492
492


 被折叠的 条评论
为什么被折叠?
被折叠的 条评论
为什么被折叠?
 到【灌水乐园】发言


