


在对MTCNN进行landmark训练前,发现celebA数据集人脸bbox的标注不准确(landmark标注准确,可以使用),所以需要对人脸bbox进行重新标注,选择用faster rcnn对celebA数据集的bbox重新标注。参考博客:
http://blog.csdn.net/xzzppp/article/details/52071546
用faster rcnn对celebA数据集的bbox重新标注后,发现有不少误报,误报主要表现为把手,眼睛,耳朵或背景当成了人脸。 所以我对bbox的刷选条件为:“如果celebA数据集的5个landmark都在bbox里面,认为这个bbox是有效的,其他的都无效” ;
celebA数据集中的标注文件,一个图片中只有一个人脸bbox,5个landmark;但faster rcnn标注的bbox中,一个图片中,可能存在多个bbox,用c++实现刷选,过滤和排除无效bbox的代码如下:
#include <iostream>
#include <stdlib.h>
#include <fstream>
#include <sstream>
#include <string>
#include <vector>
#include <opencv2/opencv.hpp>
using namespace cv;
using namespace std;

int main()
{
	ifstream infile_bbox, infile_align;
	ofstream outfile;
	string Imagedir = "E:/face_alignment/data/CelebA/Img/img_celeba.7z/img_celeba/";
	infile_bbox.open("E:/face_alignment/data/CelebA/Anno/celebA_frcnn_annot.txt");  //输入fasterrcnn标注的bbox
	infile_align.open("E:/face_alignment/data/CelebA/Anno/list_landmarks_celeba_modfy.txt");  //输入celebA的landmark
	outfile.open("E:/face_alignment/data/CelebA/Anno/celebA_bbox_landmark.txt");  //输出文件,包含bbox和landmark

	string img_bbox, img_align;
	int x1, y1, x2, y2, w, h, i = 0;
	int pst1_x, pst1_y, pst2_x, pst2_y, pst3_x, pst3_y, pst4_x, pst4_y, pst5_x, pst5_y;

	infile_bbox >> img_bbox >> x1 >> y1 >> x2 >> y2;

	while (infile_align)
	{
		infile_align >> img_align >> pst1_x >> pst1_y >> pst2_x >> pst2_y >> pst3_x >> pst3_y >> pst4_x >> pst4_y >> pst5_x >> pst5_y;

		while (infile_bbox)
		{
			// 判断是否为同一个图片
			if (strcmp(img_bbox.c_str(), img_align.c_str()) == 0)
			{
				//判断五个点是否都在bbox中
				int xx = (x1 < pst1_x && pst1_x < x2) && (x1 < pst2_x && pst2_x < x2) && (x1 < pst3_x && pst3_x < x2) && (x1 < pst4_x && pst4_x < x2) && (x1 < pst5_x && pst5_x < x2);
				int yy = (y1 < pst1_y && pst1_y < y2) && (y1 < pst2_y && pst2_y < y2) && (y1 < pst3_y && pst3_y < y2) && (y1 < pst4_y && pst4_y < y2) && (y1 < pst5_y && pst5_y < y2);

				if (xx == 1 && yy == 1)
				{
					outfile << img_align << " " << x1 << " " << y1 << " " << x2 << " " << y2 << " ";
					outfile << pst1_x << " " << pst1_y << " " << pst2_x << " " << pst2_y << " " << pst3_x << " " << pst3_y << " " << pst4_x << " " << pst4_y << " " << pst5_x << " " << pst5_y << endl;

					//string image_dir = Imagedir + img_align;
					//Mat image = imread(image_dir, -1);
					//w = x2 - x1;
					//h = y2 - y1;
					//Rect bbox(x1, y1, w, h);
					//rectangle(image, bbox, cv::Scalar(255, 0, 0), 2);
					//cv::circle(image, cv::Point(pst1_x, pst1_y), 5, cv::Scalar(255, 255, 0), 2);
					//cv::circle(image, cv::Point(pst2_x, pst2_y), 5, cv::Scalar(255, 255, 0), 2);
					//cv::circle(image, cv::Point(pst3_x, pst3_y), 5, cv::Scalar(255, 255, 0), 2);
					//cv::circle(image, cv::Point(pst4_x, pst4_y), 5, cv::Scalar(255, 255, 0), 2);
					//cv::circle(image, cv::Point(pst5_x, pst5_y), 5, cv::Scalar(255, 255, 0), 2);

					i++;
					cout << i << endl;
					//imshow("bbox", image);
					//waitKey(1000);
				}

			}
			else
				break;

			infile_bbox >> img_bbox >> x1 >> y1 >> x2 >> y2;
		}


	}

	infile_bbox.close();
	infile_align.close();
	outfile.close();

	return 0;
}
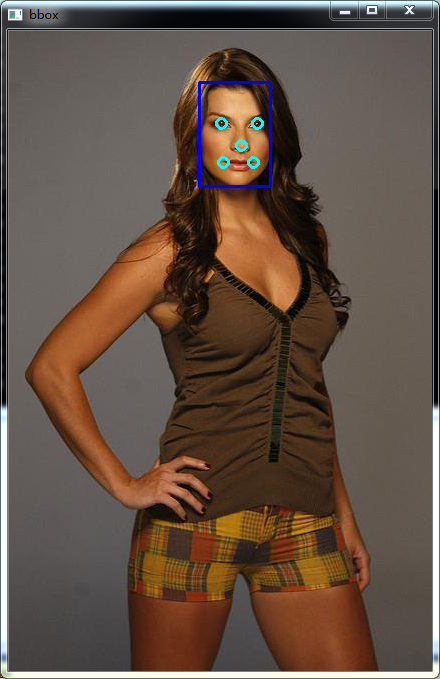
验证刷选效果是否可行的可视化程序:
#include <iostream>
#include <stdlib.h>
#include <fstream>
#include <sstream>
#include <string>
#include <vector>
#include <opencv2/opencv.hpp>
using namespace cv;
using namespace std;


int main()
{
	ifstream infile;
	string Imagedir = "E:/face_alignment/data/CelebA/Img/img_celeba.7z/img_celeba/";
	infile.open("E:/face_alignment/data/CelebA/Anno/celebA_bbox_landmark.txt");

	string img;
	int x1, y1, x2, y2, w, h, i = 0;
	int pst1_x, pst1_y, pst2_x, pst2_y, pst3_x, pst3_y, pst4_x, pst4_y, pst5_x, pst5_y;

	while (infile)
	{
		infile >> img >> x1 >> y1 >> x2 >> y2 >> pst1_x >> pst1_y >> pst2_x >> pst2_y >> pst3_x >> pst3_y >> pst4_x >> pst4_y >> pst5_x >> pst5_y;

		string image_dir = Imagedir + img;
		Mat image = imread(image_dir, -1);
		w = x2 - x1;
		h = y2 - y1;
		Rect bbox(x1, y1, w, h);
		rectangle(image, bbox, cv::Scalar(255, 0, 0), 2);
		cv::circle(image, cv::Point(pst1_x, pst1_y), 5, cv::Scalar(255, 255, 0), 2);
		cv::circle(image, cv::Point(pst2_x, pst2_y), 5, cv::Scalar(255, 255, 0), 2);
		cv::circle(image, cv::Point(pst3_x, pst3_y), 5, cv::Scalar(255, 255, 0), 2);
		cv::circle(image, cv::Point(pst4_x, pst4_y), 5, cv::Scalar(255, 255, 0), 2);
		cv::circle(image, cv::Point(pst5_x, pst5_y), 5, cv::Scalar(255, 255, 0), 2);

		i++;
		cout << i << endl;
		imshow("bbox", image);
		waitKey(1000);

	}

	infile.close();


	return 0;
}
标注效果如下图所示:


 1959
1959

 被折叠的 条评论
为什么被折叠?
被折叠的 条评论
为什么被折叠?
 到【灌水乐园】发言


