


一,android程序的测试
根据是否知道程序的源代码:
白盒测试: 知道源代码,根据源代码进行测试.
黑盒测试: 没有程序的源代码, 只是测试程序的功能.
根据测试的粒度 (模块的大小)
单元测试 unit test
方法测试 function test
集成测试 intergration test
系统测试 system test
根据测试的次数 暴力程度
冒烟测试 smoke test
示例1: (测试模拟机上的所有的应用程序,并记录在测试过程中的日志)
C:\Users\Administrator>adb shell
# monkey 2000
monkey 2000
// activityResuming(cn.guoqing.database)
// CRASH: com.android.speechrecorder (pid 470)
// Short Msg: java.lang.NullPointerException
// Long Msg: java.lang.NullPointerException
// Build Label: generic/sdk/generic:2.3.3/GRI34/101070:eng/test-keys
// Build Changelist: 101070
// Build Time: 1296773036000
// java.lang.NullPointerException
// at com.android.speechrecorder.SpeechRecorderActivity$4.run(SpeechRecorde
rActivity.java:192)
//
** Monkey aborted due to error.
Events injected: 386
## Network stats: elapsed time=51206ms (51206ms mobile, 0ms wifi, 0ms not connec
ted)
** System appears to have crashed at event 386 of 2000 using seed 0
#
示例2:(测试手机上指定的应用程序)
# monkey -p cn.guoqing.userLoginSYS 2000
monkey -p cn.guoqing.userLoginSYS 2000
压力测试 pressure test
日志的等级
ERROR > WARN > INFO > DEBUG > VERBOSE
二,对应用进行单元测试
1,Junit测试;
1)需要测试类继承AndroidTestCase
2)需要在应用程序的清单文件中配置:
1,在manifest标签中:
<!-- 指令集 -->
<instrumentation
android:name="android.test.InstrumentationTestRunner"
android:label="Tests for My App"
android:targetPackage="cn.guoqing.userLoginSYS" /> --->次处的包名要换成当前应用的包名
2,在application标签中:
<!-- 测试的指令集需要的函数库 -->
<uses-library android:name="android.test.runner" />
注意:在IDE中可以通过创建new Project-->android-->android Test Programe-->再选择你要测试的工程名 -->finish
之后再在他的清单文件中将上面两个标签中内容copy到你写的测试类中的相应位置即可
3)示例:
/**
* 创建出来一个测试类,继承AndroidTestCase
*
* 运行测试代码 1.上传当前应用程序到手机系统 2.发送指令通知手机测试刚才上传的代码
* @author Administrator
*
*/
public class TestCalcService extends AndroidTestCase {
//所有的测试方法 都应该向测试框架抛出异常
public void testAdd() throws Exception{
CalcService service = new CalcService();
int result = service.add(3, 5);
assertEquals(8, result);
}
}
三,使用文件进行数据存储
1,利用传统的方式:android系统的根目录下是不能直接进行操作的,为了安全起见,所以在根目录下的data/data/目录下
为系统中的每一个应用程序都以它的包名命名的文件夹用来存储当前应用程序的信息文件
1)文件写入
File file = new File("/data/data/com.itheima.login/info.txt");
FileOutputStream fos = new FileOutputStream(file);
fos.write("lisi".getbytes());
fos.close();
2)文件的读取
File file = new File("/data/data/com.itheima.login/info.txt");
FileInputStream fis = new FileInputStream(file);
BufferedReader br = new BufferedReader(new InputStreamReader(fis));
String line = br.readLine();
fis.close();
br.close();
2,采用上下文获取应用程序文件目录:
上下文 其实提供了应用程序 的一个详细的环境信息. 包括 包名是什么 /data/data/目录在哪里.
we do chicken right
1)文件的写入:
File file = new File(context.getFilesDir(),"info.txt"); //在当前应用程序的目录下 创建一个files目录 里面有一个文件 info.txt
FileOutputStream fis = new FileOutputStream(file);
fos.write("lisi".getbytes());
fos.close();
2)文件的读取:
File file = new File(context.getFilesDir(),"info.txt");
FileInputStream fis = new FileInputStream(file);
BufferedReader br = new BufferedReader(new InputStreamReader(fis));
String line = br.readLine();
fis.close();
br.close();
3)上下文中常用的Api
1,context.getFilesDir(); /data/data/当前应用程序包名/files
2,context.getCacheDir(); /data/data/当前应用程序包名/cache
3,安装一个apk后 系统拷贝这个apk /data/app/xx.apk -->context.getPackageCodePath()
4,直接获取一个文件的输入流
FileInputStream fis = context.openFileInput("info.txt");
等价于
File file = new File(context.getFilesDir(),"info.txt");
FileInputStream fis = new FileInputStream(file);
5,直接获取一个文件的输出流
FileOutputStream fos = this.openFileOutput("info.txt", this.MODE_PRIVATE); //文件是私有模式
(this.MODE_APPEND 追加模式 新的数据会被保存到旧的数据的后面)
等价于:
File file = new File(context.getFilesDir(),"info.txt");
FileOutputStream fis = new FileOutputStream(file);
四,文件访问权限:
模式:当前文件类型(-:文件 d:文件夹) 当前用户 组 其他用户
- rw- rw- --- 私有
- rw- rw- r-- 可读
- rw- rw- -w- 可写
- rw- rw- rw- 可读可写
android系统有一个特点 每个应用程序 都是一个单独的用户.
一个应用程序创建的文件 默认模式是私有的模式,
别的应用程序不可以访问 这个应用程序私有的数据.
五,系统源代码的查找步骤:
1,首先将系统的源应用程序导入到IDE中
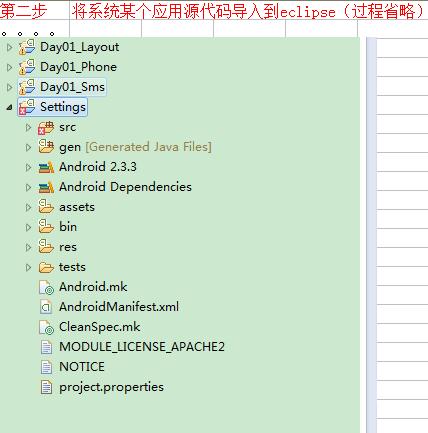
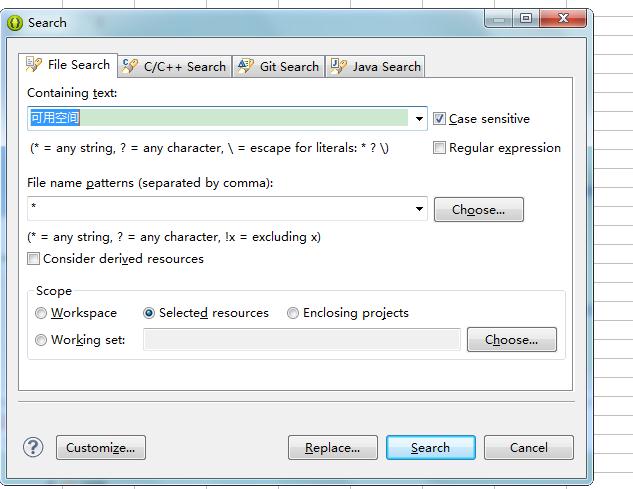
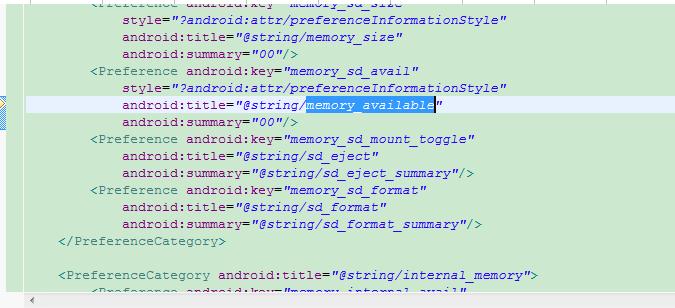
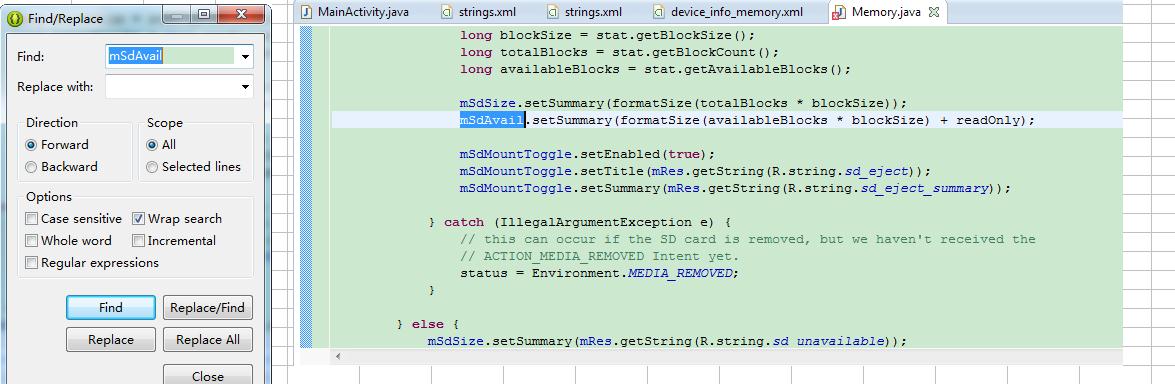
2,第一步:随便找个界面,比如要查找“可用空间”

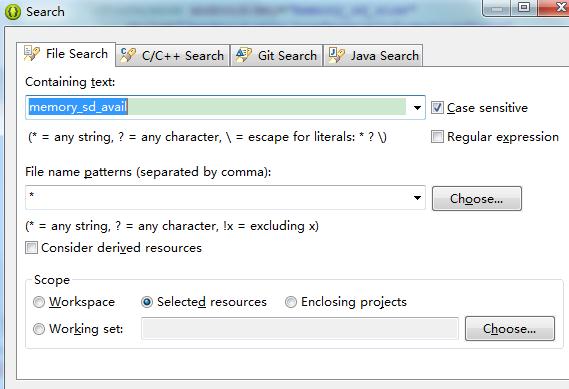
3,第三步:选中Setting这个项目,按Ctrl+H全局搜索,有几个选项按钮可以选择 workspace表示在整个工作空间中搜索,Select resource表示在当前被选中的目录下(即Setting工程下)搜索,
当然也可以选择某一个子文件夹进行搜索,enclosing project表示未关闭的工程中搜索,
在上面两个输入框中可以通过通配符的形式输入内容 比如在第二个输入框中输入*.xml表示在只搜索选中目录中的xml文件
结果如下:
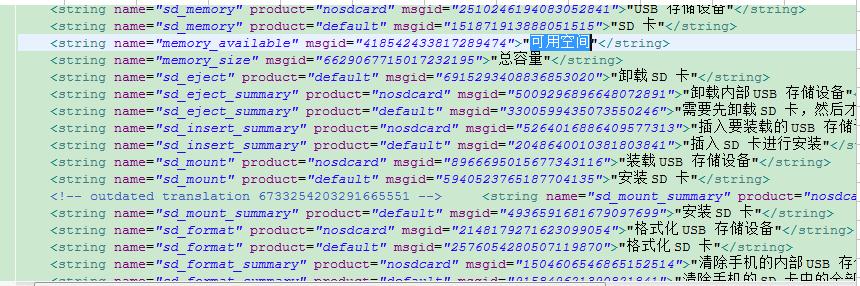
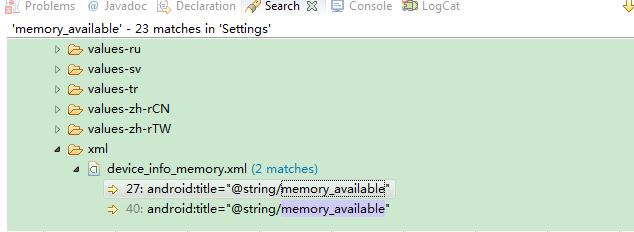
继续搜索memary_available
注意:要找到xml文件夹下面的搜索结果

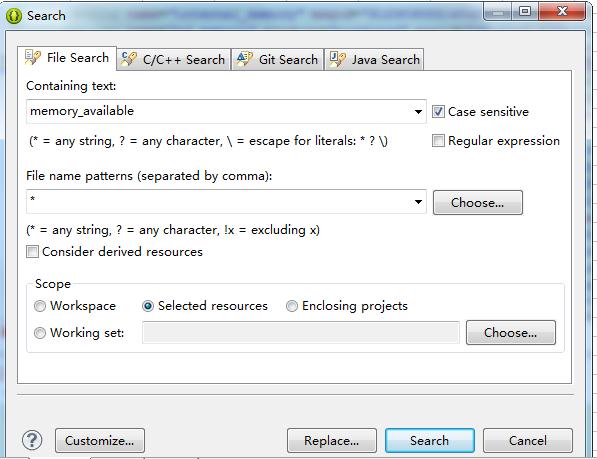
接下来搜索memory_sd_avail
结果如下: 这样就找到了java代码
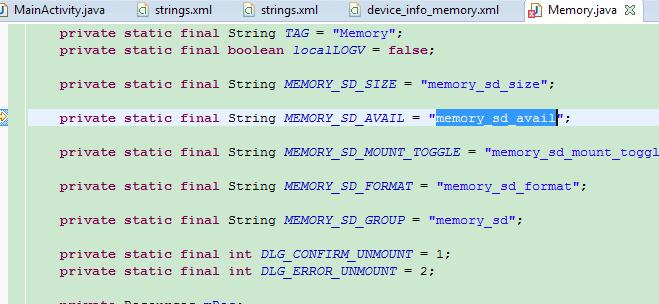

之后就可以通过ctrl+F查找相应代码块了

六,用于保存数据的api:SharedPreferences 避免了因对字符串的切割而造成数据的混乱 (例如:用户名,密码)
//1,向文件中写数据
SharedPreferences sp = context.getSharedPreferences("config", //config.xml文件
Context.MODE_PRIVATE);
Editor editor = sp.edit();
editor.putString("username", username);
editor.putString("password", password);
editor.commit();
//2,从文件中获取数据
SharedPreferences sp = context.getSharedPreferences("config",
Context.MODE_PRIVATE);
String username = sp.getString("username", "");
String password = sp.getString("password", "");
七,
1,利用xml序列化的api生成xml文件
//xml文件的序列化器 生成xml文件
XmlSerializer serializer = Xml.newSerializer();
File file = new File(context.getFilesDir(),"config.xml");
FileOutputStream fos = new FileOutputStream(file);
//初始化xml文件序列化器
serializer.setOutput(fos, "utf-8");
serializer.startDocument("utf-8", true);
serializer.startTag(null, "map");
serializer.startTag(null, "string");
serializer.attribute(null, "name", "username");
serializer.text(username);
serializer.endTag(null, "string");
serializer.startTag(null, "string");
serializer.attribute(null, "name", "password");
serializer.text(password);
serializer.endTag(null, "string");
serializer.endTag(null, "map");
serializer.endDocument();
fos.close();
2,pull解析Xml文件
要解析的xml文件:
<?xml version='1.0' encoding='utf-8' standalone='yes' ?>
<citys>
<city id="1">
<weather>晴</weather>
<name>北京</name>
<temp>25°C</temp>
<wind>7级别</wind>
<pm>800</pm>
</city>
<city id="2">
<weather>晴</weather>
<name>南京</name>
<temp>20°C</temp>
<wind>1级别</wind>
<pm>200</pm>
</city>
<city id="3">
<weather>晴</weather>
<name>东京</name>
<temp>250°C</temp>
<wind>7级别</wind>
<pm>1000</pm>
</city>
</citys>
解析:
XmlPullParser parser = Xml.newPullParser();
List<CityInfo> cityInfos = null;
CityInfo cityInfo = null;
//设置初始化参数 解析哪个流里面的内容 格式编码
parser.setInput(WeatherService.class.getClassLoader()
.getResourceAsStream("weather.xml"), "utf-8");
int type = parser.getEventType();
while(type!=XmlPullParser.END_DOCUMENT){
switch (type) {
case XmlPullParser.START_TAG: //文本开始标签
if("citys".equals(parser.getName())){
//初始化所有城市信息的集合
cityInfos = new ArrayList<CityInfo>();
}else if("city".equals(parser.getName())){
cityInfo = new CityInfo();
String id = parser.getAttributeValue(null, "id");
cityInfo.setId(Integer.parseInt(id));
}else if("weather".equals(parser.getName())){
String weather = parser.nextText();
cityInfo.setWeather(weather);
}else if("name".equals(parser.getName())){
String name = parser.nextText();
cityInfo.setName(name);
}else if("temp".equals(parser.getName())){
String temp = parser.nextText();
cityInfo.setTemp(temp);
}else if("wind".equals(parser.getName())){
String wind = parser.nextText();
cityInfo.setWind(wind);
}else if("pm".equals(parser.getName())){
String pm = parser.nextText();
cityInfo.setPm(Integer.parseInt(pm));
}
break;
case XmlPullParser.END_TAG: //结束节点
if("city".equals(parser.getName())){
//一个城市的信息解析完毕了.
cityInfos.add(cityInfo);
cityInfo = null;
}
break;
}
//只要事件类型不是文档的结尾,需要不停的解析下一个节点
type = parser.next();
}
八,SQLiteOpenHelper类 利用数据库存储,查询数据
创建SQLiteOpenHelper类的实例对象
public class PersonDBOpenHelper extends SQLiteOpenHelper {
private static final String TAG = "PersonDBOpenHelper";
/**
*
* @param context上下文
* "person.db" 数据库名称 null 采用默认游标工厂 1 数据库的版本号 >=1
*/
public PersonDBOpenHelper(Context context) {
super(context, "person.db", null, 4);
}
/**
* 数据库第一次被创建的时候 调用,如果数据库已经存在 就不会调用这个方法.
* 数据库表结构的初始化.
*/
@Override
public void onCreate(SQLiteDatabase db) {
// 当数据库在第一次被创建的时候 调用 的方法
Log.i(TAG, "数据库被创建了..");
//执行一个sql语句
db.execSQL("create table person (id integer primary key autoincrement, name varchar(20),phone varchar(20)) ");
}
/**
* 当数据库的版本号发生增加的时候调用.
* 适合在升级的时候 更新数据库的表结构
*/
@Override
public void onUpgrade(SQLiteDatabase db, int oldVersion, int newVersion) {
Log.i(TAG, "数据库需要被更新了...");
}
}
利用SQLiteOpenHelper类对数据库进行CRUD操作
public PersonDao(Context context) {
helper = new PersonDBOpenHelper(context);
}
public void add(String name, String phone) {
SQLiteDatabase db = helper.getWritableDatabase();
db.execSQL("insert into person (name,phone) values (?,?)", new Object[]{name,phone});
db.close();
}
public void delete(String name){
SQLiteDatabase db = helper.getWritableDatabase();
db.execSQL("delete from person where name=?", new Object[]{name});
db.close();
}
public void update(String name,String newphone){
SQLiteDatabase db = helper.getWritableDatabase();
db.execSQL("update person set phone=? where name=?", new Object[]{newphone,name});
db.close();
}
//查询
public boolean find(String name){
boolean result ;
SQLiteDatabase db = helper.getReadableDatabase();
Cursor cursor = db.rawQuery("select * from person where name=?", new String[]{name});
if(cursor.moveToNext()){
result = true;
}else{
result = false;
}
cursor.close();
db.close();
return result;
}
/**
* 查找全部
* @return
*/
public List<Person> findAll(){
SQLiteDatabase db = helper.getReadableDatabase();
List<Person> persons = new ArrayList<Person>();
Cursor cursor = db.rawQuery("select id,name,phone from person ", null);
while(cursor.moveToNext()){
int id = cursor.getInt(0);
String name = cursor.getString(1);
String phone = cursor.getString(2);
Person person = new Person();
person.setId(id);
person.setPhone(phone);
person.setName(name);
persons.add(person);
}
cursor.close();
db.close();
return persons;
}
注: 此时可以利用SQLite Expert Professional 软件进行对数据库的可视化操作,


 4018
4018


 被折叠的 条评论
为什么被折叠?
被折叠的 条评论
为什么被折叠?
 到【灌水乐园】发言


