


前言
此文章记录linux添加蜂鸣器驱动的步骤。
一、修改设备树文件
1.1 添加pinctrl节点
打开设备树文件/home/forlinx/work/linux-4.1.15/arch/arm/boot/dts/okmx6ULL-C-emmc.dts,在iomux节点的imx6ul-evk子节点下创建名为pinctrl_beep的子节点,节点内容如下:
/* 选用GPIO4_IO22管脚,管脚属性0x10B0 */
		pinctrl_beep: beepgrp{
          fsl,pins = <
                MX6UL_PAD_CSI_DATA01__GPIO4_IO22 0x10B0	/* GPIO4_IO22 */
                >;
       	};
1.2 添加beep设备节点
在根节点/下创建 beep 蜂鸣器节点,节点名为beep,节点内容如下:
/* 其中pinctrl-0属性设置Beep对应Pin的pinctrl子节点。beep-gpios指定beep所使用的的gpio,为GPIO4的IO22,高电平有效。 */
	beep{
		compatible = "my_beep";
		pinctrl-names = "default";
		pinctrl-0 = <&pinctrl_beep>;
		beep-gpios = <&gpio4 22 GPIO_ACTIVE_HIGH>;
		status = "okay";
	};
1.3 检查beep对应的pin脚是否被占用
在/home/forlinx/work/linux-4.1.15/arch/arm/boot/dts/okmx6ULL-C-emmc.dts文件中搜索蜂鸣器的pin脚(GPIO4_IO22)是否被其他设备占用。
如果有占用,则注释掉。注释方法与C语言类似 => /* */。
举例:
/* 注释掉&ecspi2相关代码 */
/*
&ecspi2 {
	compatible = "fsl,imx51-ecspi";
        fsl,spi-num-chipselects = <1>;
        cs-gpios = <&gpio4 22 0>;
        pinctrl-names = "default";
        pinctrl-0 = <&pinctrl_ecspi2>,<&pinctrl_ecspi2_cs>;
        status = "okay";

        spidev@1 {
                compatible = "spidev";
                spi-max-frequency = <20000000>;
                reg = <0>;
		status="okay";
        };
};
*/

/* 注释掉如下代码 */
/*
	pinctrl_ecspi2_cs: ecspi2_csgrp {
                fsl,pins = <
                MX6UL_PAD_CSI_DATA01__GPIO4_IO22   0x100b1
                >;
        };
	*/
1.4 编译设备树
将*.dts文件编译为*.dtb文件,根据自己的板子编译。
举例:
root@ubuntu:/home/forlinx/work/linux-4.1.15# make dtbs
编译完成后,在/home/forlinx/work/linux-4.1.15/arch/arm/boot/dts/目录生成okmx6ull-c-emmc.dtb文件。
注意: 编译前需要切换到root账户,且需要重新设置环境变量.
//切换到root用户
forlinx@ubuntu:~/work$ sudo su

//重新设置环境变量
forlinx@ubuntu:~/work# . /opt/fsl-imx-x11/4.1.15-2.0.0/environment-setup-cortexa7hf-neon-poky-linux-gnueabi
1.5 将新的设备树文件烧录到开发板中
将新生成的okmx6ULL-C-emmc.dtb文件烧录到开发板中,可以采用U盘或NFS(推荐)方式。
- 虚拟机设备树路径:
/home/forlinx/work/linux-4.1.15/arch/arm/boot/dts/okmx6ull-c-emmc.dtb - 开发板设备树路径:
/run/media/mmcblk1p1/okmx6ull-c-emmc.dtb
举例:
// u盘拷贝
root@fl-imx6ull:~# cp /run/media/sda1/okmx6ull-c-emmc.dtb /run/media/mmcblk1p1/okmx6ull-c-emmc.dtb

//保存
root@fl-imx6ull:~# sync

//重启
root@fl-imx6ull:~# reboot
1.6 重启后检查beep节点是否存在
系统重启后,进入开发板/proc/device-tree目录查看beep节点是否存在,如果存在的话就说明设备树基本修改成功。

二、详细驱动程序
2.1 驱动代码
/* beep.c */
#include <linux/kernel.h>
#include <linux/module.h>
#include <linux/init.h>
#include <linux/fs.h>
#include <linux/uaccess.h>
#include <linux/io.h>
#include <linux/cdev.h>
#include <linux/device.h>
#include <linux/of.h>
#include <linux/of_address.h>
#include <linux/of_irq.h>
#include <linux/of_gpio.h>
#include <linux/gpio.h>
#include <linux/slab.h>

#define BEEP_COUNT 1
#define BEEP_NAME "beep"
#define BEEPON 1
#define BEEPOFF 0

/*设备结构体*/
struct beep_dev{
    dev_t devid;    /*设备号*/
    int major;  	/*主设备号*/
    int minor;  	/*次设备号*/
    struct cdev cdev;   	/*字符设备*/
    struct class *class;    /*创建类*/
    struct device *device;  /*创建设备*/
    struct device_node *node; /*设备节点*/
    int beep_gpio;
};

struct beep_dev beep;


static int beep_open(struct inode *inode, struct file *filp){
    filp->private_data = &beep; /* 设置私有数据 */
    return 0;
}

static ssize_t beep_write(struct file *filp, const char __user *buf,size_t cnt, loff_t *offt)
{
    int ret = 0;
    unsigned char databuf[1];

    ret = copy_from_user(databuf, buf, cnt);
    if(ret < 0){
        return -EINVAL;
    }
    if(databuf[0] == BEEPON){
        gpio_set_value(beep.beep_gpio, 1);
    }
    else if(databuf[0] == BEEPOFF){
        gpio_set_value(beep.beep_gpio, 0);
    }
    return 0;
}

static int beep_release(struct inode *inode, struct file *filp){

    return 0;
}


static const struct file_operations beep_fops = { /*字符设备操作函数集合*/
    .owner = THIS_MODULE,
    .write = beep_write,
    .open = beep_open,
    .release = beep_release,

};


/*入口函数*/
static int __init beep_init(void){
    int ret = 0;

    /*注册字符设备*/
    beep.major = 0;     /*内核自动申请设备号*/
    if(beep.major){     /*如果定义了设备号*/
        beep.devid = MKDEV(beep.major, 0);
        ret = register_chrdev_region(beep.devid, BEEP_COUNT, BEEP_NAME);
    }
    else{   /*否则自动申请设备号*/
        ret = alloc_chrdev_region(&beep.devid, 0, BEEP_COUNT, BEEP_NAME);
        beep.major = MAJOR(beep.devid); /*保存主设备号*/
        beep.minor = MINOR(beep.devid); /*保存次设备号*/
    }
    if(ret < 0){
        goto failed_devid;
    }
    printk("beepdev major = %d minor = %d \r\n",beep.major,beep.minor);  /*打印主次设备号*/

    /*添加字符设备*/
    beep.cdev.owner = THIS_MODULE;
    cdev_init(&beep.cdev, &beep_fops);
    ret = cdev_add(&beep.cdev, beep.devid, BEEP_COUNT);
    if(ret < 0){    /*添加字符设备失败*/
        goto failed_cdev;
    }

    /*自动添加设备节点*/
    /*创建类*/
    beep.class = class_create(THIS_MODULE, BEEP_NAME); /*class_creat(owner,name);*/
    if(IS_ERR(beep.class)){   /*判断是否创建类成功*/
        ret = PTR_ERR(beep.class);
        goto failed_class;
    }

    /*创建设备*/
    beep.device = device_create(beep.class, NULL, beep.devid, NULL, BEEP_NAME);
     if(IS_ERR(beep.device)){   /*判断是否创建类成功*/
        ret = PTR_ERR(beep.device);
        goto failed_device;
    }

	/*获取设备节点*/
	beep.node = of_find_node_by_path("/beep");
	if(beep.node == NULL){    /*寻找节点失败*/
		ret = -EINVAL;
		goto failed_findnode;
	}

    /*获取led所对应的gpio*/
    beep.beep_gpio = of_get_named_gpio(beep.node, "beep-gpios", 0);
	if(beep.beep_gpio < 0){
		printk("can't find beep gpio \r\n");
		ret = -EINVAL;
		goto failed_findnode;
	}

    printk("beep gpio num = %d \r\n",beep.beep_gpio);

	/*申请gpio*/
	ret = gpio_request(beep.beep_gpio, "beep-gpios");
	if(ret){
		printk("Failed to request gpio \r\n");
		ret = -EINVAL;
		goto failed_findnode;
	}

	/*使用IO,申请为输出*/
	ret = gpio_direction_output(beep.beep_gpio, 0); /*设置为输出,低电平不响*/
	if(ret < 0){
		goto failed_setoutput;
	}

	return 0;

failed_setoutput:
    gpio_free(beep.beep_gpio);
failed_findnode:
    device_destroy(beep.class, beep.devid);
failed_device:
    class_destroy(beep.class);
failed_class:
    cdev_del(&beep.cdev);
failed_cdev:
    unregister_chrdev_region(beep.devid, BEEP_COUNT);
failed_devid:
    return ret;
}

/*出口函数*/
static void __exit beep_exit(void){
    /*注销字符设备*/
    cdev_del(&beep.cdev);

    /*卸载设备*/
    unregister_chrdev_region(beep.devid, BEEP_COUNT);

    gpio_free(beep.beep_gpio);
    device_destroy(beep.class, beep.devid);
    class_destroy(beep.class);
}


/*模块入口和出口*/
module_init(beep_init);
module_exit(beep_exit);

MODULE_LICENSE("GPL");
MODULE_AUTHOR("ZYC");
2.2 驱动Makefile代码
# beep驱动 Makefile
# 将KERNELDIR改为自己的linux目录

KERNELDIR := /home/forlinx/work/linux-4.1.15
CURRENT_PATH := $(shell pwd)

obj-m := beep.o

build: kernel_modules

kernel_modules:
	$(MAKE) -C $(KERNELDIR) M=$(CURRENT_PATH) modules

clean:
	$(MAKE) -C $(KERNELDIR) M=$(CURRENT_PATH) clean
2.3 编译
root@ubuntu:/home/forlinx/work/deep# make
编译成功后生成beep.ko文件。
三、详细应用测试代码
3.1 应用代码
/* beepApp.c */
#include <sys/types.h>
#include <sys/stat.h>
#include <fcntl.h>
#include <unistd.h>
#include <stdlib.h>
#include <string.h>
#include <stdio.h>

/*
*argc:应用程序参数个数
*argv[]文件参数名,字符串形式
*./beepApp /dev/beep 0 关更名器
*./beepApp /dev/beep 1 开蜂鸣器
*/

int main(int argc, int *argv[])
{
    int fd, retval;
    char *filename;
    unsigned char databuf[1];

    if(argc != 3){
        printf("Error use\r\n");
        return -1;
    }
    /*保存设备文件名*/
    filename = argv[1];
    fd = open(filename, O_RDWR);
    if(fd < 0){
        printf("open file failed \r\n");
        return -1;
    }
    /*将字符转化为数字*/
    databuf[0] = atoi(argv[2]);

    retval = write(fd, databuf, sizeof(databuf));
    if(retval < 0){
        printf("led write failed\r\n");
        close(fd);
        return -1;
    }
    close(fd);

    return 0;
}
3.2 应用程序编译
root@ubuntu:/home/forlinx/work/deep# $CC beepApp.c -o beepApp
编译成功后,生成beepApp文件。
四、测试
4.1 拷贝beep.ko
将编译好的beep.ko拷贝到/lib/modules/4.1.15-00050-ge85def2/目录。可通过命令uname -r获取系统版本(4.1.15)。
4.2 安装beep.ko
// 安装beep.ko
root@fl-imx6ull:/lib/modules/4.1.15-00050-ge85def2# insmod beep.ko

//查看安装目录
root@fl-imx6ull:/lib/modules/4.1.15-00050-ge85def2# lsmod
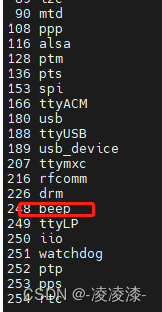
4.3 查看当前系统中的设备
root@fl-imx6ull:/lib/modules/4.1.15-00050-ge85def2# cat /proc/devices
4.4 拷贝beepApp到开发板中
将编译好的应用程序拷贝到开发板中。
4.5 测试
在应用程序的拷贝目录测试蜂鸣器。
/* 开启蜂鸣器 */
root@fl-imx6ull:~# ./beepApp /dev/beep 1

/* 关闭蜂鸣器 */
root@fl-imx6ull:~# ./beepApp /dev/beep 0
五、开机自动加载驱动
将驱动添加到内核中,这样就不用每次开机都手动加载驱动模块了。
5.1 将驱动代码拷贝到开发板合适位置
将beep.c拷贝到linux内核驱动相关的目录,例如放到led的驱动目录下(/home/forlinx/work/linux-4.1.15#/drivers/leds/):
cp beep.c /home/forlinx/work/linux-4.1.15/drivers/leds/
5.2 修改Makefile文件
修改/home/forlinx/work/linux-4.1.15/drivers/leds/目录下的Makefile文件,在最下面添加一行:
obj-y += beep.o
5.3 编译内核
参考编译设备树命令:
oot@ubuntu:/home/forlinx/work/linux-4.1.15# make imx6ull_defconfig
root@ubuntu:/home/forlinx/work/linux-4.1.15# make zImage
5.4 烧录内核
将内核烧录到开发板中:
- 虚拟机中的内核路径:
/home/forlinx/work/linux-4.1.15/arch/arm/boot/zImage - 开发板中的内核路径:
/run/media/mmcblk1p1/zImage
举例:
//u盘方式
root@fl-imx6ull:~# cp /run/media/sda1/zImage /run/media/mmcblk1p1/zImage

//保存
root@fl-imx6ull:~# sync

//重启
root@fl-imx6ull:~# reboot
5.5 测试
重启后,测试蜂鸣器是否可以正常工作。参考4.5小节。
参考:
- Linux驱动_Beep蜂鸣器
- 正点原子_I.MX6U 嵌入式 Linux 驱动开发指南_V1.8(64.4.3章节)


 256
256


 被折叠的 条评论
为什么被折叠?
被折叠的 条评论
为什么被折叠?
 到【灌水乐园】发言


