


一、源码软件包安装:安装nginx
### --- Nginx

~~~     Nginx是一款轻量级的web服务器/反向代理服务器及电子邮件(IMAP/POP3)代理服务器,
~~~     在BSD-like协议下发行,其特点是占有内存少,并发能力强。
### --- 下载nginx源码包
[root@server11 ~]# mkdir /lnmp
[root@server11 ~]# cd /lnmp/
[root@server11 lnmp]# wget http://nginx.org/download/nginx-1.12.2.tar.gz
[root@server11 lnmp]# tar -zxvf nginx-1.12.2.tar.gz### --- 创建用于运行nginx的用户
[root@server11 lnmp]# useradd -r -s /sbin/nologin nginx### --- 解压缩并安装
[root@server11 lnmp]# cd nginx-1.12.2/
[root@server11 nginx-1.12.2]# ./configure --prefix=/usr/local/nginx --user=nginx --group=nginx --with-http_stub_status_module --with-http_ssl_module && make && make install
[root@server11 nginx-1.12.2]# echo $?
0
[root@server11 nginx-1.12.2]# /usr/local/nginx/sbin/nginx
[root@server11 nginx-1.12.2]# netstat -antp
tcp 0 0 0.0.0.0:80 0.0.0.0:* LISTEN 13762/nginx: master### --- 验证:
~~~ http://10.10.10.11/
~~~ Welcome to nginx!
### --- 上传编写好的nginx启动管理脚本(见文本尾部)
~~~ 配置启动脚本,见三、附件
二、安装MySQL
### --- 安装MySQL
~~~     下载:https://dev.mysql.com/downloads.mysql/
~~~     选择:MySQL Community SERVER 5.5 >>
~~~     选择:Select Version:按照自己要求选择
~~~             Select Operating System:Source Code
~~~             Select OS Version:Generic Linux
~~~     格式:mysql-N.N.NN.tar.gz

[root@server11 nginx-1.12.2]# cd ..
[root@server11 lnmp]# wget http://downloads.mysql.com/archives/mysql-5.5/mysql-5.5.25a.tar.gz
~~~     #OR
[root@server11 lnmp]# wget https://downloads.mysql.com/archives/get/p/23/file/mysql-5.5.62-linux-glibc2.12-x86_64.tar.gz
### --- 创建用于运行MySQL的用户:
[root@server11 lnmp]# useradd -r -s /sbin/nologin mysql### --- 解压缩MySQL并安装
[root@server11 lnmp]# tar -zxvf mysql-5.5.25a.tar.gz
[root@server11 lnmp]# cd mysql-5.5.25a/
[root@server11 mysql-5.5.25a]# cmake -DCMAKE_INSTALL_PREFIX=/usr/local/mysql -DMYSQL_UNIX_ADDR=/tmp/mysql.sock \
> -DEXTRA_CHARSETS=all -DDEFAULT_CHARSET=utf8 -DDEFAULT_COLLATION=utf8_general_ci \
> -DWITH_MYISAM_STORAGE_ENGINE=1 -DWITH_INNOBASE_STORAGE_ENGINE=1 \
> -DWITH_MEMORY_STORAGE_ENGINE=1 -DWITH_READLINE=1 \
> -DENABLED_LOCAL_INFILE=1 -DMYSQL_USER=mysql -DMYSQL_TCP_PORT=3306 // 第一次编译失败删除目录可以解决,不然可能会报错
[root@server11 mysql-5.5.25a]# echo $?
0
[root@server11 mysql-5.5.25a]# make && make install
[root@server11 mysql-5.5.25a]# echo $?
0
[root@server11 mysql-5.5.25a]# ln -s /usr/local/mysql/bin/* /usr/local/bin### --- 修改安装后的目录权限
[root@server11 mysql-5.5.25a]# cd /usr/local/mysql
[root@server11 mysql]# chown -R root .
[root@server11 mysql]# chown -R mysql data/### --- 生成MySQL配置文件
[root@server11 mysql]# cp -a /lnmp/mysql-5.5.25a/support-files/my-medium.cnf /etc/my.cnf
cp: overwrite '/etc/my.cnf'? y### --- 初始化。生成授权表
[root@server11 mysql]# cd /usr/local/mysql/ // 一定要先切换到此目录下,然后在执行下一步、
[root@server11 mysql]# ./scripts/mysql_install_db --user=mysql // 初始化成功标志:两个ok### --- 生成MySQL的启动和自启动管理脚本
[root@server11 mysql]# cd /lnmp/mysql-5.5.25a/support-files/ // 切换到MySQL的源码解压缩目录下的support-files
[root@server11 support-files]# cp -a mysql.server /etc/init.d/mysqld
[root@server11 support-files]# chmod +x /etc/init.d/mysqld
[root@server11 support-files]# chkconfig --add mysqld
[root@server11 support-files]# systemctl status mysqld
ERROR! MySQL is not running
[root@server11 support-files]# systemctl start mysqld
Starting MySQL.. SUCCESS!
[root@server11 support-files]# netstat -antp
tcp 0 0 0.0.0.0:3306 0.0.0.0:* LISTEN 24400/mysqld //2.7、给MySQL的root用户设置密码
[root@server11 support-files]# mysqladmin -uroot password 123456
[root@server11 support-files]# mysql -uroot -p
Enter password: 123456
mysql>
三、PHP
### --- 下载:http://www.php.net/

[root@server11 lnmp]# wget https://www.php.net/distributions/php-7.1.29.tar.gz
[root@server11 lnmp]# tar -zxvf php-7.1.29.tar.gz
[root@server11 lnmp]# cd php-7.1.29/
### --- 解压缩PHP并安装
[root@server11 php-7.1.29]# ./configure --prefix=/usr/local/php/ --with-config-file-path=/usr/local/php/etc/ \
> --with-mysqli=/usr/local/mysql/bin/mysql_config --enable-soap --enable-mbstring=all --enable-sockets \
> --with-pdo-mysql=/usr/local/mysql --with-gd --without-pear --enable-fpm
+--------------------------------------------------------------------+
| License: |
| This software is subject to the PHP License, available in this |
| distribution in the file LICENSE. By continuing this installation |
| process, you are bound by the terms of this license agreement. |
| If you do not agree with the terms of this license, you must abort |
| the installation process at this point. |
+--------------------------------------------------------------------+
Thank you for using PHP.
config.status: creating php7.spec
config.status: creating main/build-defs.h
config.status: creating scripts/phpize
config.status: creating scripts/man1/phpize.1
config.status: creating scripts/php-config
config.status: creating scripts/man1/php-config.1
config.status: creating sapi/cli/php.1
config.status: creating sapi/fpm/php-fpm.conf
config.status: creating sapi/fpm/www.conf
config.status: creating sapi/fpm/init.d.php-fpm
config.status: creating sapi/fpm/php-fpm.service
config.status: creating sapi/fpm/php-fpm.8
config.status: creating sapi/fpm/status.html
config.status: creating sapi/phpdbg/phpdbg.1
config.status: creating sapi/cgi/php-cgi.1
config.status: creating ext/phar/phar.1
config.status: creating ext/phar/phar.phar.1
config.status: creating main/php_config.h
config.status: executing default commands### --- 报错信息
If configure fails try --with-webp-dir=<DIR>
If configure fails try --with-jpeg-dir=<DIR>
configure: error: png.h not found.
### --- 解决方案:
[root@server11 php-7.1.29]# yum install -y libpng
[root@server11 php-7.1.29]# yum install -y libpng-devel
[root@server11 php-7.1.29]# make && make install
Build complete.
Don't forget to run 'make test'.
Installing shared extensions: /usr/local/php/lib/php/extensions/no-debug-non-zts-20160303/
Installing PHP CLI binary: /usr/local/php/bin/
Installing PHP CLI man page: /usr/local/php/php/man/man1/
Installing PHP FPM binary: /usr/local/php/sbin/
Installing PHP FPM defconfig: /usr/local/php/etc/
Installing PHP FPM man page: /usr/local/php/php/man/man8/
Installing PHP FPM status page: /usr/local/php/php/php/fpm/
Installing phpdbg binary: /usr/local/php/bin/
Installing phpdbg man page: /usr/local/php/php/man/man1/
Installing PHP CGI binary: /usr/local/php/bin/
Installing PHP CGI man page: /usr/local/php/php/man/man1/
Installing build environment: /usr/local/php/lib/php/build/
Installing header files: /usr/local/php/include/php/
Installing helper programs: /usr/local/php/bin/
program: phpize
program: php-config
Installing man pages: /usr/local/php/php/man/man1/
page: phpize.1
page: php-config.1
/lnmp/php-7.1.29/build/shtool install -c ext/phar/phar.phar /usr/local/php/bin
ln -s -f phar.phar /usr/local/php/bin/phar
Installing PDO headers: /usr/local/php/include/php/ext/pdo/### --- 报错信息:
~~~ 若遇到libpeng.so not found.报错(老版本的PHP会出现此问题)
### --- 解决方案:
[root@server11 php-7.1.29]# ln -s /usr/lib64/libpng.so /usr/lib### --- 生成PHP配置文件
[root@server11 php-7.1.29]# cp -a /lnmp/php-7.1.29/php.ini-production /usr/local/php/etc/php.ini #复制源码包内的配置文件到安装目录下,并改名即可
### --- 创建软连接,使用PHP相关命令是更方便
[root@server11 php-7.1.29]# ln -s /usr/local/php/bin/* /usr/local/bin/
[root@server11 php-7.1.29]# ln -s /usr/local/php/sbin/* /usr/local/sbin/
四、配置nginx连接PHP(重难点)
### --- 配置nginx连接PHP(重难点)
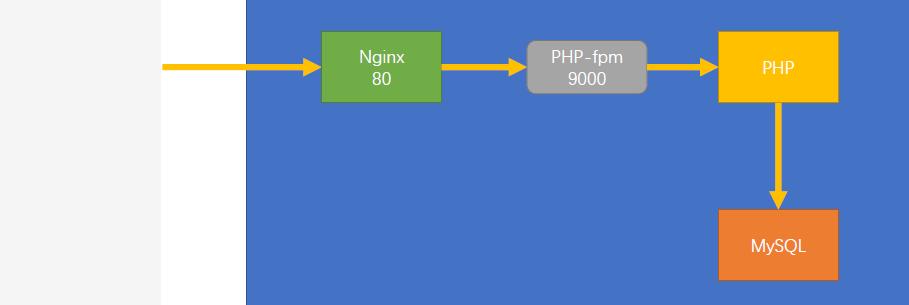
~~~ 当由用户通过nginx的80端口进行请求,nginx响应并判断用户的请求,
~~~ 若是普通的HTML的页面,nginx会直接返回结果,若是PHP的页面,
~~~ nginx会主动向php-fpm发起请求,告诉它有一个PHP的页面需要解析,你找PHP解析一下。
~~~ nginx连接PHP是借助了PHP-fpm:9000端口来完成连接,
~~~ 而Apache是通过模块来实现连接的。### --- nginx连接PHP需要启动php-fpm服务
~~~ 启动时开启的进程数、最少空闲进程数、做多空闲进程数(默认值,未修改)
~~~ 修改nginx启动管理脚本,将php-fpm的注释取消掉即可
[root@server11 php-7.1.29]# cd /usr/local/php/etc/
[root@server11 etc]# cp -a php-fpm.conf.default php-fpm.conf // 生成php-fpm的配置文件,并修改制定参数
[root@server11 etc]# vim php-fpm.conf // 修改指定条目的参数:
pid = run/php-fpm.pid
#include=/usr/local/php/etc/php-fpm.d/*.conf // 修改下面的配置文件;和centos6.x相比把一个php-fpm.conf拆分成两个配置文件:php-fpm.conf和www.conf
[root@server11 etc]# ll php-fpm.d/
total 20
-rw-r--r-- 1 root root 18781 Feb 13 01:36 www.conf.default
[root@server11 etc]# cp -a php-fpm.d/www.conf.default php-fpm.d/www.conf
[root@server11 etc]# vim php-fpm.d/www.conf
user = nginx // 默认是nobody
group = nginx
pm.start_servers = 2
pm.min_spare_servers = 1
pm.max_spare_servers = 3### --- 修改nginx的配置文件,使其识别.php后缀的文件
[root@server11 ~]# cp -a /usr/local/nginx/conf/nginx.conf /usr/local/nginx/conf/nginx.conf.bac
[root@server11 ~]# vim /usr/local/nginx/conf/nginx.conf // 取消下列的注释,并修改include选项的后缀为fastcgi.conf,并注意每一行结尾的分号和大括号
user nginx; // 默认是nobody;默认是注销的,开启即可
location ~ \.php$ { // 默认是注释的,取消注释。不需要进行任何修改,只需要取消注释
root html;
fastcgi_pass 127.0.0.1:9000;
fastcgi_index index.php;
fastcgi_param SCRIPT_FILENAME /scripts$fastcgi_script_name;
include fastcgi.conf; // 把fastcgi_params; 修改为fastcgi.conf #默认是fastcgi_params;,建议修改为fastcfi.conf,不然会报错。
}
[root@server11 ~]# vim /etc/init.d/nginx
vim /etc/init.d/nginx
[root@server11 ~]# chmod +x /etc/init.d/nginx
[root@server11 ~]# chkconfig --add nginx // 添加到开机自启里面
[root@server11 ~]# service nginx start
nginx service start success!
[root@server11 ~]# service nginx restart
nginx service stop success!
nginx service start success!### --- 测试:
### --- 重启nginx服务,创建PHP测试文件,访问并查看是否解析
[root@server11 ~]# systemctl start nginx
[root@server11 ~]# netstat -antp
tcp 0 0 127.0.0.1:9000 0.0.0.0:* LISTEN 22169/php-fpm: mast
tcp 0 0 0.0.0.0:3306 0.0.0.0:* LISTEN 24400/mysqld
tcp 0 0 0.0.0.0:80 0.0.0.0:* LISTEN 13762/nginx: master //4.3、写入PHP的测试页面
[root@server11 ~]# vim /usr/local/nginx/html/index.php
<?php
phpinfo();
### --- 访问验证:http://10.10.10.11/index.php // 可以正常获取PHP 5.6.38版本的信息### --- 修改nginx配置文件,使其默认自动加载PHP文件
### --- 验证:
~~~ 访问http://10.10.10.11/显示PHP的解析页面PHP Version 7.1.29,
~~~ 谁在前面就优先加载谁,若是都没有,就显示该目录下的文件列表
[root@server11 ~]# vim /usr/local/nginx/conf/nginx.conf
location / {
root html;
index index.html index.php index.htm; // 加入index.php的解析页面
}
[root@server11 ~]# rm -rf /usr/local/nginx/html/index.html // 把index.html的配置文件删除
五、附件:建议使用时先复制到文本文件中查看是否有字符集问题
##################################Nginx自动的管理脚本#############################

[root@server11 ~]# vim /etc/init.d/nginx
#!/bin/bash
#Author: yanqi
#chkconfig: 2345 99 33
#description:nginx server control tools

ngxc="/usr/local/nginx/sbin/nginx"
pidf="usr/local/nginx/logs/nginx.pid"
ngxc_fpm="/usr/local/php/sbin/php-fpm"
pidf_fpm="/usr/local/php/var/run/php-fpm.pid"
case "$1" in
    start)
        $ngxc -t &> /dev/null
        if [ $? -eq 0 ];then
                $ngxc
                $ngxc_fpm
                echo "nginx service start success!"
        else
                $ngxc -t
        fi
        ;;
    stop)
        kill -s QUIT $(cat $pidf)
        kill -s QUIT $(cat $pidf_fpm)
                echo "nginx service stop success!"
        ;;
    restart)
        $0 stop
        $0 start
        ;;
    reload)
        $ngxc -t &> /dev/mull
        if [ $? -eq 0 ];then
                kill -s HUP $(cat $pidf)
                kill -s HUP $(cat $pidf_fpm)
                echo "reload nginx config success!"
        else
                $ngxc -t
        fi
        ;;
    *)
        echo "please input stop|start|restart|reload."
        exit 1
esac


 44
44


 被折叠的 条评论
为什么被折叠?
被折叠的 条评论
为什么被折叠?
 到【灌水乐园】发言


