华为ce12800交换机m-lag(V-STP模式)配置举例

本文详细介绍了如何在华为交换机上配置M-LAG双归接入IP网络,包括Eth-Trunk绑定、V-STP、DFSGroup、M-LAG接口设置、VLANIF配置、OSPF路由以及MonitorLink的使用,以确保网络的稳定性和冗余性。
摘要由CSDN通过智能技术生成

在这里插入图片描述
配置## 标题思路

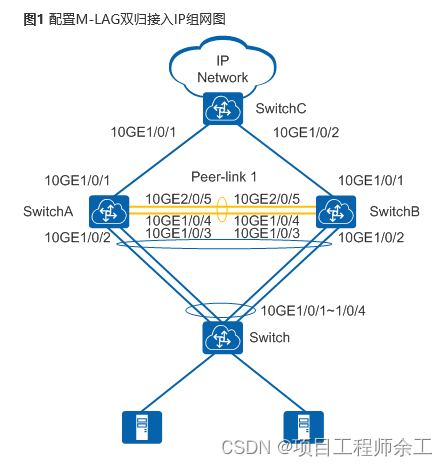
采用如下的思路配置M-LAG双归接入IP网络:
1.在Switch上配置上行接口绑定在一个Eth-Trunk中。
2.分别在SwitchA和SwitchB上配置V-STP、DFS Group、peer-link和M-LAG接口。
3.分别在SwitchA和SwitchB上配置LACP M-LAG的系统优先级、系统ID。
4.分别在SwitchA和SwitchB上配置VLANIF接口IP地址和MAC地址,作为接入设备的双活网关。
5.分别在SwitchA、SwitchB和SwitchC上配置OSPF功能,保证三层互通。
6.分别在SwitchA和SwitchB上配置Monitor Link关联上行接口和下行接口,避免因上行链路故障导致用户侧流量无法转发而丢弃。

在V-STP场景下,为防止接口因生成树协议计算结果被阻塞,可以通过配置主接口实现三层互通或者去使能IP网络侧的生成树协议。

配置Switch。

system-view
[~HUAWEI] sysname Switch
[*HUAWEI] commit
[~Switch] vlan batch 11
[*Switch] interface eth-trunk 20
[*Switch-Eth-Trunk20] mode lacp-static
[*Switch-Eth-Trunk20] port link-type trunk
[*Switch-Eth-Trunk20] port trunk allow-pass vlan 11
[*Switch-Eth-Trunk20] trunkport 10ge 1/0/1 to 1/0/4
[*Switch-Eth-Trunk20] quit
[*Switch] commit

操作步骤

1.在Switch上配置上行接口绑定在一个Eth-Trunk中 # 配置Switch。

system-view
[~HUAWEI] sysname Switch
[*HUAWEI] commit
[~Switch] vlan batch 11
[*Switch] interface eth-trunk 20
[*Switch-Eth-Trunk20] mode lacp-static
[*Switch-Eth-Trunk20] port link-type trunk
[*Switch-Eth-Trunk20] port trunk allow-pass vlan 11
[*Switch-Eth-Trunk20] trunkport 10ge 1/0/1 to 1/0/4
[*Switch-Eth-Trunk20] quit
[*Switch] commit

2.分别标题在SwitchA## 标题和SwitchB上配置V-STP、DFS Group、peer-link和M-LAG接口

配置SwitchA。
system-view
[~HUAWEI] sysname SwitchA
[*HUAWEI] commit
[~SwitchA] stp mode rstp
[*SwitchA] stp v-stp enable
[*SwitchA] interface loopback 0
[*SwitchA-LoopBack0] ip address 10.1.1.1 32
[*SwitchA-LoopBack0] quit
[*SwitchA] dfs-group 1
[*SwitchA-dfs-group-1] source ip 10.1.1.1
[*SwitchA-dfs-group-1] priority 150
[*SwitchA-dfs-group-1] quit
[*SwitchA] interface eth-trunk 1
[*SwitchA-Eth-Trunk1] trunkport 10ge 1/0/4
[*SwitchA-Eth-Trunk1] trunkport 10ge 1/0/5
[*SwitchA-Eth-Trunk1] mode lacp-static
[*SwitchA-Eth-Trunk1] peer-link 1
[*SwitchA-Eth-Trunk1] quit
[*SwitchA] vlan batch 11
[*SwitchA] interface eth-trunk 10
[*SwitchA-Eth-Trunk10] mode lacp-static
[*SwitchA-Eth-Trunk10] port link-type trunk
[*SwitchA-Eth-Trunk10] port trunk allow-pass vlan 11
[*SwitchA-Eth-Trunk10] trunkport 10ge 1/0/2
[*SwitchA-Eth-Trunk10] trunkport 10ge 1/0/3
[*SwitchA-Eth-Trunk10] dfs-group 1 m-lag 1
[*SwitchA-Eth-Trunk10] quit
[*SwitchA] commit

#配置SwitchB。
system-view
[~HUAWEI] sysname SwitchB
[*HUAWEI] commit
[~SwitchB] stp mode rstp
[*SwitchB] stp v-stp enable
[*SwitchB] interface loopback 0
[*SwitchB-LoopBack0] ip address 10.1.1.2 32
[*SwitchB-LoopBack0] quit
[*SwitchB] dfs-group 1
[*SwitchB-dfs-group-1] source ip 10.1.1.2
[*SwitchB-dfs-group-1] priority 120
[*SwitchB-dfs-group-1] quit
[*SwitchB] interface eth-trunk 1
[*SwitchB-Eth-Trunk1] trunkport 10ge 1/0/4
[*SwitchB-Eth-Trunk1] trunkport 10ge 1/0/5
[*SwitchB-Eth-Trunk1] mode lacp-static
[*SwitchB-Eth-Trunk1] peer-link 1
[*SwitchB-Eth-Trunk1] quit
[*SwitchB] vlan batch 11
[*SwitchB] interface eth-trunk 10
[*SwitchB-Eth-Trunk10] mode lacp-static
[*SwitchB-Eth-Trunk10] port link-type trunk
[*SwitchB-Eth-Trunk10] port trunk allow-pass vlan 11
[*SwitchB-Eth-Trunk10] trunkport 10ge 1/0/2
[*SwitchB-Eth-Trunk10] trunkport 10ge 1/0/3
[*SwitchB-Eth-Trunk10] dfs-group 1 m-lag 1
[*SwitchB-Eth-Trunk10] quit
[*SwitchB] commit

3.分别在SwitchA和SwitchB上配置LACP M-LA## 标题G的系统优先级、系统ID

配置SwitchA。[~SwitchA] lacp m-lag priority 10
[*SwitchA] lacp m-lag system-id 00e0-fc00-0000
[*SwitchA] commit

配置SwitchB。[~SwitchB] lacp m-lag priority 10
[*SwitchB] lacp m-lag system-id 00e0-fc00-0000
[*SwitchB] commit

4.分别在SwitchA和SwitchB上配置VLANIF接口IP地址和MAC地址,作为接入设备的双活网关

两端的虚拟IP和虚拟MAC配置要求完全一致,目的是为M-LAG提供相同的虚拟IP和虚拟MAC。

配置SwitchA。[~SwitchA] interface vlanif 11

[*SwitchA-Vlanif11] ip address 10.2.1.1 24
[*SwitchA-Vlanif11] mac-address 0000-5e00-0101
[*SwitchA-Vlanif11] quit
[*SwitchA] commit

配置SwitchB。[~SwitchB] interface vlanif 11

[*SwitchB-Vlanif11] ip address 10.2.1.1 24
[*SwitchB-Vlanif11] mac-address 0000-5e00-0101
[*SwitchB-Vlanif11] quit
[*SwitchB] commit

5.分别在SwitchA、SwitchB和SwitchC上配置OSFP功能,保证三层互通

配置SwitchA。[~SwitchA] interface 10ge 1/0/1

[~SwitchA-10GE1/0/1] undo portswitch
[*SwitchA-10GE1/0/1] ip address 10.3.1.1 24
[*SwitchA-10GE1/0/1] quit
[*SwitchA] ospf 1
[*SwitchA-ospf-1] area 0
[*SwitchA-ospf-1-area-0.0.0.0] network 10.1.1.1 0.0.0.0
[*SwitchA-ospf-1-area-0.0.0.0] network 10.2.1.0 0.0.0.255
[*SwitchA-ospf-1-area-0.0.0.0] network 10.3.1.0 0.0.0.255
[*SwitchA-ospf-1-area-0.0.0.0] quit
[*SwitchA-ospf-1] quit
[*SwitchA] commit

配置SwitchB。[~SwitchB] interface 10ge 1/0/1

[~SwitchB-10GE1/0/1] undo portswitch
[*SwitchB-10GE1/0/1] ip address 10.4.1.1 24
[*SwitchB-10GE1/0/1] quit
[*SwitchB] ospf 1
[*SwitchB-ospf-1] area 0
[*SwitchB-ospf-1-area-0.0.0.0] network 10.1.1.2 0.0.0.0
[*SwitchB-ospf-1-area-0.0.0.0] network 10.2.1.0 0.0.0.255
[*SwitchB-ospf-1-area-0.0.0.0] network 10.4.1.0 0.0.0.255
[*SwitchB-ospf-1-area-0.0.0.0] quit
[*SwitchB-ospf-1] quit
[*SwitchB] commit

配置SwitchC。

system-view
[~HUAWEI] sysname SwitchC
[*HUAWEI] commit
[~SwitchC] interface 10ge 1/0/1
[~SwitchC-10GE1/0/1] undo portswitch
[*SwitchC-10GE1/0/1] ip address 10.3.1.2 24
[*SwitchC-10GE1/0/1] quit
[*SwitchC] interface 10ge 1/0/2
[*SwitchC-10GE1/0/2] undo portswitch
[*SwitchC-10GE1/0/2] ip address 10.4.1.2 24
[*SwitchC-10GE1/0/2] quit
[*SwitchC] ospf 1
[*SwitchC-ospf-1] area 0
[*SwitchC-ospf-1-area-0.0.0.0] network 10.3.1.0 0.0.0.255
[*SwitchC-ospf-1-area-0.0.0.0] network 10.4.1.0 0.0.0.255
[*SwitchC-ospf-1-area-0.0.0.0] quit
[*SwitchC-ospf-1] quit

6.分别在SwitchA和SwitchB上配置Monitor Link关联上行接口和下行接口

配置SwitchA。[~SwitchA] monitor-link group 1

[*SwitchA-mtlk-group1] port 10ge 1/0/1 uplink
[*SwitchA-mtlk-group1] port eth-trunk 10 downlink 1
[*SwitchA-mtlk-group1] quit
[*SwitchA] commit

配置SwitchB。[~SwitchB] monitor-link group 1

[*SwitchB-mtlk-group1] port 10ge 1/0/1 uplink
[*SwitchB-mtlk-group1] port eth-trunk 10 downlink 1
[*SwitchB-mtlk-group1] quit
[*SwitchB] commit

结果查看

查看DFS Group编号为1的M-LAG信息。
[~SwitchA] display dfs-group 1 m-lag

  •            : Local node
    

Heart beat state : OK
Node 1 *
Dfs-Group ID : 1
Priority : 150
Address : ip address 10.1.1.1
State : Master
Causation : -
System ID : 0025-9e95-7c31
SysName : SwitchA
Version : V100R006C00
Device Type : CE12800
Node 2
Dfs-Group ID : 1
Priority : 120
Address : ip address 10.1.1.2
State : Backup
Causation : -
System ID : 0025-9e95-7c11
SysName : SwitchB
Version : V100R006C00
Device Type : CE12800

查看SwitchA上的M-LAG信息。

[~SwitchA] display dfs-group 1 node 1 m-lag brief

    • Local node

M-Lag ID Interface Port State Status
1 Eth-Trunk 10 Up active(*)-active

查看SwitchB上的M-LAG信息。

[~SwitchA] display dfs-group 1 node 2 m-lag brief

    • Local node

M-Lag ID Interface Port State Status
1 Eth-Trunk 10 Up active-active(*)

通过以上显示信息可以看到,“Heart beat state”的状态是“OK”,表明心跳状态正常;SwitchA作为Node 1,优先级为150,“State”的状态是“Master”;SwitchB作为Node 2,优先级为120,“State”的状态是“Backup”。同时“Causation”的状态是“-”,Node 1的“Port State”状态为“Up”,Node 2的“Port State”状态为“Up”,且Node 1和Node 2的M-LAG状态均为“active”,表明M-LAG的配置正确。

  • 11
    点赞
  • 20
    收藏
    觉得还不错? 一键收藏
  • 打赏
    打赏
  • 0
    评论
华为交换机M-LAG(Multi-Chassis Link Aggregation Group)是一种基于链路聚合的技术,可实现网络设备的冗余、负载均衡和高可用性。下面将介绍如何配置华为交换机M-LAG。 首先需要注意的是,M-LAG技术要求交换机要至少有两台,并且每台交换机必须有至少两个可用的物理接口,用于组成M-LAG群组。 1.创建M-LAG群组:在交换机配置界面中输入以下命令:创建M-LAG群组,并指定群组中主节点的优先级。 [Switch] m-lag configuration [Switch-m-lag-configuration] peer entity 1 [Switch-m-lag-configuration-peer-1] priority 50 [Switch-m-lag-configuration-peer-1] quit [Switch-m-lag-configuration] peer entity 2 [Switch-m-lag-configuration-peer-2] priority 40 [Switch-m-lag-configuration-peer-2] quit 在以上命令中,我们创建了两个M-LAG群组,每个群组包含一台交换机,主节点的优先级分别为50和40。 2.创建M-LAG接口:在交换机配置界面中输入以下命令:创建M-LAG接口,并将该接口绑定到M-LAG群组。 [Switch]interface m-lag 1 [Switch-M-LAG1] port GigabitEthernet 0/0/1 [Switch-M-LAG1] port GigabitEthernet 0/0/2 [Switch-M-LAG1] quit 在以上命令中,我们创建了一个M-LAG接口,并将接口绑定到M-LAG群组1上。该接口由GigabitEthernet 0/0/1和GigabitEthernet 0/0/2两个物理接口组成。 3.为M-LAG接口绑定Tag类型IP地址:在交换机配置界面中输入以下命令:为M-LAG接口绑定Tag类型IP地址。 [Switch]interface m-lag 1.1 [Switch-M-LAG1/1] ip address 192.168.1.1 24 [Switch-M-LAG1/1] quit 在以上命令中,我们为M-LAG接口绑定了一个Tag类型的IP地址,该IP地址为192.168.1.1。 以上就是华为交换机M-LAG配置的基本步骤。通过M-LAG技术,交换机间可以实现冗余备份和负载均衡,提高网络可用性和稳定性。

“相关推荐”对你有帮助么?

  • 非常没帮助
  • 没帮助
  • 一般
  • 有帮助
  • 非常有帮助
提交
评论
添加红包

请填写红包祝福语或标题

红包个数最小为10个

红包金额最低5元

当前余额3.43前往充值 >
需支付:10.00
成就一亿技术人!
领取后你会自动成为博主和红包主的粉丝 规则
hope_wisdom
发出的红包

打赏作者

项目工程师余工

你的鼓励将是我创作的最大动力

¥1 ¥2 ¥4 ¥6 ¥10 ¥20
扫码支付:¥1
获取中
扫码支付

您的余额不足,请更换扫码支付或充值

打赏作者

实付
使用余额支付
点击重新获取
扫码支付
钱包余额 0

抵扣说明:

1.余额是钱包充值的虚拟货币,按照1:1的比例进行支付金额的抵扣。
2.余额无法直接购买下载,可以购买VIP、付费专栏及课程。

余额充值