


Android为用户提供了多种数据存储的方式,用户可以根据具体的需求选择合适的存储方式,比如数据是只能供一个程序使用还是多个程序可以实现共享,数据所需的存储空间多大等等。
<2>Internal Storage:手机的内部存储设备是以文件的形式保存数据的,因此只能在本程序使用,外部的应用程序无法访问该文件,同时文件数据也是临时性的,当卸载本程序时,该文件也会自动被删除。
<3>External Storage:手机的外接存储设备也是以文件的形式存储数据,不过它可以存储数据量较大的公共数据。外接的存储设备可以是移动式的(比如SD卡),应该注意的是,对于保存在外接设备的数据是不安全的,因为该设备中的数据对外部公开,用户可以进行读写操作,甚至删除数据。
<4>SQLite Database:SQLite是标准的关系型数据库,用户可以使用标准的SQL语句进行数据的增删改查,该数据库具有小巧、独立性高、隔离性好、安全性高、跨平台和多语言接口等优点,它被内置在Android系统中,用于存储一些较复杂类型的数据,且系统中比较大的数据一般也都是用SQLite数据库存储(这也是Google工程师为什么在Android中内置该数据库的原因)。
<5>Network Connection:以网络来存储数据的方式有很多种,例如通过以保存文件的方式将文件上传到服务器或是以邮件的方式发送到网络上,两者的前提是要保持网络的正常连接,具体的知识查询java.net 和android.net 包。
接下来笔者将一一具体的分析Android各种数据存储方式的原理以及通过实例来呈现Android数据存储的具体代码实现过程:
Android提供如下几种数据存储方式:
<1>SharedPreference: SharedPreference提供了一套完整的框架用来存储基本类型数据的键值对,利用SharedPreference可以存储多种基本类型的数据和其他类型数据,例如:Long 、int、float、String等等。<2>Internal Storage:手机的内部存储设备是以文件的形式保存数据的,因此只能在本程序使用,外部的应用程序无法访问该文件,同时文件数据也是临时性的,当卸载本程序时,该文件也会自动被删除。
<3>External Storage:手机的外接存储设备也是以文件的形式存储数据,不过它可以存储数据量较大的公共数据。外接的存储设备可以是移动式的(比如SD卡),应该注意的是,对于保存在外接设备的数据是不安全的,因为该设备中的数据对外部公开,用户可以进行读写操作,甚至删除数据。
<4>SQLite Database:SQLite是标准的关系型数据库,用户可以使用标准的SQL语句进行数据的增删改查,该数据库具有小巧、独立性高、隔离性好、安全性高、跨平台和多语言接口等优点,它被内置在Android系统中,用于存储一些较复杂类型的数据,且系统中比较大的数据一般也都是用SQLite数据库存储(这也是Google工程师为什么在Android中内置该数据库的原因)。
<5>Network Connection:以网络来存储数据的方式有很多种,例如通过以保存文件的方式将文件上传到服务器或是以邮件的方式发送到网络上,两者的前提是要保持网络的正常连接,具体的知识查询java.net 和android.net 包。
接下来笔者将一一具体的分析Android各种数据存储方式的原理以及通过实例来呈现Android数据存储的具体代码实现过程:
使用SharedPreference实现数据的存储和删除
Sharedpreference作为Android数据存储中的一种重要的存储方式,主要用于Android开发中的一些简单配置信息的存储,比如程序退出时程序状态的存储,音乐退出时歌曲当前状态的存储等等。SharedPrefrence的存储使用键值对的方式进行存储数据,一般可以存储基本数据类型(short,int,long,float.double等等)的数据,同时也支持存储String类型的数据。
要使用SharedPreferred进行数据存储,首先要获取应用程序上下文中的SharedPreferenced对象,一般Android提供了两种获取对象的方式,如下:
getSharedPreferences(String fileName,int mode):当需要通过自定义文件名在应用程序中保存多个Sharedpreference文件时,可以使用该方法来实现。方法的第一个参数为需要自定义的文件名。
getPreferences(int mode):当只需要为一个Activity创建一个SharedPreference文件时,可以使用该方法来实现。文件名称为默认的文件名。
得到SharedPreference对象后便可进行数据的存储了,一般的,实现数据存储的步骤思路为:
<1>调用editor()方法来获取Sharedpreferences.Editor对象;
<2>调用putString()或putLong()等方法,添加数据;
<3>调用commit()方法将所需添加的数据进行提交。
下面我们通过一个实例来具体了解SharedPrefrence的使用方法。代码片段如下:
/**
 *使用 SharedPreference存储方式保存用户名和密码
 *使用SharedPreference进行数据存储的步骤一般分为以下几步:
 *	1、获取当前上下文的SharedPreferences对象
 *	2、获取SharedPreferences的编辑对象
 *	3、调用putString(),putInt()方法或getString(),getInt()等方法添加或获取数据
 *  4、调用commit()方法提交数据,(若是获取数据不许提交)
 * @author Leaf
 */
public class SharedPreferenceActivity extends Activity {

	private EditText editTextName;
	private EditText editTextPassword;
	private SharedPreferences mPreferences;
	private static final String SHAREDPREFERENCE_NAME = "sharepreference_name";
	private static final String USERNAME = "username";
	private static final String PASSWORD = "password";
    @Override
    protected void onCreate(Bundle savedInstanceState) {
        super.onCreate(savedInstanceState);
        setContentView(R.layout.activity_sharedpreference);
        /**
         * 若希望为一个Activity使用SharedPreferences方式分多个文件来保存数据,使用以下方法获取SharedPreferences对象,
         * 第一个参数为文件指定文件名
         * mPreferences = this.getSharedPreferences(SHAREDPREFERENCE_NAME, Context.MODE_PRIVATE);
         */
        //1.若只需使用一个文件为单个Activity来保存数据,可以使用以下方法获取SharedPreferences对象,文件名默认为所属Activity的类名
        mPreferences = this.getPreferences( Context.MODE_PRIVATE);
        editTextName = (EditText)findViewById(R.id.username_edittext);
        editTextPassword = (EditText)findViewById(R.id.password_edittext);
        getPreferences();
    }

    public void saveButton(View view){
    	//2.获取SharedPreferences的编辑对象
    	SharedPreferences.Editor mEditor = mPreferences.edit();
    	String username = editTextName.getText().toString().trim();
    	String password = editTextPassword.getText().toString().trim();
    	if(username.equals("")||password.equals("")){
    		Toast.makeText(getApplicationContext(), "用户名或密码不能为空!!", Toast.LENGTH_LONG).show();
    	}else{
    		mEditor.putString(USERNAME, username);
        	mEditor.putString(PASSWORD, password);
        	if(mEditor.commit()){
        		Toast.makeText(getApplicationContext(), "保存成功!!", Toast.LENGTH_LONG).show();
        		 getPreferences();
        	}
    	}
    }

    public void cancelButton(View view){
    	//3.获取SharedPreferences的编辑对象
    	SharedPreferences.Editor mEditor = mPreferences.edit();
    	mEditor.putString(USERNAME, "");
    	mEditor.putString(PASSWORD, "");
    	//4.提交数据
    	if(mEditor.commit()){
    		Toast.makeText(getApplicationContext(), "已删除!!", Toast.LENGTH_LONG).show();
    		 getPreferences();
    	}
    }
    /**
     * 获取缓存的用户名和密码
     */
    public void getPreferences(){
        editTextName.setText(mPreferences.getString(USERNAME, ""));
        editTextPassword.setText(mPreferences.getString(PASSWORD, ""));
    }
}
程序布局文件代码如下:
<RelativeLayout xmlns:android="http://schemas.android.com/apk/res/android"
    xmlns:tools="http://schemas.android.com/tools"
    android:layout_width="match_parent"
    android:layout_height="match_parent"
    android:orientation="vertical"
    >
	<TextView
	    android:layout_width="wrap_content"
	    android:layout_height="wrap_content"
	    android:layout_marginTop="30dp"
	    android:layout_marginLeft="15dp"
	    android:text="UserName:"
	    android:id="@+id/username_textview"
	    />
	<EditText
	    android:layout_width="match_parent"
	    android:layout_height="wrap_content"
	    android:hint="please enter name"
	    android:id="@+id/username_edittext"
	    android:layout_alignBaseline="@id/username_textview"
	    android:layout_toRightOf="@id/username_textview"
	    android:layout_marginRight="20dp"
	    />

	<TextView
	    android:layout_width="wrap_content"
	    android:layout_height="wrap_content"
	    android:layout_marginTop="30dp"
	    android:layout_alignLeft="@id/username_textview"
	    android:layout_below="@id/username_textview"
	    android:text="PassWord:"
	    android:id="@+id/password_textview"
	    />
	<EditText
	    android:layout_width="match_parent"
	    android:layout_height="wrap_content"
	    android:hint="please enter password"
	    android:id="@+id/password_edittext"
	    android:layout_alignBaseline="@id/password_textview"
	    android:layout_toRightOf="@id/password_textview"
	    android:layout_marginRight="20dp"
	    />
	<Button
	    android:layout_width="wrap_content"
	    android:layout_height="wrap_content"
	    android:layout_marginTop="10dp"
	    android:layout_alignParentRight="true"
	    android:layout_marginRight="20dp"
	    android:layout_below="@id/password_textview"
	    android:text="Cancel Button"
	    android:onClick="cancelButton"
	    android:id="@+id/cancel_button"
	    />
	<Button
	    android:layout_width="wrap_content"
	    android:layout_height="wrap_content"
	    android:layout_marginTop="10dp"
	    android:layout_below="@id/password_textview"
	    android:layout_toLeftOf="@id/cancel_button"
	    android:layout_alignBaseline="@id/cancel_button"
	    android:text="Save Button"
	    android:onClick="saveButton"
	    android:id="@+id/save_button"
	    />
</RelativeLayout>
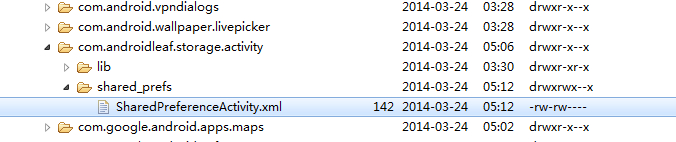
使用SharedPreference方式存储数据的存储文件存储在手机data/data/ App packagename/shared_prefs/文件夹中,文件存储位置如图下:
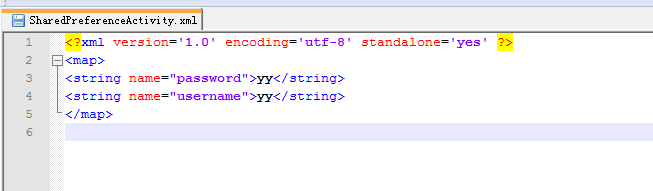
SharedPreference文件的存储内容如图下:
使用Internal Storage 和 External Storage实现数据的存储和删除
Android文件存储分为内部设备存储(Internal Storage)和外部设备存储(External Storage),两者分别有如下特点:
Internal Storage:(1)
以文件的形式保存数据,因此只能在本程序使用,外部的应用程序无法访问该文件;
(2)文件数据是临时性的,当卸载本程序时,该文件也会自动被删除;
(3)该存储设备是内置在手机内部的,因此该存储方式通常是可用的;
External Storage: (1)可以存储一些较大数据量的数据,数据是公共的,其它应用也可读写该数据文件中的内容;
(2)文件数据具有永久性和非永久性两种情况,当调用Enviroment.getExternalStoragePublicDirectory()方法实现文件存储时,文件存储在外部设备且当宿主应用卸载时,文件也不会被删除(永久性),当Context.getExternalFilesDir()实现文件存储时,文件存储在外部设备但当宿主应用卸载时,文件也随着会被删除(非永久性);
(3)由于该存储方式通常是由外接设备(如 SDcard)来存储数据的,用户可能在某些时候断开了外界设备和手机的连接,因此该存储方式在某些时候通常是不可用的。
Internal Storage 存储(内部设备存储)
一般来讲,使用内部设备存储数据步骤思路如下:
<1>调用openFileInput()或openFileOutput()方法获取内部文件存储的输入流和输出流;
<2>调用read()或write()方法输入或输出字节;
<3>调用close()方法关闭输入输出流.
<2>调用read()或write()方法输入或输出字节;
<3>调用close()方法关闭输入输出流.
下面我们通过具体实例来了解下使用Internal Storage存储方式存储数据,实例代码如下:
/**
 * 使用内部文件(Internal Storage)存储方式存储数据
 * 1、调用openFileInput()或openFileOutput()方法获取内部文件存储的输入流和输出流
 * 2、调用read()或write()方法输入或输出字节
 * 3、调用close()方法关闭输入输出流
 * @author Leaf
 */
public class InternalStorageActivity extends Activity {

	private static final String SAVE_FILE_NAME = "internal_storage_file_name";
	private EditText mEditText;
	private TextView mTextView;

	@Override
	protected void onCreate(Bundle savedInstanceState) {
		// TODO Auto-generated method stub
		super.onCreate(savedInstanceState);
		setContentView(R.layout.activity_internalstorage);
		mEditText = (EditText)findViewById(R.id.content_edittext);
		mTextView = (TextView) findViewById(R.id.content_textview);
	}

	public void readInternalFile(View view){
		StringBuffer mBuffer = new StringBuffer();
		byte[] b = new byte[1024];
		int index = -1;
		try {
			FileInputStream mFileInputStream = openFileInput(SAVE_FILE_NAME);
			while((index = mFileInputStream.read(b))!= -1){
				mBuffer.append(new String(b));
			}
			mEditText.setText(mBuffer.toString());
			mTextView.setText(mBuffer.toString());
		} catch (FileNotFoundException e) {
			// TODO Auto-generated catch block
			e.printStackTrace();
		} catch (IOException e) {
			// TODO Auto-generated catch block
			e.printStackTrace();
		}
	}

	public void saveInternalFile(View view){
		if(!mEditText.getText().toString().trim().equals("")){
			try {
				FileOutputStream mFileOutputStream = openFileOutput(SAVE_FILE_NAME, Context.MODE_PRIVATE);
				mFileOutputStream.write(mEditText.getText().toString().trim().getBytes());
				mEditText.setText("");
				mTextView.setText("");
				mFileOutputStream.close();
			} catch (FileNotFoundException e) {
				// TODO Auto-generated catch block
				e.printStackTrace();
			} catch (IOException e) {
				// TODO Auto-generated catch block
				e.printStackTrace();
			}finally{
				Toast.makeText(getApplicationContext(), "Save Sucessfully", Toast.LENGTH_LONG).show();
			}
		}else{
			Toast.makeText(getApplicationContext(), "The content can't be null", Toast.LENGTH_LONG).show();
		}
	}
}<RelativeLayout xmlns:android="http://schemas.android.com/apk/res/android"
xmlns:tools="http://schemas.android.com/tools"
android:layout_width="match_parent"
android:layout_height="match_parent"
android:orientation="vertical"
>
<EditText
android:layout_width="match_parent"
android:layout_height="wrap_content"
android:layout_marginTop="30dp"
android:id="@+id/content_edittext"
android:hint="please enter something"
/>
<Button
android:layout_width="match_parent"
android:layout_height="wrap_content"
android:id="@+id/read_button"
android:text="Read Internal File"
android:layout_below="@id/content_edittext"
android:layout_marginTop="5dp"
android:onClick="readInternalFile"
/>
<Button
android:layout_width="match_parent"
android:layout_height="wrap_content"
android:id="@+id/save_button"
android:text="Save To Internal File"
android:layout_below="@id/read_button"
android:layout_marginTop="5dp"
android:onClick="saveInternalFile"
/>
<TextView
android:layout_width="match_parent"
android:layout_height="wrap_content"
android:textSize="25sp"
android:textColor="#FF0000"
android:layout_below="@id/save_button"
android:id="@+id/content_textview"
/>
</RelativeLayout>
使用文件内部设备存储的文件在手机存储路径为data/data/App PackageName/files/,文件存储位置如图下:
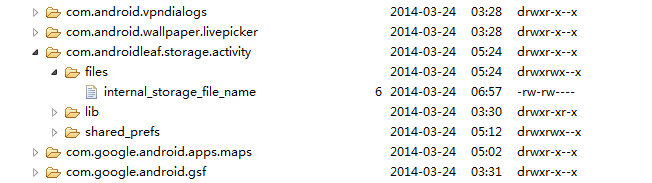
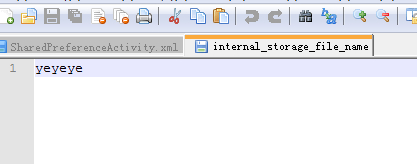
internal_storage_file_name文件中的数据内容如图下:
External Storage 存储(外部设备存储)
在Android中使用外部设备存储数据一般具有数据可共享、数据不易丢失和存储较大量数据等特点。在Android中使用外部设备存储数据的方式一般有两种,一种是调用Enviroment.getExternalStoragePublicDirectory()获取文件存储路径并保存文件数据,该种存储方式的主要特点是数据可以与其它应用共享,并且当其宿主应用被卸载时,数据文件也不会被删掉(具有数据永久性的特点);另外一种方式是使用上下文的方式获取文件存储目录(Context.getExternalFilesDir())并保存文件数据,该种存储方式的特点是数据同样可以与其它应用共享,但与前者不同的是,当其宿主应用被卸载时,其数据文件也会随之被删除(数据费永久性的特点)。下面使用实例代码一一分析如何使用两种存储方式和其各自的主要特点,代码如下:
/**
 * 使用外部设备存储文件数据,外部存储又分为永久性公共数据和非永久性公共数据两种
 * @author Leaf
 */
public class ExternalStorageActivity extends Activity {

	private static final String EXTERNAL_STORAGE_PUBLIC = "externalStoragePublic";
	private static final String  EXTERNAL_STORAGE = "externalStorage";
	private static final String EXTERNAL_STORAGE_CACHE = "externalStorageCache";

	@Override
	protected void onCreate(Bundle savedInstanceState) {
		// TODO Auto-generated method stub
		super.onCreate(savedInstanceState);
		setContentView(R.layout.activity_externalstorage);

	}

	/**
	 * 永久性公共数据存储
	 */
	public void getThePicturesPublicDirectory(View view){
		if(isExternalStorageWritable()){
			File mFile = new File(Environment.getExternalStoragePublicDirectory(Environment.DIRECTORY_PICTURES), EXTERNAL_STORAGE_PUBLIC);
			if(!mFile.exists()){
				try {
					mFile.createNewFile();
				} catch (IOException e) {
					// TODO Auto-generated catch block
					e.printStackTrace();
				};
			}
			try {
				BufferedOutputStream mBufferedOutputStream = new BufferedOutputStream(new FileOutputStream(mFile));
				mBufferedOutputStream.write(new String("getThePicturesPublicDirectory").getBytes());
				mBufferedOutputStream.flush();
				mBufferedOutputStream.close();
				Toast.makeText(getApplicationContext(), "The file have saved!!", Toast.LENGTH_LONG).show();
			} catch (FileNotFoundException e) {
				// TODO Auto-generated catch block
				e.printStackTrace();
			} catch (IOException e) {
				// TODO Auto-generated catch block
				e.printStackTrace();
			}
		}else{
			Toast.makeText(getApplicationContext(), "The SDCard can't work!!", Toast.LENGTH_LONG).show();
		}
	}
	/**
	 * 非永久性公共数据存储
	 */
	public void getThePictureDirectory(View view){
		File mFile = new File(getExternalFilesDir(Environment.DIRECTORY_PICTURES), EXTERNAL_STORAGE);
		if(!mFile.exists()){
			try {
				if(mFile.createNewFile()){
					Toast.makeText(getApplicationContext(), mFile.getAbsolutePath(), Toast.LENGTH_LONG).show();
				}
			} catch (IOException e) {
				// TODO Auto-generated catch block
				e.printStackTrace();
			};
		}
		try {
			BufferedOutputStream mBufferedOutputStream = new BufferedOutputStream(new FileOutputStream(mFile));
			mBufferedOutputStream.write(new String("getThePictureDirectory").getBytes());
			mBufferedOutputStream.flush();
			mBufferedOutputStream.close();
			Toast.makeText(getApplicationContext(), "The file have saved!!", Toast.LENGTH_LONG).show();
		} catch (FileNotFoundException e) {
			// TODO Auto-generated catch block
			e.printStackTrace();
		} catch (IOException e) {
			// TODO Auto-generated catch block
			e.printStackTrace();
		}
	}

	/**
	 * 非永久性数据缓存
	 */
	public void getThePictureCacheDirectory(View view){
		File mFile = new File(getExternalCacheDir(), EXTERNAL_STORAGE_CACHE);
		if(!mFile.exists()){
			try {
				if(mFile.createNewFile()){
					Toast.makeText(getApplicationContext(), mFile.getAbsolutePath(), Toast.LENGTH_LONG).show();
				}
			} catch (IOException e) {
				// TODO Auto-generated catch block
				e.printStackTrace();
			};
		}
		try {
			BufferedOutputStream mBufferedOutputStream = new BufferedOutputStream(new FileOutputStream(mFile));
			mBufferedOutputStream.write(new String("getThePictureCacheDirectory").getBytes());
			mBufferedOutputStream.flush();
			mBufferedOutputStream.close();
			Toast.makeText(getApplicationContext(), "The file have cached!!", Toast.LENGTH_LONG).show();
		} catch (FileNotFoundException e) {
			// TODO Auto-generated catch block
			e.printStackTrace();
		} catch (IOException e) {
			// TODO Auto-generated catch block
			e.printStackTrace();
		}
	}

	/* Checks if external storage is available for read and write */
	public boolean isExternalStorageWritable() {
	    String state = Environment.getExternalStorageState();
	    if (Environment.MEDIA_MOUNTED.equals(state)) {
	        return true;
	    }
	    return false;
	}

	/* Checks if external storage is available to at least read */
	public boolean isExternalStorageReadable() {
	    String state = Environment.getExternalStorageState();
	    if (Environment.MEDIA_MOUNTED.equals(state) ||
	        Environment.MEDIA_MOUNTED_READ_ONLY.equals(state)) {
	        return true;
	    }
	    return false;
	}
}
<LinearLayout xmlns:android="http://schemas.android.com/apk/res/android"
    xmlns:tools="http://schemas.android.com/tools"
    android:layout_width="match_parent"
    android:layout_height="match_parent"
    android:orientation="vertical"
    >
	<Button
	    android:layout_width="match_parent"
	    android:layout_height="wrap_content"
	    android:text="External Public"
	    android:onClick="getThePicturesPublicDirectory"
	    android:id="@+id/external_public_button"
	    />
	<Button
	    android:layout_width="match_parent"
	    android:layout_height="wrap_content"
	    android:text="External Private"
	    android:onClick="getThePictureDirectory"
	    android:id="@+id/external_public_button"
	    />
	<Button
	    android:layout_width="match_parent"
	    android:layout_height="wrap_content"
	    android:text="External Private Cache"
	    android:onClick="getThePictureCacheDirectory"
	    android:id="@+id/external_public_button"
	    />

<span style="font-size: 18px;"></LinearLayout>
</span>
我们查看一下手机设备中刚刚存储的文件所在的存储路径,External Public的存储路径为mnt/sdcard/Pictures/fileName,如图下:

External Private和External Private Cache的存储路径为mnt/sdcard/Android/data/App PackageName/files/fileName和mnt/sdcard/Android/data/App PackageName/cache/fileName,如图下:

至此我们已经分析完了外部设备存储的两种存储方式,那么在实际开发中这两种存储方式我们如何去选择呢。一般来讲,一些占用空间较大,需要将其数据分享给其它应用,且与宿主应用关系不那么紧密的数据(如下载的音频、视频以及图片等文件)可以使用External Public(永久性数据)的方式进行存储,而对于与宿主应用关系较为紧密,且数据量稍微较大的数据(如宿主应用所需缓存的json字符串和图片数据),则可以使用External Private或External Private Cache(非永久性)的方式进行存储。
使用SQLite DataBase 和NetWork Connection的数据操作
SQLite数据库是Android系统内嵌的关系型数据库,主要的作用是将一些数据量较大且关系较为复杂的数据存储在本地,由于这块知识在实际开发中比较重要,所以我们将在下一篇博客专门学习SQLite数据库在Android中的应用。市场上大部分的应用都是具有网络访问功能的(如从服务端下载字符串、图片以及上传文件至服务器端等),因此NetWork Connection网络存储在Android开发中也应用得非常的频繁,鉴于Android网络访问这块涉及到的知识点比较多,在此不便展开来讲,以后有机会我们会对此进行深入的学习和研究。
总结:Android所提供的这些数据存储方式已足够满足我们日常的开发存储需求,我们需要做的是在开发中根据不同的需求选择合适的存储方式,以避免使用不恰当数据存储而影响程序运行性能或导致手机设备存储空间利用不合理等情况发生。


 255
255

 被折叠的 条评论
为什么被折叠?
被折叠的 条评论
为什么被折叠?
 到【灌水乐园】发言


