


在controller包创建portal包,意为门户供前端使用。
在portal包下创建UserController类作为用户控制类,用@Controller、@RequestMapping("/user/")注释类名,前者使该类将被Spring容器作为一个Spring MVC控制器来处理HTTP请求,后者指定与用户相关的请求路径。
    @Controller
    @RequestMapping("/user/")
    public class UserController {

    }
在该类中创建login(),作为登录验证方法。先根据大致需求创建如下:
    @RequestMapping(value = "login.do",method = RequestMethod.POST)
    @ResponseBody
    public Object login(String username, String password, HttpSession session){
        //service-->mybatis-->dao

        return null;
    }
@RequestMapping注解用于将HTTP请求映射到控制器的处理方法上,表示该方法处理的请求路径为login.do,该方法只处理HTTP POST请求。@ResponseBody注解用于将控制器方法的返回值作为HTTP响应体返回给客户端。因为方法返回值类还没定义,暂时用Object代替。HttpSession对象通过服务器为每个用户创建并管理,用于存储用户特定的信息,可以在用户的多个请求之间保持状态和数据,从而实现例如用户登录保持、购物车、用户偏好设置等功能。
接着在service包下创建IUserService的interface用于声明方法。声明与上述方法对应的:
Object login(String username, String password);在接口声明了方法,那下一步自然就是在接口实现类对方法进行实现,在service包下创建impl包作为接口实现类包,impl包中创建UserServiceImpl类作为IUserService接口的实现类。并通过implements与IUserService接口连接,直接快捷生成@Override方法。
然后,我们来创建数据相应对象,在与controller平级的common包下,创建如下类:
    @JsonSerialize(include =  JsonSerialize.Inclusion.NON_NULL)
    //保证序列化json的时候,如果是null的对象,key也会消失
    public class ServerResponse<T> implements Serializable {
        private int status;
        private String msg;
        private T data;
        ......
    }
实现Serializable接口满足传输时的序列化,再通过@JsonSerializable注解保证序列化json的时候,如果是null的对象,key也会消失。
因为返回以上status时,一般作为常量,common包下创建ResponseCode对常量进行归类。
    public enum ResponseCode {
        SUCCESS(0,"SUCCESS"),
        ERROR(1,"ERROR"),
        NEED_LOGIN(10,"NEED_LOGIN"),
        ILLEGAL_ARGUMENT(2,"ILLEGAL_ARGUMENT");

        private final int code;
        private final String desc;
        ResponseCode(int code,String desc){
            this.code=code;
            this.desc=desc;
        }

        public int getCode() {
            return code;
        }

        public String getDesc() {
            return desc;
        }
    }
配置好ServerResponse类中相应的方法后,就将之前用Object定义和返回的改为ServerResponse<User>。
回到UserServiceImpl类,声明私有属性并用@Autowired注解,
    @Autowired
    private UserMapper userMapper;
@Autowired注解的作用是告诉Spring容器将一个实现了UserMapper接口的bean自动注入到userMapper字段中。这样你可以在类中直接使用userMapper进行数据库操作,而不需要手动实例化它。Spring容器会负责查找并注入正确的实现类的实例。
随后前往UserMapper类中,声明
int checkUsername(String username);方法,前往UserMapper.xml中写出相应的sql语句
  <select id="checkUsername" resultType="int" parameterType="string">
    select count(1) from mmall_user
    where username = #{username}
  </select>
返回UserServiceImpl类,完善login方法:
    @Override
    public ServerResponse<User> login(String username, String password) {
        int resultCount = userMapper.checkUsername(username);
        if(resultCount == 0 ){
            return ServerResponse.createByErrorMessage("用户名不存在");
        }

        String md5Password = MD5Util.MD5EncodeUtf8(password);
        User user  = userMapper.selectLogin(username,md5Password);
        if(user == null){
            return ServerResponse.createByErrorMessage("密码错误");
        }

        user.setPassword(org.apache.commons.lang3.StringUtils.EMPTY);
        return ServerResponse.createBySuccess("登录成功",user);
    }
其中要回到dao层的UserMapper类,再创建:
User selectLogin(@Param("username") String username, @Param("password")String password);注意:传递多个参数时需要使用@Param注解,告诉MyBatis对应参数的映射。
再前往xml文件中编写sql语句:
  <select id="selectLogin" resultMap="BaseResultMap" parameterType="map">
    SELECT
    <include refid="Base_Column_List" />
    from mmall_user
    where username = #{username}
    and password = #{password}
  </select>
为方便后续开发,在common包下创建Const常量类
    public class Const {
        public static final String CURRENT_USER="currentUser";
        public static final String EMAIL="email";
        public static final String USERNAME="username";
        public interface Role{
            int ROLE_CUSTOMER=0;//普通用户
            int ROLE_ADMIN=1;//管理员
        }
    }
最后完善UserController类中的方法:
    @Controller
    @RequestMapping("/user/")
    public class UserController {
        @Autowired
        private IUserService iUserService;
        /**
         * 用户登录
         *
         * @param username
         * @param password
         * @param session
         * @return
         */
        @RequestMapping(value = "login.do", method = RequestMethod.POST)
        @ResponseBody
        public ServerResponse<User> login(String username, String password, HttpSession session) {
            ServerResponse<User> response = iUserService.login(username, password);
            if (response.isSuccess()) {
                session.setAttribute(Const.CURRENT_USER, response.getData());
            }
            return response;
        }
这样就完成了服务端登录功能的实现。
关于测试,因为还没有对应前端制作,我们可以通过Google Chrome浏览器插件市场的Talend API Tester - Free Edition,该插件能够模拟发送HTTP请求(GET\POST\PUT等),根据发出的消息,得到相应的响应。
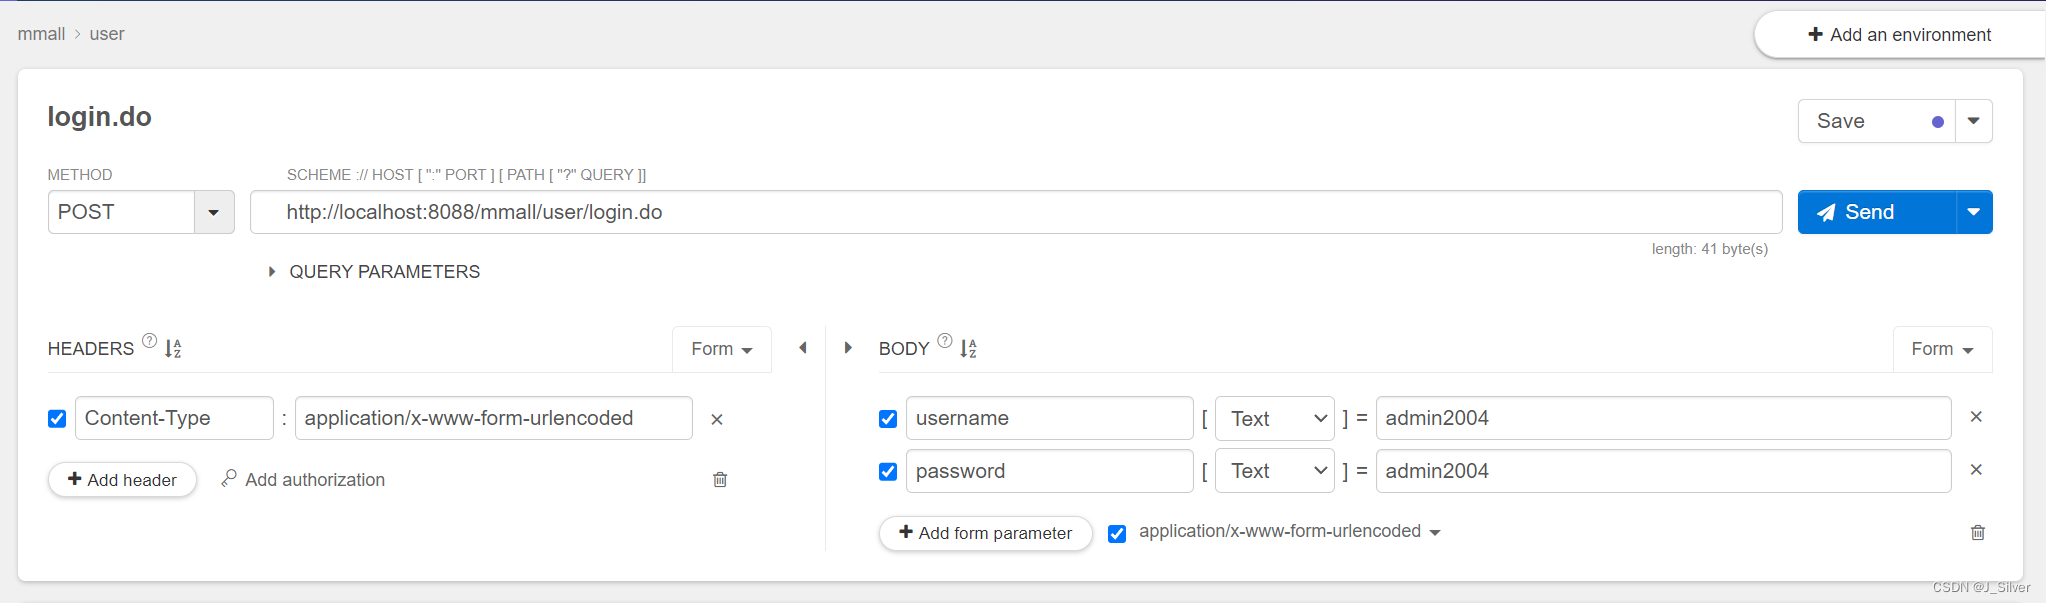 如图测试登录接口,输入username和password,得到的返回消息体为:
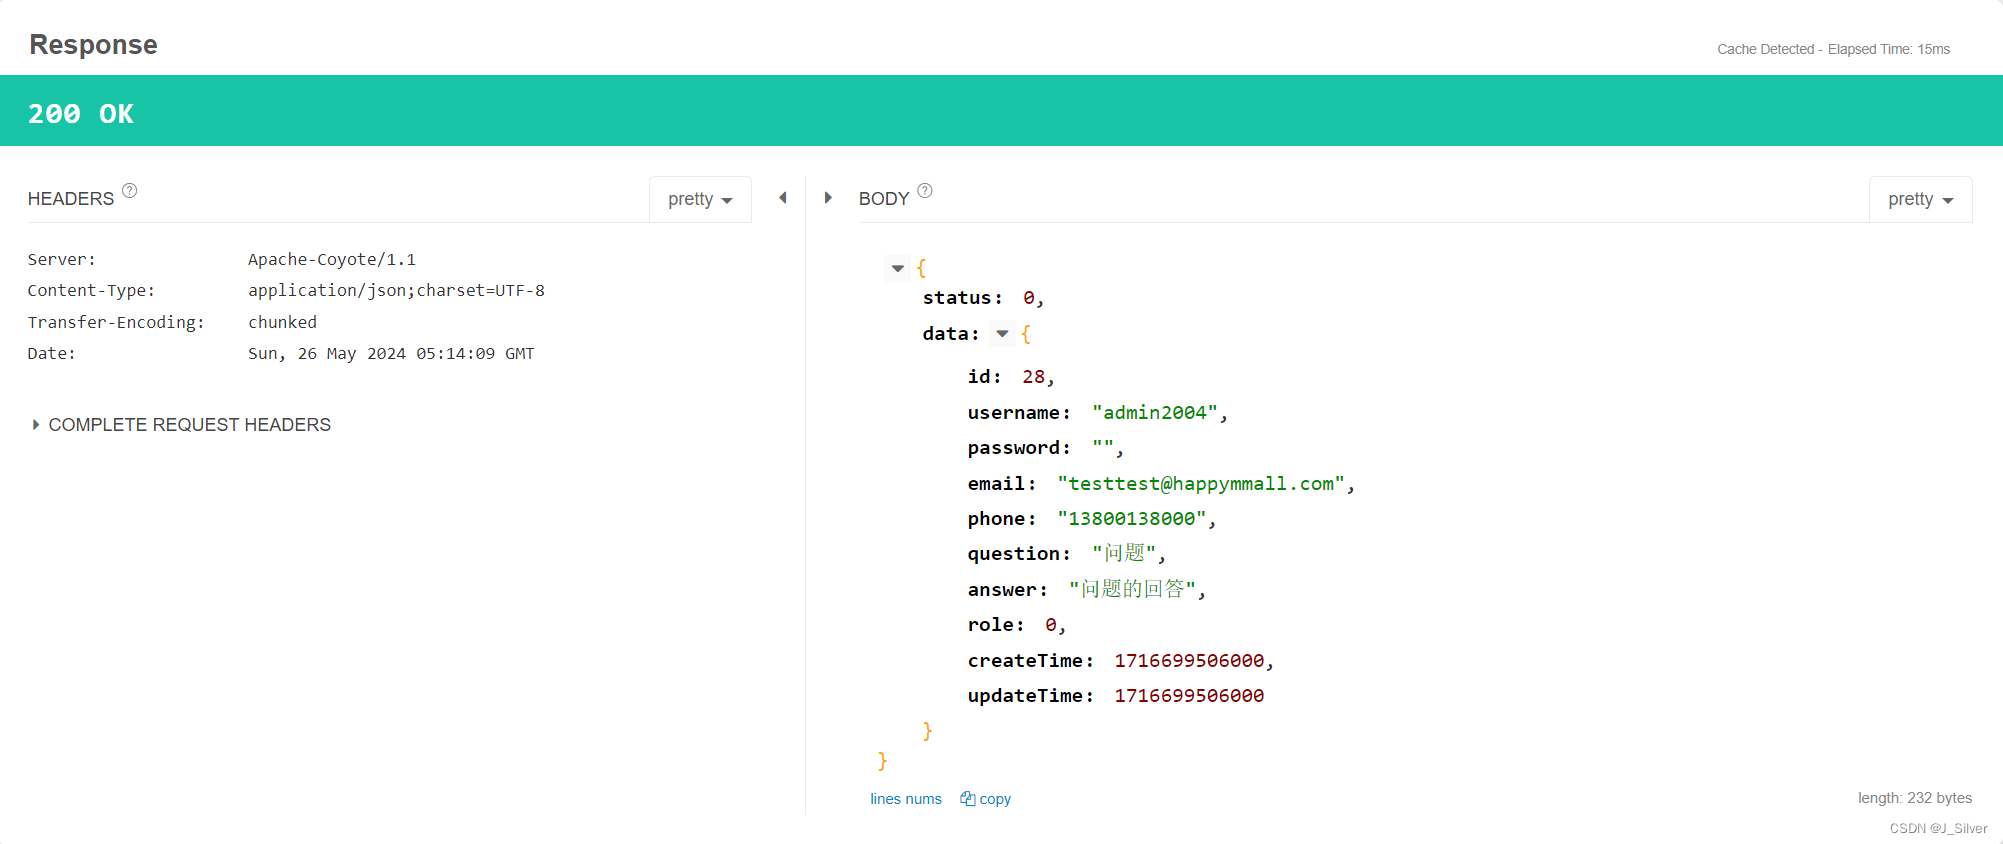
可以看到登录信息展示出来了,说明后端接口的请求成功了。


 2233
2233


 被折叠的 条评论
为什么被折叠?
被折叠的 条评论
为什么被折叠?
 到【灌水乐园】发言


