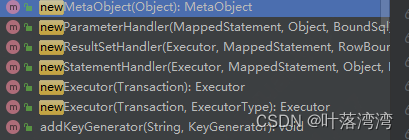
1.myBatis插件的关键类:
官方文档中有描述

Executor:myBatis的sql执行器顶层接口.
ParameterHandler :sql参数映射处理器.
ResultSetHandler :结果映射处理器.
StatementHandler:正真调用sql的接口类.常用实现类PreparedStatementHandler中调用了JDBC的API.
2.插件被扫描
在类XMLConfigBuilder的parseConfiguration()方法中:
pluginElement(root.evalNode("plugins"));这里扫描了mybatis-config.xml中配置的插件
扫描后把信息存储到mybatis的核心类Configuration中,这个类存放mybatis的所有配置信息和Mapper.xml中解析出来的信息.
3.Executor是在哪里织入插件逻辑的?
DefaultSqlSessionFactory.openSession()创建会话的时候
  private SqlSession openSessionFromDataSource(ExecutorType execType, TransactionIsolationLevel level, boolean autoCommit) {
    Transaction tx = null;
    try {
      final Environment environment = configuration.getEnvironment();
      // 获取事务工厂
      final TransactionFactory transactionFactory = getTransactionFactoryFromEnvironment(environment);
      // 创建事务
      tx = transactionFactory.newTransaction(environment.getDataSource(), level, autoCommit);
      // 根据事务工厂和默认的执行器类型,创建执行器 >>
      final Executor executor = configuration.newExecutor(tx, execType);
      return new DefaultSqlSession(configuration, executor, autoCommit);
    } catch (Exception e) {
      closeTransaction(tx); // may have fetched a connection so lets call close()
      throw ExceptionFactory.wrapException("Error opening session.  Cause: " + e, e);
    } finally {
      ErrorContext.instance().reset();
    }
  }
其中这段代码由configuration创建了一个sql执行器 final Executor executor = configuration.newExecutor(tx, execType);
进入configuration.newExecutor()方法中:
  public Executor newExecutor(Transaction transaction, ExecutorType executorType) {
    executorType = executorType == null ? defaultExecutorType : executorType;
    executorType = executorType == null ? ExecutorType.SIMPLE : executorType;
    Executor executor;
    if (ExecutorType.BATCH == executorType) {
      executor = new BatchExecutor(this, transaction);
    } else if (ExecutorType.REUSE == executorType) {
      executor = new ReuseExecutor(this, transaction);
    } else {
      // 默认 SimpleExecutor
      executor = new SimpleExecutor(this, transaction);
    }
    // 二级缓存开关,settings 中的 cacheEnabled 默认是 true
    if (cacheEnabled) {
      executor = new CachingExecutor(executor);
    }
    // 植入插件的逻辑,至此,四大对象已经全部拦截完毕
    executor = (Executor) interceptorChain.pluginAll(executor);
    return executor;
  }
插件逻辑:
executor = (Executor) interceptorChain.pluginAll(executor);
这段代码意义在于:传入一个executor时,如果有配置插件,就会返回一个代理对象.
一直进入方法会走到:Plugin.wrap()方法中,
  public static Object wrap(Object target, Interceptor interceptor) {
    Map<Class<?>, Set<Method>> signatureMap = getSignatureMap(interceptor);
    Class<?> type = target.getClass();
    Class<?>[] interfaces = getAllInterfaces(type, signatureMap);
    if (interfaces.length > 0) {
      return Proxy.newProxyInstance(
          type.getClassLoader(),
          interfaces,
          new Plugin(target, interceptor, signatureMap));
    }
    return target;
}对于JDK代理熟悉的同学就会清楚,当代理对象执行任意方法时就会调用Plugin实现了InvocationHandler的incoke()方法,进入Plugin的invole方法:
  @Override
  public Object invoke(Object proxy, Method method, Object[] args) throws Throwable {
    try {
      Set<Method> methods = signatureMap.get(method.getDeclaringClass());
      if (methods != null && methods.contains(method)) {
        return interceptor.intercept(new Invocation(target, method, args));
      }
      return method.invoke(target, args);
    } catch (Exception e) {
      throw ExceptionUtil.unwrapThrowable(e);
    }
  }
return interceptor.intercept(new Invocation(target, method, args)); 这是最重要的一段代码,只要调用了execute的方法就会调用这段代码,也就是我们去自定义插件需要去实现这个Interceptor这个接口.
其余的几个类的插件织入大家可自行去Configuration类中发现到相应的逻辑.

4.准备工作
  <dependency>
            <groupId>mysql</groupId>
            <artifactId>mysql-connector-java</artifactId>
            <version>5.1.27</version>
        </dependency>
        <dependency>
            <groupId>org.mybatis.spring.boot</groupId>
            <artifactId>mybatis-spring-boot-starter</artifactId>
            <version>2.1.3</version>
        </dependency>
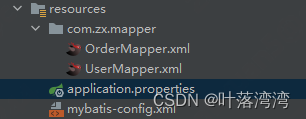
新建mybatis-config.xml文件:
<?xml version="1.0" encoding="UTF-8" ?>

<!DOCTYPE configuration
 PUBLIC "-//mybatis.org//DTD Config 3.0//EN"
        "http://mybatis.org/dtd/mybatis-3-config.dtd">

<configuration>
    <plugins>
        <plugin interceptor="com.zx.interceptor.MyInterceptor"></plugin>
    </plugins>
</configuration>
新建application.properties:
spring.datasource.password=canal
spring.datasource.name=canal
spring.datasource.url=jdbc:mysql://127.0.0.1:3306/study?useSSL=false&useUnicode=true&characterEncodeing=UTF-8
spring.datasource.driver-class-name=com.mysql.jdbc.Driver

mybatis.mapper-locations=classpath:com/zx/mapper/*.xml
mybatis.type-aliases-package=com.zx.domain
新建插件类:
@Intercepts({

        @Signature(type = StatementHandler.class, method = "query", args = {Statement.class,ResultHandler.class}),
})
@Component
public class MyInterceptor implements Interceptor{
    @Override
    public Object intercept(Invocation invocation) throws Throwable {
        StatementHandler statementHandler = (StatementHandler)invocation.getTarget();
        System.out.println("------------------插件逻辑----------------");
        //执行本身的查询逻辑
        Object proceed = invocation.proceed();
        BoundSql boundSql = statementHandler.getBoundSql();
        String sql = boundSql.getSql();
        System.out.println("sql:"+sql);
        return proceed;
    }
}
@Intercepts({
@Signature(type = StatementHandler.class, method = "query", args = {Statement.class,ResultHandler.class}),
})
type = StatementHandler.class
指的是要在哪个类进行拦截,前面讲了总共有四个类可以拦截.
method = "query"
要拦截StatementHandler类中的哪个方法.
args = {Statement.class,ResultHandler.class}
StatementHandler类中可能重载了query方法,你需要通过入参的类型来觉得拦截哪个方法
Object proceed = invocation.proceed();
这是原本查询需要执行的逻辑。
看效果:
    @Test
    public void selectTest(){
        User user = userMapper.selectById(1L);
        System.out.println(user);
    }
4.插件能做啥
你可以在在做个分页插件,也可以做慢sql的统计等等


 2507
2507


 被折叠的 条评论
为什么被折叠?


