


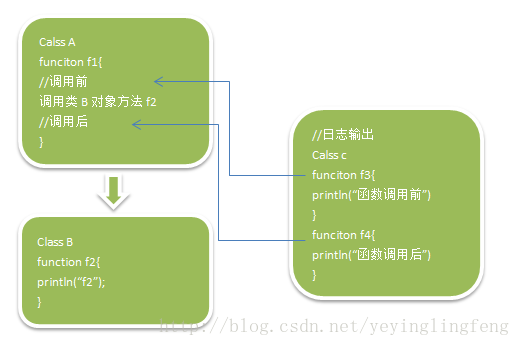
spring AOP,面向切面编程,通常应用于系统的日志,事物信息输出部分,如下图中所示,当A调用B的f2方法时,如果我们想要让系统在f2调用前输出一些调用前的信息,在f2调用结束后输出一些调用结束后的信息,一般的想法就是在调用f2前去调用C的f3,然后在调用f2后去调用C的f4。从整体上来看,运行f1时将会先调用f3,然后f2,然后f4,给人一种从上至下的纵向感。这也是我们通常编程时的思维,线性。
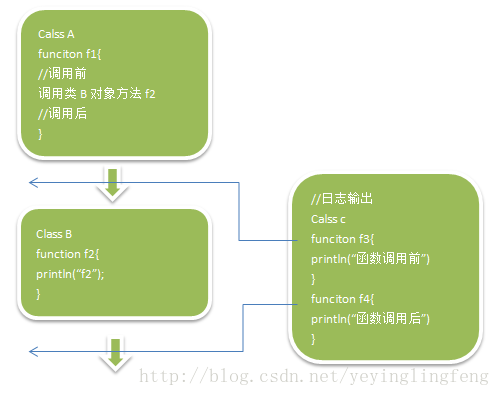
但是这种方式使得代码耦合度增加,不利于后期维护,然后如果还有类C,D,E,F…..中的方法都调用了f2,那么我们还要不厌其烦的在每个地方加上f3,f4?明显不可能的,这样代码冗余了,再说,以后维护时稍作修改(比如要将f3,f4替换成f5,f6)每个类调用的地方都要改,这样维护成本太高。因此面向切面编程的思路出现了。如下图中所示,日志输出函数f3,f4从运行流程中分离出来,而在调用f2时将会触发f3,f4横向的切入进运行流程中,这样理论上我们只需要给f3,f4指定一个触发器(即f2被调用时进行切入),这样无论在哪个地方f2被调用,都能实现f3,f4的调用。同时,当想要修改时,也只需要修改触发器的配置即可,这样一来就大大降低了维护成本。
spring 注解形式配置和使用aop
我这边是在spring mvc框架的基础上配置和使用的spring aop,其实都差不多啦,就是多个配置文件罢了。
先准备下所需的jar包
下载
spring-framework-4.3.9.RELEASE
然后将其中lib中的jar都放到我们自己的web工程lib文件夹内
然后是这4个,都能很容易的百度到
aopalliance-1.0.jar
aspectjweaver-1.7.4.jar
cglib-nodep-2.2.2.jar
commons-logging-1.1.1.jar
最后效果如下,红框中的4个,其他的都是spring-framework-4.3.9.RELEASE lib中的

各种文件建立
先放一张总体的结构图
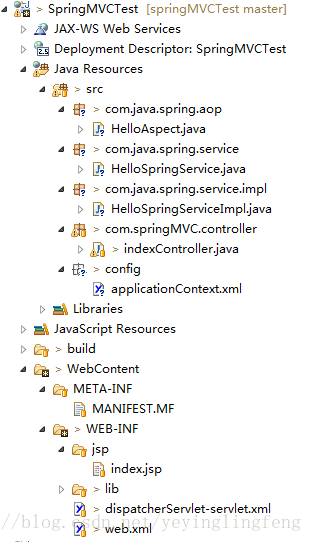
大致讲解下,从上至下
1.HelloAspect.java
对应的就是上面例子中的class C,里面定义了前置方法(f3),后置方法(f4)等等,因为我们用的是注解方式配置,所以该文件中还含有对应的所有配置注解。
2.HelloSpringService.java
就是我们通常开发中的service(业务逻辑层)的接口文件。
3.HelloSpringServiceImpl.java
HelloSpringService.java接口的实现。
对应例子中的class B
4.indexController.java
controller层,同struts中的action层,业务调动层。
对应例子中的class A
5.applicationContext.xml
spring配置,和下面的dispatcherServlet-servlet.xml一起分离了bean扫描范围
6.index.jsp
就是个简单的示例页面
7.dispatcherServlet-servlet.xml
主要就是spring mvc的相关配置,与applicationContext.xml一起分离了bean扫描范围
8.web.xml
各种配置文件的读取设置等等
将下重点HelloAspect.java ,代码如下
package com.java.spring.aop;
import org.aspectj.lang.ProceedingJoinPoint;
import org.aspectj.lang.annotation.After;
import org.aspectj.lang.annotation.AfterReturning;
import org.aspectj.lang.annotation.AfterThrowing;
import org.aspectj.lang.annotation.Around;
import org.aspectj.lang.annotation.Aspect;
import org.aspectj.lang.annotation.Before;
import org.aspectj.lang.annotation.Pointcut;
import org.springframework.stereotype.Component;

@Component
@Aspect
public class HelloAspect {
    //对应例子中所说的f3,f4'触发器'配置,即对com.java.spring.service.impl.HelloSpringServiceImpl下的所有方法都添加前置函数,后置函数...通俗讲就是在调用HelloSpringServiceImpl中的任意一个函数时都会在不同的时间段调用下面设置的函数(前置,后置...)
    @Pointcut("execution(* com.java.spring.service.impl.HelloSpringServiceImpl.*(..))")
    private void anyMethod(){}//定义一个切入点

    @Before("anyMethod() && args(name)")
    public void doAccessCheck(String name){
        System.out.println(name);
        System.out.println("前置通知");
    }

    @AfterReturning("anyMethod()")
    public void doAfter(){
        System.out.println("后置通知");
    }

    @After("anyMethod()")
    public void after(){
        System.out.println("最终通知");
    }

    @AfterThrowing("anyMethod()")
    public void doAfterThrow(){
        System.out.println("例外通知");
    }

    @Around("anyMethod()")
    public Object doBasicProfiling(ProceedingJoinPoint pjp) throws Throwable{
        System.out.println("进入环绕通知");
        Object object = pjp.proceed();//执行该方法
        System.out.println("退出方法");
        return object;
    }
}
致于上面文件中每个函数的执行顺序,这里给出运行实例结果
//indexController.java文件
package com.springMVC.controller;
import javax.servlet.http.HttpServletRequest;
import javax.servlet.http.HttpServletResponse;
import org.springframework.beans.factory.annotation.Autowired;
import org.springframework.stereotype.Controller;
import org.springframework.web.bind.annotation.RequestMapping;
import org.springframework.web.servlet.ModelAndView;
import com.java.spring.service.HelloSpringService;
@Controller
public class indexController{
    @Autowired
    HelloSpringService helloSpringService;

    @RequestMapping( value="/index")
    public ModelAndView handleRequest(HttpServletRequest arg0, HttpServletResponse arg1)
            throws Exception {
        // TODO Auto-generated method stub
        ModelAndView model=new ModelAndView();
        helloSpringService.printHello("123");//对应例子中的f1中调用f2部分,参数123
        model.addObject("demoStr", "HelloWorld");
        model.setViewName("index");
        return model;
    }
}
//HelloSpringServiceImpl.java文件
package com.java.spring.service.impl;
import org.springframework.stereotype.Service;
import com.java.spring.service.HelloSpringService;
@Service
public class HelloSpringServiceImpl implements HelloSpringService{
@Override
public String printHello(String xx) {
// TODO Auto-generated method stub
System.out.println("Hello Spring,this is impl");
return "123";
}
}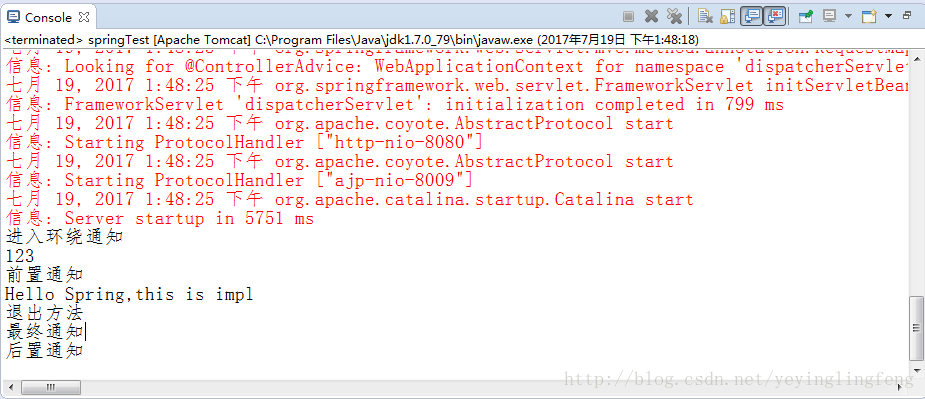
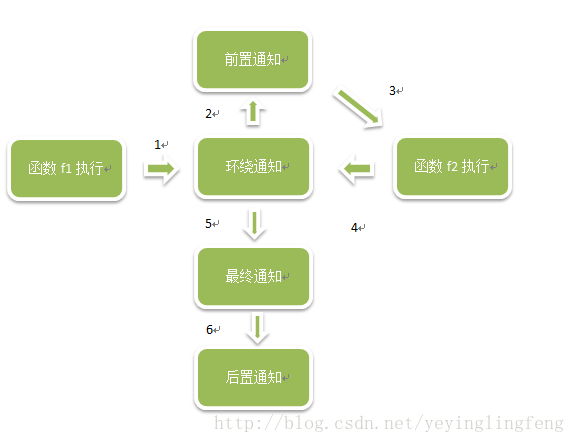
可以看到大致的运行顺序类似下图
3个配置文件内容,主要的说明都写在注释里了,这里就不多讲了。
applicationContext.xml配置文件,主要针对非@controller注释的扫描
<?xml version="1.0" encoding="UTF-8"?>
<beans xmlns="http://www.springframework.org/schema/beans" xmlns:xsi="http://www.w3.org/2001/XMLSchema-instance"
    xmlns:context="http://www.springframework.org/schema/context" xmlns:jdbc="http://www.springframework.org/schema/jdbc"
    xmlns:jee="http://www.springframework.org/schema/jee" xmlns:tx="http://www.springframework.org/schema/tx"
    xmlns:jpa="http://www.springframework.org/schema/data/jpa" xmlns:aop="http://www.springframework.org/schema/aop"
    xmlns:mvc="http://www.springframework.org/schema/mvc"
    xsi:schemaLocation="
        http://www.springframework.org/schema/beans http://www.springframework.org/schema/beans/spring-beans-4.0.xsd
        http://www.springframework.org/schema/context http://www.springframework.org/schema/context/spring-context-4.0.xsd
        http://www.springframework.org/schema/jdbc http://www.springframework.org/schema/jdbc/spring-jdbc-4.0.xsd
        http://www.springframework.org/schema/jee http://www.springframework.org/schema/jee/spring-jee-4.0.xsd
        http://www.springframework.org/schema/tx http://www.springframework.org/schema/tx/spring-tx-4.0.xsd
        http://www.springframework.org/schema/data/jpa http://www.springframework.org/schema/data/jpa/spring-jpa-1.3.xsd
        http://www.springframework.org/schema/aop http://www.springframework.org/schema/aop/spring-aop-4.0.xsd
        http://www.springframework.org/schema/mvc
        http://www.springframework.org/schema/mvc/spring-mvc-3.0.xsd"
    default-lazy-init="true">

    <!-- 使用annotation 自动注册bean, 并保证@Required、@Autowired的属性被注入 -->
    <!-- 不扫描com.java.spring包下的@Controller注释,其他的注释都扫描,除controller注释扫描都放在applicationContext.xml中(扫描功能分离),despatch servlet中专职controller注释的扫描 -->
    <context:component-scan base-package="com.java.spring">
        <context:exclude-filter type="annotation" expression="org.springframework.stereotype.Controller"/>
        <context:exclude-filter type="annotation" expression="org.springframework.web.bind.annotation.ControllerAdvice"/>
    </context:component-scan>
     <!-- 使AspectJ注解起作用:自动为匹配的类生产代理对象 -->
    <aop:aspectj-autoproxy></aop:aspectj-autoproxy>

</beans>
dispatcherServlet-servlet.xml配置文件,主要针对@controller注释的扫描
<?xml version="1.0" encoding="UTF-8"?>
<beans xmlns="http://www.springframework.org/schema/beans"
    xmlns:xsi="http://www.w3.org/2001/XMLSchema-instance"
    xmlns:context="http://www.springframework.org/schema/context"
    xmlns:mvc="http://www.springframework.org/schema/mvc"
    xmlns:task="http://www.springframework.org/schema/task"
    xmlns:aop="http://www.springframework.org/schema/aop"
    xsi:schemaLocation="http://www.springframework.org/schema/mvc
        http://www.springframework.org/schema/mvc/spring-mvc-4.0.xsd
        http://www.springframework.org/schema/beans
        http://www.springframework.org/schema/beans/spring-beans-4.0.xsd
        http://www.springframework.org/schema/context
        http://www.springframework.org/schema/context/spring-context-4.0.xsd
        http://www.springframework.org/schema/aop
        http://www.springframework.org/schema/aop/spring-aop-3.0.xsd
        http://www.springframework.org/schema/task
        http://www.springframework.org/schema/task/spring-task-3.0.xsd">

    <!-- 自动扫描且只扫描@Controller -->
    <!-- 当且仅当扫描com.springMVC.controller下的@Controller注解 -->
    <!-- use-default-filters="false" 指除了context子项,其他注释都不扫描-->
    <context:component-scan base-package="com.springMVC.controller" use-default-filters="false">
        <context:include-filter type="annotation" expression="org.springframework.stereotype.Controller"/>
        <context:include-filter type="annotation" expression="org.springframework.web.bind.annotation.ControllerAdvice"/>
    </context:component-scan>

    <!--Spring3.1开始的注解 HandlerMapping -->
    <bean class="org.springframework.web.servlet.mvc.method.annotation.RequestMappingHandlerMapping"/>
    <!--Spring3.1开始的注解 HandlerAdapter -->
    <bean class="org.springframework.web.servlet.mvc.method.annotation.RequestMappingHandlerAdapter"/>

    <!-- 定义JSP文件的位置 -->
    <bean class="org.springframework.web.servlet.view.InternalResourceViewResolver">
        <property name="prefix" value="/WEB-INF/jsp/"/>
        <property name="suffix" value=".jsp"/>
    </bean>
</beans>
web.xml
<?xml version="1.0" encoding="UTF-8"?>
<web-app xmlns:xsi="http://www.w3.org/2001/XMLSchema-instance" xmlns="http://java.sun.com/xml/ns/javaee"
    xmlns:web="http://java.sun.com/xml/ns/javaee/web-app_2_5.xsd" xsi:schemaLocation="http://java.sun.com/xml/ns/javaee http://java.sun.com/xml/ns/javaee/web-app_2_5.xsd"
    version="2.5">
    <!-- 扫描applicationContext.xml文件-->
    <context-param>
        <param-name>contextConfigLocation</param-name>
        <param-value>
            classpath*:config/applicationContext.xml,
        </param-value>
    </context-param>

    <listener>
        <listener-class>org.springframework.web.context.ContextLoaderListener</listener-class>
    </listener>
    <!-- 设定拦截器&对应的配置文件-->
    <servlet>
        <servlet-name>dispatcherServlet</servlet-name>
        <servlet-class>org.springframework.web.servlet.DispatcherServlet</servlet-class>
        <load-on-startup>1</load-on-startup>
    </servlet>
    <servlet-mapping>
        <servlet-name>dispatcherServlet</servlet-name>
        <url-pattern>/</url-pattern>
    </servlet-mapping>
</web-app> 运行下,我这里用的地址是http://localhost:8080/SpringMVCTest/index
可以看到后台:

大功告成
大致重要的文件就是上面所讲的,剩下一些文件可以下载项目来查看
csdn:http://download.csdn.net/detail/yeyinglingfeng/9904070
github:https://github.com/SecondMagic/spring-mvc-spring-aop


 1254
1254

 被折叠的 条评论
为什么被折叠?
被折叠的 条评论
为什么被折叠?
 到【灌水乐园】发言


