


Vue开发实战学习笔记
Vuex
Why Vuex
provide和inject虽然能够实现层层传递的数据管理,但对于一个大的管理系统而言会显得有些繁琐,我们需要一个大型的状态管理系统。
How Vuex
一个简单的计数器的例子,在main.js中引入Vuex
import Vue from 'vue'
import Vuex from 'vuex'
import App from './App.vue'

Vue.use(Vuex)
Vue.config.productionTip = false

const store = new Vuex.Store({
  state: {
    count: 0,
  },
  mutations: {
    increment(state) {
      state.count++
    }
  },
  actions: {
    increment({commit}) {
      setTimeout(()=>{
        // state.count++ // 不要对state进行更改操作,应该通过commit交给mutations去处理
        commit('increment')
      }, 3000)
    }
  },
  getters: {
    doubleCount(state) {
      return state.count * 2
    }
  }
})

new Vue({
  store,
  render: h => h(App),
}).$mount('#app')
APP.vue中, $store.dispatch对应的是action的定义,$store.commit对应的是mutations 的定义:
<template>
  <div id="app">
    {{count}}
    <br>
    {{$store.getters.doubleCount}}
    <button @click="$store.commit('increment')">count++</button>
    <button @click="$store.dispatch('increment')">count++</button>
  </div>
</template>

<script>
export default {
  name: 'app',
  computed: {
    count() {
      return this.$store.state.count
    }
  }
}
</script>

<style>
</style>
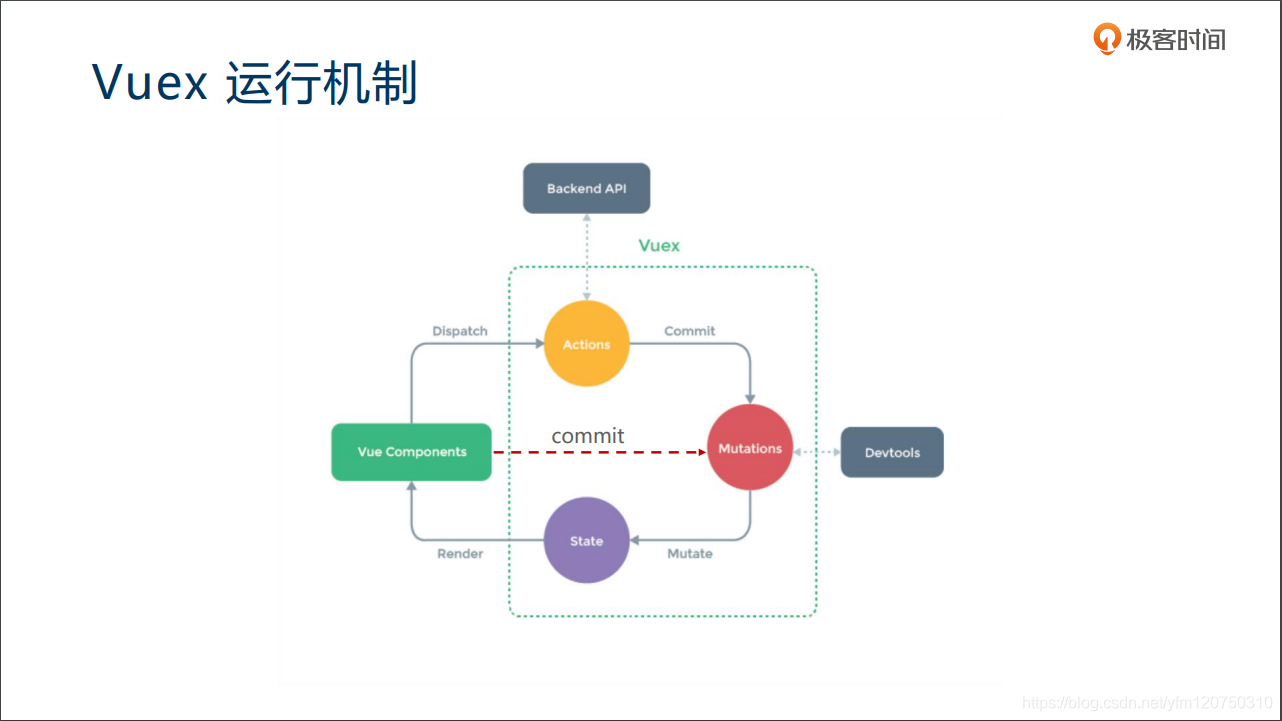
$store 是如何是如何挂载到实例 this 上的?
通过new Vue中放置store
Vuex的核心概念和底层原理


min-vuex实例:我们尝试实现一个简单的min-vuex:
import Vue from 'vue'
const Store = function Store (options = {}) {
  const {state = {}, mutations={}} = options
  this._vm = new Vue({
    data: {
      $$state: state
    },
  })
  this._mutations = mutations
}
Store.prototype.commit = function(type, payload){
  if(this._mutations[type]) {
    this._mutations[type](this.state, payload)
  }
}
Object.defineProperties(Store.prototype, {
  state: {
    get: function(){
      return this._vm._data.$$state
    }
  }
});
export default {Store}
在这个简易的min-vuex中,我们定义了state、mutation、commit、get等属性,可以将上述的case中的vuex替换为我们的min-vuex,计时器也是可以跑起来的。
main.js文件
import Vue from 'vue'
import Vuex from './min-vuex'
import App from './App.vue'

Vue.use(Vuex)
Vue.config.productionTip = false

const store = new Vuex.Store({
  state: {
    count: 0,
  },
  mutations: {
    increment(state) {
      state.count++
    }
  },
  // actions: {
  //   increment({commit}) {
  //     setTimeout(()=>{
  //       // state.count++ // 不要对state进行更改操作,应该通过commit交给mutations去处理
  //       commit('increment')
  //     }, 3000)
  //   }
  // },
  // getters: {
  //   doubleCount(state) {
  //     return state.count * 2
  //   }
  // }
})
Vue.prototype.$store = store
new Vue({
  // store,
  render: h => h(App),
}).$mount('#app')
App.vue文件
<template>
  <div id="app">
    {{count}}
    <button @click="$store.commit('increment')">count++</button>
  </div>
</template>

<script>
export default {
  name: 'app',
  computed: {
    count() {
      return this.$store.state.count
    }
  }
}
</script>

<style>
</style>
扩展简化版的 min-vuex,实现 getters,并实现 Vuex 的方式注入$store
- 计算属性computer实现getters缓存
- beforeCreate中混入$store的获取方式
看一下扩展后的min-vuex
let Vue;
function install (_Vue) {
  Vue = _Vue;
  function vuexInit () {
    var options = this.$options;
    // store injection
    if (options.store) {
      this.$store = typeof options.store === 'function'
        ? options.store()
        : options.store;
    } else if (options.parent && options.parent.$store) {
      this.$store = options.parent.$store;
    }
  }
  Vue.mixin({ beforeCreate: vuexInit });
}

const Store = function Store (options = {}) {
  const {state = {}, mutations={}, getters={}} = options
  const computed = {}
  const store = this
  store.getters = {};
  for (let [key, fn] of Object.entries(getters)) {
    computed[key] = function () { return fn(store.state, store.getters); };
    Object.defineProperty(store.getters, key, {
      get: function () { return store._vm[key]; },
    });
  }
  this._vm = new Vue({
    data: {
      $$state: state
    },
    computed,
  })
  this._mutations = mutations
}
Store.prototype.commit = function(type, payload){
  if(this._mutations[type]) {
    this._mutations[type](this.state, payload)
  }
}
Object.defineProperties(Store.prototype, {
  state: {
    get: function(){
      return this._vm._data.$$state
    }
  }
});
export default {Store, install}
Vuex的最佳实践
前面提到的五个核心概念的取值,vuex提供了很多简写的方式:

我们可以用常量代替Mutation事件类型:

Module:
- 开启命名空间 namespaced: true
- 嵌套模块不要过深,尽量扁平化
- 灵活应用 createNamespacedHelpers
购物车示例
看下代码运行页面:

示例的逻辑还是比较清晰的,我们可以将产品添加到清单中,添加完产品可以将清单提交到后台去购买,我们看一下我们的代码逻辑。
入口文件main.js
import Vue from 'vue'
import App from './App.vue'
import store from './store'

Vue.config.productionTip = false

new Vue({
  store,
  render: h => h(App),
}).$mount('#app')
入口文件还是一样,只是将store相关的数据都放在了store文件中,入口文件没有什么特别之处,我们接下来看一下App.vue
<template>
  <div id="app">
    <h1>购物车示例</h1>
    <p>账号: {{email}}</p>
    <hr>
    <h2>产品</h2>
    <ProductList/>
    <hr>
    <ShoppingCart/>
  </div>
</template>

<script>
import { mapState } from 'vuex'
import ProductList from './components/ProductList.vue'
import ShoppingCart from './components/ShoppingCart.vue'
export default {
  computed: mapState({
    email: state => state.userInfo.email
  }),
  components: { ProductList, ShoppingCart },
}
</script>
这个页面展现了页面的主题结构,有购物车示例、账号等信息,我们来看下ProductList 和ShoppingCart
ProductList.vue
<template>
  <ul>
    <li
      v-for="product in products"
      :key="product.id">
      {{ product.title }} - {{ product.price }}
      <br>
      <button
        :disabled="!product.inventory"
        @click="addProductToCart(product)">
        加入购物车
      </button>
    </li>
  </ul>
</template>

<script>
import { mapState, mapActions } from 'vuex'
export default {
  computed: mapState({
    products: state => state.products.all,
  }),
  // computed: {
  //   products(){
  //     return this.$store.state.products.all
  //   }
  // },
  methods: mapActions('cart', [
    'addProductToCart'
  ]),
  // methods: {
  //   addProductToCart(product){
  //     this.$store.dispatch('cart/addProductToCart', product)
  //   }
  // },
  created () {
    this.$store.dispatch('products/getAllProducts')
  }
}
</script>
注意:上述注释的代码等价于未注释的代码。
ShoppingCart.Vue
<template>
  <div class="cart">
    <h2>清单</h2>
    <p v-show="!products.length"><i>请添加产品到购物车</i></p>
    <ul>
      <li
        v-for="product in products"
        :key="product.id">
        {{ product.title }} - {{ product.price }} x {{ product.quantity }}
      </li>
    </ul>
    <p>合计: {{ total }}</p>
    <p><button :disabled="!products.length" @click="checkout(products)">提交</button></p>
    <p v-show="checkoutStatus">提交 {{ checkoutStatus }}.</p>
  </div>
</template>

<script>
import { mapGetters, mapState } from 'vuex'
export default {
  computed: {
    ...mapState({
      checkoutStatus: state => state.cart.checkoutStatus
    }),
    ...mapGetters('cart', {
      products: 'cartProducts',
      total: 'cartTotalPrice'
    }),
    // ...mapGetters({
    //   products: 'cart/cartProducts',
    //   total: 'cart/cartTotalPrice'
    // })
  },
  // computed: {
  //   checkoutStatus(){
  //     return this.$store.state.cart.checkoutStatus
  //   },
  //   products() {
  //     return this.$store.getters['cart/cartProducts']
  //   },
  //   total() {
  //     return this.$store.getters['cart/cartTotalPrice']
  //   }
  // },
  methods: {
    checkout (products) {
      this.$store.dispatch('cart/checkout', products)
    }
  },
}
</script>
我们来看一下store的内容:
index.js文件中:
import Vue from 'vue'
import Vuex from 'vuex'
import cart from './modules/cart'
import products from './modules/products'

Vue.use(Vuex)
export default new Vuex.Store({
  state: {
    userInfo: {
      email: "xxxxxx@qq.com"
    }
  },
  modules: {
    cart,
    products
  },
})
在这里我们把cart和products模块引入注册到modules中。
看一下modules/products.js模块
import shop from '../../api/shop'
import {PRODUCTS} from '../mutation-types'

// initial state
const state = {
  all: []
}

// getters
const getters = {}

// actions
const actions = {
  getAllProducts ({ commit }) {
    shop.getProducts(products => {
      commit(PRODUCTS.SET_PRODUCTS, products)
    })
  }
}

// mutations
const mutations = {
  [PRODUCTS.SET_PRODUCTS] (state, products) {
    state.all = products
  },

  [PRODUCTS.DECREMENT_PRODUCT_INVENTORY] (state, { id }) {
    const product = state.all.find(product => product.id === id)
    product.inventory--
  }
}

export default {
  namespaced: true,
  state,
  getters,
  actions,
  mutations
}
其中shop就是去模拟一下ajax请求:
/**
 * Mocking client-server processing
 */
const _products = [
  {"id": 1, "title": "华为 Mate 20", "price": 3999, "inventory": 2},
  {"id": 2, "title": "小米 9", "price": 2999, "inventory": 0},
  {"id": 3, "title": "OPPO R17", "price": 2999, "inventory": 5}
]

export default {
  getProducts (cb) {
    setTimeout(() => cb(_products), 100)
  },

  buyProducts (products, cb, errorCb) {
    setTimeout(() => {
      // simulate random checkout failure.
      Math.random() > 0.5
        ? cb()
        : errorCb()
    }, 100)
  }
}
cart的代码会稍微复杂一点:
import shop from '../../api/shop'
import { CART, PRODUCTS } from '../mutation-types'

// initial state
// shape: [{ id, quantity }]
const state = {
  items: [],
  checkoutStatus: null
}

// getters
const getters = {
  cartProducts: (state, getters, rootState) => {
    return state.items.map(({ id, quantity }) => {
      const product = rootState.products.all.find(product => product.id === id)
      return {
        title: product.title,
        price: product.price,
        quantity
      }
    })
  },

  cartTotalPrice: (state, getters) => {
    return getters.cartProducts.reduce((total, product) => {
      return total + product.price * product.quantity
    }, 0)
  }
}

// actions
const actions = {
  checkout ({ commit, state }, products) {
    const savedCartItems = [...state.items]
    //先将购物车的状态置为空
    commit(CART.SET_CHECKOUT_STATUS, null)
    // empty cart
    commit(CART.SET_CART_ITEMS, { items: [] })
    shop.buyProducts(
      products,
      () => commit(CART.SET_CHECKOUT_STATUS, 'successful'),
      () => {
        commit(CART.SET_CHECKOUT_STATUS, 'failed')
        // rollback to the cart saved before sending the request
        commit(CART.SET_CART_ITEMS, { items: savedCartItems })
      }
    )
  },

  addProductToCart ({ state, commit }, product) {
    commit(CART.SET_CHECKOUT_STATUS, null)
    if (product.inventory > 0) {
      const cartItem = state.items.find(item => item.id === product.id)
      if (!cartItem) {
        commit(CART.PUSH_PRODUCT_TO_CART, { id: product.id })
      } else {
        commit(CART.INCREMENT_ITEM_QUANTITY, cartItem)
      }
      // remove 1 item from stock
      commit(`products/${PRODUCTS.DECREMENT_PRODUCT_INVENTORY}`, { id: product.id }, { root: true })
    }
  }
}

// mutations
const mutations = {
  [CART.PUSH_PRODUCT_TO_CART] (state, { id }) {
    state.items.push({
      id,
      quantity: 1
    })
  },

  [CART.INCREMENT_ITEM_QUANTITY] (state, { id }) {
    const cartItem = state.items.find(item => item.id === id)
    cartItem.quantity++
  },

  [CART.SET_CART_ITEMS] (state, { items }) {
    state.items = items
  },

  [CART.SET_CHECKOUT_STATUS] (state, status) {
    state.checkoutStatus = status
  }
}

export default {
  namespaced: true,
  state,
  getters,
  actions,
  mutations
}
扩展购物车示例,提供单次添加 1-N 的数量到购物车的功能:
https://github.com/geektime-geekbang/geektime-vue-1/tree/master/vuex-demo3_a
Vue Router
Why Vue Router
传统开发模式下,每个url都对应着一个html页面,每次切换url的时候会引起页面的重新加载,在这种情况下诞生了单页面(spa)开发模式,用户在切换url的时候不在是执行页面的变化,而是根据我们的逻辑进行执行,返回数据。
看一下Vue Router解决的问题:
- 监听 URL 的变化,并在变化前后执行相应的逻辑
- 不同的 URL 对应不同的不同的组件
- 提供多种方式改变 URL 的 API(URL 的改变不能导致浏览器刷新)
它的使用方式:
- 提供一个路由配置表,不同 URL 对应不同组件的配置
- 初始化路由实例 new VueRouter()
- 挂载到 Vue 实例上
- 提供一个路由占位,用来挂载 URL 匹配到的组件
看一下Vue Router的使用实例:
在main.js中引入路由
import Vue from 'vue'
import VueRouter from 'vue-router'
import App from './App.vue'
import routes from './routes'

Vue.config.productionTip = false

Vue.use(VueRouter)

const router = new VueRouter({
  mode: 'history',
  routes,
})

new Vue({
  router,
  render: h => h(App),
}).$mount('#app')
在main.js中完成路由的注册,接下来看App.vue这个文件:
<template>
  <div id="app">
    <h2>router demo</h2>
    <router-view></router-view>
  </div>
</template>

<script>
export default {
  name: 'app',
  components: {
  },
}
</script>

<style>
#app {
  font-family: 'Avenir', Helvetica, Arial, sans-serif;
  -webkit-font-smoothing: antialiased;
  -moz-osx-font-smoothing: grayscale;
  text-align: center;
  color: #2c3e50;
  margin-top: 60px;
}
</style>
在里面加入了<router-view></router-view>组件。
在路由配置列表中则进行如下配置:
import RouterDemo from './components/RouterDemo'
import RouterChildrenDemo from './components/RouterChildrenDemo'

const routes = [
  { path: '/foo', component: RouterDemo, name: '1' },
  { path: '/bar', component: RouterDemo, name: '2' },
  // 当 /user/:id 匹配成功,
  // RouterDemo 会被渲染在 App 的 <router-view /> 中
  { path: '/user/:id',
    component: RouterDemo,
    name: '3',
    props: true,
    children: [
      {
        // 当 /user/:id/profile 匹配成功,
        // RouterChildrenDemo 会被渲染在 RouterDemo 的 <router-view/> 中
        path: 'profile',
        component: RouterChildrenDemo,
        name: '3-1'
      },
      {
        // 当 /user/:id/posts 匹配成功
        // RouterChildrenDemo 会被渲染在 RouterDemo 的 <router-view/> 中
        path: 'posts',
        component: RouterChildrenDemo
      }
    ]
  },
  { path: '/a', redirect: '/bar' },
  { path: '*', component: RouterDemo, name: '404' }
]

export default routes
SPA 的缺点有哪些,如何解决?
- 不利于SEO
- 首屏渲染时间长
路由类型及底层原理
路由类型:
- hash模式 丑,无法使用锚点定位
hashchange - History模式 需要后端配合,IE9不兼容(可使用强制刷新处理)
我们只需要在声明router的时候把mode改成history的模式就可以了。
history.pushState API

看一下路由的底层原理图:
路由通过Vue.util.defineReactive_route 这样一个api把router的信息变为一个响应式的,我们通过router-link, $router.push, a href, 浏览器的前进后退以及手动更改URL来触发updateRouter方法,由updateRouter来改变响应式数据,updateRouter触发以后再来更改我们的router-view的更新。
对于动态内容,如果不使用SSR,如何做SEO
- 使用无头浏览器(phantomjs、headlessChrome)——效率比较低
Nuxt
Nuxt解决的问题
我们都知道spa单页面的缺点有以下几种:
- 不利于SEO(搜索引擎爬取单页面是没有内容的,它不会出现再搜索的结果中)
- 首屏渲染时间长
针对这两个缺点,我们会有一些方案来解决:
- 服务端渲染SSR
- 预渲染Prerendering
Prerendering预渲染
- 主要适用于静态站点
SSR
- 动态渲染
- 配置繁琐
那么针对这些问题Nuxt就是去做这些操作
- 静态站点
- 动态渲染
- 简化配置
Nuxt的核心原理

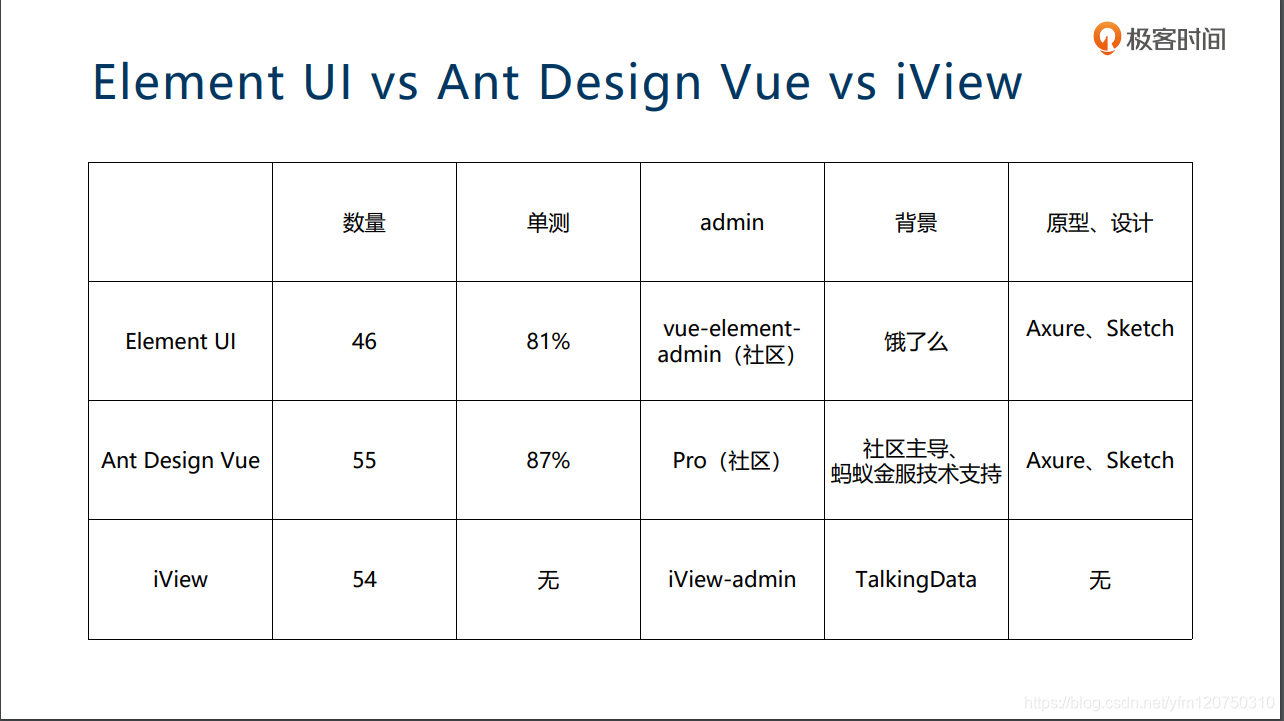
UI组件库对比
常用开发工具
Vetur
- 语法高亮
- Lint 检查
- 格式化
ESLint
- 代码规范
- 错误检查
Prettier
- 格式化
** Vue DevTools**
- 集成Vuex
- 可远程调试
单元测试
使用方式:
- jest或mocha
- @vue/test-utils
- sinon
看一下单测jest的配置(jest.config.js )
module.exports = {
  moduleFileExtensions: ["js", "jsx", "json", "vue"],
  transform: {
    "^.+\\.vue$": "vue-jest",
    ".+\\.(css|styl|less|sass|scss|svg|png|jpg|ttf|woff|woff2)$":
      "jest-transform-stub",
    "^.+\\.jsx?$": "babel-jest"
  },
  transformIgnorePatterns: ["/node_modules/"],
  moduleNameMapper: {
    "^@/(.*)$": "<rootDir>/src/$1"
  },
  snapshotSerializers: ["jest-serializer-vue"],
  testMatch: [
    "**/tests/unit/**/*.spec.(js|jsx|ts|tsx)|**/__tests__/*.(js|jsx|ts|tsx)"
  ],
  testURL: "http://localhost/"
};
transform中配置不同的类型处理不同的文件
moduleNameMapper 指定快捷路径
snapshotSerializers 用来做快照的格式化
testMatch 来匹配那些需要做单元测试
testURL 是给jest去使用的
书写单测代码:
import { mount } from "@vue/test-utils";
import HelloWorld from "@/components/HelloWorld.vue";

describe("HelloWorld.vue", () => {
  it("renders props.msg when passed", () => {
    const msg = "new message";
    const wrapper = mount(HelloWorld, {
      propsData: { msg }
    });
    expect(wrapper.text()).toMatch(msg);
  });
});
expect是一个断言,我希望wrapper.text()和msg是匹配的。
看一个复杂一点的单元测试,这是一个计数器的单元测试:
import { mount } from "@vue/test-utils";
import Counter from "@/components/Counter.vue";
import sinon from "sinon";

describe("Counter.vue", () => {
  const change = sinon.spy();
  const wrapper = mount(Counter, {
    listeners: {
      change
    }
  });
  it("renders counter html", () => {
    expect(wrapper.html()).toMatchSnapshot();
  });
  it("count++", () => {
    const button = wrapper.find("button");
    button.trigger("click");
    expect(wrapper.vm.count).toBe(1);
    expect(change.called).toBe(true);
    button.trigger("click");
    expect(change.callCount).toBe(2);
  });
});


 456
456


 被折叠的 条评论
为什么被折叠?
被折叠的 条评论
为什么被折叠?
 到【灌水乐园】发言


