


TodoList任务列表
为了更加说明AngularJS关心数据的问题,我们来看一下这个TodoList的例子。通过转换思考方式一步一步的来实现。
列表,添加
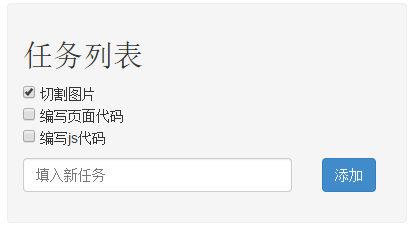
观察上面的图片,首先要实现的效果很简单,无非就是在输入框中输入新任务,点击添加按钮之后,讲新任务提交到任务列表中
如果按照之前的jquery方式去思考,那么肯定要先思考应该怎么去操作DOM
那么按照AngularJS的方式,首先应该想到的是:
1.要创建任务列表,应该有任务列表数据
2.要添加新任务,无非就是把新任务添加到原来的任务列表中
如果这么去思考的话,事情就简单了,列表无非就是放在数组中的数据,而新任务无非就是push到数组中的新数据
直接观察代码:
<!DOCTYPE html>
<html lang="en" ng-app="todo">
<head>
    <meta charset="UTF-8">
    <title>Document</title>
    <link rel="stylesheet" href="http://apps.bdimg.com/libs/bootstrap/3.1.1/css/bootstrap.css">
    <style>
        #content{
            width: 400px;
            margin: 5px auto;
            background-color:#f5f5f5;
            border: 1px solid #eee;
            border-radius:4px;
            padding: 15px;
        }
        ul{
            list-style: none;
            padding: 0;
            margin: 0 0 10px 0;
        }
    </style>
</head>
<body>
<div id="content">
    <h2>任务列表</h2>
    <div ng-controller="todoListCtrl">
        <ul>
            <li ng-repeat="todo in todos">
                <input type="checkbox" ng-model='todo.done'>
                <span ng-bind="todo.text"></span>
            </li>
        </ul>

        <form ng-submit="addTodo()" class="form-horizontal">
            <div class="form-group">
                <div class="col-sm-9">
                    <input type="text" ng-model='todoText' placeholder="填入新任务" class="form-control">
                    </div>
                    <div class="col-sm-2">
                        <button class="btn btn-primary">添加</button>
                    </div>
            </div>
        </form>
    </div>
</div>
</body>
<script src="http://apps.bdimg.com/libs/angular.js/1.2.9/angular.min.js"></script>
<script>
    var todo = angular.module('todo', []);
    todo.controller('todoListCtrl', ['$scope', function($scope){
        $scope.todos = [
            {text:'切割图片',done:true},
            {text:'编写页面代码',done:false},
            {text:'编写js代码',done:false}
        ];
        $scope.addTodo = function(){
            $scope.todos.push(
                {text:$scope.todoText,done:false}
            );
            $scope.todoText = '';
        }
    }]);
</script>
</html>
上面的js代码其实就只有两步:
1.创建数组
2.往数组中插入新值
和我们之前分析的一模一样,无非多了一点内容就是需要和界面进行一下双向数据绑定(关于双向数据绑定大家不用纠结这个名字,简单理解就是js中声明的变量,在html代码中也可以直接访问到,并且无论是js中,还是html代码中,只要一边做出了修改,就会影响另外一边)
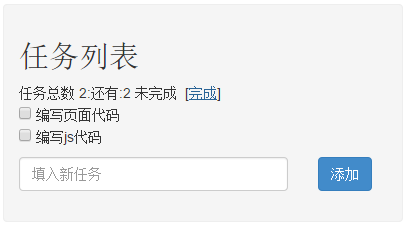
完成,删除
基本框架已经搭好,接下的内容就更简单了,接下来完成几步
1.已经完成的任务,点击checkbox打上勾表示完成,并有相应css样式
2.界面有提示总共有多少任务,还有多少个未完成
3.点击完成链接,删除已经完成的任务
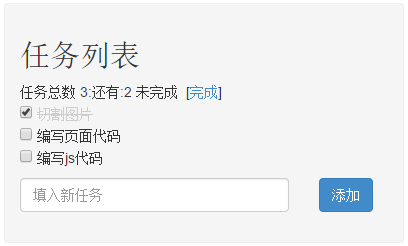
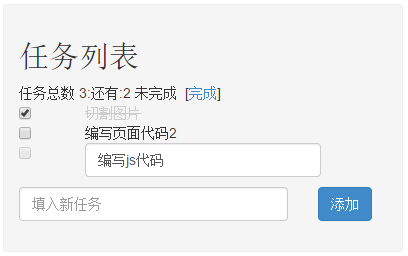
根据上面图片分析:
1.点击checkbox选中,切换样式–这个其实就是取巧了一下,class样式的名字和ng-model的名字重合就切换样式
2.任务完成数,和未完成数显示–这个其实就是数组的长度,和数组里done的值为false的对象个数
3.点击完成,删除已经完成的项目–这个就是把已经完成的任务从数组中删除
来看下面的代码:
<!DOCTYPE html>
<html lang="en" ng-app="todo">
<head>
<meta charset="UTF-8">
<title>Document</title>
<link rel="stylesheet" href="http://apps.bdimg.com/libs/bootstrap/3.1.1/css/bootstrap.css">
<style>
#content{
width: 400px;
margin: 5px auto;
background-color:#f5f5f5;
border: 1px solid #eee;
border-radius:4px;
padding: 15px;
}
ul{
list-style: none;
padding: 0;
margin: 0 0 10px 0;
}
.done-true{
text-decoration: line-through;
color: #ccc;
}
</style>
</head>
<body>
<div id="content">
<h2>任务列表</h2>
<div ng-controller="todoListCtrl">
<span>任务总数 {{todos.length}}:还有:{{remaining()}} 未完成</span> [<a href="" ng-click="archive()">完成</a>]
<ul>
<li ng-repeat="todo in todos">
<input type="checkbox" ng-model='todo.done'>
<span class="done-{{todo.done}}" ng-bind="todo.text"></span>
</li>
</ul>
<form ng-submit="addTodo()" class="form-horizontal">
<div class="form-group">
<div class="col-sm-9">
<input type="text" ng-model='todoText' placeholder="填入新任务" class="form-control">
</div>
<div class="col-sm-2">
<button class="btn btn-primary">添加</button>
</div>
</div>
</form>
</div>
</div>
</body>
<script src="http://apps.bdimg.com/libs/angular.js/1.2.9/angular.min.js"></script>
<script>
var todo = angular.module('todo', []);
todo.controller('todoListCtrl', ['$scope', function($scope){
$scope.todos = [
{text:'切割图片',done:true},
{text:'编写页面代码',done:false},
{text:'编写js代码',done:false}
];
$scope.remaining = function(){
var count = 0;
$scope.todos.forEach(function(ele){
count += ele.done ? 0 : 1;
});
return count;
}
$scope.addTodo = function(){
$scope.todos.push(
{text:$scope.todoText,done:false}
);
$scope.todoText = '';
}
$scope.archive = function(){
$scope.todos = $scope.todos.filter(function(ele){
return !ele.done;
});
}
}]);
</script>
</html>修改
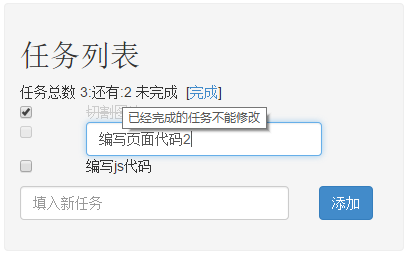
现在再对代码进行一下修改,稍微涉及到了一些业务内容了。
1.点击已经存在的任务,我们可以进行修改
2.一次只能修改一项任务
3.已经完成的任务不能修改,必须改成未完成状态
4.正在修改的任务不能点击多选框
直接上代码:
<!DOCTYPE html>
<html lang="en" ng-app="todo">
<head>
<meta charset="UTF-8">
<title>Document</title>
<link rel="stylesheet" href="http://apps.bdimg.com/libs/bootstrap/3.1.1/css/bootstrap.css">
<style>
#content{
width: 400px;
margin: 5px auto;
background-color:#f5f5f5;
border: 1px solid #eee;
border-radius:4px;
padding: 15px;
}
ul{
list-style: none;
padding: 0;
margin: 0 0 10px 0;
}
.done-true{
text-decoration: line-through;
color: #ccc;
}
</style>
</head>
<body>
<div id="content">
<h2>任务列表</h2>
<div ng-controller="todoListCtrl">
<span>任务总数 {{todos.length}}:还有:{{remaining()}} 未完成</span> [<a href="" ng-click="archive()">完成</a>]
<ul>
<li ng-repeat="todo in todos" class="row">
<div class="col-sm-2">
<!-- 这里的ng-disabled是为了和下面输入框对应,
如果任务处于输入状态不能点击多选框完成任务
-->
<input type="checkbox" ng-model='todo.done' ng-disabled="!todo.showing">
</div>
<div class="col-sm-8">
<!-- 这里用了一个比较取巧的操作, 使用ng-show判断
到底是输入框显示,还是span显示
-->
<input class="form-control" ng-show="!todo.showing" ng-model="todo.text" ng-blur="changeFlag($index)">
<span ng-show="todo.showing" class="done-{{todo.done}}" ng-click="changeFlag($index)" ng-mouseover="tooltipWarning($index)" data-toggle="tooltip" data-placement="right" title="{{todo.warning}}">{{todo.text}}</span>
</div>
</li>
</ul>
<form ng-submit="addTodo()" class="form-horizontal">
<div class="form-group">
<div class="col-sm-9">
<input type="text" ng-model='todoText' placeholder="填入新任务" class="form-control">
</div>
<div class="col-sm-2">
<button class="btn btn-primary">添加</button>
</div>
</div>
</form>
</div>
</div>
</body>
<script src="http://apps.bdimg.com/libs/angular.js/1.2.9/angular.min.js"></script>
<script src="http://apps.bdimg.com/libs/jquery/1.9.1/jquery.min.js"></script>
<script src="http://apps.bdimg.com/libs/bootstrap/3.1.1/js/bootstrap.min.js"></script>
<script>
var todo = angular.module('todo', []);
todo.controller('todoListCtrl', ['$scope', function($scope){
$scope.todos = [
{text:'切割图片',done:true,showing:true,warning:''},
{text:'编写页面代码',done:false,showing:true,warning:''},
{text:'编写js代码',done:false,showing:true,warning:''}
];
$scope.changeFlag = function(index){
//如果任务没有完成才能进行修改
if(!$scope.todos[index].done){
//遍历数组中所有对象,
//将非当前点击的对象的showing属性设置为true
//也就是全部都显示的是span状态
$scope.todos.forEach(function(ele,i){
if(i != index) ele.showing = true;
});
//取反之后重新赋值
$scope.todos[index].showing = !$scope.todos[index].showing;
}
}
$scope.remaining = function(){
var count = 0;
$scope.todos.forEach(function(ele){
count += ele.done ? 0 : 1;
});
return count;
}
$scope.addTodo = function(){
$scope.todos.push(
{text:$scope.todoText,done:false,showing:true,warning:''}
);
$scope.todoText = '';
}
$scope.archive = function(){
$scope.todos = $scope.todos.filter(function(ele){
return !ele.done;
});
}
$scope.tooltipWarning = function(index){
if($scope.todos[index].done){
$scope.todos[index].warning = "已经完成的任务不能修改";
}else{
$scope.todos[index].warning = "";
}
}
}]);
</script>
</html>


 303
303

 被折叠的 条评论
为什么被折叠?
被折叠的 条评论
为什么被折叠?
 到【灌水乐园】发言


