


通常在我们在开发ios应用时,系统已经给我们提供了足够的UI组件供我们开发,比如UIView以及其子类UIButton,UILabel,UIScrollview等等,但有些时候系统的组件不能满足我们的需求,这时候需要自定义视图以满足需求,自定义视图需要继承已经具有某些特征的父类视图,本文通过继承UIView达到自定义视图的目的,来加深对自定义视图以及CoreGraphics.framework的理解,废话不多说,进入正题:
一.首先继承UIView,重写其- (void)drawRect:(CGRect)rect方法
二.画矩形:
//矩形大小
    CGRect rectFrame = CGRectMake(50, 50, 100, 100);
    //CGContextSetRGBStrokeColor(context,1.0f, 1.0f, 1.0f, 1.0f);//设置画笔颜色
    CGContextSetStrokeColorWithColor(context, [UIColor greenColor].CGColor);//设置画笔颜色
   // CGContextSetRGBFillColor(context, .4f, .2f, .1f, 1);//设置填充颜色
    CGContextSetFillColorWithColor(context, [UIColor orangeColor].CGColor);//设置填充颜色
    CGContextAddRect(context,rectFrame);
    //设置矩形范围
    CGContextDrawPath(context,kCGPathFillStroke);
// 简单的画文字
    NSString *text = @"画文字画文字画文字画文字";
    UIFont *font = [UIFont boldSystemFontOfSize:14];
    // 设置需要画的矩形大小
    CGRect textRect;
    textRect.size = [text sizeWithFont:font];//根据字体大小设置文本区域的大小
    textRect.origin.x = rectFrame.origin.x;
    textRect.origin.y = rectFrame.origin.y;
    // 填充context颜色
    [[UIColor blackColor] setFill];
    //设置阴影的偏移量,向右便宜4,向下偏移3
    CGSize offset = CGSizeMake(4, 3);
    //设置阴影颜色
    CGColorRef color = [[UIColor darkGrayColor] CGColor];
    CGContextSetShadowWithColor(context, offset, 2.0, color);
    [text drawInRect:textRect
            withFont:font];
四.画有省略号的文字
text = @"画文字画文字画文字画文字";
    textRect.size  = CGSizeMake(100, 10);
    textRect.origin.x = rectFrame.origin.x;
    textRect.origin.y = rectFrame.origin.y+20;
    // Set the fill color of the current context to black
    [[UIColor blackColor] setFill];
    //画文字,在超出范围时显示省略号在末尾
    [text drawInRect:textRect withFont:font lineBreakMode:NSLineBreakByTruncatingTail];
五.让文字居中显示
//4.让文字居中显示
    text = @"画文字";
    textRect.size  = CGSizeMake(100, 10);
    textRect.origin.x = rectFrame.origin.x;
    textRect.origin.y = rectFrame.origin.y+40;
    // Set the fill color of the current context to black
    [[UIColor blackColor] setFill];
    //画文字,在超出范围时显示省略号在末尾,并居中显示
    [text drawInRect:textRect withFont:font lineBreakMode:NSLineBreakByTruncatingTail alignment:NSTextAlignmentCenter];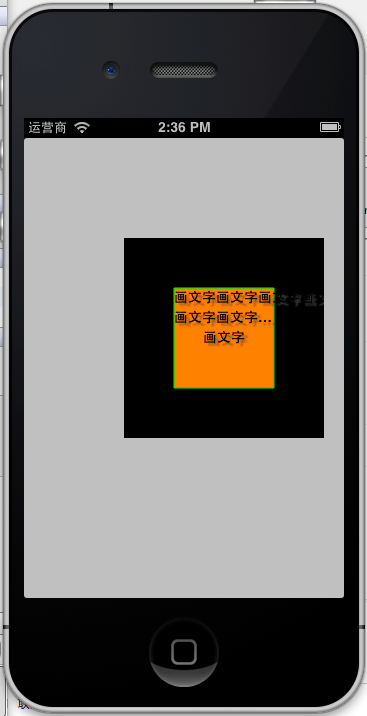


 1534
1534

 被折叠的 条评论
为什么被折叠?
被折叠的 条评论
为什么被折叠?
 到【灌水乐园】发言


