


203.移除链表元素
注意: 什么时候用while (cur != None), 什么时候用 while (cur.next != None)
# Definition for singly-linked list.
# class ListNode:
# def __init__(self, val=0, next=None):
# self.val = val
# self.next = next
class Solution:
def removeElements(self, head: Optional[ListNode], val: int) -> Optional[ListNode]:
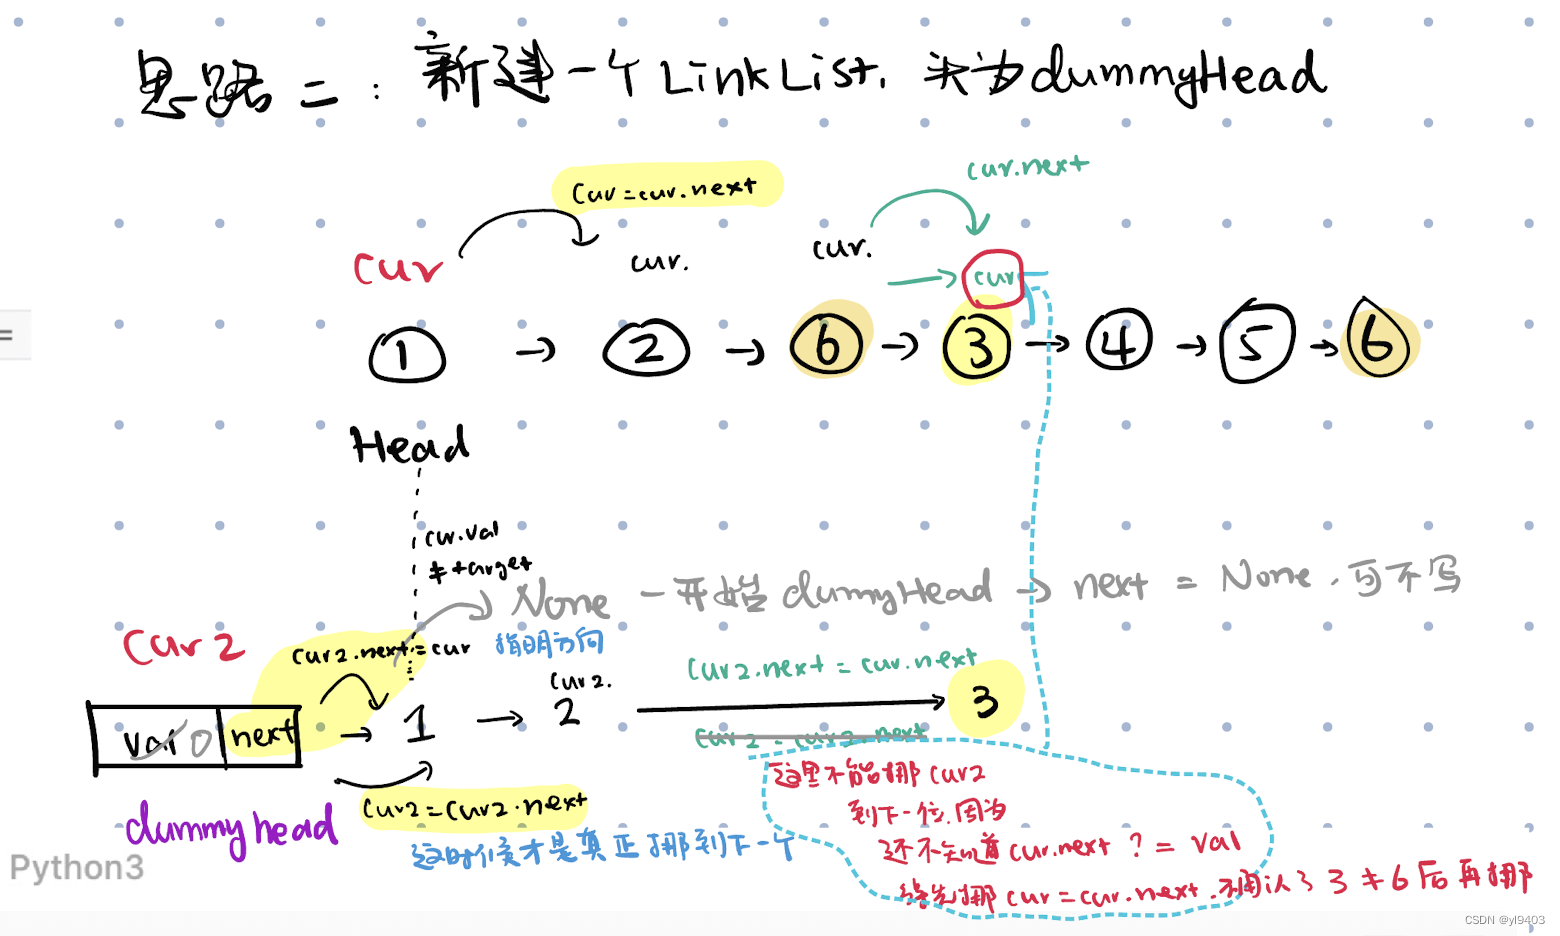
dummy = ListNode(0, None)
cur = head # 原ll上的iterator
cur2 = dummy #新建的ll上的iterator, 从dummyHead开始
while cur:
# 如果cur.val == val的话, 就跳过这个node
if cur.val == val:
cur2.next = cur.next # 在新的ll中的cur2.next = cur.next
cur = cur.next # 原cur先挪下一个看是不是等于val
else:
cur2.next = cur # 这里cur2.next= cur 只是指明方向,并没有真的挪到下一个
cur = cur.next # cur向后挪一个,检查后一个是不是等于val的
cur2 = cur2.next # 这里才是真正让cur2挪位置
return dummy.next # return dummyhead的下一个, 因为下一个开始才是真正的LL
707. 设计链表
# 定义一个node: node 上有value和pointer next
class Node:
    def __init__(self, val):
        self.val = val
        self.next = None


class MyLinkedList:

    #定义LinkList: 有head和size
    def __init__(self):
        self.head = ListNode(0) # 定义一个dummyhead, head上的value默认是0
        self.size = 0

    def get(self, index: int) -> int:
        if(index < 0) or (index >= self.size):
            return -1

        cur = self.head
        for iter in range(index+1):  #cur 从dummyhead开始,一直移动到idx = target index,
            cur = cur.next

        return cur.val


    def addAtHead(self, val: int) -> None:
        self.addAtIndex(0, val)


    def addAtTail(self, val: int) -> None:
        self.addAtIndex(self.size, val)


    def addAtIndex(self, index: int, val: int) -> None:
        if(index < 0) | (index > self.size):
            return

        cur = self.head

        for iter in range(index):
            cur = cur.next

        newNode = ListNode(val)
        newNode.next = cur.next # newNode插在cur的后面
        cur.next = newNode

        self.size += 1


    def deleteAtIndex(self, index: int) -> None:
        if index < 0 or index >= self.size:
            return

        cur = self.head #从dummyhead开始, 从dummyhead后面开始才是真正的idx 0,1,2 ....

        for iter in range(index): # idx = 3,那就从dummy开始挪3位,dummy-> 0-> 1 -> 2
            cur = cur.next   # cur挪到index - 1的位置

        cur.next = cur.next.next # 跳过index 那一个node

        self.size -= 1


# Your MyLinkedList object will be instantiated and called as such:
# obj = MyLinkedList()
# param_1 = obj.get(index)
# obj.addAtHead(val)
# obj.addAtTail(val)
# obj.addAtIndex(index,val)
# obj.deleteAtIndex(index)
206. 反转链表
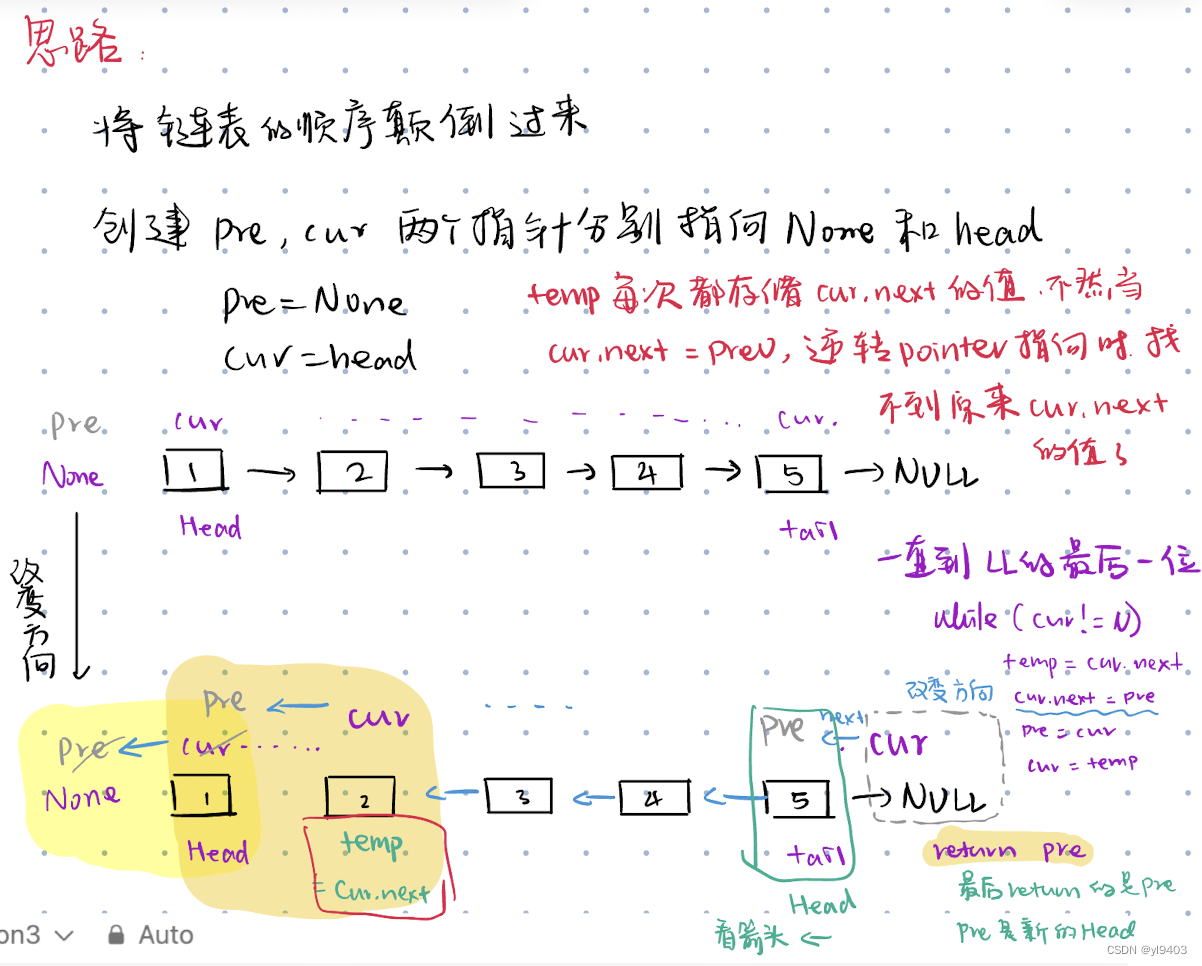
注意: 设置temp先储存cur.next的值, 这样当cur.next = pre 改变原指针方向时就会找不到原来cur的下一个是什么
# Definition for singly-linked list.
# class ListNode:
#     def __init__(self, val=0, next=None):
#         self.val = val
#         self.next = next
class Solution:
    def reverseList(self, head: Optional[ListNode]) -> Optional[ListNode]:
        cur = head
        pre = None # pre 一开始为空, 因为我们要最后reverse过来的时候最后一个node连着的是空

        while(cur is not None):
            temp = cur.next #提前temp = cur的下一个, 这样当cur的next pointer指向pre的时候
            cur.next = pre

            pre = cur # 这样cur = 原来的cur.next
            cur = temp

        return pre


 1013
1013

 被折叠的 条评论
为什么被折叠?
被折叠的 条评论
为什么被折叠?
 到【灌水乐园】发言


