


系列文章
【Vue】vue增加导航标签
本文链接:https://blog.csdn.net/youcheng_ge/article/details/134965353
【Vue】Element开发笔记
本文链接:https://blog.csdn.net/youcheng_ge/article/details/133947977
【Vue】vue,在Windows IIS平台部署
本文链接:https://blog.csdn.net/youcheng_ge/article/details/133859117
【Vue】vue2与WebApi跨域CORS问题
本文链接:https://blog.csdn.net/youcheng_ge/article/details/133808959
【Vue】nvm安装教程(解决npm下依赖包版本冲突)
本文链接:https://blog.csdn.net/youcheng_ge/article/details/132896207
【Vue】vue开发环境搭建教程(详细)
本文链接:https://blog.csdn.net/youcheng_ge/article/details/132689006
【Vue】全局日期格式化
本文链接:https://blog.csdn.net/youcheng_ge/article/details/135017332
【Vue】elementUI表格,导出Excel
本文链接:https://blog.csdn.net/youcheng_ge/article/details/135018489
【Vue】el-date-picker日期范围组件(本周、本月、上周)
本文链接:https://blog.csdn.net/youcheng_ge/article/details/135088143
【前端】前后端通信方法与差异
本文链接:https://blog.csdn.net/youcheng_ge/article/details/135153985
前言
本专栏为 前端【Vue】专栏,主要介绍Vue知识点。对于刚进入计算机世界的学生来说,学习课本上的知识是远远不够的,并且国内教材偏旧,所以需要我们通过互联网自主学习。
这里普及一个知识:HTML已不仅仅只能开发 Web,也可以开发移动端(Android、iOS),所以本专栏也会介绍 移动端的开发。
我个人将移动端开发,分为两大方向:
①原生开发
最早一批,使用安卓开发工具包(Android SDK)和Java语言来开发App的方式。原生开发允许开发者充分利用安卓平台的功能和特性,以及庞大的安卓开发社区资源。但缺点就是门槛高、需要适配不同尺寸的屏幕、测试繁琐,对开发人员技术要求高。
②混合开发(加壳方式)
当前热门,使用Web技术(网页三剑客HTML、CSS和JavaScript)开发App的方式,使用vue.js、node.js、Angular.js、React.js、api.js等框架开发。混合开发具有较高的开发效率和跨平台的优势,由于使用Web技术进行 界面渲染样式丰富、屏幕适配(栅格技术自适应)效果好。但缺点就是对底层硬件调用库尚不完善,有时候会发生异常,对框架依赖较高,不过库在不断完善中,主要的相机、相册、GPS、存储调用是没有问题的。
Vue是前端开发中的一个分支,它基于标准 HTML、CSS 和 JavaScript 构建,学习Vue不可以速成,得先熟悉网页三剑客(HTML、CSS和JavaScript)。Vue是一套声明式的、组件化的编程模型,帮助你高效地开发用户界面。

一、技术介绍
1.1 为什么会产生跨越
出于浏览器的同源策略限制。同源策略(Sameoriginpolicy)是一种约定,它是浏览器最核心也最基本的安全功能,如果缺少了同源策略,则浏览器的正常功能可能都会受到影响。可以说Web是构建在同源策略基础之上的,浏览器只是针对同源策略的一种实现。同源策略会阻止一个域的。
1.2 什么是跨越
当一个请求URL,协议名、域名、端口三者之间任意一个与当前页面URL不同即为跨域。
二、问题描述
我这里是vue前端采用axios通信(使用vue+element+admin框架,通信交互使用request.js,归根到底还是对axios通信的封装)。
axios通信需要自己解决跨越,现在ajax的封装已经不需要考虑跨越问题了,底层已经处理好了。
跨域的报错信息,具体如下:

三、问题解决
3.1 方法一:前端Vue修改
配置代理转发,将URL转换成新的URL。
操作步骤:vue.config.js文件,加以下代码:
 devServer: {
    // host: 'localhost', // 服务器 host,默认为 localhost
    port: 18888,
    open: false, // string | boolean,启动后是否打开浏览器,当为字符串时,打开指定浏览器
    overlay: { // 设置编译出错或警告后,页面是否会直接显示信息
      warnings: false,
      errors: true
    },
    proxy: {
      // 路由代理
      '/prod-api': {
        target: PLATFROM_CONFIG.PLATFROM_CONFIG.baseURL,
        changeOrigin: true, // 如果接口跨域,需要进行这个参数配置
        pathRewrite:{
          '^/prod-api':'' // 重写请求,接口是/api/doc变为/doc
        }
      },
      '/dev-api': {
        target: PLATFROM_CONFIG.PLATFROM_CONFIG.baseURL,
        changeOrigin: true, // 如果接口跨域,需要进行这个参数配置
        pathRewrite:{
          '^/dev-api':'' // 重写请求,接口是/api/doc变为/doc
        }
      },
      '/api': {
        target: "http://192.168.6.6:19999",
        changeOrigin: true // 如果接口跨域,需要进行这个参数配置
      }
    }
  },
/api取决于你定义的格式是什么样的,具体可以看一下 .env.development 和 .env.production 文件。
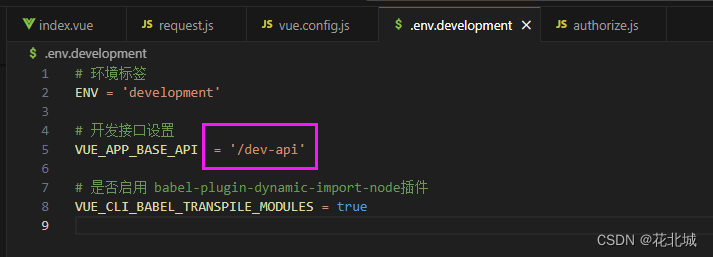
我这里开发模式,URL头使用/dev-api,那就对它做代理转发。
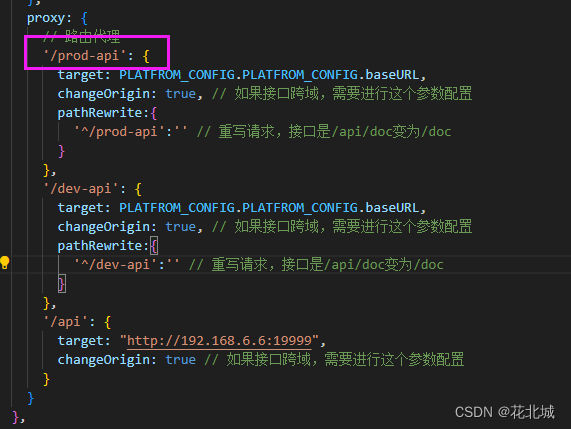
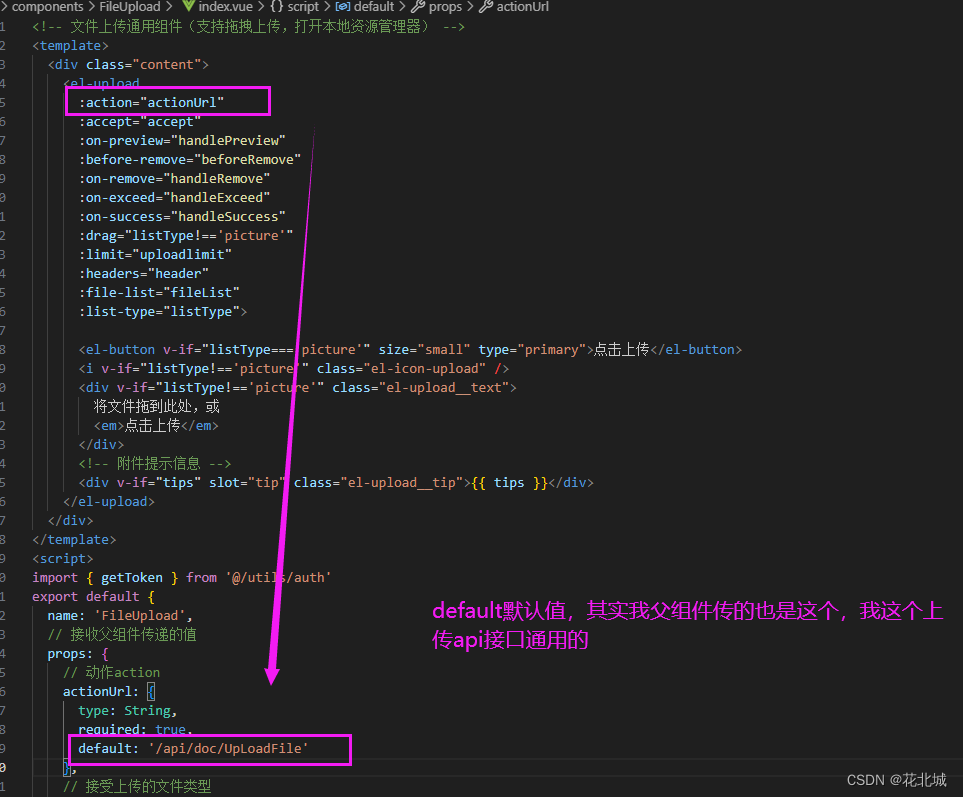
/api那个我是用于,文件上传、下载的转发的,文件上传比较特殊使用action
3.2 方法二:后端允许Cors跨越访问
①官方原生的net core webapi
Program.cs文件
//配置跨域
builder.Services.AddCors(c =>
{
    c.AddDefaultPolicy(policy =>
    {
        policy.AllowAnyOrigin()//允许所有来源的访问
        .AllowAnyHeader()//允许所有类型的请求头
        .AllowAnyMethod();//允许所有类型的请求
    });
});
启动跨越,在run之前
app.UseCors();
app.UseHttpsRedirection();
②采用服务注入的net core webapi
创建类SetupCors.cs
using YS.Common;
using Microsoft.AspNetCore.Builder;
using Microsoft.Extensions.DependencyInjection;
using System;

namespace YS.WebApi.Extensions
{

    public static class SetupCors
    {
        public static void AddCorsSetup(this IServiceCollection services)
        {
            if (services == null) throw new ArgumentNullException(nameof(services));

            services.AddCors(options =>
            {
                options.AddPolicy("LimitRequests", policy =>
                {
                    //policy.WithOrigins(AppSettings.Configuration["Startup:AllowOrigins"].Split('|'))
                    policy.AllowAnyOrigin()//允许所有来源的访问
                    .AllowAnyHeader()//允许所有类型的请求头
                    .AllowAnyMethod();//允许所有类型的请求
                });
            });
        }

        public static void UseCorsSetup(this IApplicationBuilder app)
        {
            app.UseCors("LimitRequests");
        }
    }
}
服务注入使用跨越
 //跨域设置
 services.AddCorsSetup();
四、资源链接
vue.config.js文件
'use strict'
const path = require('path')
const defaultSettings = require('./src/settings.js')
const PLATFROM_CONFIG = require('./public/config')

function resolve(dir) {
  return path.join(__dirname, dir)
}

const name = defaultSettings.title // 网址标题
const port = process.env.port || 18888 // 端口配置

// webpack.dev.js devServer 配置
module.exports = {
  publicPath: '/', // 公共路径
  outputDir: 'dist',
  assetsDir: 'static',
  lintOnSave: process.env.NODE_ENV === 'development',
  productionSourceMap: false,
  devServer: {
    // host: 'localhost', // 服务器 host,默认为 localhost
    port: 18888,
    open: false, // string | boolean,启动后是否打开浏览器,当为字符串时,打开指定浏览器
    overlay: { // 设置编译出错或警告后,页面是否会直接显示信息
      warnings: false,
      errors: true
    },
    proxy: {
      // 路由代理
      '/prod-api': {
        target: PLATFROM_CONFIG.PLATFROM_CONFIG.baseURL,
        changeOrigin: true, // 如果接口跨域,需要进行这个参数配置
        pathRewrite:{
          '^/prod-api':'' // 重写请求,接口是/api/doc变为/doc
        }
      },
      '/dev-api': {
        target: PLATFROM_CONFIG.PLATFROM_CONFIG.baseURL,
        changeOrigin: true, // 如果接口跨域,需要进行这个参数配置
        pathRewrite:{
          '^/dev-api':'' // 重写请求,接口是/api/doc变为/doc
        }
      },
      '/api': {
        target: "http://192.168.6.6:19999",
        changeOrigin: true // 如果接口跨域,需要进行这个参数配置
      }
    }
  },
  configureWebpack: {
    // provide the app's title in webpack's name field, so that
    // it can be accessed in index.html to inject the correct title.
    name: name,
    resolve: {
      alias: {
        '@': resolve('src')
        }
    },
    performance: {
      maxEntrypointSize: 10000000,
      maxAssetSize: 30000000
    }
  },
  chainWebpack(config) {
    // it can improve the speed of the first screen, it is recommended to turn on preload
    config.plugin('preload').tap(() => [
      {
        rel: 'preload',
        // to ignore runtime.js
        // https://github.com/vuejs/vue-cli/blob/dev/packages/@vue/cli-service/lib/config/app.js#L171
        fileBlacklist: [/\.map$/, /hot-update\.js$/, /runtime\..*\.js$/],
        include: 'initial'
      }
    ])

    // when there are many pages, it will cause too many meaningless requests
    config.plugins.delete('prefetch')

    // set svg-sprite-loader
    config.module
      .rule('svg')
      .exclude.add(resolve('src/assets/icons'))
      .end()
    config.module
      .rule('icons')
      .test(/\.svg$/)
      .include.add(resolve('src/assets/icons'))
      .end()
      .use('svg-sprite-loader')
      .loader('svg-sprite-loader')
      .options({
        symbolId: 'icon-[name]'
      })
      .end()

    // set preserveWhitespace
    config.module
      .rule('vue')
      .use('vue-loader')
      .loader('vue-loader')
      .tap(options => {
        options.compilerOptions.preserveWhitespace = true
        return options
      })
      .end()

    config
      // https://webpack.js.org/configuration/devtool/#development
      .when(process.env.NODE_ENV === 'development',
        config => config.devtool('cheap-source-map')
      )

    config
      .when(process.env.NODE_ENV !== 'development',
        config => {
          config
            .plugin('ScriptExtHtmlWebpackPlugin')
            .after('html')
            .use('script-ext-html-webpack-plugin', [{
              // `runtime` must same as runtimeChunk name. default is `runtime`
              inline: /runtime\..*\.js$/
            }])
            .end()
          config
            .optimization.splitChunks({
              chunks: 'all',
              cacheGroups: {
                libs: {
                  name: 'chunk-libs',
                  test: /[\\/]node_modules[\\/]/,
                  priority: 10,
                  chunks: 'initial' // only package third parties that are initially dependent
                },
                elementUI: {
                  name: 'chunk-elementUI', // split elementUI into a single package
                  priority: 20, // the weight needs to be larger than libs and app or it will be packaged into libs or app
                  test: /[\\/]node_modules[\\/]_?element-ui(.*)/ // in order to adapt to cnpm
                },
                commons: {
                  name: 'chunk-commons',
                  test: resolve('src/components'), // can customize your rules
                  minChunks: 3, //  minimum common number
                  priority: 5,
                  reuseExistingChunk: true
                }
              }
            })
          config.optimization.runtimeChunk('single')
        }
      )
  },
  transpileDependencies: [
    'vue-echarts',
    'resize-detector'
  ]
}
Program.cs文件
using System.Configuration;
using WebApplication5;

var builder = WebApplication.CreateBuilder(args);

// Add services to the container.

//配置跨域
builder.Services.AddCors(c =>
{
    c.AddDefaultPolicy(policy =>
    {
        policy.AllowAnyOrigin()//允许所有来源的访问
        .AllowAnyHeader()//允许所有类型的请求头
        .AllowAnyMethod();//允许所有类型的请求
    });
});

builder.Services.AddControllers();
// Learn more about configuring Swagger/OpenAPI at https://aka.ms/aspnetcore/swashbuckle
builder.Services.AddEndpointsApiExplorer();
builder.Services.AddSwaggerGen();


var app = builder.Build();

app.UseCors();
app.UseHttpsRedirection();

if (app.Environment.IsDevelopment())
{
    app.UseSwagger();
    app.UseSwaggerUI();
}

app.UseHttpsRedirection();

app.UseAuthorization();

app.MapControllers();

app.Run();


 9091
9091

 被折叠的 条评论
为什么被折叠?
被折叠的 条评论
为什么被折叠?
 到【灌水乐园】发言


