


命令模式
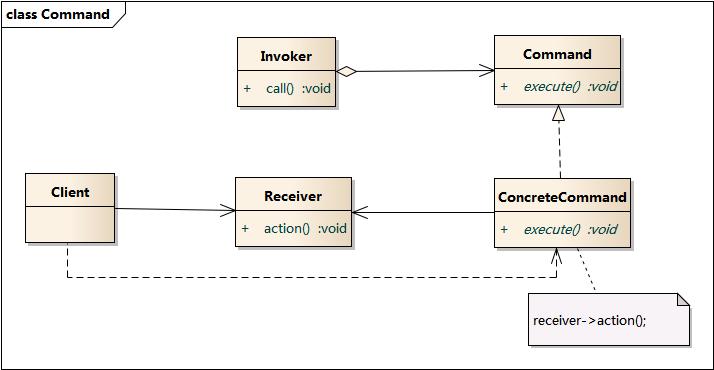
命令模式很好理解,举个例子,司令员下令让士兵去干件事情,从整个事情的角度来考虑,司令员的作用是,发出口令,口令经过传递,传到了士兵耳朵里,士兵去执行。这个过程好在,三者相互解耦,任何一方都不用去依赖其他人,只需要做好自己的事儿就行,司令员要的是结果,不会去关注到底士兵是怎么实现的。我们看看关系图:
Invoker是调用者(司令员),Receiver是被调用者(士兵),MyCommand是命令,实现了Command接口,持有接收对象,看实现代码:
实例代码一:
/**
 *命令接口
 */
public interface Command {
    public void exe();
}

*************************************************************************


public class Receiver {

    public void action(){
        System.out.println("command received!");
    }
}
*************************************************************************


public class MyCommand implements Command {

    private Receiver receiver;

    public MyCommand(Receiver receiver) {
        this.receiver = receiver;
    }

    public Receiver getReceiver() {
        return receiver;
    }

    public void setReceiver(Receiver receiver) {
        this.receiver = receiver;
    }

    @Override
    public void exe() {
        receiver.action();
    }
}

*************************************************************************


public class Invoker {
    private Command command;

    public Invoker(Command command) {
        this.command = command;
    }

    public Command getCommand() {
        return command;
    }

    public void setCommand(Command command) {
        this.command = command;
    }

    public void action() {
        command.exe();
    }
}

*************************************************************************

/**
 * innvoker 中调用cmmand ,command中持有recover的引用,这样客户端只需要跟invoker交互就可以,具体的执行命令下发下去由receiver执行
 *
 *   命令模式的目的就是达到命令的发出者和执行者之间解耦,实现请求和执行分开,
 */
public class MainClass {
    public static void main(String[] args) {
        Receiver receiver = new Receiver();
        Command command = new MyCommand(receiver);
        Invoker invoker = new Invoker(command);

        invoker.action();
    }
}

*************************************************************************
测试结果:
command received!


*************************************************************************
实例代码二:
public interface Command {
   void execute();
}
*******************************************************
/* The Invoker class */
public class Switch {
   private List<Command> history = new ArrayList<>();

   public Switch() {
   }

   public void storeAndExecute(Command cmd) {
      this.history.add(cmd); // optional
      cmd.execute();
   }
}
*******************************************************

/* The Receiver class */
public class Light {
   public Light() {
   }

   public void turnOn() {
      System.out.println("The light is on");
   }

   public void turnOff() {
      System.out.println("The light is off");
   }
}
*******************************************************

/* The Command for turning on the light - ConcreteCommand #1 */
public class FlipUpCommand implements Command {
   private Light theLight;

   public FlipUpCommand(Light light) {
      this.theLight = light;
   }

   public void execute(){
      theLight.turnOn();
   }
}
*******************************************************

/* The Command for turning off the light - ConcreteCommand #2 */
public class FlipDownCommand implements Command {
   private Light theLight;

   public FlipDownCommand(Light light) {
      this.theLight = light;
   }

   public void execute() {
      theLight.turnOff();
   }
}
*******************************************************

/* The test class or client */
public class PressSwitch {
   public static void main(String[] args){
      Light lamp = new Light();
      Command switchUp = new FlipUpCommand(lamp);
      Command switchDown = new FlipDownCommand(lamp);

      Switch mySwitch = new Switch();

      try {
         if ("ON".equalsIgnoreCase(args[0])) {
            mySwitch.storeAndExecute(switchUp);
         }
         else if ("OFF".equalsIgnoreCase(args[0])) {
            mySwitch.storeAndExecute(switchDown);
         }
         else {
            System.out.println("Argument \"ON\" or \"OFF\" is required.");
         }
      } catch (Exception e) {
         System.out.println("Arguments required.");
      }
   }
}
实例代码三:
*********************************************************************
/**
 * 一个对象调用灵位一个对象,一般情况下的调用过程是:创建目标对象实例,设置调用参数,调用目标对象方法
 *
 * 但是有些情况下有必要使用一个专门的类对这种调用过程加以封装,我们把这种称为Command类
 *
 * 整个过程调用比较繁琐,或者存在多处调用,这时候使用Command类对该调用加以封装,便于功能再利用
 *
 * 调用前后需要对调用参数进行某些处理
 *
 * 调用前后需要进行某些额外的处理,比如日志,缓存,记录历史等操作。
 */
public interface Command {
    public void sail();
}

*********************************************************************

/**
 * 商贩卖水果
 */

public class Peddle {

    public void sailAppl() {
        System.out.println("卖苹果");
    }


    public void sailBanana() {
        System.out.println("卖香蕉");
    }
}


*********************************************************************


public class AppleCommand implements Command {

    private Peddle peddle;

    public AppleCommand(Peddle peddle) {
        this.peddle = peddle;
    }

    public Peddle getPeddle() {
        return peddle;
    }

    public void setPeddle(Peddle peddle) {
        this.peddle = peddle;
    }

    @Override
    public void sail() {
        peddle.sailAppl();
    }
}

*********************************************************************


public class BananaCommand implements Command {
    protected Peddle peddle;


    public BananaCommand(Peddle peddle) {
        this.peddle = peddle;
    }

    @Override
    public void sail() {
        peddle.sailBanana();
    }
}

*********************************************************************


public class Waiter {

    //一系列命令类
  private List<Command> commands  = new ArrayList<>();

   public void setOrder(Command command) {
        commands.add(command);
   }

   public void removeOrder(Command command) {
       commands.remove(command);
   }
   public void sail() {
       for(Command c:commands) {
            c.sail();
       }
   }

}


*********************************************************************
public static void main(String[] args) {
        Peddle peddle  = new Peddle();
        //方式一
//        peddle.sailAppl();
//        peddle.sailBanana();

        //方式二
        Command appleCom = new AppleCommand(peddle);
//        appleCom.sail();
//
//        System.out.println("******************");
        Command bananaCom = new BananaCommand(peddle);
//        bananaCom.sail();

        //方式三,使用Invoker调用command然后通过command调用上架peddle的方法
        Waiter waiter = new Waiter();
        waiter.setOrder(appleCom);
        waiter.setOrder(bananaCom);
        waiter.sail();
        System.out.println("*****************");
        waiter.removeOrder(bananaCom);
        waiter.sail();

    }


*********************************************************************
输出结果:
卖苹果
卖香蕉
*****************
卖苹果实例代码四:这个与第三个实例差不多,只是waiter类中只有一个command,而实例三种有command的集合,可以处理多个 command命令,相对来说还可以添加和删除command
*********************************************************************
/**
 * 一个对象调用灵位一个对象,一般情况下的调用过程是:创建目标对象实例,设置调用参数,调用目标对象方法
 *
 * 但是有些情况下有必要使用一个专门的类对这种调用过程加以封装,我们把这种称为Command类
 *
 * 整个过程调用比较繁琐,或者存在多处调用,这时候使用Command类对该调用加以封装,便于功能再利用
 *
 * 调用前后需要对调用参数进行某些处理
 *
 * 调用前后需要进行某些额外的处理,比如日志,缓存,记录历史等操作。
 */
public interface Command {
    public void sail();
}

*********************************************************************

/**
 * 商贩卖水果
 */

public class Peddle {

    public void sailAppl() {
        System.out.println("卖苹果");
    }


    public void sailBanana() {
        System.out.println("卖香蕉");
    }
}


*********************************************************************


public class AppleCommand implements Command {

    private Peddle peddle;

    public AppleCommand(Peddle peddle) {
        this.peddle = peddle;
    }

    public Peddle getPeddle() {
        return peddle;
    }

    public void setPeddle(Peddle peddle) {
        this.peddle = peddle;
    }

    @Override
    public void sail() {
        peddle.sailAppl();
    }
}

*********************************************************************


public class BananaCommand implements Command {
    protected Peddle peddle;


    public BananaCommand(Peddle peddle) {
        this.peddle = peddle;
    }

    @Override
    public void sail() {
        peddle.sailBanana();
    }
}

*********************************************************************


public class Waiter {
    private Command command;

    public Waiter() {
    }

    public Command getCommand() {
        return command;
    }

    public void setCommand(Command command) {
        this.command = command;
    }

    public Waiter(Command command) {
        this.command = command;
    }

    public void action() {
        command.sail();
    }

}


*********************************************************************


public class MainClass {
    public static void main(String[] args) {
        Peddle peddle  = new Peddle();
        //方式一
//        peddle.sailAppl();
//        peddle.sailBanana();

        //方式二
        Command appleCom = new AppleCommand(peddle);
//        appleCom.sail();
//
//        System.out.println("******************");
        Command bananaCom = new BananaCommand(peddle);
//        bananaCom.sail();

        //方式三,使用Invoker调用command然后通过command调用上架peddle的方法
        Waiter waiter = new Waiter();

        waiter.setCommand(appleCom);
        waiter.action();

        System.out.println("**************");
        waiter.setCommand(bananaCom);
        waiter.action();
    }
}

************************************************
测试结果:
卖苹果
**************
卖香蕉


命令模式三个角色,发布命令者,命令角色,执行命令角色
抽象命令角色Command
public interface Command {
    void execute();
    void undo();
}
实际命令角色:灯光开,灯光闭,不操作
// 不操作
public class LightNoCommand implements Command{
    @Override
    public void execute() {

    }

    @Override
    public void undo() {

    }
}
// 灯光关闭命令
public class LightOffCommand implements Command{

    private LightReceiver lightReceiver;

    public LightOffCommand(LightReceiver lightReceiver) {
        this.lightReceiver = lightReceiver;
    }

    @Override
    public void execute() {
        lightReceiver.off();
    }

    @Override
    public void undo() {
        lightReceiver.on();
    }
}
// 灯光打开
public class LightOnCommand implements Command{
    private LightReceiver lightReceiver;

    public LightOnCommand(LightReceiver lightReceiver) {
        this.lightReceiver = lightReceiver;
    }

    @Override
    public void execute() {
        lightReceiver.on();
    }

    @Override
    public void undo() {
        lightReceiver.off();
    }
}
命令执行者角色LightReceiver
public class LightReceiver {
    public void on() {
        System.out.println("开灯");
    }

    public void off() {
        System.out.println("关灯");
    }
}
执行console
public static void main(String[] args) {
        //命令模式 三个角色 发号命令角色 执行命令角色  命令本身角色

        RemoteController controller = new RemoteController();
        LightReceiver lightReceiver = new LightReceiver();
        LightOnCommand lightOnCommand = new LightOnCommand(lightReceiver);
        LightOffCommand lightOffCommand = new LightOffCommand(lightReceiver);
        controller.setCommand(1, lightOnCommand, lightOffCommand);
        // 按下启动按钮
        controller.onButtonWasPushed(1);
        // 按下关闭按钮
        controller.offButtonWasPushed(1);
        // 按下撤销按钮
        controller.undoButton();

        System.out.println("--------------");
        TvReceiver tvReceiver = new TvReceiver();
        TvOffCommand tvOffCommand = new TvOffCommand(tvReceiver);
        TvOnCommand tvOnCommand = new TvOnCommand(tvReceiver);
        controller.setCommand(0, tvOnCommand, tvOffCommand);
        // 按下启动按钮
        controller.onButtonWasPushed(0);
        // 按下关闭按钮
        controller.offButtonWasPushed(0);
        // 按下撤销按钮
        controller.undoButton();
    }
}
// console
开灯
关灯
开灯
--------------
电视打开了
电视关闭了
电视打开了
其他命令可以继续实现Command接口
// 电视机不操作
public class TvNoCommand implements Command{
    @Override
    public void execute() {

    }

    @Override
    public void undo() {

    }
}
// 电视机关闭
public class TvOffCommand implements Command{

    private TvReceiver tvReceiver;

    public TvOffCommand(TvReceiver tvReceiver) {
        this.tvReceiver = tvReceiver;
    }

    @Override
    public void execute() {
        tvReceiver.off();
    }

    @Override
    public void undo() {
        tvReceiver.on();
    }
}
// 电视机打开
public class TvOnCommand implements Command{
    private TvReceiver tvReceiver;

    public TvOnCommand(TvReceiver tvReceiver) {
        this.tvReceiver = tvReceiver;
    }

    @Override
    public void execute() {
        tvReceiver.on();
    }

    @Override
    public void undo() {
        tvReceiver.off();
    }
}
电视机命令接收执行者
public class TvReceiver {

    public void on() {
        System.out.println("电视打开了");
    }
    public void off() {
        System.out.println("电视关闭了");
    }
}


 1194
1194


 被折叠的 条评论
为什么被折叠?
被折叠的 条评论
为什么被折叠?
 到【灌水乐园】发言


